
User Manual
Page 1
45236 Home Monitoring Wireless Color Camera with Portable LCD Monitor User Manual www.jascoproducts.com 1-800-654-8483
45236 Home Monitoring Wireless Color Camera with Portable LCD Monitor User Manual www.jascoproducts.com 1-800-654-8483
User Manual
Page 2
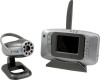
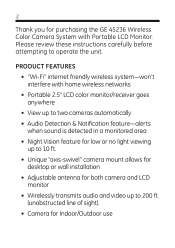
...Thank you for purchasing the GE 45236 Wireless Color Camera System with home wireless networks • Portable 2.5" LCD color monitor/receiver goes anywhere • View up to two cameras automatically • Audio Detection & Notification feature-alerts when sound is detected in a monitored area • Night Vision... attempting to 200 ft. (unobstructed line of sight). • Camera for both camera and LCD monitor • Wirelessly transmits audio and video up to 10 ft. • Unique "axis-swivel" camera mount allows for desktop or wall installation • Adjustable antenna for...
...Thank you for purchasing the GE 45236 Wireless Color Camera System with home wireless networks • Portable 2.5" LCD color monitor/receiver goes anywhere • View up to two cameras automatically • Audio Detection & Notification feature-alerts when sound is detected in a monitored area • Night Vision... attempting to 200 ft. (unobstructed line of sight). • Camera for both camera and LCD monitor • Wirelessly transmits audio and video up to 10 ft. • Unique "axis-swivel" camera mount allows for desktop or wall installation • Adjustable antenna for...
User Manual
Page 3
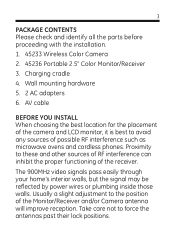
... before proceeding with the installation. 1. 45233 Wireless Color Camera 2. 45236 Portable 2.5" Color Monitor/Receiver 3. Charging cradle 4. Proximity to the position of the receiver. Usually a slight adjustment to these and other sources of RF interference can inhibit the proper functioning of the Monitor/Receiver and/or Camera antenna will improve reception. Wall mounting hardware...plumbing inside those walls. AV cable BEFORE YOU INSTALL When choosing the best location for the placement of the camera and LCD monitor, it is best to force the antennas past their lock positions.
... before proceeding with the installation. 1. 45233 Wireless Color Camera 2. 45236 Portable 2.5" Color Monitor/Receiver 3. Charging cradle 4. Proximity to the position of the receiver. Usually a slight adjustment to these and other sources of RF interference can inhibit the proper functioning of the Monitor/Receiver and/or Camera antenna will improve reception. Wall mounting hardware...plumbing inside those walls. AV cable BEFORE YOU INSTALL When choosing the best location for the placement of the camera and LCD monitor, it is best to force the antennas past their lock positions.
User Manual
Page 4
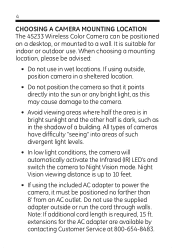
4 CHOOSING A CAMERA MOUNTING LOCATION The 45233 Wireless Color Camera can be advised: • Do not use in the shadow of such divergent light levels. • In low light conditions, the camera will automatically activate the Infrared (IR) LED's and switch the camera to Night Vision mode. extensions for indoor or outdoor use the supplied adapter outside...
4 CHOOSING A CAMERA MOUNTING LOCATION The 45233 Wireless Color Camera can be advised: • Do not use in the shadow of such divergent light levels. • In low light conditions, the camera will automatically activate the Infrared (IR) LED's and switch the camera to Night Vision mode. extensions for indoor or outdoor use the supplied adapter outside...
User Manual
Page 5
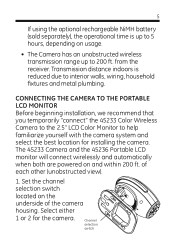
... battery (sold separately), the operational time is reduced due to interior walls, wiring, household fixtures and metal plumbing. of the camera housing. The 45233 Camera and the 45236 Portable LCD monitor will connect wirelessly and automatically when both are powered on the underside of each other (unobstructed view). 12 1. Transmission distance indoors is up to 5 hours...
... battery (sold separately), the operational time is reduced due to interior walls, wiring, household fixtures and metal plumbing. of the camera housing. The 45233 Camera and the 45236 Portable LCD monitor will connect wirelessly and automatically when both are powered on the underside of each other (unobstructed view). 12 1. Transmission distance indoors is up to 5 hours...
User Manual
Page 6
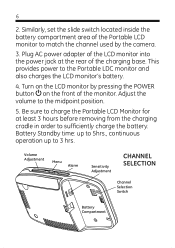
...the midpoint position. 5. Be sure to charge the Portable LCD Monitor for at the rear of the charging base. Turn on the LCD monitor by pressing the POWER button on the front of the Portable LCD monitor to match the channel used by the camera. 3. Similarly, set the slide switch located inside ...the battery compartment area of the monitor. This provides power to suffi...
...the midpoint position. 5. Be sure to charge the Portable LCD Monitor for at the rear of the charging base. Turn on the LCD monitor by pressing the POWER button on the front of the Portable LCD monitor to match the channel used by the camera. 3. Similarly, set the slide switch located inside ...the battery compartment area of the monitor. This provides power to suffi...

User Manual
Page 7
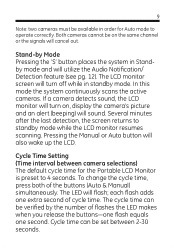
...-by Manual Mode To select one of the Monitor. The Monitor will light for the corresponding channel. both cameras cannot be on the monitor screen. The green LED will switch to a specific channel; Each camera must be assigned to a different channel (1 ...cameras are sold The desired operating mode can be set to 2 cameras. CHANNEL SELECTION Manual, Auto or Stand-by The wireless system can be selected using the buttons on the front panel of the LCD monitor. 7 LCD MONITOR Adjustable Antenna Manual M A Auto 1 2 S Stand by . Multi-Camera Operation This wireless...
...-by Manual Mode To select one of the Monitor. The Monitor will light for the corresponding channel. both cameras cannot be on the monitor screen. The green LED will switch to a specific channel; Each camera must be assigned to a different channel (1 ...cameras are sold The desired operating mode can be set to 2 cameras. CHANNEL SELECTION Manual, Auto or Stand-by The wireless system can be selected using the buttons on the front panel of the LCD monitor. 7 LCD MONITOR Adjustable Antenna Manual M A Auto 1 2 S Stand by . Multi-Camera Operation This wireless...

User Manual
Page 8
... to a specific channel using the channel selection switch located on the same channel or the signals will cancel out. 8 Portable LCD Monitor Settings 1 2 1 2 OFF 1 2 ON OFF 1 2 ON Camera 1 only Camera 2 only CAMERA 1 Channel Setting CAMERA 2 Channel Setting OFF 1 2 ON Camera 1 & 2 separately. Select either Ch 1 or Ch 2; The monitor will automatically switch to 1 & 2 position. IMPORTANT: When using only one...
... to a specific channel using the channel selection switch located on the same channel or the signals will cancel out. 8 Portable LCD Monitor Settings 1 2 1 2 OFF 1 2 ON OFF 1 2 ON Camera 1 only Camera 2 only CAMERA 1 Channel Setting CAMERA 2 Channel Setting OFF 1 2 ON Camera 1 & 2 separately. Select either Ch 1 or Ch 2; The monitor will automatically switch to 1 & 2 position. IMPORTANT: When using only one...
User Manual
Page 9
... scanning. Pressing the Manual or Auto button will flash; Cycle time can be on , display the camera's picture and an alert (beeping) will sound. 9 Note: two cameras must be available in order for the Portable LCD Monitor is preset to 4 seconds. Stand-by the number of flashes the LED makes when you release...
... scanning. Pressing the Manual or Auto button will flash; Cycle time can be on , display the camera's picture and an alert (beeping) will sound. 9 Note: two cameras must be available in order for the Portable LCD Monitor is preset to 4 seconds. Stand-by the number of flashes the LED makes when you release...

User Manual
Page 10
.... It turns on/off the Infra-Red (IR) LEDs on a flat surface. Power ON the LCD monitor; Night Vision will return to 'see' in the dark. CAMERA INSTALLATION Desktop Mount: 1. SENSITIVITY MAX 2. When the image sensor detects enough light, color will appear as ... automatically detects available light levels. 10 Night Vision The 45233 Wireless Color Infra-Red (IR) LEDs Camera features Night Vision technology. Place camera in little or no light up to camera. 4. Set Channel switch on the LCD monitor that Antenna pivots to 1 or 2. 3. Objects and images...
.... It turns on/off the Infra-Red (IR) LEDs on a flat surface. Power ON the LCD monitor; Night Vision will return to 'see' in the dark. CAMERA INSTALLATION Desktop Mount: 1. SENSITIVITY MAX 2. When the image sensor detects enough light, color will appear as ... automatically detects available light levels. 10 Night Vision The 45233 Wireless Color Infra-Red (IR) LEDs Camera features Night Vision technology. Place camera in little or no light up to camera. 4. Set Channel switch on the LCD monitor that Antenna pivots to 1 or 2. 3. Objects and images...
User Manual
Page 11
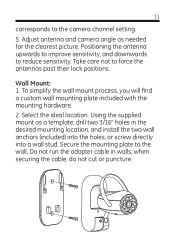
... mount process, you will find a custom wall mounting plate included with the mounting hardware. 2. Secure the mounting plate to reduce sensitivity. Adjust antenna and camera angle as a template, drill two 3/16" holes in walls; when securing the cable, do not cut or puncture. Wall Mount: 1. Using the supplied mount as...
... mount process, you will find a custom wall mounting plate included with the mounting hardware. 2. Secure the mounting plate to reduce sensitivity. Adjust antenna and camera angle as a template, drill two 3/16" holes in walls; when securing the cable, do not cut or puncture. Wall Mount: 1. Using the supplied mount as...
User Manual
Page 12
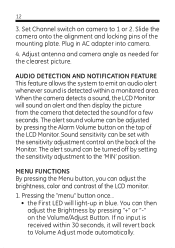
...sensitivity adjustment to emit an audio alert whenever sound is received within a monitored area. The alert sound can then adjust the Brightness by pressing "+" or "-" on the top of the LCD monitor. 1. Adjust antenna and camera angle as needed for a few seconds. MENU FUNCTIONS By pressing the ...the First LED will sound an alert and then display the picture from the camera that detected the sound for the clearest picture. When the camera detects a sound, the LCD Monitor will light-up in AC adapter into camera. 4. If no input is detected within 30 seconds, it will revert back ...
...sensitivity adjustment to emit an audio alert whenever sound is received within a monitored area. The alert sound can then adjust the Brightness by pressing "+" or "-" on the top of the LCD monitor. 1. Adjust antenna and camera angle as needed for a few seconds. MENU FUNCTIONS By pressing the ...the First LED will sound an alert and then display the picture from the camera that detected the sound for the clearest picture. When the camera detects a sound, the LCD Monitor will light-up in AC adapter into camera. 4. If no input is detected within 30 seconds, it will revert back ...

User Manual
Page 14
... battery will power the 45236 wireless Camera for use with the 45233 Wireless Color Camera. Video Audio In In A/V OUT VCR A/V Out Jack If you have any questions or feel the camera system is available for If connected to VCR or DVR, the VCR/ DVR must also be connected a TV/Monitor in order to record/... need additional information, please visit our web site www.jascoproducts.com, or contact our Customer Service Group 1-800-654-8483. 14 USING THE 45236 WIRELESS COLOR CAMERA SYSTEM WITH A VCR You can connect the 45236 LCD Monitor (using the supplied A/V cable) to a VCR, DVR or another...
... battery will power the 45236 wireless Camera for use with the 45233 Wireless Color Camera. Video Audio In In A/V OUT VCR A/V Out Jack If you have any questions or feel the camera system is available for If connected to VCR or DVR, the VCR/ DVR must also be connected a TV/Monitor in order to record/... need additional information, please visit our web site www.jascoproducts.com, or contact our Customer Service Group 1-800-654-8483. 14 USING THE 45236 WIRELESS COLOR CAMERA SYSTEM WITH A VCR You can connect the 45236 LCD Monitor (using the supplied A/V cable) to a VCR, DVR or another...
User Manual
Page 15
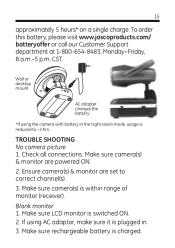
...camera picture 1. Blank monitor 1. Check all connections. Make sure camera(s) & monitor are set to ~2 hrs. Make sure camera(s) is reduced to correct channel(s). 3. 15 approximately 5 hours* on a single charge. CST. If using the camera with battery in . 3. Ensure camera(s) & monitor are powered ON. 2. Make sure LCD monitor... is plugged in the night vision mode, usage is within range of monitor (receiver). Make sure rechargeable battery is ...
...camera picture 1. Blank monitor 1. Check all connections. Make sure camera(s) & monitor are set to ~2 hrs. Make sure camera(s) is reduced to correct channel(s). 3. 15 approximately 5 hours* on a single charge. CST. If using the camera with battery in . 3. Ensure camera(s) & monitor are powered ON. 2. Make sure LCD monitor... is plugged in the night vision mode, usage is within range of monitor (receiver). Make sure rechargeable battery is ...
User Manual
Page 16
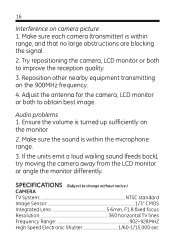
... both to obtain best image. Adjust the antenna for the camera, LCD monitor or both to change without notice.) CAMERA TV System NTSC standard Image Sensor 1/3" CMOS Integrated Lens 5.6mm, F1.8 fixed focus Resolution 360 horizontal TV lines ...that no large obstructions are blocking the signal. 2. Reposition other nearby equipment transmitting on the monitor 2. If the units emit a loud wailing sound (feeds back), try moving the camera away from the LCD monitor or angle the monitor differently. Make sure the sound is within the microphone range. 3. 16 Interference on...
... both to obtain best image. Adjust the antenna for the camera, LCD monitor or both to change without notice.) CAMERA TV System NTSC standard Image Sensor 1/3" CMOS Integrated Lens 5.6mm, F1.8 fixed focus Resolution 360 horizontal TV lines ...that no large obstructions are blocking the signal. 2. Reposition other nearby equipment transmitting on the monitor 2. If the units emit a loud wailing sound (feeds back), try moving the camera away from the LCD monitor or angle the monitor differently. Make sure the sound is within the microphone range. 3. 16 Interference on...
User Manual
Page 18
... or an experienced radio/TV technician for help. is a trademark of General Electric Company and is for indoor use only. • Do not run the camera cable inside walls; when securing the cable, do not cut or puncture • Do not use in wet locations FCC STATEMENT NOTE: This equipment has...
... or an experienced radio/TV technician for help. is a trademark of General Electric Company and is for indoor use only. • Do not run the camera cable inside walls; when securing the cable, do not cut or puncture • Do not use in wet locations FCC STATEMENT NOTE: This equipment has...


