

User Guide
Page 1
Model 28300 2 in 1 - Internet Phone User's Guide Quick Set-Up Guide on page 6 can be used with the internet or as a landline telephone
Model 28300 2 in 1 - Internet Phone User's Guide Quick Set-Up Guide on page 6 can be used with the internet or as a landline telephone

User Guide
Page 3
... to which the receiving antenna is connected. This booklet is available from that may not ensure compliance with this product. For body worn operation, this phone has been tested and meets the FCC RF exposure guidelines when used in accordance with FCC RF radiation exposure limits set forth for an uncontrolled...
... to which the receiving antenna is connected. This booklet is available from that may not ensure compliance with this product. For body worn operation, this phone has been tested and meets the FCC RF exposure guidelines when used in accordance with FCC RF radiation exposure limits set forth for an uncontrolled...

User Guide
Page 4
...Checklist 7 Telephone Jack Requirements 8 Installation 8 Digital Security System 8 Important Installation Guidelines 8 Handset Layout 9 Base Layout 9 Installing the Phone 10 Installing the Handset Battery 10 Base Station 10 Software Installation 11 SKYLINK™ Operation Guide 15 To Uninstall the Software 16 Programming...Adjusting Earpiece and Ringer Volume..... 32 Muting the Microphone and Ringer........... 32 Paging the Handset 32 Handset Speaker Phone 33 Key Lock 33 Call Transfer/Forwarding 33 Intercom Operation 34 Handset to Handset Intercom Call........... 34 Receiving ...
...Checklist 7 Telephone Jack Requirements 8 Installation 8 Digital Security System 8 Important Installation Guidelines 8 Handset Layout 9 Base Layout 9 Installing the Phone 10 Installing the Handset Battery 10 Base Station 10 Software Installation 11 SKYLINK™ Operation Guide 15 To Uninstall the Software 16 Programming...Adjusting Earpiece and Ringer Volume..... 32 Muting the Microphone and Ringer........... 32 Paging the Handset 32 Handset Speaker Phone 33 Key Lock 33 Call Transfer/Forwarding 33 Intercom Operation 34 Handset to Handset Intercom Call........... 34 Receiving ...

User Guide
Page 6
... into the CD-rom drive of your computer and landline respectively traditional VOIP phone calls calls ? ? 1. connect to your landline socket with phone cable 3. follow the install wizard 1. double click the setup icon 3. connect to USB port when prompted by CD-rom now you can make and receive ...on hard drive Internet Connection (either dial-up: minimum 33.6 Kbps modem, or any broadband: cable, DSL, etc.) 3 steps setup your GE 28300 USB DECT step 1 download and install Skype™ software from www.skype.com step 2 install the software in power cord 2. plug in the...
... into the CD-rom drive of your computer and landline respectively traditional VOIP phone calls calls ? ? 1. connect to your landline socket with phone cable 3. follow the install wizard 1. double click the setup icon 3. connect to USB port when prompted by CD-rom now you can make and receive ...on hard drive Internet Connection (either dial-up: minimum 33.6 Kbps modem, or any broadband: cable, DSL, etc.) 3 steps setup your GE 28300 USB DECT step 1 download and install Skype™ software from www.skype.com step 2 install the software in power cord 2. plug in the...
User Guide
Page 7
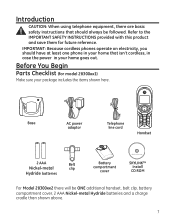
...Parts Checklist (for future reference. Introduction CAUTION: When using telephone equipment, there are basic safety instructions that isn't cordless, in case the power in your package includes the items shown here. PAGE Base AC power adaptor Telephone line cord... 2 AAA Belt Nickel-metal clip Hydride batteries Battery compartment cover SKYLINK™ Dual Phone Utility SKYLINK™ Install CD ROM For Model 28300xx2 there will be followed. IMPORTANT: Because cordless phones operate on electricity, you should always be ONE additional handset, belt clip, battery compartment...
...Parts Checklist (for future reference. Introduction CAUTION: When using telephone equipment, there are basic safety instructions that isn't cordless, in case the power in your package includes the items shown here. PAGE Base AC power adaptor Telephone line cord... 2 AAA Belt Nickel-metal clip Hydride batteries Battery compartment cover SKYLINK™ Dual Phone Utility SKYLINK™ Install CD ROM For Model 28300xx2 there will be followed. IMPORTANT: Because cordless phones operate on electricity, you should always be ONE additional handset, belt clip, battery compartment...
User Guide
Page 8
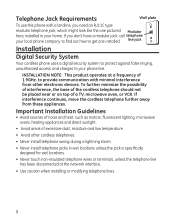
... like the one installed. line jack Installation Digital Security System Your cordless phone uses a digital security system to protect against false ringing, unauthorized access, and charges to your local phone company to find out how to provide communication with a landline, you... don't have a modular jack, call telephone your phone line. If interference continues, move the cordless telephone further away from other cordless telephones. • Never install telephone wiring during a lightning storm. • Never install telephone...
... like the one installed. line jack Installation Digital Security System Your cordless phone uses a digital security system to protect against false ringing, unauthorized access, and charges to your local phone company to find out how to provide communication with a landline, you... don't have a modular jack, call telephone your phone line. If interference continues, move the cordless telephone further away from other cordless telephones. • Never install telephone wiring during a lightning storm. • Never install telephone...

User Guide
Page 10
... a level surface near an electrical outlet and a telephone wall jack (RJ11C), and place your cordless telephone on your personal computer. Installing the Phone Installing the Handset Battery NOTE: You must connect the handset battery before using the cordless handset(s). Locate the battery compartment on the back of fire or personal injury, use only...
... a level surface near an electrical outlet and a telephone wall jack (RJ11C), and place your cordless telephone on your personal computer. Installing the Phone Installing the Handset Battery NOTE: You must connect the handset battery before using the cordless handset(s). Locate the battery compartment on the back of fire or personal injury, use only...

User Guide
Page 11
The CHARGE indicator turns on the back of the base. 4. Allow handset to charge for 16 hours prior to start the SKYLINK™ 2-in-1 Phone Utility procedure. 2. Wait while the program prepares setup. Click [Cancel] ONLY if you do not properly charge the handset, battery performance is compromised. 2. Plug the .... Plug one end of the base and the other power adaptors may damage the unit. CAUTION: Use only the model 5-2711 power adaptor that the USB cable is charging. Using other end into the TEL jack on icon to first use. Insert the SKYLINK™ 2-in...
The CHARGE indicator turns on the back of the base. 4. Allow handset to charge for 16 hours prior to start the SKYLINK™ 2-in-1 Phone Utility procedure. 2. Wait while the program prepares setup. Click [Cancel] ONLY if you do not properly charge the handset, battery performance is compromised. 2. Plug the .... Plug one end of the base and the other power adaptors may damage the unit. CAUTION: Use only the model 5-2711 power adaptor that the USB cable is charging. Using other end into the TEL jack on icon to first use. Insert the SKYLINK™ 2-in...

User Guide
Page 12
... the Skype connection will prompt you can be changed. Important: If you do not select "Allow this phone and you will have to remove and reinstall the SKYLINK™ 2-in -1 Phone Utility works properly with this program to install. Click [Finish] to continue. 5. A Skype prompt window...screen appears. Click [Next] to terminate the procedure. 4. Click [Next] to continue or [Cancel] to continue. 6. The Install screen appears. Connect USB cable when prompted. Wait 10 seconds, then press [OK]. 8. NOTE: If the Skype™ program is not installed on the computer, it will ...
... the Skype connection will prompt you can be changed. Important: If you do not select "Allow this phone and you will have to remove and reinstall the SKYLINK™ 2-in -1 Phone Utility works properly with this program to install. Click [Finish] to continue. 5. A Skype prompt window...screen appears. Click [Next] to terminate the procedure. 4. Click [Next] to continue or [Cancel] to continue. 6. The Install screen appears. Connect USB cable when prompted. Wait 10 seconds, then press [OK]. 8. NOTE: If the Skype™ program is not installed on the computer, it will ...

User Guide
Page 13
After successful installation, a SKYLINK™ 2-in-1 Phone Utility icon will see a Notifcation window suggesting that you will appear in -1 Phone" is selected, 13 Click Yes to manually check your toolbar menu. If "Speakers 2-in your settings. NOTE: If you are using Microsoft Vista you verify your audio settings.
After successful installation, a SKYLINK™ 2-in-1 Phone Utility icon will see a Notifcation window suggesting that you will appear in -1 Phone" is selected, 13 Click Yes to manually check your toolbar menu. If "Speakers 2-in your settings. NOTE: If you are using Microsoft Vista you verify your audio settings.

User Guide
Page 14
then select your PC playback device and set as the user prefers. Open Monitor Opens the SKYLINK™ 2-in -1 Phone Utility when computer is started or rebooted. Start when windows start Automatically starts the SKYLINK™ 2-in -1 Phone Utility Monitor window, see SKYLINK™ Operation Guide section for more detail. Right-Click on the icon to view the following options; This can be turned ON or OFF as default. 10. Exit Closes the SKYLINK™ 2-in-1 Phone Utility. 14
then select your PC playback device and set as the user prefers. Open Monitor Opens the SKYLINK™ 2-in -1 Phone Utility when computer is started or rebooted. Start when windows start Automatically starts the SKYLINK™ 2-in -1 Phone Utility Monitor window, see SKYLINK™ Operation Guide section for more detail. Right-Click on the icon to view the following options; This can be turned ON or OFF as default. 10. Exit Closes the SKYLINK™ 2-in-1 Phone Utility. 14
User Guide
Page 15
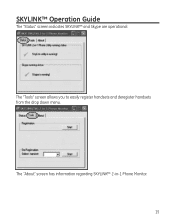
The "Tools" screen allows you to easily register handsets and deregister handsets from the drop down menu. The "About" screen has information regarding SKYLINK™ 2-in-1 Phone Monitor. 15 SKYLINK™ Operation Guide The "Status" screen indicates SKYLINK™ and Skype are operational.
The "Tools" screen allows you to easily register handsets and deregister handsets from the drop down menu. The "About" screen has information regarding SKYLINK™ 2-in-1 Phone Monitor. 15 SKYLINK™ Operation Guide The "Status" screen indicates SKYLINK™ and Skype are operational.

User Guide
Page 16
... Contacts, and press 5 or 6 buttons to navigate to the applicable section. CONTACTS The telephone can store up to 100 landline entries in -1 Phone Utility" from the PC. 1. BASE SETTINGS Allows you to set preferences for the base. To Uninstall the Software If you choose to uninstall the... (SKL) button to the START/Setting/Control Panel, choose the icon "Add or Remove Programs". 2. During programming, you to all of your phone the handset name, time, battery charge status and wallpaper when idle. Go to activate a menu option. TIMER Set time format, clock and alarm settings...
... Contacts, and press 5 or 6 buttons to navigate to the applicable section. CONTACTS The telephone can store up to 100 landline entries in -1 Phone Utility" from the PC. 1. BASE SETTINGS Allows you to set preferences for the base. To Uninstall the Software If you choose to uninstall the... (SKL) button to the START/Setting/Control Panel, choose the icon "Add or Remove Programs". 2. During programming, you to all of your phone the handset name, time, battery charge status and wallpaper when idle. Go to activate a menu option. TIMER Set time format, clock and alarm settings...

User Guide
Page 17
... the number keypad to enter the menu. 3. Timer There are three programmable menus available: Time Format, Clock and Alarm. 1. Alarm Select the settings for your phone is OFF (not in talk mode). 2. Press the OK (SKL) button to input the time. 6. Press the MENU (SKL) button and use the 6 or 5 button...
... the number keypad to enter the menu. 3. Timer There are three programmable menus available: Time Format, Clock and Alarm. 1. Alarm Select the settings for your phone is OFF (not in talk mode). 2. Press the OK (SKL) button to input the time. 6. Press the MENU (SKL) button and use the 6 or 5 button...
User Guide
Page 18
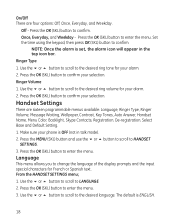
.... Press the OK (SKL) button to confirm your alarm. 2. Press the OK (SKL) button to LANGUAGE. 2. Use the 6 or 5 button to scroll to confirm your phone is OFF (not in the top icon bar. Press the MENU (SKL) button and use the 6 or 5 button to scroll to confirm. The default is...
.... Press the OK (SKL) button to confirm your alarm. 2. Press the OK (SKL) button to LANGUAGE. 2. Use the 6 or 5 button to scroll to confirm your phone is OFF (not in the top icon bar. Press the MENU (SKL) button and use the 6 or 5 button to scroll to confirm. The default is...

User Guide
Page 20
... END CALL button to return to dial the number. Message Waiting If you have subscribed to a voice messaging service, the green message light on your phone. Press the OK (SKL) button to confirm your selection. Press the OK (SKL) button to MESSAGE WAITING. 2. Use the 6 or 5 button to scroll to confirm...
... END CALL button to return to dial the number. Message Waiting If you have subscribed to a voice messaging service, the green message light on your phone. Press the OK (SKL) button to confirm your selection. Press the OK (SKL) button to MESSAGE WAITING. 2. Use the 6 or 5 button to scroll to confirm...
User Guide
Page 22
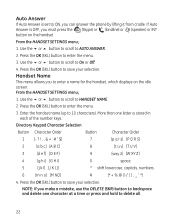
Press the OK (SKL) button to AUTO ANSWER. 2. NOTE: If you can answer the phone by lifting it from cradle. Use the 6 or 5 button to scroll to enter the menu. 3. Press the OK (SKL) button to HANDSET NAME. 2. Use the 6 ...
Press the OK (SKL) button to AUTO ANSWER. 2. NOTE: If you can answer the phone by lifting it from cradle. Use the 6 or 5 button to scroll to enter the menu. 3. Press the OK (SKL) button to HANDSET NAME. 2. Use the 6 ...

User Guide
Page 25
... to return the handset to SELECT BASE. 2. Press the OK (SKL) button to enter the menu. 25 Base Settings There are returned to save your phone is selected. Press the OK (SKL) button to confirm the selection. Select Base This option allows you to register a handset to a specific base (1-4, Auto Base...
... to return the handset to SELECT BASE. 2. Press the OK (SKL) button to enter the menu. 25 Base Settings There are returned to save your phone is selected. Press the OK (SKL) button to confirm the selection. Select Base This option allows you to register a handset to a specific base (1-4, Auto Base...
User Guide
Page 27
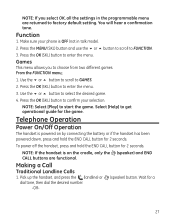
... off the handset, press and hold the END CALL button for the game. Function 1. Wait for 2 seconds. Press the OK (SKL) button to confirm your phone is OFF (not in the programmable menu are functional. Making a Call Traditional Landline Calls 1. Press the MENU (SKL) button and use the 6 or 5 button to...
... off the handset, press and hold the END CALL button for the game. Function 1. Wait for 2 seconds. Press the OK (SKL) button to confirm your phone is OFF (not in the programmable menu are functional. Making a Call Traditional Landline Calls 1. Press the MENU (SKL) button and use the 6 or 5 button to...

User Guide
Page 28
Skype is logged into and running properly (Skype software should be 1.4 or later version). 3. 28300 Hardware connected to PC and USB Driver is a local number, othewise you will start counting when you can view phone book by pressing the Contact (SKR) button. Use the 6 or 5 button to scroll to connect. 3. Dial the number...
Skype is logged into and running properly (Skype software should be 1.4 or later version). 3. 28300 Hardware connected to PC and USB Driver is a local number, othewise you will start counting when you can view phone book by pressing the Contact (SKR) button. Use the 6 or 5 button to scroll to connect. 3. Dial the number...


