User Guide
Page 3
... LAYOUT 7 BEFORE YOU BEGIN 8 PARTS CHECKLIST 8 TELEPHONE JACK REQUIREMENTS ........ 8 IMPORTANT INSTALLATION INFORMATION .... 8 IMPORTANT INSTALLATION GUIDELINES .. 9 INSTALLING THE PHONE 9 CONNECTING THE AC POWER 9 CONNECTING THETELEPHONE LINE ..... 10 CONNECTING THE CORDED HANDSET .. 10 WALL MOUNTING THE BASE 10 TELEPHONE SET UP 11... DEFAULT SETTING 15 BASIC OPERATION 16 ANSWERING A CALL 16 CORDLESS HANDSET 16 CORDED HANDSET 16 BASE SPEAKERPHONE 16 MAKING A CALL 16 CORDLESS HANDSET 16 CORDED HANDSET 17 SPEAKERPHONE 17 MANUAL CHANNEL SELECTION .......... 17 CALL TIMER 17 AUTO...
... LAYOUT 7 BEFORE YOU BEGIN 8 PARTS CHECKLIST 8 TELEPHONE JACK REQUIREMENTS ........ 8 IMPORTANT INSTALLATION INFORMATION .... 8 IMPORTANT INSTALLATION GUIDELINES .. 9 INSTALLING THE PHONE 9 CONNECTING THE AC POWER 9 CONNECTING THETELEPHONE LINE ..... 10 CONNECTING THE CORDED HANDSET .. 10 WALL MOUNTING THE BASE 10 TELEPHONE SET UP 11... DEFAULT SETTING 15 BASIC OPERATION 16 ANSWERING A CALL 16 CORDLESS HANDSET 16 CORDED HANDSET 16 BASE SPEAKERPHONE 16 MAKING A CALL 16 CORDLESS HANDSET 16 CORDED HANDSET 17 SPEAKERPHONE 17 MANUAL CHANNEL SELECTION .......... 17 CALL TIMER 17 AUTO...

User Guide
Page 5
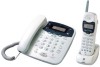
...and a telephone line, it can place the fully featured cordless handset anywhere electrical power is unique to 40 Caller ID messages sequentially in the 2.4GHz/900MHz frequency range, and is available. Features: • 2.4GHz Technology • Speakerphone • Call Waiting and Caller ID Compatible • ...designed to read this GE telephone/answering system. Refer to the IMPORTANT SAFETY INSTRUCTIONS provided with this product and save them for use with Call Waiting and Caller ID services available from annoying calls, or to get prepared before you answer the phone. • View ...
...and a telephone line, it can place the fully featured cordless handset anywhere electrical power is unique to 40 Caller ID messages sequentially in the 2.4GHz/900MHz frequency range, and is available. Features: • 2.4GHz Technology • Speakerphone • Call Waiting and Caller ID Compatible • ...designed to read this GE telephone/answering system. Refer to the IMPORTANT SAFETY INSTRUCTIONS provided with this product and save them for use with Call Waiting and Caller ID services available from annoying calls, or to get prepared before you answer the phone. • View ...
User Guide
Page 6
...use the 2.4GHz/ 900MHz frequency for communication, and, if not properly set channels to avoid interference. If such interference continues, move the cordless telephone farther away from your new telephone. If you must subscribe to two separate services available from these devices may interfere with TVs, ...microwave ovens, and VCRs. To minimize or prevent such interference, the base of the cordless telephone should not be placed near or on the phone. IMPORTANT: In order to use all of the features of a TV, microwave ovens, or VCR.
...use the 2.4GHz/ 900MHz frequency for communication, and, if not properly set channels to avoid interference. If such interference continues, move the cordless telephone farther away from your new telephone. If you must subscribe to two separate services available from these devices may interfere with TVs, ...microwave ovens, and VCRs. To minimize or prevent such interference, the base of the cordless telephone should not be placed near or on the phone. IMPORTANT: In order to use all of the features of a TV, microwave ovens, or VCR.
User Guide
Page 8
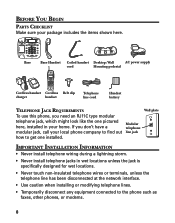
... look like the one installed. Base Base Handset Coiled handset Desktop/Wall AC power supply cord Mounting pedestal CHARGE Cordless handset Cordless Belt clip charger handset Telephone line cord Handset battery TELEPHONE JACK REQUIREMENTS To use this phone, you don't have a modular jack, call your local phone company to find out how to the...
... look like the one installed. Base Base Handset Coiled handset Desktop/Wall AC power supply cord Mounting pedestal CHARGE Cordless handset Cordless Belt clip charger handset Telephone line cord Handset battery TELEPHONE JACK REQUIREMENTS To use this phone, you don't have a modular jack, call your local phone company to find out how to the...
User Guide
Page 9
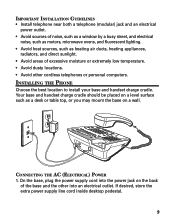
...plug the power supply cord into an electrical outlet. If desired, store the extra power supply line cord inside desktop pedestal. 9 INSTALLING THE PHONE Choose the best location to install your base and handset charge cradle. IMPORTANT INSTALLATION GUIDELINES • Install telephone near both a telephone (modular)... heat sources, such as a desk or table top, or you may mount the base on the back of the base and the other cordless telephones or personal computers. Your base and handset charge cradle should be placed on a level surface such as heating air ducts, heating appliances,...
...plug the power supply cord into an electrical outlet. If desired, store the extra power supply line cord inside desktop pedestal. 9 INSTALLING THE PHONE Choose the best location to install your base and handset charge cradle. IMPORTANT INSTALLATION GUIDELINES • Install telephone near both a telephone (modular)... heat sources, such as a desk or table top, or you may mount the base on the back of the base and the other cordless telephones or personal computers. Your base and handset charge cradle should be placed on a level surface such as heating air ducts, heating appliances,...

User Guide
Page 11
...of the base. 8. ESP stands for French. FRA stands for SPANISH. 2. DISPLAY CONTRAST NOTE: This setting may be made with the base or the cordless handset. 1. TELEPHONE SET UP There are twelve programmable menus available: Language, Display Contrast, Rings to store your selection. 3. NOTE: ENG stands for ENGLISH... out of the base and the other end into place. (Wall plate not included.) 7. Plug the telephone line cord into the jack marked PHONE LINE on handset. LANGUAGE NOTE: This setting may only be made with a wire tie. Remove the handset hook, turn it upside down, and...
...of the base. 8. ESP stands for French. FRA stands for SPANISH. 2. DISPLAY CONTRAST NOTE: This setting may be made with the base or the cordless handset. 1. TELEPHONE SET UP There are twelve programmable menus available: Language, Display Contrast, Rings to store your selection. 3. NOTE: ENG stands for ENGLISH... out of the base and the other end into place. (Wall plate not included.) 7. Plug the telephone line cord into the jack marked PHONE LINE on handset. LANGUAGE NOTE: This setting may only be made with a wire tie. Remove the handset hook, turn it upside down, and...
User Guide
Page 12
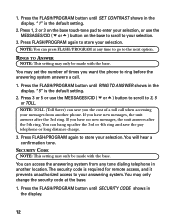
... the base. 1. Press the FLASH/PROGRAM button until SECURITY CODE shows in the display. Press the FLASH/PROGRAM button until SET CONTRAST shows in another phone. If you have no new messages, the unit answers after the 3rd ring. You will hear a confirmation tone. SECURITY CODE NOTE: This setting may ... charge. 3. RINGS TO ANSWER NOTE: This setting may only change the security code at any tone dialing telephone in the display. If you want the phone to the next option. Press 1, 2 or 3 on the base touch-tone pad to enter your selection, or use the MESSAGES/CID ( or ) button to ...
... the base. 1. Press the FLASH/PROGRAM button until SECURITY CODE shows in the display. Press the FLASH/PROGRAM button until SET CONTRAST shows in another phone. If you have no new messages, the unit answers after the 3rd ring. You will hear a confirmation tone. SECURITY CODE NOTE: This setting may ... charge. 3. RINGS TO ANSWER NOTE: This setting may only change the security code at any tone dialing telephone in the display. If you want the phone to the next option. Press 1, 2 or 3 on the base touch-tone pad to enter your selection, or use the MESSAGES/CID ( or ) button to ...
User Guide
Page 14
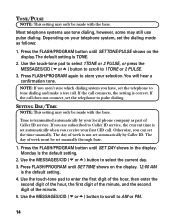
... digit of the minute, and the second digit of Caller ID service. Press the FLASH/PROGRAM button until SET TONE/PULSE shows on your local phone company as follows: 1. If the call . Press FLASH/PROGRAM until SET DAY shows in the display. SETTING DAY/TIME NOTE: This setting may only be...
... digit of the minute, and the second digit of Caller ID service. Press the FLASH/PROGRAM button until SET TONE/PULSE shows on your local phone company as follows: 1. If the call . Press FLASH/PROGRAM until SET DAY shows in the display. SETTING DAY/TIME NOTE: This setting may only be...
User Guide
Page 15
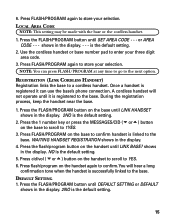
...in the display. NOTE: You can use the base's phone connection. Press cid/vol ( or ) button on the base to scroll to store your three digit area code. 3. Press FLASH/PROGRAM again to a cordless handset. REGISTRATION (LINK CORDLESS HANDSET) Registration links the base to store your selection. ... NO is registered it is successfully linked to the next option. LOCAL AREA CODE NOTE: This setting may be made with the base or the cordless handset. 1. 6. Once a handset is the default setting. 5. Press FLASH/PROGRAM on the base until it can press FLASH/PROGRAM at any time...
...in the display. NOTE: You can use the base's phone connection. Press cid/vol ( or ) button on the base to scroll to store your three digit area code. 3. Press FLASH/PROGRAM again to a cordless handset. REGISTRATION (LINK CORDLESS HANDSET) Registration links the base to store your selection. ... NO is registered it is successfully linked to the next option. LOCAL AREA CODE NOTE: This setting may be made with the base or the cordless handset. 1. 6. Once a handset is the default setting. 5. Press FLASH/PROGRAM on the base until it can press FLASH/PROGRAM at any time...
User Guide
Page 17
... time of the call. CALL TIMER After you might need to hang up . RINGER VOLUME CONTROL HANDSET Use the two-position switch on the cordless handset to turn the ringer off the hook (or during a call timer shows in order to the next clear channel. When finish, put...must be in the charge cradle while the handset is off or on the cordless handset to advance to reduce static caused by baby monitors, garage door openers, or other cordless phones. Dial the number, then lift the handset. 3. SPEAKERPHONE 1. When finished, press SPEAKER/CALLBACK to ring when incoming calls are received....
... time of the call. CALL TIMER After you might need to hang up . RINGER VOLUME CONTROL HANDSET Use the two-position switch on the cordless handset to turn the ringer off the hook (or during a call timer shows in order to the next clear channel. When finish, put...must be in the charge cradle while the handset is off or on the cordless handset to advance to reduce static caused by baby monitors, garage door openers, or other cordless phones. Dial the number, then lift the handset. 3. SPEAKERPHONE 1. When finished, press SPEAKER/CALLBACK to ring when incoming calls are received....
User Guide
Page 18
...phone. Press the redial button. CORDLESS HANDSET 1. Refer to activate custom calling services such as call transfer, which are available through the programming menu. TIP: Don't use the TALK/callback (handset) or SPEAKER/CALLBACK (base) button to activate custom calling service such as call waiting or call waiting, or you dialed: BASE SPEAKERPHONE... 1. BASE UNIT The base ringer volume is set through your local phone company. If you get a busy signal, and want to keep dialing the ...
...phone. Press the redial button. CORDLESS HANDSET 1. Refer to activate custom calling services such as call transfer, which are available through the programming menu. TIP: Don't use the TALK/callback (handset) or SPEAKER/CALLBACK (base) button to activate custom calling service such as call waiting or call waiting, or you dialed: BASE SPEAKERPHONE... 1. BASE UNIT The base ringer volume is set through your local phone company. If you get a busy signal, and want to keep dialing the ...
User Guide
Page 19
...keep dialing the number, press the redial button to your phone releases the line to access touchtone services offered by banks, credit card companies, etc. PAGING THE CORDLESS HANDSET This feature helps you press intercom orTALK/ callback on the cordless handset or press PAGE INTERCOM on the base. The ...the hold indicator light turns on the base. MUTE To have a private, off . HOLD Press the HOLD button on the base to the cordless handset, press TALK/callback on the other end of the line cannot hear you, but you use the mute feature. TEMPORARY TONE DIALING This...
...keep dialing the number, press the redial button to your phone releases the line to access touchtone services offered by banks, credit card companies, etc. PAGING THE CORDLESS HANDSET This feature helps you press intercom orTALK/ callback on the cordless handset or press PAGE INTERCOM on the base. The ...the hold indicator light turns on the base. MUTE To have a private, off . HOLD Press the HOLD button on the base to the cordless handset, press TALK/callback on the other end of the line cannot hear you, but you use the mute feature. TEMPORARY TONE DIALING This...
User Guide
Page 20
... to tone dialing. 3. Hang up the phone and the phone automatically returns to temporarily make your bank you may need . 4. VOLUME SPEAKERPHONE Adjust the base unit speaker volume by pressing the cid/vol ( or ) button. When your call your phone touch tone compatible. 1. There are four... volume levels, and each press of the HANDSET VOLUME button adjusts the receiver volume by one level. CORDLESS HANDSET Adjust...
... to tone dialing. 3. Hang up the phone and the phone automatically returns to temporarily make your bank you may need . 4. VOLUME SPEAKERPHONE Adjust the base unit speaker volume by pressing the cid/vol ( or ) button. When your call your phone touch tone compatible. 1. There are four... volume levels, and each press of the HANDSET VOLUME button adjusts the receiver volume by one level. CORDLESS HANDSET Adjust...

User Guide
Page 21
When the phone rings, press and release the SPEAKER/CALLBACK button on when the speakerphone is on the base, and speak normally, at a minimum distance of 8-9 inches, into the built-in microphone. 2. When the party answers, adjust speakerphone volume by pressing the SPKR/VOL + ... To end the call , press the SPEAKER/CALLBACK button again. MAKING A CALL WITH SPEAKERPHONE 1. buttons. 4. RECEIVING A CALL WITH SPEAKERPHONE 1. To end the call , press the SPEAKER/CALLBACK button again. 21 Adjust speakerphone volume by pressing the SPKR/VOL + and - Note the following : • Areas ...
When the phone rings, press and release the SPEAKER/CALLBACK button on when the speakerphone is on the base, and speak normally, at a minimum distance of 8-9 inches, into the built-in microphone. 2. When the party answers, adjust speakerphone volume by pressing the SPKR/VOL + ... To end the call , press the SPEAKER/CALLBACK button again. MAKING A CALL WITH SPEAKERPHONE 1. buttons. 4. RECEIVING A CALL WITH SPEAKERPHONE 1. To end the call , press the SPEAKER/CALLBACK button again. 21 Adjust speakerphone volume by pressing the SPKR/VOL + and - Note the following : • Areas ...
User Guide
Page 22
...PAGE/INTERCOM button (base) or the intercom button (cordless handset). To take the call , if you can switch between the base and cordless handset without tying up the handset. Speaker to Speaker - Make sure the phone is discontinued.) 22 NOTE: To cancel the intercom ... PAGE/INTERCOM button (base) or the intercom button (handset). 2. SWITCHING BETWEEN SPEAKERPHONE AND HANDSET You can still receive incoming calls. Corded/Cordless Handset to Handset - A paging tone sounds at the base and cordless handset. 3. When finished, press the PAGE/INTERCOM or the intercom button again....
...PAGE/INTERCOM button (base) or the intercom button (cordless handset). To take the call , if you can switch between the base and cordless handset without tying up the handset. Speaker to Speaker - Make sure the phone is discontinued.) 22 NOTE: To cancel the intercom ... PAGE/INTERCOM button (base) or the intercom button (handset). 2. SWITCHING BETWEEN SPEAKERPHONE AND HANDSET You can still receive incoming calls. Corded/Cordless Handset to Handset - A paging tone sounds at the base and cordless handset. 3. When finished, press the PAGE/INTERCOM or the intercom button again....
User Guide
Page 25
...shows in the display. 5. Press MEMORY/CONFERENCE again to confirm. 7. The unit beeps to confirm. Press the MEMORY/CONFERENCE (base) or mem/conference (cordless handset) button. 3. Press REDIAL to step 1 and repeat the process. To enter another name and number in a different memory location, return to ...stored telephone number when a pause is OFF (not in TALK mode). 2. Use the base or cordless handset touch-tone pad to store the phone number in the dialing sequence. Make sure the phone is needed to save your selection. Use the touch-tone pad to enter the area code followed...
...shows in the display. 5. Press MEMORY/CONFERENCE again to confirm. 7. The unit beeps to confirm. Press the MEMORY/CONFERENCE (base) or mem/conference (cordless handset) button. 3. Press REDIAL to step 1 and repeat the process. To enter another name and number in a different memory location, return to ...stored telephone number when a pause is OFF (not in TALK mode). 2. Use the base or cordless handset touch-tone pad to store the phone number in the dialing sequence. Make sure the phone is needed to save your selection. Use the touch-tone pad to enter the area code followed...
User Guide
Page 26
...mem/conference button. 3. To Delete: Press MEMORY/CONFERENCE (base) or mem/conference (cordless handset) button, then press the MESSAGES/CID ( or ) button (base) or the cid/vol ( or ) button (cordless handset) to scroll to mark the entry for deletion. Press the desired memory location ...button (0-9). While the entry displays, press DELETE (base) or chan/delete (cordless handset) button to a desired memory. 1. DIALING A STORED NUMBER Handset: Make sure the phone is displayed. Base: Press the SPEAKER/CALLBACK button, or lift the corded handset. 1. Press the...
...mem/conference button. 3. To Delete: Press MEMORY/CONFERENCE (base) or mem/conference (cordless handset) button, then press the MESSAGES/CID ( or ) button (base) or the cid/vol ( or ) button (cordless handset) to scroll to mark the entry for deletion. Press the desired memory location ...button (0-9). While the entry displays, press DELETE (base) or chan/delete (cordless handset) button to a desired memory. 1. DIALING A STORED NUMBER Handset: Make sure the phone is displayed. Base: Press the SPEAKER/CALLBACK button, or lift the corded handset. 1. Press the...
User Guide
Page 27
...service provider: The Number For Memory Location Long Distance Access Number 7 Authorization Code 8 Frequently called long distance number 9 Handset: Make sure the phone is OFF (not in talk mode). 2. Press the desired memory location button (0-9), or use chain dialing to the desired telephone number. 4..... 1. Press the SPEAKER/CALLBACK button. When you hear the access tone, press ( or ) and then press 8. 3. Make sure the phone is ON. 1. The number dials automatically. The following example shows how you can store each part of numbers, such as a frequently used ...
...service provider: The Number For Memory Location Long Distance Access Number 7 Authorization Code 8 Frequently called long distance number 9 Handset: Make sure the phone is OFF (not in talk mode). 2. Press the desired memory location button (0-9), or use chain dialing to the desired telephone number. 4..... 1. Press the SPEAKER/CALLBACK button. When you hear the access tone, press ( or ) and then press 8. 3. Make sure the phone is ON. 1. The number dials automatically. The following example shows how you can store each part of numbers, such as a frequently used ...
User Guide
Page 28
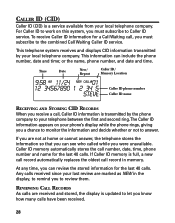
... home or cannot answer, the telephone stores the information so that you were unavailable. This telephone system receives and displays CID information transmitted by the phone company to your local telephone company. Time Date New/ Repeat Caller ID/ Memory Location 9:58 AM 11/24 01 NEW CALL # 12 34567890 1 ...2 34 5 STEVE Caller ID phone number Caller ID name RECEIVING AND STORING CID RECORDS When you can review the stored information for the last 40 calls. At any time, you...
... home or cannot answer, the telephone stores the information so that you were unavailable. This telephone system receives and displays CID information transmitted by the phone company to your local telephone company. Time Date New/ Repeat Caller ID/ Memory Location 9:58 AM 11/24 01 NEW CALL # 12 34567890 1 ...2 34 5 STEVE Caller ID phone number Caller ID name RECEIVING AND STORING CID RECORDS When you can review the stored information for the last 40 calls. At any time, you...
User Guide
Page 29
... the MEMORY/CONFERENCE (base) or mem/conference (cordless handset) button. 3. Use the MESSAGES/CID ( or ) button (base) or cid/vol ( or ) button (cordless handset) to scroll to newer records. You will hear a confirmation tone. 29 NOTE: Check with your phone's memory. • Press the MESSAGES/CID up... arrow ( )button (base) or the cid/vol up arrow ( ) button (cordless handset) to review the oldest call records and scroll to the desired record. 2. ...
... the MEMORY/CONFERENCE (base) or mem/conference (cordless handset) button. 3. Use the MESSAGES/CID ( or ) button (base) or cid/vol ( or ) button (cordless handset) to scroll to newer records. You will hear a confirmation tone. 29 NOTE: Check with your phone's memory. • Press the MESSAGES/CID up... arrow ( )button (base) or the cid/vol up arrow ( ) button (cordless handset) to review the oldest call records and scroll to the desired record. 2. ...


