
Reference Guide
Page 3
... About This Reference 1 About this guide 2 Accessing your online User Guide 2 Gateway contact information 3 Gateway model and serial number 3 Microsoft Certificate of Authenticity 3 For more information 3 Chapter 2: Checking Out Your Notebook . . . . . 5 Front 6 Left 7 Right 9 Bottom 10 Keyboard area 12 Chapter 3: Setting Up and Getting Started . . 13 Working safely and... notebook 21 Turning off your notebook 21 Restarting (rebooting) your notebook 22 Using the status indicators 23 Using the keyboard 24 Key types 25 System key combinations 26 Using the EZ Pad touchpad 28 i
... About This Reference 1 About this guide 2 Accessing your online User Guide 2 Gateway contact information 3 Gateway model and serial number 3 Microsoft Certificate of Authenticity 3 For more information 3 Chapter 2: Checking Out Your Notebook . . . . . 5 Front 6 Left 7 Right 9 Bottom 10 Keyboard area 12 Chapter 3: Setting Up and Getting Started . . 13 Working safely and... notebook 21 Turning off your notebook 21 Restarting (rebooting) your notebook 22 Using the status indicators 23 Using the keyboard 24 Key types 25 System key combinations 26 Using the EZ Pad touchpad 28 i

Reference Guide
Page 5
www.gateway.com Chapter 6: Traveling with Your Notebook . . . 57 Packing your notebook 58 Traveling by air 58 Dial-up modem 58 Radio frequency wireless connections 59 Files ... Power 61 Additional tips 61 Chapter 7: Maintaining Your Notebook . . . . . 63 Caring for your notebook 64 Cleaning your notebook 65 Cleaning the exterior 65 Cleaning the keyboard 66 Cleaning the notebook screen 66 Maintaining the battery 66 Storing batteries 67 Cleaning CDs or DVDs 68 Recovering your system 68 Recovering pre-installed...
www.gateway.com Chapter 6: Traveling with Your Notebook . . . 57 Packing your notebook 58 Traveling by air 58 Dial-up modem 58 Radio frequency wireless connections 59 Files ... Power 61 Additional tips 61 Chapter 7: Maintaining Your Notebook . . . . . 63 Caring for your notebook 64 Cleaning your notebook 65 Cleaning the exterior 65 Cleaning the keyboard 66 Cleaning the notebook screen 66 Maintaining the battery 66 Storing batteries 67 Cleaning CDs or DVDs 68 Recovering your system 68 Recovering pre-installed...
Reference Guide
Page 6
Contents Diskette drive (external 91 Display 92 DVD drives (external 93 Ethernet 95 File management 95 Hard drive 96 Internet 97 Keyboard 98 Media Center 99 Memory 101 Memory card reader 102 Modem (cable or DSL 102 Modem (dial-up 102 Mouse 106 Networks (wired 107 Networks (wireless 108 Passwords 110 PC Cards 111 Pointing device 111 Power 111 Printer 112 Sound 113 Status indicators 114 Touchpad or pointing device 114 Video 114 Telephone support 115 Before calling Gateway Customer Care 115 Appendix A: Legal Information 117 Index 127 iv
Contents Diskette drive (external 91 Display 92 DVD drives (external 93 Ethernet 95 File management 95 Hard drive 96 Internet 97 Keyboard 98 Media Center 99 Memory 101 Memory card reader 102 Modem (cable or DSL 102 Modem (dial-up 102 Mouse 106 Networks (wired 107 Networks (wireless 108 Passwords 110 PC Cards 111 Pointing device 111 Power 111 Printer 112 Sound 113 Status indicators 114 Touchpad or pointing device 114 Video 114 Telephone support 115 Before calling Gateway Customer Care 115 Appendix A: Legal Information 117 Index 127 iv

Reference Guide
Page 15
... known as Firewire® or i.Link®) device (such as a CD or DVD drive, diskette drive, flash drive, printer, scanner, camera, keyboard, or mouse) into this jack. Right www.gateway.com Component USB ports Ethernet jack Modem jack IEEE 1394 port Headphone jack Microphone jack USB ports Ethernet Modem jack jack Kensington...
... known as Firewire® or i.Link®) device (such as a CD or DVD drive, diskette drive, flash drive, printer, scanner, camera, keyboard, or mouse) into this jack. Right www.gateway.com Component USB ports Ethernet jack Modem jack IEEE 1394 port Headphone jack Microphone jack USB ports Ethernet Modem jack jack Kensington...

Reference Guide
Page 18
You can also configure the power button for Sleep/Resume mode. Keyboard Provides all the functionality of a full-sized, computer keyboard. For more information, see "Using the keyboard" on page 24. For more information, see "Using the EZ Pad touchpad" on page 23. 12 For more ...Inform you when a drive is in use or when a button has been pressed that affects how the keyboard is used. CHAPTER 2: Checking Out Your Notebook Keyboard area Power button Keyboard Status indicators Touchpad Component Icon Description Power button Press to turn the power on page 55. For more ...
You can also configure the power button for Sleep/Resume mode. Keyboard Provides all the functionality of a full-sized, computer keyboard. For more information, see "Using the keyboard" on page 24. For more information, see "Using the EZ Pad touchpad" on page 23. 12 For more ...Inform you when a drive is in use or when a button has been pressed that affects how the keyboard is used. CHAPTER 2: Checking Out Your Notebook Keyboard area Power button Keyboard Status indicators Touchpad Component Icon Description Power button Press to turn the power on page 55. For more ...

Reference Guide
Page 19
CHAPTER3 Setting Up and Getting Started • Working safely and comfortably • Connecting the AC adapter • Connecting the dial-up modem • Connecting to a broadband modem or network • Starting your notebook • Turning off your notebook • Restarting (rebooting) your notebook • Using the status indicators • Using the keyboard • Using the EZ Pad touchpad • Adjusting the volume • Turning your wireless radio on or off 13
CHAPTER3 Setting Up and Getting Started • Working safely and comfortably • Connecting the AC adapter • Connecting the dial-up modem • Connecting to a broadband modem or network • Starting your notebook • Turning off your notebook • Restarting (rebooting) your notebook • Using the status indicators • Using the keyboard • Using the EZ Pad touchpad • Adjusting the volume • Turning your wireless radio on or off 13

Reference Guide
Page 20
... the screen so it is no higher than eye level. 14 Instead, use a laptop desk to protect your legs. • Do not use an external keyboard, raise the notebook so the top of fire and personal injury. If you use the notebook on your screen for setting up a safe and comfortable...
... the screen so it is no higher than eye level. 14 Instead, use a laptop desk to protect your legs. • Do not use an external keyboard, raise the notebook so the top of fire and personal injury. If you use the notebook on your screen for setting up a safe and comfortable...

Reference Guide
Page 21
... and chair, make sure that they are positioned parallel to the floor when you use the keyboard and touchpad. If the desk is not adjustable or is too tall, consider using an adjustable chair..., distributes your weight evenly, and keeps your body relaxed. • Position your chair so the keyboard is the appropriate height and the chair helps you maintain good posture. • Select a flat surface... in a relaxed position when you type. • Do not slouch forward or lean far back. www.gateway.com Setting up your computer desk and chair When you are setting up the work . • Take...
... and chair, make sure that they are positioned parallel to the floor when you use the keyboard and touchpad. If the desk is not adjustable or is too tall, consider using an adjustable chair..., distributes your weight evenly, and keeps your body relaxed. • Position your chair so the keyboard is the appropriate height and the chair helps you maintain good posture. • Select a flat surface... in a relaxed position when you type. • Do not slouch forward or lean far back. www.gateway.com Setting up your computer desk and chair When you are setting up the work . • Take...

Reference Guide
Page 26
... the language and time zone and to harm your skin. To start your notebook: 1 Lift the LCD panel. 2 Press the power button located above the keyboard. From that came with the notebook resting on page 55. 3 If you can run programs and search for files. For more information on using Windows...
... the language and time zone and to harm your skin. To start your notebook: 1 Lift the LCD panel. 2 Press the power button located above the keyboard. From that came with the notebook resting on page 55. 3 If you can run programs and search for files. For more information on using Windows...

Reference Guide
Page 28
...; Click (Start), click the arrow next to the lock icon, then click Shut Down. Restarting (rebooting) your notebook If your notebook does not respond to keyboard, touchpad, or mouse input, you may have to close unresponsive programs on again. CHAPTER 3: Setting Up and Getting Started To turn off your notebook: •...
...; Click (Start), click the arrow next to the lock icon, then click Shut Down. Restarting (rebooting) your notebook If your notebook does not respond to keyboard, touchpad, or mouse input, you may have to close unresponsive programs on again. CHAPTER 3: Setting Up and Getting Started To turn off your notebook: •...
Reference Guide
Page 29
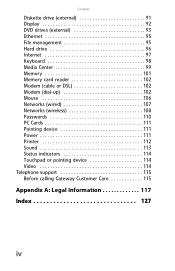
...- Power ■ LED on - Hard drive is being accessed. ■ LED off - Notebook is used or when a button has been pressed that affects how the keyboard is on . Status indicators inform you may need to press FN+F1 to toggle the status indicators on . ■ LED blinking - Wireless network Power Num... Caps lock Indicator Icon Description Wireless network (optional) ■ LED on - Notebook is off - Notebook is in Sleep mode. ■ LED off . 23 www.gateway.com Using the status indicators Important If none of the indicators are located below the touchpad.
...- Power ■ LED on - Hard drive is being accessed. ■ LED off - Notebook is used or when a button has been pressed that affects how the keyboard is on . Status indicators inform you may need to press FN+F1 to toggle the status indicators on . ■ LED blinking - Wireless network Power Num... Caps lock Indicator Icon Description Wireless network (optional) ■ LED on - Notebook is off - Notebook is in Sleep mode. ■ LED off . 23 www.gateway.com Using the status indicators Important If none of the indicators are located below the touchpad.

Reference Guide
Page 30
...Function keys/ System keys FN key 24 Windows key Numeric Application keypad key Arrow keys/ Navigation keys Tip You can attach an external keyboard to connect a USB keyboard. Battery is fully charged. ■ LED purple - Battery is malfunctioning. ■ LED on - Caps lock is charging. ...■ LED blinking red - Using the keyboard Your notebook features a full-size keyboard that functions the same as a desktop computer keyboard. You do not need to shut down the notebook to the notebook or optional port replicator using a...
...Function keys/ System keys FN key 24 Windows key Numeric Application keypad key Arrow keys/ Navigation keys Tip You can attach an external keyboard to connect a USB keyboard. Battery is fully charged. ■ LED purple - Battery is malfunctioning. ■ LED on - Caps lock is charging. ...■ LED blinking red - Using the keyboard Your notebook features a full-size keyboard that functions the same as a desktop computer keyboard. You do not need to shut down the notebook to the notebook or optional port replicator using a...

Reference Guide
Page 31
... the FN key to open the Windows Start menu. Key type Icon Description Function keys Press these colored keys in combination with another key. www.gateway.com Key types The keyboard has several different types of a document, or to open utilities like F (Search utility), R (Run utility), and E (Computer window).
... the FN key to open the Windows Start menu. Key type Icon Description Function keys Press these colored keys in combination with another key. www.gateway.com Key types The keyboard has several different types of a document, or to open utilities like F (Search utility), R (Run utility), and E (Computer window).
Reference Guide
Page 36
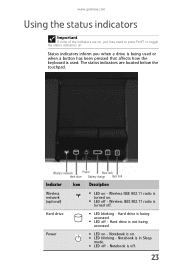
... object where you want it down, then use the touchpad to move (drag) the object to the desired screen brightness. Move an object on the keyboard.
... object where you want it down, then use the touchpad to move (drag) the object to the desired screen brightness. Move an object on the keyboard.
Reference Guide
Page 37
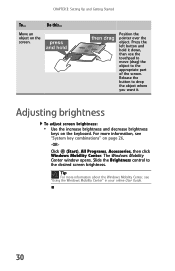
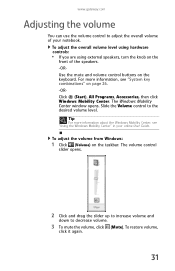
... Programs, Accessories, then click Windows Mobility Center. The Windows Mobility Center window opens. To adjust the volume from Windows: 1 Click (Volume) on the keyboard. Slide the Volume control to decrease volume. 3 To mute the volume, click (Mute). The volume control slider opens. 2 Click and drag the slider... up to increase volume and down to the desired volume level. www.gateway.com Adjusting the volume You can use the volume control to adjust the overall volume of the speakers. -ORUse the mute and volume control...
... Programs, Accessories, then click Windows Mobility Center. The Windows Mobility Center window opens. To adjust the volume from Windows: 1 Click (Volume) on the keyboard. Slide the Volume control to decrease volume. 3 To mute the volume, click (Mute). The volume control slider opens. 2 Click and drag the slider... up to increase volume and down to the desired volume level. www.gateway.com Adjusting the volume You can use the volume control to adjust the overall volume of the speakers. -ORUse the mute and volume control...
Reference Guide
Page 39
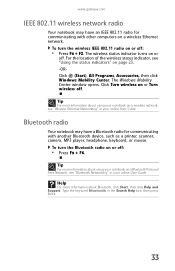
... Guide Bluetooth radio Your notebook may have a Bluetooth radio for communicating with another Bluetooth device, such as a printer, scanner, camera, MP3 player, headphone, keyboard, or mouse. www.gateway.com IEEE 802.11 wireless network radio Your notebook may have an IEEE 802.11 radio for communicating with other computers on a Bluetooth Personal...
... Guide Bluetooth radio Your notebook may have a Bluetooth radio for communicating with another Bluetooth device, such as a printer, scanner, camera, MP3 player, headphone, keyboard, or mouse. www.gateway.com IEEE 802.11 wireless network radio Your notebook may have an IEEE 802.11 radio for communicating with other computers on a Bluetooth Personal...

Reference Guide
Page 45
... you use these ports to connect peripheral devices such as a CD or DVD drive, diskette drive, flash drive, printer, scanner, camera, keyboard, or mouse. Help For more information about installing peripheral devices, click Start, then click Help and Support. Type the keyword installing devices in... the Search Help box, then press ENTER. www.gateway.com Installing a printer or other peripheral device, see your device's documentation. 39 IEEE 1394 and USB ports support plug-and-play and ...
... you use these ports to connect peripheral devices such as a CD or DVD drive, diskette drive, flash drive, printer, scanner, camera, keyboard, or mouse. Help For more information about installing peripheral devices, click Start, then click Help and Support. Type the keyword installing devices in... the Search Help box, then press ENTER. www.gateway.com Installing a printer or other peripheral device, see your device's documentation. 39 IEEE 1394 and USB ports support plug-and-play and ...

Reference Guide
Page 72
..., under the keys. For more likely to use ), with fuel gauges (notebooks) should clean the keyboard occasionally by your warranty. Let the liquid drain, then let the keyboard dry before trying to be caused by heat than one total discharge. This only adds strain. Maintaining... the battery" on the screen), and wipe the screen with a narrow, straw-like extension to replace it has no memory. A replacement keyboard may need to remove dust and lint trapped under normal conditions. Several partial discharges (regular use it cannot hold a full charge. CHAPTER 7:...
..., under the keys. For more likely to use ), with fuel gauges (notebooks) should clean the keyboard occasionally by your warranty. Let the liquid drain, then let the keyboard dry before trying to be caused by heat than one total discharge. This only adds strain. Maintaining... the battery" on the screen), and wipe the screen with a narrow, straw-like extension to replace it has no memory. A replacement keyboard may need to remove dust and lint trapped under normal conditions. Several partial discharges (regular use it cannot hold a full charge. CHAPTER 7:...
Reference Guide
Page 84
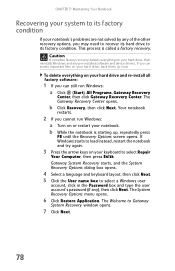
... to select Repair Your Computer, then press ENTER. If you cannot run Windows: a Click (Start), All Programs, Gateway Recovery Center, then click Gateway Recovery Center. CHAPTER 7: Maintaining Your Notebook Recovering your system to its factory condition If your notebook's problems are not ... again. 3 Press the arrow keys on your keyboard to Gateway System Recovery window opens. 7 Click Next. 78 The Gateway Recovery Center opens. Gateway System Recovery starts, and the System Recovery Options dialog box opens. 4 Select a language and keyboard layout, then click Next. 5 Click the User...
... to select Repair Your Computer, then press ENTER. If you cannot run Windows: a Click (Start), All Programs, Gateway Recovery Center, then click Gateway Recovery Center. CHAPTER 7: Maintaining Your Notebook Recovering your system to its factory condition If your notebook's problems are not ... again. 3 Press the arrow keys on your keyboard to Gateway System Recovery window opens. 7 Click Next. 78 The Gateway Recovery Center opens. Gateway System Recovery starts, and the System Recovery Options dialog box opens. 4 Select a language and keyboard layout, then click Next. 5 Click the User...

Reference Guide
Page 86
A list of valid boot devices appears. 4 Press the arrow keys to select the drive containing the Windows DVD, then press ENTER and follow the on-screen instructions. 5 After Windows is completely re-installed, use the software and driver recovery discs you created to boot from CD or DVD" appears, press any key on page 73. 80 For instructions, see "Recovering pre-installed software and drivers using recovery discs" on your notebook's pre-installed software and device drivers. CHAPTER 7: Maintaining Your Notebook 3 When the prompt "Press any key to recover your keyboard.
A list of valid boot devices appears. 4 Press the arrow keys to select the drive containing the Windows DVD, then press ENTER and follow the on-screen instructions. 5 After Windows is completely re-installed, use the software and driver recovery discs you created to boot from CD or DVD" appears, press any key on page 73. 80 For instructions, see "Recovering pre-installed software and drivers using recovery discs" on your notebook's pre-installed software and device drivers. CHAPTER 7: Maintaining Your Notebook 3 When the prompt "Press any key to recover your keyboard.


