Gateway Quick Start Guide for Windows 7
Page 10
... is protected by Macrovision, and is dirty, the optical drive may cause injury with your computer. ✓ The computer's hard disk drive, optical drive and processor are idling or under the following conditions: ✓ The battery is appropriate for home and other intellectual property rights. Battery Life Battery life depends on...
... is protected by Macrovision, and is dirty, the optical drive may cause injury with your computer. ✓ The computer's hard disk drive, optical drive and processor are idling or under the following conditions: ✓ The battery is appropriate for home and other intellectual property rights. Battery Life Battery life depends on...
Gateway Quick Start Guide for Windows 7
Page 44
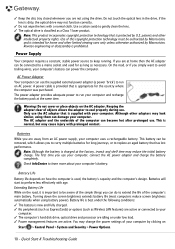
... with each device to know how to install it can be necessary to open your system's Random Access Memory (RAM) or Processor (CPU), please refer to restore the hardware configuration so that it properly. Remember to do so by any cables. You should...43). 2. Incorrect operations may want to InfoCentre. 3. Quick Start & Troubleshooting Guide Hardware Caution: Gateway strongly recommends that you never change your computer and is not covered by a qualified Gateway technician. is not a complicated task. Each type of device has its own installation specifications, so ...
... with each device to know how to install it can be necessary to open your system's Random Access Memory (RAM) or Processor (CPU), please refer to restore the hardware configuration so that it properly. Remember to do so by any cables. You should...43). 2. Incorrect operations may want to InfoCentre. 3. Quick Start & Troubleshooting Guide Hardware Caution: Gateway strongly recommends that you never change your computer and is not covered by a qualified Gateway technician. is not a complicated task. Each type of device has its own installation specifications, so ...

Gateway NV50 Series User's Reference Guide - Canada/French
Page 60
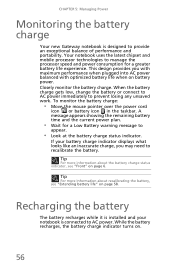
...about the battery charge status indicator, see "Extending battery life" on page 6. CHAPTER 5: Managing Power Monitoring the battery charge Your new Gateway notebook is installed and your battery charge indicator displays what looks like an inaccurate charge, you with maximum performance when plugged into AC power ... with optimized battery life when on . 56 Recharging the battery The battery recharges while it is designed to manage the processor speed and power consumption for a Low Battery warning message to prevent losing any unsaved work. Your notebook uses the latest chipset and...
...about the battery charge status indicator, see "Extending battery life" on page 6. CHAPTER 5: Managing Power Monitoring the battery charge Your new Gateway notebook is installed and your battery charge indicator displays what looks like an inaccurate charge, you with maximum performance when plugged into AC power ... with optimized battery life when on . 56 Recharging the battery The battery recharges while it is designed to manage the processor speed and power consumption for a Low Battery warning message to prevent losing any unsaved work. Your notebook uses the latest chipset and...
Gateway NV50 Series User's Reference Guide - English
Page 60
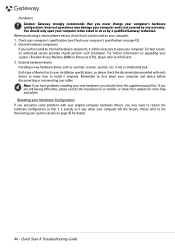
... the battery charge status indicator, see "Extending battery life" on page 6. Your notebook uses the latest chipset and mobile processor technologies to manage the processor speed and power consumption for a Low Battery warning message to appear. • Look at the battery charge status indicator.... While the battery recharges, the battery charge indicator turns on battery power. CHAPTER 5: Managing Power Monitoring the battery charge Your new Gateway notebook is designed to prevent losing any unsaved work. To monitor the battery charge: • Move the mouse pointer over the...
... the battery charge status indicator, see "Extending battery life" on page 6. Your notebook uses the latest chipset and mobile processor technologies to manage the processor speed and power consumption for a Low Battery warning message to appear. • Look at the battery charge status indicator.... While the battery recharges, the battery charge indicator turns on battery power. CHAPTER 5: Managing Power Monitoring the battery charge Your new Gateway notebook is designed to prevent losing any unsaved work. To monitor the battery charge: • Move the mouse pointer over the...
Service Guide
Page 4
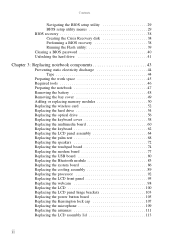
... modem board 77 Replacing the USB board 80 Replacing the Bluetooth module 83 Replacing the system board 86 Replacing the cooling assembly 89 Replacing the processor 92 Replacing the LCD front panel 95 Replacing the webcam 98 Replacing the LCD 100 Replacing the LCD panel hinge brackets 103 Replacing the power...
... modem board 77 Replacing the USB board 80 Replacing the Bluetooth module 83 Replacing the system board 86 Replacing the cooling assembly 89 Replacing the processor 92 Replacing the LCD front panel 95 Replacing the webcam 98 Replacing the LCD 100 Replacing the LCD panel hinge brackets 103 Replacing the power...

Service Guide
Page 9
www.gateway.com Features Platform • Processor • AMD Turion™ II Ultra Dual-Core Mobile Processors: M640 (2.6 GHz), M620 (2.5 GHz), M600 (2.4 GHz) • AMD Turion™ II Dual-Core Mobile Processors: M520 (2.3 GHz), M500 (2.2 GHz) • AMD Athlon™ II Dual-Core Mobile Processors: M320 (2.1 GHz), M300 (2.0 GHz) • Core logic: ATI RS880M + SB710 •...
www.gateway.com Features Platform • Processor • AMD Turion™ II Ultra Dual-Core Mobile Processors: M640 (2.6 GHz), M620 (2.5 GHz), M600 (2.4 GHz) • AMD Turion™ II Dual-Core Mobile Processors: M520 (2.3 GHz), M500 (2.2 GHz) • AMD Athlon™ II Dual-Core Mobile Processors: M320 (2.1 GHz), M300 (2.0 GHz) • Core logic: ATI RS880M + SB710 •...

Service Guide
Page 13
...gateway.com Hardware specifications and configurations CPU Item CPU type Core logic CPU package CPU core voltage Controllers Item Core logic VGA LAN USB 2.0 Bluetooth Wireless 802.11 Memory Card Reader Audio Codec BIOS Item BIOS vendor BIOS version Specification AMD Turion™ II Ultra Dual-Core Mobile Processors..., AMD Turion™ II Dual-Core Mobile Processors, or AMD Athlon™ II Dual-Core Mobile Processors ATI RS880M + SB710 Socket-S1 (S1g2), µFCPGA 1.075V to 1.125V ...
...gateway.com Hardware specifications and configurations CPU Item CPU type Core logic CPU package CPU core voltage Controllers Item Core logic VGA LAN USB 2.0 Bluetooth Wireless 802.11 Memory Card Reader Audio Codec BIOS Item BIOS vendor BIOS version Specification AMD Turion™ II Ultra Dual-Core Mobile Processors..., AMD Turion™ II Dual-Core Mobile Processors, or AMD Athlon™ II Dual-Core Mobile Processors ATI RS880M + SB710 Socket-S1 (S1g2), µFCPGA 1.075V to 1.125V ...
Service Guide
Page 36
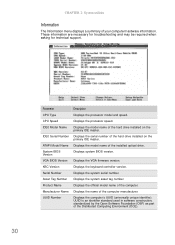
.... These information are necessary for troubleshooting and may be required when asking for technical support. 30 Parameter Description CPU Type Displays the processor model and speed. CPU Speed Displays the processor speed. VGA BIOS Version Displays the VGA firmware version. IDE0 Serial Number Displays the serial number of the computer. System BIOS...
.... These information are necessary for troubleshooting and may be required when asking for technical support. 30 Parameter Description CPU Type Displays the processor model and speed. CPU Speed Displays the processor speed. VGA BIOS Version Displays the VGA firmware version. IDE0 Serial Number Displays the serial number of the computer. System BIOS...
Service Guide
Page 49
... modem board • Replacing the USB board • Replacing the Bluetooth module • Replacing the system board • Replacing the cooling assembly • Replacing the processor • Replacing the LCD front panel • Replacing the webcam • Replacing the LCD • Replacing the LCD panel hinge brackets • Replacing the power...
... modem board • Replacing the USB board • Replacing the Bluetooth module • Replacing the system board • Replacing the cooling assembly • Replacing the processor • Replacing the LCD front panel • Replacing the webcam • Replacing the LCD • Replacing the LCD panel hinge brackets • Replacing the power...
Service Guide
Page 94
... by performing steps 4-7 of the "Replacing the cooling assembly" procedure on page 89. 12 If your new system board does not include a processor, remove the processor from the base enclosure. 88 Note A circuit board that is facing up. 20 Reinstall the optical drive by performing steps 10 and 11 of... Carefully remove the system board from the old system board and install it on the new system board by performing steps 4-7 in the "Replacing the processor" section on page 92. 13 Reinstall the cooling assembly by performing steps 8 and 9 of the "Replacing the hard drive" procedure on page 89....
... by performing steps 4-7 of the "Replacing the cooling assembly" procedure on page 89. 12 If your new system board does not include a processor, remove the processor from the base enclosure. 88 Note A circuit board that is facing up. 20 Reinstall the optical drive by performing steps 10 and 11 of... Carefully remove the system board from the old system board and install it on the new system board by performing steps 4-7 in the "Replacing the processor" section on page 92. 13 Reinstall the cooling assembly by performing steps 8 and 9 of the "Replacing the hard drive" procedure on page 89....

Service Guide
Page 97
... a soft cloth with isopropyl alcohol and clean the processor die to remove any wireless antennas, reconnect them now. 21 Reinstall the bay cover. 22 Reinstall the battery. 91 www.gateway.com 8 Remove the barcode sticker on page 54. 20 If you have disconnected any thermal grease residue. Wipe the die .... Allow the alcohol to secure it in poor thermal grease performance. 10 Apply just enough thermal grease to evenly coat the surface of the processor die. 11 Place the new cooling assembly on the system board and tighten its system board connector. 13 Reinstall the system board by performing...
... a soft cloth with isopropyl alcohol and clean the processor die to remove any wireless antennas, reconnect them now. 21 Reinstall the bay cover. 22 Reinstall the battery. 91 www.gateway.com 8 Remove the barcode sticker on page 54. 20 If you have disconnected any thermal grease residue. Wipe the die .... Allow the alcohol to secure it in poor thermal grease performance. 10 Apply just enough thermal grease to evenly coat the surface of the processor die. 11 Place the new cooling assembly on the system board and tighten its system board connector. 13 Reinstall the system board by performing...
Service Guide
Page 98
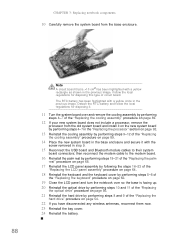
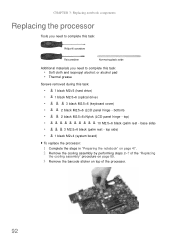
...bottom) • 2 black M2.5×6+Nylok (LCD panel hinge - top side) • 1 black M2×4 (system board) To replace the processor: 1 Complete the steps in "Preparing the notebook" on page 47. 2 Remove the cooling assembly by performing steps 2-7 of the "Replacing the cooling ...assembly" procedure on page 89. 3 Remove the barcode sticker on top of the processor. 92 base side) • 3 M2.5×6 black (palm rest - CHAPTER 3: Replacing notebook components Replacing the processor Tools you need to complete this task: Phillips #0 screwdriver Flat screwdriver Non-marring ...
...bottom) • 2 black M2.5×6+Nylok (LCD panel hinge - top side) • 1 black M2×4 (system board) To replace the processor: 1 Complete the steps in "Preparing the notebook" on page 47. 2 Remove the cooling assembly by performing steps 2-7 of the "Replacing the cooling ...assembly" procedure on page 89. 3 Remove the barcode sticker on top of the processor. 92 base side) • 3 M2.5×6 black (palm rest - CHAPTER 3: Replacing notebook components Replacing the processor Tools you need to complete this task: Phillips #0 screwdriver Flat screwdriver Non-marring ...
Service Guide
Page 99
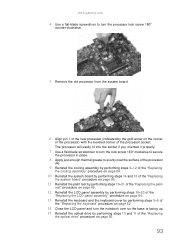
... easily fit into the socket if you oriented it properly. 7 Use a flat-blade screwdriver to turn the lock screw 180° clockwise to secure the processor in place. 8 Apply just enough thermal grease to turn the notebook over so the base is facing up. 15 Reinstall the optical drive by the... gold arrow on page 56. 93 www.gateway.com 4 Use a flat-blade screwdriver to evenly coat the surface of the processor die. 9 Reinstall the cooling assembly by performing steps 9-12 of the "Replacing the cooling assembly" procedure on page 89...
... easily fit into the socket if you oriented it properly. 7 Use a flat-blade screwdriver to turn the lock screw 180° clockwise to secure the processor in place. 8 Apply just enough thermal grease to turn the notebook over so the base is facing up. 15 Reinstall the optical drive by the... gold arrow on page 56. 93 www.gateway.com 4 Use a flat-blade screwdriver to evenly coat the surface of the processor die. 9 Reinstall the cooling assembly by performing steps 9-12 of the "Replacing the cooling assembly" procedure on page 89...
Service Guide
Page 131
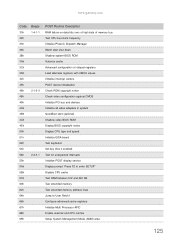
www.gateway.com Code 30h 32h 33h 36h 38h 3Ah 3Ch 3Dh 42h 45h 46h 48h 49h 4Ah 4Bh 4Ch 4Eh 50h 51h 52h 54h 58h 59h ... Test RAM between 512 and 640 KB Test extended memory Test extended memory address lines Jump to User Patch1 Configure advanced cache registers Initialize Multi Processor APIC Enable external and CPU caches Setup System Management Mode (SMM) area 125
www.gateway.com Code 30h 32h 33h 36h 38h 3Ah 3Ch 3Dh 42h 45h 46h 48h 49h 4Ah 4Bh 4Ch 4Eh 50h 51h 52h 54h 58h 59h ... Test RAM between 512 and 640 KB Test extended memory Test extended memory address lines Jump to User Patch1 Configure advanced cache registers Initialize Multi Processor APIC Enable external and CPU caches Setup System Management Mode (SMM) area 125

Service Guide
Page 132
... floppy controller Determine number of ATA drives (optional) Initialize hard-disk controllers Initialize local-bus hard-disk controllers Jump to UserPatch2 Build MPTABLE for multi-processor boards Install CD ROM for boot Clear huge ES segment register Fixup Multi...
... floppy controller Determine number of ATA drives (optional) Initialize hard-disk controllers Initialize local-bus hard-disk controllers Jump to UserPatch2 Build MPTABLE for multi-processor boards Install CD ROM for boot Clear huge ES segment register Fixup Multi...
Service Guide
Page 134
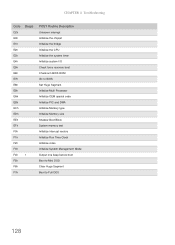
... bridge Initialize the CPU Initialize the system timer Initialize system I/O Check force recovery boot Checksum BIOS ROM Go to BIOS Set Huge Segment Initialize Multi Processor Initialize OEM special code Initialize PIC and DMA Initialize Memory type Initialize Memory size Shadow Boot Block System memory test Initialize interrupt vectors Initialize Run...
... bridge Initialize the CPU Initialize the system timer Initialize system I/O Check force recovery boot Checksum BIOS ROM Go to BIOS Set Huge Segment Initialize Multi Processor Initialize OEM special code Initialize PIC and DMA Initialize Memory type Initialize Memory size Shadow Boot Block System memory test Initialize interrupt vectors Initialize Run...
Service Guide
Page 143
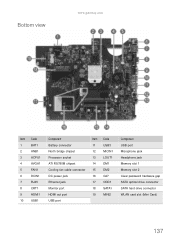
Bottom view www.gateway.com Item Code 1 BAT1 2 ANB1 3 ACPU1 4 AVGA1 5 FAN1 6 DCIN1 7 RJ45 8 CRT1 9 HDMI1 10 USB1 Component Battery connector North bridge chipset Processor socket ATI RS780M chipset Cooling fan cable connector DC power jack Ethernet jack Monitor port HDMI out port USB port Item Code 11 USB3 12 ...
Bottom view www.gateway.com Item Code 1 BAT1 2 ANB1 3 ACPU1 4 AVGA1 5 FAN1 6 DCIN1 7 RJ45 8 CRT1 9 HDMI1 10 USB1 Component Battery connector North bridge chipset Processor socket ATI RS780M chipset Cooling fan cable connector DC power jack Ethernet jack Monitor port HDMI out port USB port Item Code 11 USB3 12 ...
Service Guide
Page 153
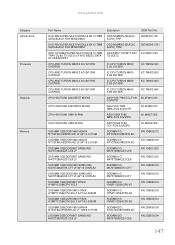
www.gateway.com Category Optical drive Processor Heatsink Memory Part Name DVD-RW SUPER-MULTI MODULE 8X 12.7MM SATA BLACK FOR WINDOWS7 DVD-RW SUPER-MULTI MODULE 8X 12.7MM SATA ...
www.gateway.com Category Optical drive Processor Heatsink Memory Part Name DVD-RW SUPER-MULTI MODULE 8X 12.7MM SATA BLACK FOR WINDOWS7 DVD-RW SUPER-MULTI MODULE 8X 12.7MM SATA ...
Service Guide
Page 163
... hinge brackets 103 memory 50 microphone 109 modem 77 multimedia board 60 optical drive 56 palm rest 68 power button board 105 preparatory steps 47 processor 92 safety reminders 44 speakers 72 system board 86 tape 44 tools 46 touchpad / fingerprint reader board 74 USB board 80 webcam 98 wireless card...
... hinge brackets 103 memory 50 microphone 109 modem 77 multimedia board 60 optical drive 56 palm rest 68 power button board 105 preparatory steps 47 processor 92 safety reminders 44 speakers 72 system board 86 tape 44 tools 46 touchpad / fingerprint reader board 74 USB board 80 webcam 98 wireless card...
Service Guide
Page 165
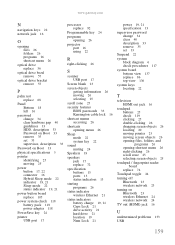
www.gateway.com N navigation keys 22 network jack 16 O opening files 26 folders 26 programs 26 shortcut menu 26 optical drive replace 56 optical drive bezel remove ... indicator 19, 21 power button board replace 105 power system check 118 battery pack 119 power adapter 118 PowerSave key 24 printer USB port 17 processor replace 92 Programmable key 24 programs opening 26 projector port 16 using 22 R right-clicking 26 S scanner USB port 17 Screen blank 23 screen objects...
www.gateway.com N navigation keys 22 network jack 16 O opening files 26 folders 26 programs 26 shortcut menu 26 optical drive replace 56 optical drive bezel remove ... indicator 19, 21 power button board replace 105 power system check 118 battery pack 119 power adapter 118 PowerSave key 24 printer USB port 17 processor replace 92 Programmable key 24 programs opening 26 projector port 16 using 22 R right-clicking 26 S scanner USB port 17 Screen blank 23 screen objects...
