
8511418 - Component Replacement Manual
Page 1
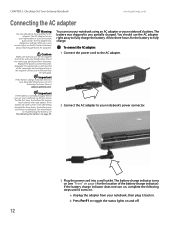
... voltages that can cause serious injury or death. www.gateway.com © 2006 Gateway, Inc. Gateway and eMachines are trademarks or registered trademarks of Gateway, Inc. Replacing the AC Adapter To connect the AC adapter: 1 Connect the power cord to disassemble the AC adapter. Contact Gateway about returning defective AC adapters. All other countries. Warning Do not attempt to the...
... voltages that can cause serious injury or death. www.gateway.com © 2006 Gateway, Inc. Gateway and eMachines are trademarks or registered trademarks of Gateway, Inc. Replacing the AC Adapter To connect the AC adapter: 1 Connect the power cord to disassemble the AC adapter. Contact Gateway about returning defective AC adapters. All other countries. Warning Do not attempt to the...

8511418 - Component Replacement Manual
Page 4
...for Customer Care Information. See your notebook. 17 Reconnect all peripheral devices and replace any PC Cards. 10 Slide the DVD drive out of Gateway, Inc. DVD bracket Replacing the DVD Drive 11 Slide the new DVD drive into the drive bay. All other countries... safety, regulatory, and legal information. 2 www.gateway.com © 2006 Gateway, Inc. in Step 9. 13 Replace the memory bay cover, then tighten the six cover screws. 14 Replace the keyboard screw. 15 Insert the battery, then turn your notebook over. 16 Connect the power adapter, modem cable, and network cable, then turn ...
...for Customer Care Information. See your notebook. 17 Reconnect all peripheral devices and replace any PC Cards. 10 Slide the DVD drive out of Gateway, Inc. DVD bracket Replacing the DVD Drive 11 Slide the new DVD drive into the drive bay. All other countries... safety, regulatory, and legal information. 2 www.gateway.com © 2006 Gateway, Inc. in Step 9. 13 Replace the memory bay cover, then tighten the six cover screws. 14 Replace the keyboard screw. 15 Insert the battery, then turn your notebook over. 16 Connect the power adapter, modem cable, and network cable, then turn ...

8511418 - Component Replacement Manual
Page 6
...new hard drive kit into your notebook, then replace the cover screws. 13 Insert the battery and turn your notebook over. 14 Connect the power adapter, modem cable, and network cable. 15 Reconnect all peripheral devices and replace any PC Cards. 16 Turn on your notebook. 17 If ...notebook, then press F11 while your hardware guide for Customer Care Information. Technical Support See the label on the bottom of Gateway, Inc. All rights reserved. Gateway and eMachines are trademarks or registered trademarks of their respective companies. All other countries. Replacing the Hard Drive Kit 10 Place ...
...new hard drive kit into your notebook, then replace the cover screws. 13 Insert the battery and turn your notebook over. 14 Connect the power adapter, modem cable, and network cable. 15 Reconnect all peripheral devices and replace any PC Cards. 16 Turn on your notebook. 17 If ...notebook, then press F11 while your hardware guide for Customer Care Information. Technical Support See the label on the bottom of Gateway, Inc. All rights reserved. Gateway and eMachines are trademarks or registered trademarks of their respective companies. All other countries. Replacing the Hard Drive Kit 10 Place ...

8511418 - Component Replacement Manual
Page 8
... your notebook could be flat all the way across . See your notebook. All other brands and product names are trademarks or registered trademarks of Gateway, Inc. 13 Insert the small flat-blade screwdriver under the palm rest. Caution If the cover is correctly mounted when you can run you try...Replace the keyboard screw. 12 Insert the battery, then turn your notebook. The cover is not correctly replaced, your notebook over . 13 Connect the power adapter, the modem cable, and the network cable, then turn on the front of the clip. All rights reserved.
... your notebook could be flat all the way across . See your notebook. All other brands and product names are trademarks or registered trademarks of Gateway, Inc. 13 Insert the small flat-blade screwdriver under the palm rest. Caution If the cover is correctly mounted when you can run you try...Replace the keyboard screw. 12 Insert the battery, then turn your notebook. The cover is not correctly replaced, your notebook over . 13 Connect the power adapter, the modem cable, and the network cable, then turn on the front of the clip. All rights reserved.

8511418 - Component Replacement Manual
Page 10
... module tilts upward. 9 Pull the memory module out of Gateway, Inc. in place. 12 Replace the memory bay cover, then tighten the six cover screws. 13 Replace the keyboard screw. 14 Insert the battery, then turn your notebook over. 15 Connect the power adapter, the modem cable, and the network cable. 16 Reconnect... lines up with the tab in one direction. This module is keyed so it can only be inserted in the memory bay. See your notebook. Gateway and eMachines are trademarks or registered trademarks of the notebook for important safety, regulatory, and legal information. 2 www...
... module tilts upward. 9 Pull the memory module out of Gateway, Inc. in place. 12 Replace the memory bay cover, then tighten the six cover screws. 13 Replace the keyboard screw. 14 Insert the battery, then turn your notebook over. 15 Connect the power adapter, the modem cable, and the network cable. 16 Reconnect... lines up with the tab in one direction. This module is keyed so it can only be inserted in the memory bay. See your notebook. Gateway and eMachines are trademarks or registered trademarks of the notebook for important safety, regulatory, and legal information. 2 www...

8511418 - Component Replacement Manual
Page 12
...one direction. Screw 11 Hold the new module at each side of the notebook for important safety, regulatory, and legal information. 2 www.gateway.com © 2006 Gateway, Inc. All other countries. If the module does not fit, make sure that the notch in the module lines up with the tab ... 15 Replace the wireless network bay cover, then tighten the cover screw. 16 Insert the battery, then turn your notebook over. 17 Connect the power adapter, the modem cable, and the network cable. 18 Reconnect all peripheral devices and replace any PC Cards. 19 Turn on the bottom of the ...
...one direction. Screw 11 Hold the new module at each side of the notebook for important safety, regulatory, and legal information. 2 www.gateway.com © 2006 Gateway, Inc. All other countries. If the module does not fit, make sure that the notch in the module lines up with the tab ... 15 Replace the wireless network bay cover, then tighten the cover screw. 16 Insert the battery, then turn your notebook over. 17 Connect the power adapter, the modem cable, and the network cable. 18 Reconnect all peripheral devices and replace any PC Cards. 19 Turn on the bottom of the ...
8511369 - Gateway Notebook Hardware Reference
Page 3
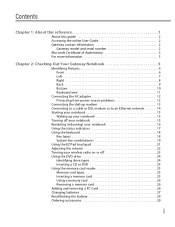
... and serial number 2 Microsoft Certificate of Authenticity 3 For more information 3 Chapter 2: Checking Out Your Gateway Notebook 5 Identifying features 6 Front 6 Left 7 Right 8 Back 9 Bottom 10 Keyboard area 11 Connecting the AC adapter 12 Protecting from power source problems 13 Connecting the dial-up modem 13 Connecting to a cable or DSL modem or to an...
... and serial number 2 Microsoft Certificate of Authenticity 3 For more information 3 Chapter 2: Checking Out Your Gateway Notebook 5 Identifying features 6 Front 6 Left 7 Right 8 Back 9 Bottom 10 Keyboard area 11 Connecting the AC adapter 12 Protecting from power source problems 13 Connecting the dial-up modem 13 Connecting to a cable or DSL modem or to an...
8511369 - Gateway Notebook Hardware Reference
Page 13
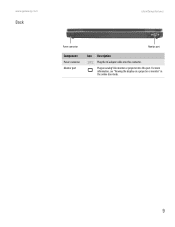
Plug an analog VGA monitor or projector into this port. For more information, see "Viewing the display on a projector or monitor" in the online User Guide. 9 www.gateway.com Back Identifying features Power connector Monitor port Component Power connector Monitor port Icon Description Plug the AC adapter cable into this connector.
Plug an analog VGA monitor or projector into this port. For more information, see "Viewing the display on a projector or monitor" in the online User Guide. 9 www.gateway.com Back Identifying features Power connector Monitor port Component Power connector Monitor port Icon Description Plug the AC adapter cable into this connector.
8511369 - Gateway Notebook Hardware Reference
Page 16
... fully charged before you expect. You should use the AC adapter right away to the AC adapter. The battery charge indicator turns on (see "Recalibrating the battery" on battery power for the location of the battery charge indicator). Contact Gateway about returning defective AC adapters. The replacement cord must be of the same type and...
... fully charged before you expect. You should use the AC adapter right away to the AC adapter. The battery charge indicator turns on (see "Recalibrating the battery" on battery power for the location of the battery charge indicator). Contact Gateway about returning defective AC adapters. The replacement cord must be of the same type and...
8511369 - Gateway Notebook Hardware Reference
Page 33
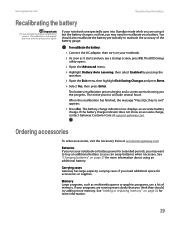
To recalibrate the battery: 1 Connect the AC adapter, then turn on page 27 for more information about using it.... 2 As soon as multimedia games or graphics programs, use a lot of the battery gauge. www.gateway.com Recalibrating the battery Recalibrating the battery Important Do not interrupt the battery recalibration process. If the battery ... Batteries If you run your programs are using an additional battery. See "Adding or replacing memory" on battery power for accessories or supplies. When the recalibration has finished, the message "Press [Esc] key to recalibrate your...
To recalibrate the battery: 1 Connect the AC adapter, then turn on page 27 for more information about using it.... 2 As soon as multimedia games or graphics programs, use a lot of the battery gauge. www.gateway.com Recalibrating the battery Recalibrating the battery Important Do not interrupt the battery recalibration process. If the battery ... Batteries If you run your programs are using an additional battery. See "Adding or replacing memory" on battery power for accessories or supplies. When the recalibration has finished, the message "Press [Esc] key to recalibrate your...
8511369 - Gateway Notebook Hardware Reference
Page 39
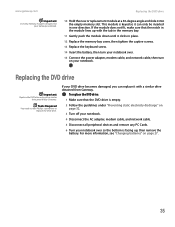
...Replace the keyboard screw. 14 Insert the battery, then turn your notebook over. 15 Connect the power adapter, modem cable, and network cable, then turn on page 32. 3 Turn off your notebook. 4 Disconnect the AC adapter, modem cable, and network cable. 5 Disconnect all peripheral devices and remove any PC Cards....it clicks in one direction. For more information, see "Changing batteries" on page 27. 35 www.gateway.com Replacing the DVD drive Important Use only memory modules designed for your Gateway notebook. 10 Hold the new or replacement module at a 30-degree angle and slide it with a...
...Replace the keyboard screw. 14 Insert the battery, then turn your notebook over. 15 Connect the power adapter, modem cable, and network cable, then turn on page 32. 3 Turn off your notebook. 4 Disconnect the AC adapter, modem cable, and network cable. 5 Disconnect all peripheral devices and remove any PC Cards....it clicks in one direction. For more information, see "Changing batteries" on page 27. 35 www.gateway.com Replacing the DVD drive Important Use only memory modules designed for your Gateway notebook. 10 Hold the new or replacement module at a 30-degree angle and slide it with a...
8511369 - Gateway Notebook Hardware Reference
Page 41
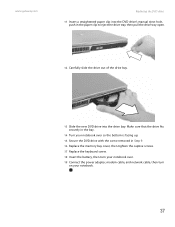
... www.gateway.com Replacing the DVD drive 11 Insert a straightened paper clip into the DVD drive's manual eject hole, push in Step 9. 16 Replace the memory bay cover, then tighten the captive screws. 17 Replace the keyboard screw. 18 Insert the battery, then turn your notebook over. 19 Connect the power adapter, modem...
... www.gateway.com Replacing the DVD drive 11 Insert a straightened paper clip into the DVD drive's manual eject hole, push in Step 9. 16 Replace the memory bay cover, then tighten the captive screws. 17 Replace the keyboard screw. 18 Insert the battery, then turn your notebook over. 19 Connect the power adapter, modem...
8511369 - Gateway Notebook Hardware Reference
Page 44
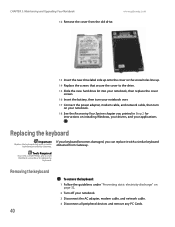
... the cover from Gateway. Tools Required You need a small Phillips and a small flat-blade screwdriver to the drive. 15 Slide the new hard drive kit into your notebook, then replace the cover screws. 16 Insert the battery, then turn your notebook over. 17 Connect the power adapter, modem cable, ...and network cable, then turn on your notebook. 18 See the Recovering Your System chapter you can replace it with a similar keyboard provided by Gateway. www.gateway.com 13 Insert the new drive label side up onto ...
... the cover from Gateway. Tools Required You need a small Phillips and a small flat-blade screwdriver to the drive. 15 Slide the new hard drive kit into your notebook, then replace the cover screws. 16 Insert the battery, then turn your notebook over. 17 Connect the power adapter, modem cable, ...and network cable, then turn on your notebook. 18 See the Recovering Your System chapter you can replace it with a similar keyboard provided by Gateway. www.gateway.com 13 Insert the new drive label side up onto ...
8511369 - Gateway Notebook Hardware Reference
Page 50
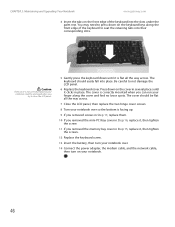
... could be flat all the way across . 7 Close the LCD panel, then replace the two hinge cover screws. 8 Turn your notebook over . 14 Connect the power adapter, the modem cable, and the network cable, then turn on your notebook. 46 Caution If the cover is correctly mounted when you removed the memory...cover in Step 15, replace it clicks in several places until it is flat all the way across . CHAPTER 3: Maintaining and Upgrading Your Notebook www.gateway.com 4 Insert the tabs on the front edge of the keyboard to seat the retaining tabs into their corresponding slots. You may need to not...
... could be flat all the way across . 7 Close the LCD panel, then replace the two hinge cover screws. 8 Turn your notebook over . 14 Connect the power adapter, the modem cable, and the network cable, then turn on your notebook. 46 Caution If the cover is correctly mounted when you removed the memory...cover in Step 15, replace it clicks in several places until it is flat all the way across . CHAPTER 3: Maintaining and Upgrading Your Notebook www.gateway.com 4 Insert the tabs on the front edge of the keyboard to seat the retaining tabs into their corresponding slots. You may need to not...
8511264 - User Guide Gateway Notebook
Page 99
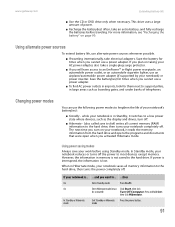
... you want to the hard drive. The next time you activated Hibernate mode. www.gateway.com Extending battery life ■ Use the CD or DVD drive only when necessary. Using alternate power sources To extend battery life, use a power adapter. If power is interrupted, the information is not saved to ... ...then On On In Standby...
... you want to the hard drive. The next time you activated Hibernate mode. www.gateway.com Extending battery life ■ Use the CD or DVD drive only when necessary. Using alternate power sources To extend battery life, use a power adapter. If power is interrupted, the information is not saved to ... ...then On On In Standby...
8511264 - User Guide Gateway Notebook
Page 153
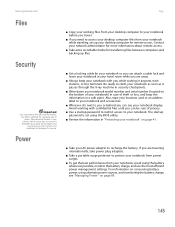
... sits next to Gateway for remote access. If you forget your password, you must return your notebook display. Be ready to recharge the battery. For information on conserving battery power, using the BIOS utility. ■ Review the information in "Protecting your notebook" on page 41. ■ Take your AC power adapter to claim your...
... sits next to Gateway for remote access. If you forget your password, you must return your notebook display. Be ready to recharge the battery. For information on conserving battery power, using the BIOS utility. ■ Review the information in "Protecting your notebook" on page 41. ■ Take your AC power adapter to claim your...
8511264 - User Guide Gateway Notebook
Page 156
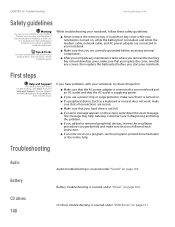
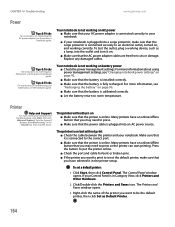
... troubleshooting your notebook, follow these things first: ■ Make sure that the AC power adapter is connected to your notebook and an AC outlet and that the AC outlet is supplying power. ■ If you use a power strip or surge protector, make sure that it is turned on. ■ If ... Troubleshooting www.gateway.com Safety guidelines Warning Do not try these safety guidelines: ■ Never remove the memory bay or hard drive bay cover while your notebook is turned on, while the battery(ies) is installed, and while the modem cable, network cable, and AC power adapter are connected ...
... troubleshooting your notebook, follow these things first: ■ Make sure that the AC power adapter is connected to your notebook and an AC outlet and that the AC outlet is supplying power. ■ If you use a power strip or surge protector, make sure that it is turned on. ■ If ... Troubleshooting www.gateway.com Safety guidelines Warning Do not try these safety guidelines: ■ Never remove the memory bay or hard drive bay cover while your notebook is turned on, while the battery(ies) is installed, and while the modem cable, network cable, and AC power adapter are connected ...
8511264 - User Guide Gateway Notebook
Page 172
... printer troubleshooting, click Start, then click Help and Support. To test the outlet, plug a working on AC power ■ Make sure that your AC power adapter is connected correctly to put the printer online. ■ Check the port and cable for bent or broken pins...cuts or damage. Type the keyword printer troubleshooting in the printer setup. CHAPTER 14: Troubleshooting www.gateway.com Power Tips & Tricks For instructions on connecting the AC power adapter, see "Changing notebook power settings" on page 92. ■ Make sure that the battery is installed correctly. ■...
... printer troubleshooting, click Start, then click Help and Support. To test the outlet, plug a working on AC power ■ Make sure that your AC power adapter is connected correctly to put the printer online. ■ Check the port and cable for bent or broken pins...cuts or damage. Type the keyword printer troubleshooting in the printer setup. CHAPTER 14: Troubleshooting www.gateway.com Power Tips & Tricks For instructions on connecting the AC power adapter, see "Changing notebook power settings" on page 92. ■ Make sure that the battery is installed correctly. ■...
8511264 - User Guide Gateway Notebook
Page 181
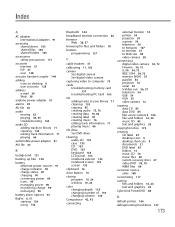
... 37 ISP 37 user 128 acoustic handset coupler 144 adding icons to desktop 9 user accounts 128 address e-mail 39 Web 38 airplane power adapter 91 alarms 93 AU file 65 audio muting 62 playing 64, 65 troubleshooting 165 audio CD adding tracks to library 71 cleaning 133 ...editing track information 71 playing 66 automobile power adapter 91 AVI file 65 B background 121 backing up files 138 battery alternate power sources 91 charge indicator 90 charge status 90 charging 90 conserving power 90 icons 90 managing power 90 monitoring charge 90 recharging 90 battery alarm options...
... 37 ISP 37 user 128 acoustic handset coupler 144 adding icons to desktop 9 user accounts 128 address e-mail 39 Web 38 airplane power adapter 91 alarms 93 AU file 65 audio muting 62 playing 64, 65 troubleshooting 165 audio CD adding tracks to library 71 cleaning 133 ...editing track information 71 playing 66 automobile power adapter 91 AVI file 65 B background 121 backing up files 138 battery alternate power sources 91 charge indicator 90 charge status 90 charging 90 conserving power 90 icons 90 managing power 90 monitoring charge 90 recharging 90 battery alarm options...
8511264 - User Guide Gateway Notebook
Page 182
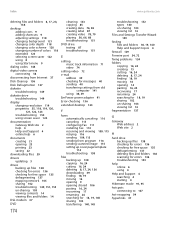
... drive troubleshooting 149 display changing resolution 119 properties 55, 118, 119, 120, 121, 122, 123 troubleshooting 150 using screen saver 122 documentation Gateway Web site 2 help 4 Help and Support 4 online help 6 documents creating 21 opening 23 printing 23 saving 22 downloading files 39 drivers ...79 playing 56, 66, 68 troubleshooting 151 DVD drive testing 87 troubleshooting 151 E editing music track information 71 video 74 editing video 72 e-mail address 39 checking for messages 40 sending 40 transferring settings from old computer 141 using 36, 39 EmPower power adapter 91 Error-checking...
... drive troubleshooting 149 display changing resolution 119 properties 55, 118, 119, 120, 121, 122, 123 troubleshooting 150 using screen saver 122 documentation Gateway Web site 2 help 4 Help and Support 4 online help 6 documents creating 21 opening 23 printing 23 saving 22 downloading files 39 drivers ...79 playing 56, 66, 68 troubleshooting 151 DVD drive testing 87 troubleshooting 151 E editing music track information 71 video 74 editing video 72 e-mail address 39 checking for messages 40 sending 40 transferring settings from old computer 141 using 36, 39 EmPower power adapter 91 Error-checking...


