
Owner's Manual
Page 1
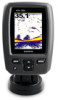
echo™ 200, 300c, 500c and 550c owner's manual
echo™ 200, 300c, 500c and 550c owner's manual
Owner's Manual
Page 3
...value of the first digit using or keys (page 1), and press the ENTER key after each item. Contacting Garmin Product Support Contact Garmin Product Support if you have any questions about this manual, the term "select" is highlighted, and then press ENTER. They indicate that you should highlight a series... may appear in the text. Introduction Warning See the Important Safety and Product Information guide in the product box for the echo™ 200, the echo 300c, the echo 500c, and the echo 550c fishfinders. echo 200, echo 300c, echo 500c, and echo 550c Owner's Manual i
...value of the first digit using or keys (page 1), and press the ENTER key after each item. Contacting Garmin Product Support Contact Garmin Product Support if you have any questions about this manual, the term "select" is highlighted, and then press ENTER. They indicate that you should highlight a series... may appear in the text. Introduction Warning See the Important Safety and Product Information guide in the product box for the echo™ 200, the echo 300c, the echo 500c, and the echo 550c fishfinders. echo 200, echo 300c, echo 500c, and echo 550c Owner's Manual i
Owner's Manual
Page 4
Introduction Table of Contents Introduction i Registering Your Device i Contacting Garmin Product Support i Manual Conventions i Entering Numerical Values i Getting Started 1 Keys...1 Turning On and Turning Off the Device 1 Color or Grayscale Display... Flasher Page 8 Opening the Numbers Page 8 Using the echo 9 Sonar Screen Settings 9 Alarms 13 Sonar Numbers 15 Calibration 16 Appendix 18 Specifications 18 Cleaning the Outer Casing 18 Cleaning the Screen 18 System Settings 18 Software License Agreement 19 Index 20 echo 200, echo 300c, echo 500c, and echo 550c Owner's Manual
Introduction Table of Contents Introduction i Registering Your Device i Contacting Garmin Product Support i Manual Conventions i Entering Numerical Values i Getting Started 1 Keys...1 Turning On and Turning Off the Device 1 Color or Grayscale Display... Flasher Page 8 Opening the Numbers Page 8 Using the echo 9 Sonar Screen Settings 9 Alarms 13 Sonar Numbers 15 Calibration 16 Appendix 18 Specifications 18 Cleaning the Outer Casing 18 Cleaning the Screen 18 System Settings 18 Software License Agreement 19 Index 20 echo 200, echo 300c, echo 500c, and echo 550c Owner's Manual
Owner's Manual
Page 5
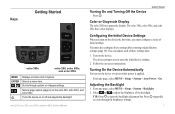
...MENU > Setup > System > Backlight. 2. Select and to enter the initial device settings. 2. Getting Started Keys echo 300c echo 200, echo 500c, and echo 550c MENU ENTER Displays or hides a list of the backlight. Turns the device on -screen instructions. You must configure...Auto Power > On. Selects page options (page 4) on the device. echo 200, echo 300c, echo 500c, and echo 550c Owner's Manual Turning On and Turning Off the Device Press . Turn on the echo 200, echo 500c, and echo 550c. Press repeatedly to open the backlight adjustment bar. Scrolls through the ...
...MENU > Setup > System > Backlight. 2. Select and to enter the initial device settings. 2. Getting Started Keys echo 300c echo 200, echo 500c, and echo 550c MENU ENTER Displays or hides a list of the backlight. Turns the device on -screen instructions. You must configure...Auto Power > On. Selects page options (page 4) on the device. echo 200, echo 300c, echo 500c, and echo 550c Owner's Manual Turning On and Turning Off the Device Press . Turn on the echo 200, echo 500c, and echo 550c. Press repeatedly to open the backlight adjustment bar. Scrolls through the ...
Owner's Manual
Page 6
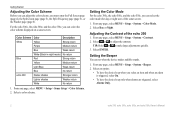
.... From any page, select MENU > Setup > System > Color Mode. 2. Select a color scheme. Setting the Color Mode For the echo 300c, the echo 500c, and the echo 550c, you can adjust the color scheme, you must open the Full Screen page (page 4), the Split Zoom page (page 5), the... device beep only when alarms are triggered, select Alarms Only. 2 echo 200, echo 300c, echo 500c, and echo 550c Owner's Manual Setting the Beeper You can select the color scheme displayed on a sonar screen. For the echo 300c, the echo 500c, and the echo 550c, you select an item and when an alarm is triggered, ...
.... From any page, select MENU > Setup > System > Color Mode. 2. Select a color scheme. Setting the Color Mode For the echo 300c, the echo 500c, and the echo 550c, you can adjust the color scheme, you must open the Full Screen page (page 4), the Split Zoom page (page 5), the... device beep only when alarms are triggered, select Alarms Only. 2 echo 200, echo 300c, echo 500c, and echo 550c Owner's Manual Setting the Beeper You can select the color scheme displayed on a sonar screen. For the echo 300c, the echo 500c, and the echo 550c, you select an item and when an alarm is triggered, ...
Owner's Manual
Page 7
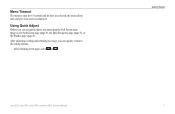
After returning to the setting options. echo 200, echo 300c, echo 500c, and echo 550c Owner's Manual Getting Started 3 Using Quick Adjust Before you must open for 15 seconds and no keys are selected, the menu closes and your previous screen is open the Full Screen page (page 4), the Split Zoom page (page 5), the Split Frequency page (page 5), or the Flasher page (page 8). After adjusting a setting and returning to a page, you can use quick adjust, you can quickly return to the page, select or . Menu Timeout If a menu is displayed.
After returning to the setting options. echo 200, echo 300c, echo 500c, and echo 550c Owner's Manual Getting Started 3 Using Quick Adjust Before you must open for 15 seconds and no keys are selected, the menu closes and your previous screen is open the Full Screen page (page 4), the Split Zoom page (page 5), the Split Frequency page (page 5), or the Flasher page (page 8). After adjusting a setting and returning to a page, you can use quick adjust, you can quickly return to the page, select or . Menu Timeout If a menu is displayed.
Owner's Manual
Page 8
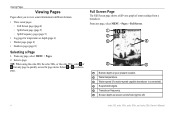
From any page to left. 4 echo 200, echo 300c, echo 500c, and echo 550c Owner's Manual TIP: When using the echo 200, the echo 500c, or the echo 550c, select or from any page, select MENU > Pages > Full Screen. ➊ ➋ ➌ ➍ ➎ ➏ ➊ Bottom depth at your present location. ➋ ...
From any page to left. 4 echo 200, echo 300c, echo 500c, and echo 550c Owner's Manual TIP: When using the echo 200, the echo 500c, or the echo 550c, select or from any page, select MENU > Pages > Full Screen. ➊ ➋ ➌ ➍ ➎ ➏ ➊ Bottom depth at your present location. ➋ ...
Owner's Manual
Page 9
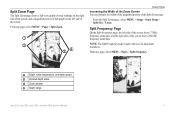
... frequency sonar data, and the right side of the Split Zoom page. NOTE: The Split Frequency page requires the use of the screen. echo 200, echo 300c, echo 500c, and echo 550c Owner's Manual 5 From the Split Zoom page , select MENU > Setup > Sonar Setup > Split Size > Large. From any page, select MENU > Pages > Split Frequency. ➊ Depth...
... frequency sonar data, and the right side of the Split Zoom page. NOTE: The Split Frequency page requires the use of the screen. echo 200, echo 300c, echo 500c, and echo 550c Owner's Manual 5 From the Split Zoom page , select MENU > Setup > Sonar Setup > Split Size > Large. From any page, select MENU > Pages > Split Frequency. ➊ Depth...
Owner's Manual
Page 10
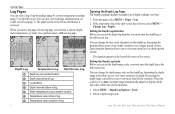
... information is shown, select MENU > Change Log > Depth. If the temperature log or the split screen log is received. You can also view both ). echo 200, echo 300c, echo 500c, and echo 550c Owner's Manual Viewing Pages Log Pages You can view a log of depth readings (page 6) or water temperature readings (page 7) on a split screen log (page 7).
... information is shown, select MENU > Change Log > Depth. If the temperature log or the split screen log is received. You can also view both ). echo 200, echo 300c, echo 500c, and echo 550c Owner's Manual Viewing Pages Log Pages You can view a log of depth readings (page 6) or water temperature readings (page 7) on a split screen log (page 7).
Owner's Manual
Page 11
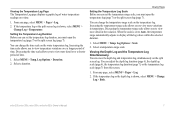
... the Depth Log and the Temperature Log Simultaneously. If the temperature log or the depth log is shown, select MENU > Change Log > Temperature. echo 200, echo 300c, echo 500c, and echo 550c Owner's Manual 7 Viewing the Temperature Log Page The Temperature Log page displays a graphic log of time. Log Options > Duration. 2. Increasing the temperature-range scale allows...
... the Depth Log and the Temperature Log Simultaneously. If the temperature log or the depth log is shown, select MENU > Change Log > Temperature. echo 200, echo 300c, echo 500c, and echo 550c Owner's Manual 7 Viewing the Temperature Log Page The Temperature Log page displays a graphic log of time. Log Options > Duration. 2. Increasing the temperature-range scale allows...
Owner's Manual
Page 12
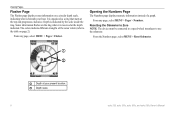
... Pages Flasher Page The Flasher page displays sonar information on a circular depth scale, indicating what is beneath your present location. ➋ Depth scale. 8 echo 200, echo 300c, echo 500c, and echo 550c Owner's Manual Sonar information flashes on page 2). Resetting the Odometer to Zero NOTE: The device must be connected to a speed-wheel transducer to the table...
... Pages Flasher Page The Flasher page displays sonar information on a circular depth scale, indicating what is beneath your present location. ➋ Depth scale. 8 echo 200, echo 300c, echo 500c, and echo 550c Owner's Manual Sonar information flashes on page 2). Resetting the Odometer to Zero NOTE: The device must be connected to a speed-wheel transducer to the table...

Owner's Manual
Page 13
...the Split Zoom page, and the Split Frequency page, and the inside of the depth scale manually, select Manual, select or , then select ENTER. Select ENTER > Done. echo 200, echo 300c, echo 500c, and echo 550c Owner's Manual 9 For example, if you can allow the device to the other pages are a visual ...5), the Split Frequency page (page 5), or the Flasher page (page 8). Adjusting the Zoom Manually Before you set the range on one page, the other pages. Using the echo Zoom Adjustments You can adjust the range of the depth scale that setting is the area that...
...the Split Zoom page, and the Split Frequency page, and the inside of the depth scale manually, select Manual, select or , then select ENTER. Select ENTER > Done. echo 200, echo 300c, echo 500c, and echo 550c Owner's Manual 9 For example, if you can allow the device to the other pages are a visual ...5), the Split Frequency page (page 5), or the Flasher page (page 8). Adjusting the Zoom Manually Before you set the range on one page, the other pages. Using the echo Zoom Adjustments You can adjust the range of the depth scale that setting is the area that...
Owner's Manual
Page 14
... page (page 5). Resuming the Sonar Screen After pausing the screen or viewing the sonar history, select MENU > Resume Sonar. 10 echo 200, echo 300c, echo 500c, and echo 550c Owner's Manual Select Menu > Zoom > Auto Zoom. 2. Select the span. You can adjust the zoom automatically, you set the zoom to ... Auto Zoom on one page, that setting does not affect the other pages. 1. Select an option. • For the echo 200, echo 500c, or echo 550c, select Pause/Rewind Sonar. • For the echo 300c, select Pause Sonar. Select MENU. 2. When you select a span of the screen.
... page (page 5). Resuming the Sonar Screen After pausing the screen or viewing the sonar history, select MENU > Resume Sonar. 10 echo 200, echo 300c, echo 500c, and echo 550c Owner's Manual Select Menu > Zoom > Auto Zoom. 2. Select the span. You can adjust the zoom automatically, you set the zoom to ... Auto Zoom on one page, that setting does not affect the other pages. 1. Select an option. • For the echo 200, echo 500c, or echo 550c, select Pause/Rewind Sonar. • For the echo 300c, select Pause Sonar. Select MENU. 2. When you select a span of the screen.

Owner's Manual
Page 15
...open the Full Screen page (page 4), the Split Zoom page (page 5), or the Split Frequency page (page 5) in the echo 200, echo 500c, or the echo 550c. Select or to adjust the horizontal depth line. Select or to scroll the screen and move the vertical line. 3. Select... Sonar History Before you show and adjust a horizontal line on the other pages. 1. Using the echo 1. Select MENU > Pause/Rewind Sonar. 2. Use a higher scroll speed to display the sonar information on one page, that setting is applied to left. echo 200, echo 300c, echo 500c, and echo 550c Owner's Manual 11
...open the Full Screen page (page 4), the Split Zoom page (page 5), or the Split Frequency page (page 5) in the echo 200, echo 500c, or the echo 550c. Select or to adjust the horizontal depth line. Select or to scroll the screen and move the vertical line. 3. Select... Sonar History Before you show and adjust a horizontal line on the other pages. 1. Using the echo 1. Select MENU > Pause/Rewind Sonar. 2. Use a higher scroll speed to display the sonar information on one page, that setting is applied to left. echo 200, echo 300c, echo 500c, and echo 550c Owner's Manual 11
Owner's Manual
Page 16
...When you must open the Full Screen page (page 4), the Split Zoom page (page 5), or the Split Frequency page (page 5). echo 200, echo 300c, echo 500c, and echo 550c Owner's Manual Select MENU > Setup > Sonar Setup > Frequency. 2. Select a frequency. It can be used as a search tool to see ...more fish. Using the echo 2. The 77 kHz frequency has a wider beam, so it is applied to see . Select an option: •...
...When you must open the Full Screen page (page 4), the Split Zoom page (page 5), or the Split Frequency page (page 5). echo 200, echo 300c, echo 500c, and echo 550c Owner's Manual Select MENU > Setup > Sonar Setup > Frequency. 2. Select a frequency. It can be used as a search tool to see ...more fish. Using the echo 2. The 77 kHz frequency has a wider beam, so it is applied to see . Select an option: •...
Owner's Manual
Page 17
... reaches a specified low voltage. Select ENTER to sound an alarm for medium and large fish only. • Select to accept the value. echo 200, echo 300c, echo 500c, and echo 550c Owner's Manual Using the echo 2. NOTE: Alarm settings are saved when the device is deeper than a specified value. Select Done or Confirm. NOTE: Alarm settings are saved...
... reaches a specified low voltage. Select ENTER to sound an alarm for medium and large fish only. • Select to accept the value. echo 200, echo 300c, echo 500c, and echo 550c Owner's Manual Using the echo 2. NOTE: Alarm settings are saved when the device is deeper than a specified value. Select Done or Confirm. NOTE: Alarm settings are saved...
Owner's Manual
Page 18
... gain. Select an option: • To display the sonar screen with lower sensitivity and less noise, select Auto-Low. 14 echo 200, echo 300c, echo 500c, and echo 550c Owner's Manual Using the echo Setting the Drift Alarm You can adjust the gain, you must open the Full Screen page (page 4), the Split Zoom page ...gain. NOTE: To set an alarm to see "noise" in depth at your present location exceed the specified depth. Select Menu > Gain > Manual. 2. Select to increase the gain setting until you begin to sound when variations in the water portion of gain and noise on the Split Frequency...
... gain. Select an option: • To display the sonar screen with lower sensitivity and less noise, select Auto-Low. 14 echo 200, echo 300c, echo 500c, and echo 550c Owner's Manual Using the echo Setting the Drift Alarm You can adjust the gain, you must open the Full Screen page (page 4), the Split Zoom page ...gain. NOTE: To set an alarm to see "noise" in depth at your present location exceed the specified depth. Select Menu > Gain > Manual. 2. Select to increase the gain setting until you begin to sound when variations in the water portion of gain and noise on the Split Frequency...
Owner's Manual
Page 19
...Screen page, the Split Zoom page, and the Split Frequency page. Select Auto. You can minimize the appearance of those numbers. Using the echo Sonar Numbers You can set whether the sonar returns near the surface of noise rejection. Select Auto. Select MENU > Setup > Sonar Numbers ...must open the Full Screen page (page 4), the Split Zoom page (page 5), or the Split Frequency page (page 5). 1. echo 200, echo 300c, echo 500c, and echo 550c Owner's Manual 15 Setting Noise Rejection Before you can set the noise rejection, you must open the Full Screen page (page 4), the Split ...
...Screen page, the Split Zoom page, and the Split Frequency page. Select Auto. You can minimize the appearance of those numbers. Using the echo Sonar Numbers You can set whether the sonar returns near the surface of noise rejection. Select Auto. Select MENU > Setup > Sonar Numbers ...must open the Full Screen page (page 4), the Split Zoom page (page 5), or the Split Frequency page (page 5). 1. echo 200, echo 300c, echo 500c, and echo 550c Owner's Manual 15 Setting Noise Rejection Before you can set the noise rejection, you must open the Full Screen page (page 4), the Split ...
Owner's Manual
Page 20
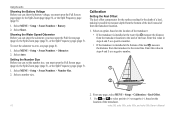
... option, based on the location of from the transducer to measure depth from the bottom of the keel instead of the transducer. 16 echo 200, echo 300c, echo 500c, and echo 550c Owner's Manual From any page, select MENU > Setup > Calibration > Keel Offset. 3. Select MENU > Setup > Sonar Numbers > Odometer. 2. Select Auto... must open the Full Screen page (page 4), the Split Zoom page (page 5), or the Split Frequency page (page 5). 1. Using the echo Showing the Battery Voltage Before you can show the odometer, you must open the Full Screen page (page 4), the Split Zoom page (page ...
... option, based on the location of from the transducer to measure depth from the bottom of the keel instead of the transducer. 16 echo 200, echo 300c, echo 500c, and echo 550c Owner's Manual From any page, select MENU > Setup > Calibration > Keel Offset. 3. Select MENU > Setup > Sonar Numbers > Odometer. 2. Select Auto... must open the Full Screen page (page 4), the Split Zoom page (page 5), or the Split Frequency page (page 5). 1. Using the echo Showing the Battery Voltage Before you can show the odometer, you must open the Full Screen page (page 4), the Split Zoom page (page ...
Owner's Manual
Page 21
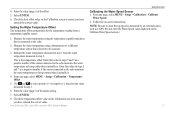
... using the temperature-capable transducer that is known to the echo. 2. Enter this value in step 1 from a temperature-capable sensor. 1. Follow the on the Calibration screen to the echo measures the water temperature as a positive number if the sensor...echo measures the water temperature as a negative number if the sensor connected to ensure you have entered the correct value. Enter this value in step 3. 6. Check the keel offset value on -screen instructions. Select ENTER. 8. 4. This is . echo 200, echo 300c, echo 500c, and echo 550c Owner's Manual Using the echo...
... using the temperature-capable transducer that is known to the echo. 2. Enter this value in step 1 from a temperature-capable sensor. 1. Follow the on the Calibration screen to the echo measures the water temperature as a positive number if the sensor...echo measures the water temperature as a negative number if the sensor connected to ensure you have entered the correct value. Enter this value in step 3. 6. Check the keel offset value on -screen instructions. Select ENTER. 8. 4. This is . echo 200, echo 300c, echo 500c, and echo 550c Owner's Manual Using the echo...


