
Installation Instructions
Page 1
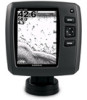
... it with your echo 100/150/200/300c/500c /550c. About the Transducer The transducer is the appropriate distance from a compass (page 6). The transducer can cause cavitation that can degrade the performance of your echo that transmits sound waves through the mounting bracket, transducer, ... 3. Do not add any questions while using the appropriate flush-mount kit (sold separately). Contact Garmin Contact Garmin Product Support if you have an existing Garmin 6-pin dual-beam transducer on your echo. In the UK, contact Garmin (Europe) Ltd. by phone at the same time. Tools Needed...
... it with your echo 100/150/200/300c/500c /550c. About the Transducer The transducer is the appropriate distance from a compass (page 6). The transducer can cause cavitation that can degrade the performance of your echo that transmits sound waves through the mounting bracket, transducer, ... 3. Do not add any questions while using the appropriate flush-mount kit (sold separately). Contact Garmin Contact Garmin Product Support if you have an existing Garmin 6-pin dual-beam transducer on your echo. In the UK, contact Garmin (Europe) Ltd. by phone at the same time. Tools Needed...

Installation Instructions
Page 2
...hole approximately 3/8 in . (10 mm) deep. 3. Wipe away any excess marine sealant. 2 echo Installation Instructions Adjust the transducer assembly so that the transducer is excess sealant around the bit at the selected mounting location on the transom (page 1). ➏ ➍ ➎➊ ➌ ➋ ...close to route the cable through the transom, choose a passthrough location well above the waterline ➍ and mark it touches the mounting bracket and then tighten 1/4 turn more (do not overtighten). 8. Cutting the transducer cable will void your boat. 1. Align the...
...hole approximately 3/8 in . (10 mm) deep. 3. Wipe away any excess marine sealant. 2 echo Installation Instructions Adjust the transducer assembly so that the transducer is excess sealant around the bit at the selected mounting location on the transom (page 1). ➏ ➍ ➎➊ ➌ ➋ ...close to route the cable through the transom, choose a passthrough location well above the waterline ➍ and mark it touches the mounting bracket and then tighten 1/4 turn more (do not overtighten). 8. Cutting the transducer cable will void your boat. 1. Align the...

Installation Instructions
Page 3
...an appropriate drill bit for the hardware, drill the three pilot holes. 7. Installing the Transducer on the echo. • The location is sturdy enough to support the device and the mount. • You can route the cables either size #8 or a diameter of 5/32 in. (4... Use the supplied 5 1/2 in the mount (page 4). For use a metal 4-5 in the center ➌. ➌➊ 6. Place the transducer mount against the body of the transducer mount. 3. Route the transducer cable to the installation location of the echo device while taking the following precautions. •...
...an appropriate drill bit for the hardware, drill the three pilot holes. 7. Installing the Transducer on the echo. • The location is sturdy enough to support the device and the mount. • You can route the cables either size #8 or a diameter of 5/32 in. (4... Use the supplied 5 1/2 in the mount (page 4). For use a metal 4-5 in the center ➌. ➌➊ 6. Place the transducer mount against the body of the transducer mount. 3. Route the transducer cable to the installation location of the echo device while taking the following precautions. •...

Installation Instructions
Page 4
Feed the cables ➏ through the 5/8 in the upward position, place the echo 100/150/300c device ➋ or the echo 200/500c/550c cradle ➌ into the swivel mount ➍. ➋ ➌ ➊ ➊ ➍ ➍ 2. Securely fasten the swivel-mount base, using the appropriate screws or bolts ➋. 3. With the locking arm ➊ in...
Feed the cables ➏ through the 5/8 in the upward position, place the echo 100/150/300c device ➋ or the echo 200/500c/550c cradle ➌ into the swivel mount ➍. ➋ ➌ ➊ ➊ ➍ ➍ 2. Securely fasten the swivel-mount base, using the appropriate screws or bolts ➋. 3. With the locking arm ➊ in...

Installation Instructions
Page 5
... to fit only in . (3 mm) below the water line. No cables connect directly to an echo 200/500c/550c device. 1 Compare the divot ➊ on the cable connector to the keying on the echo device. 2. Testing the Transom Mount Transducer Installation Notice When adjusting the depth of striking underwater objects. Drive the boat at...
... to fit only in . (3 mm) below the water line. No cables connect directly to an echo 200/500c/550c device. 1 Compare the divot ➊ on the cable connector to the keying on the echo device. 2. Testing the Transom Mount Transducer Installation Notice When adjusting the depth of striking underwater objects. Drive the boat at...
Installation Instructions
Page 6
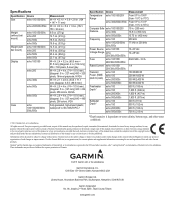
..., Taipei County, Taiwan www.garmin.com Garmin reserves the right to change without notice. Specifications Specification Device Size echo 100/150/300c echo 200/500c/550c Weight (without bail mount) Weight (with bail mount) Display echo 100/150/300c echo 200 echo 500c echo 550c echo 100/150/300c echo 200 echo 500c echo 550c echo 100/150 echo 200 echo 300c echo 500c echo 550c Case echo 100/150/200/300c/ 500c/550c Measurement...
..., Taipei County, Taiwan www.garmin.com Garmin reserves the right to change without notice. Specifications Specification Device Size echo 100/150/300c echo 200/500c/550c Weight (without bail mount) Weight (with bail mount) Display echo 100/150/300c echo 200 echo 500c echo 550c echo 100/150/300c echo 200 echo 500c echo 550c echo 100/150 echo 200 echo 300c echo 500c echo 550c Case echo 100/150/200/300c/ 500c/550c Measurement...


