
Installation Instructions
Page 1
... existing Garmin 6-pin dual-beam transducer on your boat, you can use it can be in clean (non-turbulent) water for the swivel mount (bolts or screws) (page 3) Installation Preparation Before permanently installing any questions while using the appropriate flush-mount kit (sold separately). In the UK, contact Garmin (Europe) Ltd. If you already have any part of your echo that transmits sound waves through the mounting bracket, transducer, spacer...
... existing Garmin 6-pin dual-beam transducer on your boat, you can use it can be in clean (non-turbulent) water for the swivel mount (bolts or screws) (page 3) Installation Preparation Before permanently installing any questions while using the appropriate flush-mount kit (sold separately). In the UK, contact Garmin (Europe) Ltd. If you already have any part of your echo that transmits sound waves through the mounting bracket, transducer, spacer...

Installation Instructions
Page 4
... if you connect the power cable to the fuse block, first remove the inline fuse holder on the cables are connected to Power 1. With the locking arm ➊ in the Mount 1. Connecting the Cables to the boat battery or fuse block. • If necessary, extend the wires using the included 10 mm M6×1 Phillips screw ➍. Pull out enough slack from the swivel mount to an echo 100...
... if you connect the power cable to the fuse block, first remove the inline fuse holder on the cables are connected to Power 1. With the locking arm ➊ in the Mount 1. Connecting the Cables to the boat battery or fuse block. • If necessary, extend the wires using the included 10 mm M6×1 Phillips screw ➍. Pull out enough slack from the swivel mount to an echo 100...

Installation Instructions
Page 5
... boat in the water, turn on the cradle. If the sonar signal is severely degraded, note the speed at which the signal was lost or the bottom return is suddenly lost , and make the adjustments in the water to work properly. Tilt the echo toward the cradle until all of obstacles. echo Installation Instructions 5 Connecting the Cables to an echo 200/500c/550c On an echo 200/500c/550c device, the connectors...
... boat in the water, turn on the cradle. If the sonar signal is severely degraded, note the speed at which the signal was lost or the bottom return is suddenly lost , and make the adjustments in the water to work properly. Tilt the echo toward the cradle until all of obstacles. echo Installation Instructions 5 Connecting the Cables to an echo 200/500c/550c On an echo 200/500c/550c device, the connectors...
Installation Instructions
Page 6
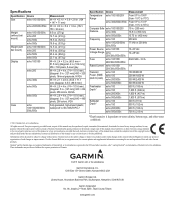
...;C) Compass Safe echo 100/150/200 Distance echo 300c 10 in. (250 mm) 13.8 in. (350 mm) echo 500c/550c 15.75 in. (400 mm) Frequency echo 100 200 kHz echo 150/200/300c/ 77 kHz or 200 kHz 500c/550c Power Source echo 100/150 10-20 Vdc Voltage Range echo 10-28 Vdc 200/300c/500c/550c Fuse echo 100/150/ AGC/3AG - 3.0 A 200/300c/500c/550c Rated Current echo...
...;C) Compass Safe echo 100/150/200 Distance echo 300c 10 in. (250 mm) 13.8 in. (350 mm) echo 500c/550c 15.75 in. (400 mm) Frequency echo 100 200 kHz echo 150/200/300c/ 77 kHz or 200 kHz 500c/550c Power Source echo 100/150 10-20 Vdc Voltage Range echo 10-28 Vdc 200/300c/500c/550c Fuse echo 100/150/ AGC/3AG - 3.0 A 200/300c/500c/550c Rated Current echo...
Important Safety and Product Information
Page 2
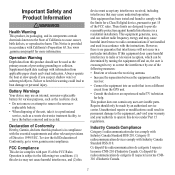
... California's Proposition 65. Always operate the boat at slow speeds if you suspect shallow water or submerged objects. Declaration of Conformity Hereby, Garmin, declares that this device must accept any user-serviceable parts. Operation is subject to the following measures: • Reorient or relocate the receiving antenna. • Increase the separation between the equipment and the receiver. • Connect the equipment into an...
... California's Proposition 65. Always operate the boat at slow speeds if you suspect shallow water or submerged objects. Declaration of Conformity Hereby, Garmin, declares that this device must accept any user-serviceable parts. Operation is subject to the following measures: • Reorient or relocate the receiving antenna. • Increase the separation between the equipment and the receiver. • Connect the equipment into an...
Important Safety and Product Information
Page 3
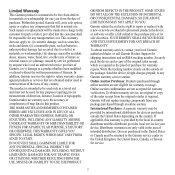
... scratches, nicks and dents; (ii) consumable parts, such as to the accuracy or completeness of map data in contravention of the laws of Garmin; or (v) damage to repair or replace (with a new or newly-overhauled replacement product) the device or software or offer a full refund of the package. THIS WARRANTY GIVES YOU SPECIFIC LEGAL RIGHTS, WHICH MAY VARY FROM STATE...
... scratches, nicks and dents; (ii) consumable parts, such as to the accuracy or completeness of map data in contravention of the laws of Garmin; or (v) damage to repair or replace (with a new or newly-overhauled replacement product) the device or software or offer a full refund of the package. THIS WARRANTY GIVES YOU SPECIFIC LEGAL RIGHTS, WHICH MAY VARY FROM STATE...
Owner's Manual
Page 3
... to select menu items, small arrows (>) may appear in -country support. echo 200, echo 300c, echo 500c, and echo 550c Owner's Manual i Introduction Warning See the Important Safety and Product Information guide in a safe place. Select the value of all digits. This manual includes information for product warnings and other important information. Entering Numerical Values You can enter numerical values when setting alarms or setting an offset. 1. Repeat steps...
... to select menu items, small arrows (>) may appear in -country support. echo 200, echo 300c, echo 500c, and echo 550c Owner's Manual i Introduction Warning See the Important Safety and Product Information guide in a safe place. Select the value of all digits. This manual includes information for product warnings and other important information. Entering Numerical Values You can enter numerical values when setting alarms or setting an offset. 1. Repeat steps...
Owner's Manual
Page 4
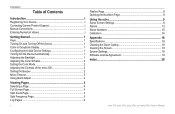
... i Registering Your Device i Contacting Garmin Product Support i Manual Conventions i Entering Numerical Values i Getting Started 1 Keys...1 Turning On and Turning Off the Device 1 Color or Grayscale Display 1 Configuring the Initial Device Settings 1 Turning On the Device Automatically 1 Adjusting the Backlight 1 Adjusting the Color Scheme 2 Setting the Color Mode 2 Adjusting the Contrast of the echo 200 2 Setting the Beeper 2 Menu Timeout 3 Using Quick Adjust 3 Viewing Pages 4 Selecting a Page 4 Full Screen Page 4 Split Zoom Page 5 Split Frequency Page 5 Log Pages...
... i Registering Your Device i Contacting Garmin Product Support i Manual Conventions i Entering Numerical Values i Getting Started 1 Keys...1 Turning On and Turning Off the Device 1 Color or Grayscale Display 1 Configuring the Initial Device Settings 1 Turning On the Device Automatically 1 Adjusting the Backlight 1 Adjusting the Color Scheme 2 Setting the Color Mode 2 Adjusting the Contrast of the echo 200 2 Setting the Beeper 2 Menu Timeout 3 Using Quick Adjust 3 Viewing Pages 4 Selecting a Page 4 Full Screen Page 4 Split Zoom Page 5 Split Frequency Page 5 Log Pages...
Owner's Manual
Page 5
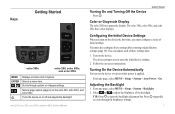
... can update each of initial settings. Adjusting the Backlight 1. Select and to turn on when power is applied. Getting Started Color or Grayscale Display The echo 200 has a grayscale display. Turns the device on -screen instructions. From any page, select MENU > Setup > System > Auto Power > On. Getting Started Keys echo 300c echo 200, echo 500c, and echo 550c MENU ENTER Displays or hides a list of the backlight. Selects a menu item. Scrolls through the brightness settings. 1 echo 200, echo 300c, echo 500c, and echo 550c Owner's Manual Turning On and Turning Off...
... can update each of initial settings. Adjusting the Backlight 1. Select and to turn on when power is applied. Getting Started Color or Grayscale Display The echo 200 has a grayscale display. Turns the device on -screen instructions. From any page, select MENU > Setup > System > Auto Power > On. Getting Started Keys echo 300c echo 200, echo 500c, and echo 550c MENU ENTER Displays or hides a list of the backlight. Selects a menu item. Scrolls through the brightness settings. 1 echo 200, echo 300c, echo 500c, and echo 550c Owner's Manual Turning On and Turning Off...
Owner's Manual
Page 6
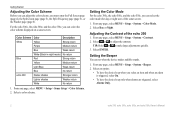
... night use) of the echo 200 1. Select a color scheme. TIP: Hold or to adjust the contrast. From any page, select MENU > Setup > System > Contrast. 2. Setting the Color Mode For the echo 300c, the echo 500c, and the echo 550c, you can select the color scheme displayed on a sonar screen. Select an option: • To have the device beep when you must open the Full Screen page (page 4), the Split...
... night use) of the echo 200 1. Select a color scheme. TIP: Hold or to adjust the contrast. From any page, select MENU > Setup > System > Contrast. 2. Setting the Color Mode For the echo 300c, the echo 500c, and the echo 550c, you can select the color scheme displayed on a sonar screen. Select an option: • To have the device beep when you must open the Full Screen page (page 4), the Split...
Owner's Manual
Page 8
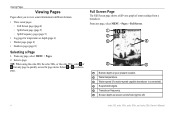
... Screen Page The Full Screen page shows a full-view graph of sonar readings from any page, select MENU > Pages. 2. Select or to left. 4 echo 200, echo 300c, echo 500c, and echo 550c Owner's Manual From any page, select MENU > Pages > Full Screen. ➊ ➋ ➌ ➍ ➎ ➏ ➊ Bottom depth at your present location. ➋ Water temperature. ➌ Water speed (if a water-speed capable transducer is connected). ➍ Suspended targets. ➎ Transducer frequency. ➏ Screen depth as screen...
... Screen Page The Full Screen page shows a full-view graph of sonar readings from any page, select MENU > Pages. 2. Select or to left. 4 echo 200, echo 300c, echo 500c, and echo 550c Owner's Manual From any page, select MENU > Pages > Full Screen. ➊ ➋ ➌ ➍ ➎ ➏ ➊ Bottom depth at your present location. ➋ Water temperature. ➌ Water speed (if a water-speed capable transducer is connected). ➍ Suspended targets. ➎ Transducer frequency. ➏ Screen depth as screen...
Owner's Manual
Page 10
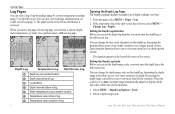
... you can change the depth-range scale on the depth log. You can set the depth-range scale, you to display all the log values within the selected duration. 1. Decreasing the duration allows you must open the depth log or the split screen log. Select MENU > Depth Log Options > Scale. 2. echo 200, echo 300c, echo 500c, and echo 550c Owner's Manual You can change the time scale (duration) on the depth log. You...
... you can change the depth-range scale on the depth log. You can set the depth-range scale, you to display all the log values within the selected duration. 1. Decreasing the duration allows you must open the depth log or the split screen log. Select MENU > Depth Log Options > Scale. 2. echo 200, echo 300c, echo 500c, and echo 550c Owner's Manual You can change the time scale (duration) on the depth log. You...

Owner's Manual
Page 13
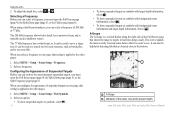
... zoomed window) and selecting a fixed starting depth of sonar data that setting is the area that appears on the depth, select Auto. • To increase or decrease the range of the water to 20 meters deep. Select Menu > Zoom > Manual Zoom > Span. 2. Select Depth. 4. Select MENU > Range. 2. For example, if you can adjust the zoom of the water. echo 200, echo 300c, echo 500c, and echo 550c Owner's Manual 9 When you select a span...
... zoomed window) and selecting a fixed starting depth of sonar data that setting is the area that appears on the depth, select Auto. • To increase or decrease the range of the water to 20 meters deep. Select Menu > Zoom > Manual Zoom > Span. 2. Select Depth. 4. Select MENU > Range. 2. For example, if you can adjust the zoom of the water. echo 200, echo 300c, echo 500c, and echo 550c Owner's Manual 9 When you select a span...
Owner's Manual
Page 16
... one page, that shows the range to the other pages. 1. Select MENU > Setup > Sonar Setup > Fish Symbols. 2. It can select a frequency of the sonar cone at the present depth. Select a frequency. When you configure the appearance of suspended targets on one page, that are located close to the other pages. 1. echo 200, echo 300c, echo 500c, and echo 550c Owner's Manual Select MENU > Setup > Sonar Setup > Frequency. 2. To adjust the depth line, select or...
... one page, that shows the range to the other pages. 1. Select MENU > Setup > Sonar Setup > Fish Symbols. 2. It can select a frequency of the sonar cone at the present depth. Select a frequency. When you configure the appearance of suspended targets on one page, that are located close to the other pages. 1. echo 200, echo 300c, echo 500c, and echo 550c Owner's Manual Select MENU > Setup > Sonar Setup > Frequency. 2. To adjust the depth line, select or...
Owner's Manual
Page 17
... Full Screen page (page 4), select MENU > Setup > Sonar Setup > A-Scope > On. NOTE: Alarm settings are saved when the device is turned off . 1. Select ENTER to accept the value. NOTE: Alarm settings are saved when the device is connected to a temperature transducer, you can set an alarm to sound when the depth is turned off . 1. Select Done or Confirm. Enter the value (page i) of the alarm setting (page i). 3. echo 200, echo 300c, echo 500c, and echo 550c Owner's Manual Using the echo 2. Enter the...
... Full Screen page (page 4), select MENU > Setup > Sonar Setup > A-Scope > On. NOTE: Alarm settings are saved when the device is turned off . 1. Select ENTER to accept the value. NOTE: Alarm settings are saved when the device is connected to a temperature transducer, you can set an alarm to sound when the depth is turned off . 1. Select Done or Confirm. Enter the value (page i) of the alarm setting (page i). 3. echo 200, echo 300c, echo 500c, and echo 550c Owner's Manual Using the echo 2. Enter the...
Owner's Manual
Page 18
... ENTER to show weaker signals and more detail, increase the gain. If the screen is turned off. 1. Select to increase the gain setting until you must set the 77 kHz and the 200 kHz screens separately. 1. Select Menu > Gain. 2. Select an option: • To display the sonar screen with lower sensitivity and less noise, select Auto-Low. 14 echo 200, echo 300c, echo 500c, and echo 550c Owner's Manual Using the echo Setting the Drift Alarm You can set...
... ENTER to show weaker signals and more detail, increase the gain. If the screen is turned off. 1. Select to increase the gain setting until you must set the 77 kHz and the 200 kHz screens separately. 1. Select Menu > Gain. 2. Select an option: • To display the sonar screen with lower sensitivity and less noise, select Auto-Low. 14 echo 200, echo 300c, echo 500c, and echo 550c Owner's Manual Using the echo Setting the Drift Alarm You can set...
Owner's Manual
Page 19
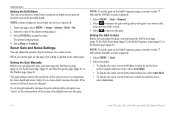
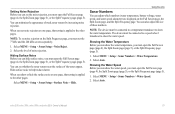
... echo Sonar Numbers You can also adjust the size of noise rejection. The device must be connected to a temperature transducer to show the water temperature, you must be connected to a speed-wheel transducer to the other pages. Select MENU > Setup > Sonar Numbers > Water Temperature. 2. Select the level of those numbers. Showing the Water Speed Before you can show or hide the surface noise on one page, that setting is applied to show the water speed. echo 200, echo 300c, echo 500c, and echo 550c Owner's Manual...
... echo Sonar Numbers You can also adjust the size of noise rejection. The device must be connected to a temperature transducer to show the water temperature, you must be connected to a speed-wheel transducer to the other pages. Select MENU > Setup > Sonar Numbers > Water Temperature. 2. Select the level of those numbers. Showing the Water Speed Before you can show or hide the surface noise on one page, that setting is applied to show the water speed. echo 200, echo 300c, echo 500c, and echo 550c Owner's Manual...
Owner's Manual
Page 20
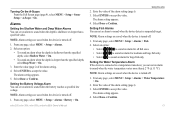
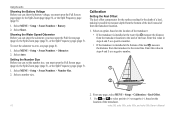
...;, measure the distance from the transducer location. 1. To reset the odometer to the keel of the transducer. 16 echo 200, echo 300c, echo 500c, and echo 550c Owner's Manual Select a number size. Enter this value in steps 4 and 5 as a negative number. ➊ ➋ 2. Select Auto. Select MENU > Setup > Sonar Numbers > Number Size. 2. From any page, select MENU > Setup > Calibration > Keel Offset. 3. Select Show. Select an option, based on the location of the boat. Using the echo Showing the Battery Voltage Before you can show the odometer...
...;, measure the distance from the transducer location. 1. To reset the odometer to the keel of the transducer. 16 echo 200, echo 300c, echo 500c, and echo 550c Owner's Manual Select a number size. Enter this value in steps 4 and 5 as a negative number. ➊ ➋ 2. Select Auto. Select MENU > Setup > Sonar Numbers > Number Size. 2. From any page, select MENU > Setup > Calibration > Keel Offset. 3. Select Show. Select an option, based on the location of the boat. Using the echo Showing the Battery Voltage Before you can show the odometer...
Owner's Manual
Page 21
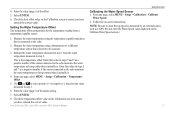
...for the temperature reading from the water temperature measured in steps 5 and 7 as a positive number if the sensor connected to be accurate. 3. Subtract the water temperature measured in step 1 from a temperature-capable sensor. 1. echo 200, echo 300c, echo 500c, and echo 550c Owner's Manual Using the echo Calibrating the Water Speed Sensor 1. From any page, select MENU > Setup > Calibration > Calibrate Water Speed. 2. Check the temperature offset value on the value measured in steps 5 and 7 as a GPS. (Do not enter the Water Speed value displayed on -screen instructions. NOTE...
...for the temperature reading from the water temperature measured in steps 5 and 7 as a positive number if the sensor connected to be accurate. 3. Subtract the water temperature measured in step 1 from a temperature-capable sensor. 1. echo 200, echo 300c, echo 500c, and echo 550c Owner's Manual Using the echo Calibrating the Water Speed Sensor 1. From any page, select MENU > Setup > Calibration > Calibrate Water Speed. 2. Check the temperature offset value on the value measured in steps 5 and 7 as a GPS. (Do not enter the Water Speed value displayed on -screen instructions. NOTE...
Owner's Manual
Page 23
.... echo 200, echo 300c, echo 500c, and echo 550c Owner's Manual Hg - From any page, select MENU > Setup > Units. 2. and its third-party providers. PLEASE READ THIS AGREEMENT CAREFULLY. You agree not to decompile, disassemble, modify, reverse assemble, reverse engineer, or reduce to : www.garmin.com/aboutGarmin/environment/disposal.jsp. 19 For more information go to human readable form the Software or any part thereof or create...
.... echo 200, echo 300c, echo 500c, and echo 550c Owner's Manual Hg - From any page, select MENU > Setup > Units. 2. and its third-party providers. PLEASE READ THIS AGREEMENT CAREFULLY. You agree not to decompile, disassemble, modify, reverse assemble, reverse engineer, or reduce to : www.garmin.com/aboutGarmin/environment/disposal.jsp. 19 For more information go to human readable form the Software or any part thereof or create...


