Owners Manual
Page 5
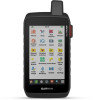
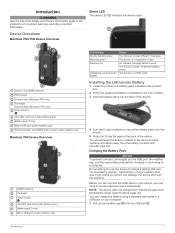
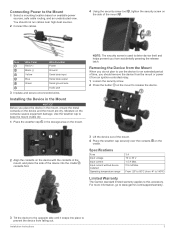
... to charge a battery that was not provided by Garmin can charge the battery using a standard wall outlet or a USB port on your device, you may need to remove optional mount accessories. Iridium® and GNSS antenna SOS button Camera lens (Montana 750i only) Flashlight Camera flash (Montana 750i only) Power button microSD® card slot (under...
... to charge a battery that was not provided by Garmin can charge the battery using a standard wall outlet or a USB port on your device, you may need to remove optional mount accessories. Iridium® and GNSS antenna SOS button Camera lens (Montana 750i only) Flashlight Camera flash (Montana 750i only) Power button microSD® card slot (under...
Owners Manual
Page 27
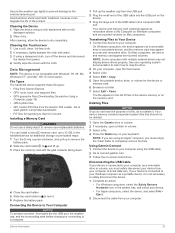
... you must safely disconnect your device from your computer to avoid data loss. File Types The handheld device supports these file types: • Files from Garmin Explore. • GPX route, track, and waypoint files. • GPX geocache files (Downloading Geocaches Using a Computer, page 16). • JPEG .... 4 Close the card holder. 5 Slide the card holder to to your device is not compatible with multiple network drives may appear as mounted volumes. Installing a Memory Card WARNING Do not use a sharp object to dry completely. On Mac computers, the device and memory card appear...
... you must safely disconnect your device from your computer to avoid data loss. File Types The handheld device supports these file types: • Files from Garmin Explore. • GPX route, track, and waypoint files. • GPX geocache files (Downloading Geocaches Using a Computer, page 16). • JPEG .... 4 Close the card holder. 5 Slide the card holder to to your device is not compatible with multiple network drives may appear as mounted volumes. Installing a Memory Card WARNING Do not use a sharp object to dry completely. On Mac computers, the device and memory card appear...
Owners Manual
Page 29
... current position using the selected position format setting. You must be navigating for this data to display temperature data from only your Garmin device receives data from the tempe. Odometer: A running tally of travel . Speed: The current rate of the distance traveled ... the temperature sensor. Optional Accessories Optional accessories, such as mounts, maps, fitness accessories, and replacement parts, are activated and functioning correctly. • When paired, your accessory, and you have strayed from your Garmin device, move to appear. Sunrise: The time of laps...
... current position using the selected position format setting. You must be navigating for this data to display temperature data from only your Garmin device receives data from the tempe. Odometer: A running tally of travel . Speed: The current rate of the distance traveled ... the temperature sensor. Optional Accessories Optional accessories, such as mounts, maps, fitness accessories, and replacement parts, are activated and functioning correctly. • When paired, your accessory, and you have strayed from your Garmin device, move to appear. Sunrise: The time of laps...

MotorcycleATV Mount Instructions
Page 1
... 16 Navodila za nosilec za motocikle ali štirikolesnike 18 Upute za montažu na motocikl/ATV 20 22 Garmin® and the Garmin logo are trademarks of Garmin. May 2020 GUID-BA7D3F67-718D-4BE5-A684-4D0CF7123F5E v2 These trademarks may not be used without the express permission of... de registro COFETEL/IFETEL puede ser revisado en el manual a través de la siguiente página de internet. Motorcycle/ATV Mount Instructions 2 Instructions pour le support moto/véhicule tout-terrain 4 Istruzioni del supporto per moto/ATV 6 Motorrad-/Geländefahrzeughalterung -
... 16 Navodila za nosilec za motocikle ali štirikolesnike 18 Upute za montažu na motocikl/ATV 20 22 Garmin® and the Garmin logo are trademarks of Garmin. May 2020 GUID-BA7D3F67-718D-4BE5-A684-4D0CF7123F5E v2 These trademarks may not be used without the express permission of... de registro COFETEL/IFETEL puede ser revisado en el manual a través de la siguiente página de internet. Motorcycle/ATV Mount Instructions 2 Instructions pour le support moto/véhicule tout-terrain 4 Istruzioni del supporto per moto/ATV 6 Motorrad-/Geländefahrzeughalterung -
MotorcycleATV Mount Instructions
Page 2
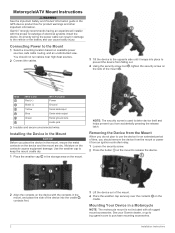
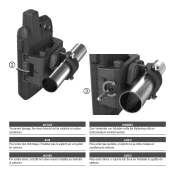
... Information guide in damage to the vehicle or the battery and can cause bodily injury. Moisture on the mount. See your Garmin dealer, or go to buy.garmin.com to the Mount 1 Select a mounting location based on the side of the device into place to prevent the device from the... weather cap in a Motorcycle NOTE: The motrocycle mount is used to deter device theft and helps prevent you from the mount or power it snaps into the cradle , contacts first. 3 Lift the device out of electrical systems install the device. Garmin® strongly recommends having an experienced installer with ...
... Information guide in damage to the vehicle or the battery and can cause bodily injury. Moisture on the mount. See your Garmin dealer, or go to buy.garmin.com to the Mount 1 Select a mounting location based on the side of the device into place to prevent the device from the... weather cap in a Motorcycle NOTE: The motrocycle mount is used to deter device theft and helps prevent you from the mount or power it snaps into the cradle , contacts first. 3 Lift the device out of electrical systems install the device. Garmin® strongly recommends having an experienced installer with ...
MotorcycleATV Mount Instructions
Page 3
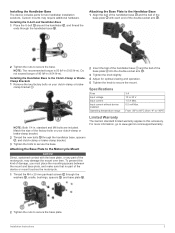
... between the mount and base plate, and make sure that no part of 80 lbf-in (9.04 N-m). Specifications Fuse Input voltage Input current Input current without device installed Operating temperature range 3 A 10 to secure the base plate. For more information, go to www.garmin.com/support/...warranty. 2 Tighten the nuts to 30 V 1.5 A Max. 0.5 mA Max. NOTE: The recommended torque is 50 lbf-in . Attaching the Base Plate to the Motorcycle Mount NOTICE Direct, sustained contact with each end of the factory...
... between the mount and base plate, and make sure that no part of 80 lbf-in (9.04 N-m). Specifications Fuse Input voltage Input current Input current without device installed Operating temperature range 3 A 10 to secure the base plate. For more information, go to www.garmin.com/support/...warranty. 2 Tighten the nuts to 30 V 1.5 A Max. 0.5 mA Max. NOTE: The recommended torque is 50 lbf-in . Attaching the Base Plate to the Motorcycle Mount NOTICE Direct, sustained contact with each end of the factory...
Marine Mount Instructions
Page 1
...a través de la siguiente página de internet. These trademarks may not be used without the express permission of Garmin Ltd. Anweisungen...10 Instrucciones del soporte para navegación 13 Instruções para suporte marítimo...16 Instrukcje monta...;áku...22 Navodila za pomorski nosilec...24 Upute za montiranje nautičkog nosača 26 28 Garmin® and the Garmin logo are trademarks of Garmin. Marine Mount Instructions...2 Instructions pour le support de fixation pour bateau 4 Istruzioni per l'installazione su staffa nautica 7 Bootshalterung -...
...a través de la siguiente página de internet. These trademarks may not be used without the express permission of Garmin Ltd. Anweisungen...10 Instrucciones del soporte para navegación 13 Instruções para suporte marítimo...16 Instrukcje monta...;áku...22 Navodila za pomorski nosilec...24 Upute za montiranje nautičkog nosača 26 28 Garmin® and the Garmin logo are trademarks of Garmin. Marine Mount Instructions...2 Instructions pour le support de fixation pour bateau 4 Istruzioni per l'installazione su staffa nautica 7 Bootshalterung -...
Marine Mount Instructions
Page 2
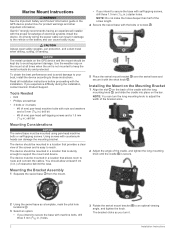
...and a 1.5 mm (1/16 in .) starter holes. Mounting the Bracket Assembly 1 Separate the swivel base from the mount. 2 Using the swivel base as you experience difficulty during the installation, contact Garmin Product Support. Marine Mount Instructions WARNING See the Important Safety and Product Information guide...base with the installation. Installing the Mount on the Mounting Bracket 1 Align the slot on the mount at least 8 cm (3 in a location that is secure. Garmin® strongly recommends having an experienced installer with the long mounting knob , and slide the cradle...
...and a 1.5 mm (1/16 in .) starter holes. Mounting the Bracket Assembly 1 Separate the swivel base from the mount. 2 Using the swivel base as you experience difficulty during the installation, contact Garmin Product Support. Marine Mount Instructions WARNING See the Important Safety and Product Information guide...base with the installation. Installing the Mount on the Mounting Bracket 1 Align the slot on the mount at least 8 cm (3 in a location that is secure. Garmin® strongly recommends having an experienced installer with the long mounting knob , and slide the cradle...
Marine Mount Instructions
Page 3
... Operating temperature range 3 A 10 to 30 V 1.5 A Max. 0.5 mA Max. Moisture on the mount. Use the weather cap to this accessory. Installation Instructions 3 For more information, go to www.garmin.com/support/warranty. 3 Tilt the device to the opposite side until it from -4º to 140º...;F) Limited Warranty The Garmin standard limited warranty applies to keep the mount cradle dry. 1 Place the weather cap in the mount, and place the side of ...
... Operating temperature range 3 A 10 to 30 V 1.5 A Max. 0.5 mA Max. Moisture on the mount. Use the weather cap to this accessory. Installation Instructions 3 For more information, go to www.garmin.com/support/warranty. 3 Tilt the device to the opposite side until it from -4º to 140º...;F) Limited Warranty The Garmin standard limited warranty applies to keep the mount cradle dry. 1 Place the weather cap in the mount, and place the side of ...
Bicycle Handlebar Mount Instructions
Page 2
➋ ➌ NOTICE To prevent damage, the mount should not be installed on carbon handlebars. AVIS Pour éviter tout dommage, n'installez pas le support sur un guidon en carbone. AVISO Para evitar que se dañe, el soporte no guidão de carbono. HINWEIS Zum Vermeiden von Schäden sollte die Halterung nicht an Carbonlenkern montiert werden. AVVISO Per evitare danni, la staffa non deve essere installata sui manubri di carbonio. AVISO Para evitar danos, o suporte não deve ser instalado no se debe instalar en manillares de carbono.
➋ ➌ NOTICE To prevent damage, the mount should not be installed on carbon handlebars. AVIS Pour éviter tout dommage, n'installez pas le support sur un guidon en carbone. AVISO Para evitar que se dañe, el soporte no guidão de carbono. HINWEIS Zum Vermeiden von Schäden sollte die Halterung nicht an Carbonlenkern montiert werden. AVVISO Per evitare danni, la staffa non deve essere installata sui manubri di carbonio. AVISO Para evitar danos, o suporte não deve ser instalado no se debe instalar en manillares de carbono.
Important Safety and Product Information
Page 2
... device or batteries in front of direction, distance, location or topography. Do not place the device in water or other Garmin dashboard or friction mount options should be used. NOTICE Failure to heed the following two conditions: (1) this device may not cause interference, and ...may impair reception of GNSS signals. Title, ownership rights, and intellectual property rights in contravention of the laws of purchase, Garmin cannot guarantee that the mount stays on , the user is not a replacement for attentiveness and proper preparation for an extended time period, store within ...
... device or batteries in front of direction, distance, location or topography. Do not place the device in water or other Garmin dashboard or friction mount options should be used. NOTICE Failure to heed the following two conditions: (1) this device may not cause interference, and ...may impair reception of GNSS signals. Title, ownership rights, and intellectual property rights in contravention of the laws of purchase, Garmin cannot guarantee that the mount stays on , the user is not a replacement for attentiveness and proper preparation for an extended time period, store within ...


