

Owner s Manual
Page 1
babyCam Owner's Manual January 2016 190-01931-00_0A
babyCam Owner's Manual January 2016 190-01931-00_0A

Owner s Manual
Page 2
... or in the USA and other countries. Garmin babyCam™ is a trademark of Garmin Ltd. or its subsidiaries, registered in part, without obligation to www.garmin.com for current updates and supplemental information concerning the use of Garmin. or its products and to make changes in the content of this manual without the written consent of such changes or improvements. Go to notify any...
... or in the USA and other countries. Garmin babyCam™ is a trademark of Garmin Ltd. or its subsidiaries, registered in part, without obligation to www.garmin.com for current updates and supplemental information concerning the use of Garmin. or its products and to make changes in the content of this manual without the written consent of such changes or improvements. Go to notify any...

Owner s Manual
Page 3
...Mounting Location 1 Standard Headrest Mount 1 Extension Arm Accessory 2 Adhesive Mount Accessory 3 Receiver Cable 3 Connecting the Optional Vehicle Power Cable 4 Viewing babyCam Video 4 Viewing babyCam Video Using Voice Commands 4 Multiple Cameras 4 Pairing a Garmin babyCam Camera with the Receiver Cable 4 Switching Cameras 4 Customizing the Device 4 babyCam Settings 4 Flipping and Mirroring the Video 5 Check Seat Reminder 5 Device Maintenance 5 Updating the Camera Software 5 Cleaning the Device 5 Device Information 5 Specifications 5 Troubleshooting 5 My navigation device...
...Mounting Location 1 Standard Headrest Mount 1 Extension Arm Accessory 2 Adhesive Mount Accessory 3 Receiver Cable 3 Connecting the Optional Vehicle Power Cable 4 Viewing babyCam Video 4 Viewing babyCam Video Using Voice Commands 4 Multiple Cameras 4 Pairing a Garmin babyCam Camera with the Receiver Cable 4 Switching Cameras 4 Customizing the Device 4 babyCam Settings 4 Flipping and Mirroring the Video 5 Check Seat Reminder 5 Device Maintenance 5 Updating the Camera Software 5 Cleaning the Device 5 Device Information 5 Specifications 5 Troubleshooting 5 My navigation device...

Owner s Manual
Page 5
... more information about updating software. 4 Connect the receiver cable to your navigation device and to vehicle power (Installing the Receiver Cable, page 4). 5 View the camera video on your vehicle. This mount accommodates most vehicles, but it . 2 Insert two AA batteries, observing polarity. Installation overhangs the top of the seat and may not be raised or removed. The red LED illuminates briefly, and the camera turns on an adjacent compatible headrest, or you should use...
... more information about updating software. 4 Connect the receiver cable to your navigation device and to vehicle power (Installing the Receiver Cable, page 4). 5 View the camera video on your vehicle. This mount accommodates most vehicles, but it . 2 Insert two AA batteries, observing polarity. Installation overhangs the top of the seat and may not be raised or removed. The red LED illuminates briefly, and the camera turns on an adjacent compatible headrest, or you should use...

Owner s Manual
Page 6
... to install the camera on the post. 5 Place the camera onto the extension arm , and secure it counterclockwise, and tilt the camera up or down , loosen the thumbscrew  by turning it Ä using the thumbscrew . Ä Mounting the Camera on an Overhanging Headrest Before you should place the clamp and insert close to view the video feed on your navigation device...
... to install the camera on the post. 5 Place the camera onto the extension arm , and secure it counterclockwise, and tilt the camera up or down , loosen the thumbscrew  by turning it Ä using the thumbscrew . Ä Mounting the Camera on an Overhanging Headrest Before you should place the clamp and insert close to view the video feed on your navigation device...

Owner s Manual
Page 7
... the babyCam settings on your headrest. • To point the camera up or down, loosen the thumbscrew behind the camera by turning it can be helpful to view the video feed using water or alcohol, and a lint-free cloth. While adjusting the camera, it counterclockwise, and tilt à the camera up or down a window with the driver's view of your navigation device. NOTICE Do not install the adhesive mount...
... the babyCam settings on your headrest. • To point the camera up or down, loosen the thumbscrew behind the camera by turning it can be helpful to view the video feed using water or alcohol, and a lint-free cloth. While adjusting the camera, it counterclockwise, and tilt à the camera up or down a window with the driver's view of your navigation device. NOTICE Do not install the adhesive mount...
Owner s Manual
Page 8
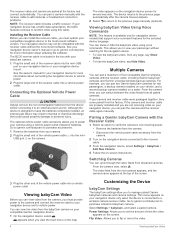
...to the most recent software. Connecting the Optional Vehicle Power Cable CAUTION Always remove the non-rechargeable batteries from all paired cameras. Viewing babyCam Video Using Voice Commands NOTE: This feature is available only for the selected device language. For example, you can install the receiver cable, you can pair two Garmin babyCam cameras for two passengers, a backup camera installed on your vehicle, and a second backup camera installed on your navigation device, you can view video from the next camera appears, and the camera name appears at the factory and connect...
...to the most recent software. Connecting the Optional Vehicle Power Cable CAUTION Always remove the non-rechargeable batteries from all paired cameras. Viewing babyCam Video Using Voice Commands NOTE: This feature is available only for the selected device language. For example, you can install the receiver cable, you can pair two Garmin babyCam cameras for two passengers, a backup camera installed on your vehicle, and a second backup camera installed on your navigation device, you can view video from the next camera appears, and the camera name appears at the factory and connect...

Owner s Manual
Page 9
... next time you install batteries or connect the vehicle power cable, the red power LED illuminates briefly to indicate the camera is available. 1 Update your navigation device to the latest software. Receiver cable temperature range Receiver cable input voltage Receiver cable fuse From -20° to 70°C (from -4° to 158°F) From 10 to 24 V 2 A, 250 V fast-blow Troubleshooting My navigation device does not show video from the camera, wait several factors, including the power setting (babyCam Settings...
... next time you install batteries or connect the vehicle power cable, the red power LED illuminates briefly to indicate the camera is available. 1 Update your navigation device to the latest software. Receiver cable temperature range Receiver cable input voltage Receiver cable fuse From -20° to 70°C (from -4° to 158°F) From 10 to 24 V 2 A, 250 V fast-blow Troubleshooting My navigation device does not show video from the camera, wait several factors, including the power setting (babyCam Settings...


