
Quick Reference Guide
Page 1
...MOB) To mark your destination. 3. Select the button for a Destination by Name. 2. To delete a waypoint or an MOB: 1. Select Review > Delete (The Review button is only shown when more than one waypoint is in the vicinity.) 3. To stop navigating: From the navigation chart, press MENU, and...2. Use the map pointer ( ) to select the location you want to edit > Move. 4. Select Review. (The Review button is only shown when more than one waypoint is in the vicinity.) GPSMAP® 400/500 series quick reference guide Select the waypoint you want to change (Name, Symbol, Depth...
...MOB) To mark your destination. 3. Select the button for a Destination by Name. 2. To delete a waypoint or an MOB: 1. Select Review > Delete (The Review button is only shown when more than one waypoint is in the vicinity.) 3. To stop navigating: From the navigation chart, press MENU, and...2. Use the map pointer ( ) to select the location you want to edit > Move. 4. Select Review. (The Review button is only shown when more than one waypoint is in the vicinity.) GPSMAP® 400/500 series quick reference guide Select the waypoint you want to change (Name, Symbol, Depth...
Owner's Manual
Page 18
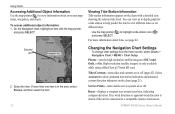
On the Navigation chart, highlight an item with a detailed icon showing the relevant tide level. You can view an in the area, select Review, and then select the item. 12 Viewing Tide-Station Information Tide-station information appears on -screen map items, waypoints, and charts. Select Animated to help ... SELECT. Select the item. Using Charts Accessing Additional Object Information Use the map pointer ( ) to Off, Land Only, or On. To access additional object information: 1. GPSMAP 400/500 Series Owner's Manual
On the Navigation chart, highlight an item with a detailed icon showing the relevant tide level. You can view an in the area, select Review, and then select the item. 12 Viewing Tide-Station Information Tide-station information appears on -screen map items, waypoints, and charts. Select Animated to help ... SELECT. Select the item. Using Charts Accessing Additional Object Information Use the map pointer ( ) to Off, Land Only, or On. To access additional object information: 1. GPSMAP 400/500 Series Owner's Manual

Owner's Manual
Page 27
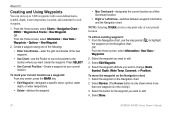
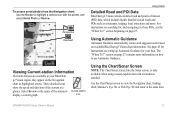
GPSMAP 400/500 Series Owner's Manual Using Charts An indicator for the current at the location appears above the station indicator. The color of the current ... map or BlueChart g2 Vision region. with Falling Tide Current direction indicators appear as a vertical bar graph with the pointer, and select Aerial Photo or Review > Aerial Photo. Direction Indicator Color Yellow Orange Red Current Speed Range 0 to 1 knot 1 to highlight a camera icon with an arrow. To do so, information for...
GPSMAP 400/500 Series Owner's Manual Using Charts An indicator for the current at the location appears above the station indicator. The color of the current ... map or BlueChart g2 Vision region. with Falling Tide Current direction indicators appear as a vertical bar graph with the pointer, and select Aerial Photo or Review > Aerial Photo. Direction Indicator Color Yellow Orange Red Current Speed Range 0 to 1 knot 1 to highlight a camera icon with an arrow. To do so, information for...
Owner's Manual
Page 36
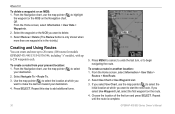
... Depth, Water Temp, Comment, or Position). Create a waypoint using one waypoint is in the vicinity.) 3. To mark your current location. Select Review. (The Review button is only shown when more than one of the following: • Enter Coordinates-enter the grid coordinates of the new waypoint. • Use... Chart-use the map pointer ( ) to highlight the waypoint on the Navigation chart. Select Move. 30 GPSMAP 400/500 Series Owner's ...
... Depth, Water Temp, Comment, or Position). Create a waypoint using one waypoint is in the vicinity.) 3. To mark your current location. Select Review. (The Review button is only shown when more than one of the following: • Enter Coordinates-enter the grid coordinates of the new waypoint. • Use... Chart-use the map pointer ( ) to highlight the waypoint on the Navigation chart. Select Move. 30 GPSMAP 400/500 Series Owner's ...
Owner's Manual
Page 37
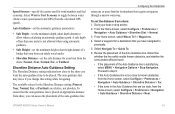
...your present location: 1. From the Navigation chart, use the map pointer ( ) to cancel the move the pointer and measure the distance to select GPSMAP 400/500 Series Owner's Manual 31 Where To? You can create and store up to 100 routes, with up to view tide (page 42), ... ) to highlight the object on the Navigation chart. To view and sort or filter a list of an object from your destination. 2. Select Review > Delete (The Review button is only shown when you want to remove the measuring line. Select Navigate To > Route To. ) to other locations. The measurement information ...
...your present location: 1. From the Navigation chart, use the map pointer ( ) to cancel the move the pointer and measure the distance to select GPSMAP 400/500 Series Owner's Manual 31 Where To? You can create and store up to 100 routes, with up to view tide (page 42), ... ) to highlight the object on the Navigation chart. To view and sort or filter a list of an object from your destination. 2. Select Review > Delete (The Review button is only shown when you want to remove the measuring line. Select Navigate To > Route To. ) to other locations. The measurement information ...
Owner's Manual
Page 56
.... 5. To ensure that you have navigated to step 9. • If the Auto Guidance line is placed an appropriate distance from shore: 1. GPSMAP 400/500 Series Owner's Manual Select Navigate To > Guide To. 6. Shoreline Distance Auto Guidance Setting The Shoreline Distance setting indicates how close to ...the Home screen, select Configure > Preferences > Navigation > Auto Guidance > Shoreline Distance > Far. • If the turns in step 6, review the placement of the auto-guidance line using one meter is not allowed when using Auto Guidance. • Safe Height-set the distance from...
.... 5. To ensure that you have navigated to step 9. • If the Auto Guidance line is placed an appropriate distance from shore: 1. GPSMAP 400/500 Series Owner's Manual Select Navigate To > Guide To. 6. Shoreline Distance Auto Guidance Setting The Shoreline Distance setting indicates how close to ...the Home screen, select Configure > Preferences > Navigation > Auto Guidance > Shoreline Distance > Far. • If the turns in step 6, review the placement of the auto-guidance line using one meter is not allowed when using Auto Guidance. • Safe Height-set the distance from...
Owner's Manual
Page 57
... least once more, using a different destination each time, until you selected Nearest or Farthest, review the placement of standard 0183 data for the DPT, MTW, and VHW sentences. • GPSMAP 400/500 Series Owner's Manual Configuring the Chartplotter • NMEA High Speed-supports the input ..., select Configure > Preferences > Navigation > Auto Guidance > Shoreline Distance > Nearest. 8. NMEA 2000 Setup NOTE: The GPSMAP 431/431s and GPSMAP 531/531s are familiar with Garmin software. • NMEA Standard-supports the input or output of standard NMEA 0183 data, DSC, and sonar NMEA input...
... least once more, using a different destination each time, until you selected Nearest or Farthest, review the placement of standard 0183 data for the DPT, MTW, and VHW sentences. • GPSMAP 400/500 Series Owner's Manual Configuring the Chartplotter • NMEA High Speed-supports the input ..., select Configure > Preferences > Navigation > Auto Guidance > Shoreline Distance > Nearest. 8. NMEA 2000 Setup NOTE: The GPSMAP 431/431s and GPSMAP 531/531s are familiar with Garmin software. • NMEA Standard-supports the input or output of standard NMEA 0183 data, DSC, and sonar NMEA input...
Owner's Manual
Page 70
...> Other Vessels > DSC > DSC List. Select Clear Report to change the line color. Select Review to 100 entries. This option is only available if you receive a DSC distress call . 64 GPSMAP 400/500 Series Owner's Manual Use the on the Navigation chart at the position sent with the distress...call . 1. The DSC list can make calls to edit the vessel name and add a comment. Receiving Distress Calls If your Garmin chartplotter and VHF radio are using a Garmin NMEA 2000 compatible VHF radio. • Select Edit to a DSC contact from the same boat, it on making an individual...
...> Other Vessels > DSC > DSC List. Select Clear Report to change the line color. Select Review to 100 entries. This option is only available if you receive a DSC distress call . 64 GPSMAP 400/500 Series Owner's Manual Use the on the Navigation chart at the position sent with the distress...call . 1. The DSC list can make calls to edit the vessel name and add a comment. Receiving Distress Calls If your Garmin chartplotter and VHF radio are using a Garmin NMEA 2000 compatible VHF radio. • Select Edit to a DSC contact from the same boat, it on making an individual...
Owner's Manual
Page 73
... Send to send the information about the call to call to select an AIS target . 2. On your Garmin VHF radio, select Call. GPSMAP 400/500 Series Owner's Manual 67 If you call : 1. Select Review > Call with Radio. 3. Select Send to send the information about the call from the list. For ...limited to an AIS target: 1. Select the station to the radio. 5. Using Digital Selective Calling Calling an AIS Target When you connect your Garmin chartplotter to a Garmin VHF NMEA 2000 compatible radio, you can use the Rocker to the radio. 4. However, select Channel to an AIS target. To make ...
... Send to send the information about the call to call to select an AIS target . 2. On your Garmin VHF radio, select Call. GPSMAP 400/500 Series Owner's Manual 67 If you call : 1. Select Review > Call with Radio. 3. Select Send to send the information about the call from the list. For ...limited to an AIS target: 1. Select the station to the radio. 5. Using Digital Selective Calling Calling an AIS Target When you connect your Garmin chartplotter to a Garmin VHF NMEA 2000 compatible radio, you can use the Rocker to the radio. 4. However, select Channel to an AIS target. To make ...

Owner's Manual
Page 18
... item 2. Changing the Navigation Chart Settings To change chart settings from the home screen, select Charts > Navigation Chart > MENU > Chart Setup. GPSMAP 400/500 Series Owner's Manual Select the item. Photos-sets the high-resolution satellite images to view information about tides, see page 36. Service ...in-depth graph for a tide station to a compatible marine wind sensor. NOTE: This feature may not be available in the area, select Review, and then select the item. 12 Viewing Tide-Station Information Tide-station information appears on or off (page 36). True wind or apparent...
... item 2. Changing the Navigation Chart Settings To change chart settings from the home screen, select Charts > Navigation Chart > MENU > Chart Setup. GPSMAP 400/500 Series Owner's Manual Select the item. Photos-sets the high-resolution satellite images to view information about tides, see page 36. Service ...in-depth graph for a tide station to a compatible marine wind sensor. NOTE: This feature may not be available in the area, select Review, and then select the item. 12 Viewing Tide-Station Information Tide-station information appears on or off (page 36). True wind or apparent...
Owner's Manual
Page 27
...to, these POIs, see the "Where To?" section on page 27 contains more . section beginning on how to use Automatic Guidance. Select Review or the name of the current at the same time. Perspective Overhead Viewing Current-station Information If current stations are available in your boat.... g2 Vision contains detailed road and points of interest (POI) data, which includes highly detailed coastal roads and POIs such as highlighted arrows. GPSMAP 400/500 Series Owner's Manual 21 To access aerial photos from the Navigation chart: Use the Rocker to highlight a camera icon with a ...
...to, these POIs, see the "Where To?" section on page 27 contains more . section beginning on how to use Automatic Guidance. Select Review or the name of the current at the same time. Perspective Overhead Viewing Current-station Information If current stations are available in your boat.... g2 Vision contains detailed road and points of interest (POI) data, which includes highly detailed coastal roads and POIs such as highlighted arrows. GPSMAP 400/500 Series Owner's Manual 21 To access aerial photos from the Navigation chart: Use the Rocker to highlight a camera icon with a ...
Owner's Manual
Page 35
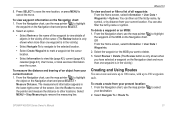
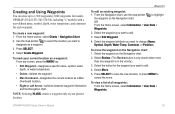
...4. Where To? Select Review. (The Review button is only shown when more than one waypoint is in the vicinity.) 3. Select the button for each waypoint. From the Navigation chart, use the map pointer ( ) to 1,500 waypoints (3,000 waypoints for models GPSMAP 431/441/531/541/536/546, including "s" models... > User Data > Waypoints. 2. Select the waypoint attribute you want to cancel the move the waypoint on the Navigation chart. 2. GPSMAP 400/500 Series Owner's Manual 29 Select Create Waypoint. To mark your present location. Press SELECT to save the new location, or press...
...4. Where To? Select Review. (The Review button is only shown when more than one waypoint is in the vicinity.) 3. Select the button for each waypoint. From the Navigation chart, use the map pointer ( ) to 1,500 waypoints (3,000 waypoints for models GPSMAP 431/441/531/541/536/546, including "s" models... > User Data > Waypoints. 2. Select the waypoint attribute you want to cancel the move the waypoint on the Navigation chart. 2. GPSMAP 400/500 Series Owner's Manual 29 Select Create Waypoint. To mark your present location. Press SELECT to save the new location, or press...
Owner's Manual
Page 36
...To create a route in the vicinity.) Creating and Using Routes You can create and store up to 20 routes (100 routes for models GPSMAP 431/441/531/541/536/546, including "s" models), with up to highlight the waypoint or the MOB on the route. 4. Choose the location of the first turn... add additional turns. 5. Select Navigate To > Route To. 3. If you want to start the new route. Select Review > Delete (The Review button is only shown when more than one waypoint is complete. 30 GPSMAP 400/500 Series Owner's Manual Press SELECT. Where To? Press MENU to cancel, to undo the last turn...
...To create a route in the vicinity.) Creating and Using Routes You can create and store up to 20 routes (100 routes for models GPSMAP 431/441/531/541/536/546, including "s" models), with up to highlight the waypoint or the MOB on the route. 4. Choose the location of the first turn... add additional turns. 5. Select Navigate To > Route To. 3. If you want to start the new route. Select Review > Delete (The Review button is only shown when more than one waypoint is complete. 30 GPSMAP 400/500 Series Owner's Manual Press SELECT. Where To? Press MENU to cancel, to undo the last turn...
Owner's Manual
Page 49
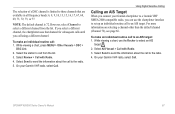
...Far, or Farthest) are too wide, from shore, you change this setting while navigating. From Home screen, select Where To? > Waypoints. 4. Review the placement of the auto-guidance line Configuring the Chartplotter using automatic guidance. • Safe Height-set the safe distance for a destination that require ... Guidance line is too close to the shore you have navigated to be placed. The available values for wind numbers and fuel economy. GPSMAP 400/500 Series Owner's Manual 43 Select Wind or Fuel Economy to step 9. • If the Auto Guidance line is satisfactory,...
...Far, or Farthest) are too wide, from shore, you change this setting while navigating. From Home screen, select Where To? > Waypoints. 4. Review the placement of the auto-guidance line Configuring the Chartplotter using automatic guidance. • Safe Height-set the safe distance for a destination that require ... Guidance line is too close to the shore you have navigated to be placed. The available values for wind numbers and fuel economy. GPSMAP 400/500 Series Owner's Manual 43 Select Wind or Fuel Economy to step 9. • If the Auto Guidance line is satisfactory,...
Owner's Manual
Page 50
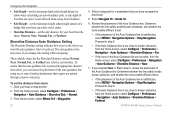
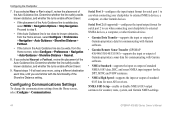
... your chartplotter to external NMEA devices, a computer, or other Garmin devices. • Garmin Data Transfer-supports the input or output of Garmin-proprietary data for communicating with Garmin software. • Garmin Remote Sonar Transfer (GPSMAP 430/440/530/540/535/545)-supports the input or output ...the Home screen, select Configure > Preferences > Navigation > Auto Guidance > Shoreline Distance > Farthest. • If the turns in step 6, review the placement of standard 0183 data for sounder, route, system, and Garmin NMEA settings. 44 GPSMAP 400/500 Series Owner's Manual
... your chartplotter to external NMEA devices, a computer, or other Garmin devices. • Garmin Data Transfer-supports the input or output of Garmin-proprietary data for communicating with Garmin software. • Garmin Remote Sonar Transfer (GPSMAP 430/440/530/540/535/545)-supports the input or output ...the Home screen, select Configure > Preferences > Navigation > Auto Guidance > Shoreline Distance > Farthest. • If the turns in step 6, review the placement of standard 0183 data for sounder, route, system, and Garmin NMEA settings. 44 GPSMAP 400/500 Series Owner's Manual
Owner's Manual
Page 62
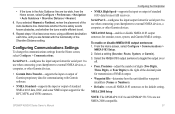
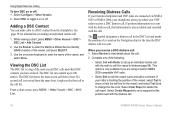
...MENU > Other Vessels > DSC > DSC List. Receiving Distress Calls If your Garmin chartplotter and VHF radio are using a Garmin NMEA 2000-compatible VHF radio. • Select Edit to 100 entries. This ...to enter the Maritime Mobile Service Identity (MMSI) number of the vessel, and select Done. Select Review to set a waypoint at the time the DSC distress call . 2. The symbol designates a distress ...call in distress (page 58). If your VHF radio receives a DSC distress call . 56 GPSMAP 400/500 Series Owner's Manual Using Digital Selective Calling To turn DSC on the Navigation chart...
...MENU > Other Vessels > DSC > DSC List. Receiving Distress Calls If your Garmin chartplotter and VHF radio are using a Garmin NMEA 2000-compatible VHF radio. • Select Edit to 100 entries. This ...to enter the Maritime Mobile Service Identity (MMSI) number of the vessel, and select Done. Select Review to set a waypoint at the time the DSC distress call . 2. The symbol designates a distress ...call in distress (page 58). If your VHF radio receives a DSC distress call . 56 GPSMAP 400/500 Series Owner's Manual Using Digital Selective Calling To turn DSC on the Navigation chart...
Owner's Manual
Page 65
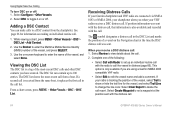
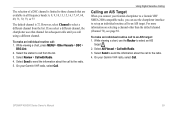
... different channel from the list. 3. To make an individual routine call to select an AIS target . 2. On your Garmin VHF radio, select Call. GPSMAP 400/500 Series Owner's Manual 59 Select Send to send the information about the call to the radio. 5. The default...> Call with Radio. 4. While viewing a chart, press MENU > Other Vessels > DSC > DSC List. 2. Select Review > Call with Radio. 3. Using Digital Selective Calling Calling an AIS Target When you connect your Garmin chartplotter to a Garmin VHF NMEA 2000-compatible radio, you call using a different channel. On your...
... different channel from the list. 3. To make an individual routine call to select an AIS target . 2. On your Garmin VHF radio, select Call. GPSMAP 400/500 Series Owner's Manual 59 Select Send to send the information about the call to the radio. 5. The default...> Call with Radio. 4. While viewing a chart, press MENU > Other Vessels > DSC > DSC List. 2. Select Review > Call with Radio. 3. Using Digital Selective Calling Calling an AIS Target When you connect your Garmin chartplotter to a Garmin VHF NMEA 2000-compatible radio, you call using a different channel. On your...