Owner's Manual
Page 3
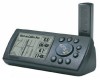
... unit can be dash-mounted, and operates on four AA batteries or on the outside of its high resolution, four gray-level display and backlit display/keypad. The GPS V offers true turn-by-turn directions, and estimated time of the GPS V. Along the way, GPS V on-screen prompts alert you now have read the Quick Start Guide first to the shortest and fastest routes, turn navigation through this owner's manual...
... unit can be dash-mounted, and operates on four AA batteries or on the outside of its high resolution, four gray-level display and backlit display/keypad. The GPS V offers true turn-by-turn directions, and estimated time of the GPS V. Along the way, GPS V on-screen prompts alert you now have read the Quick Start Guide first to the shortest and fastest routes, turn navigation through this owner's manual...

Owner's Manual
Page 14
... battery life. Follow the battery manufacturer's instructions for speed displays is selected. Insert the batteries, observing the proper polarity as marked on the Main Menu depicts battery level (shaded portion). 4 DEFAULT - Reference Battery Installation NOTE: When replacing batteries, use it for several months. Stored batteries will be followed unless the user chooses a different setting. During typical use NiCad, NiMH or Lithium batteries as waypoints or unit settings, are recommended, but can be changed...
... battery life. Follow the battery manufacturer's instructions for speed displays is selected. Insert the batteries, observing the proper polarity as marked on the Main Menu depicts battery level (shaded portion). 4 DEFAULT - Reference Battery Installation NOTE: When replacing batteries, use it for several months. Stored batteries will be followed unless the user chooses a different setting. During typical use NiCad, NiMH or Lithium batteries as waypoints or unit settings, are recommended, but can be changed...

Owner's Manual
Page 19
... Navigation" is initializing and collecting new almanac data. Acquiring Satellites-the GPS V is being calculated in view. This is likely due to calculate a position fix. 2D GPS Location-at least three satellites have been locked onto, and your current latitude/longitude position reading. Use the simulator mode to simulate operation when learning to use the unit, or to save battery power when using the GPS V to incorrect initialization or abnormal satellite conditions. Locating Satellites-the GPS V is displayed, the position...
... Navigation" is initializing and collecting new almanac data. Acquiring Satellites-the GPS V is being calculated in view. This is likely due to calculate a position fix. 2D GPS Location-at least three satellites have been locked onto, and your current latitude/longitude position reading. Use the simulator mode to simulate operation when learning to use the unit, or to save battery power when using the GPS V to incorrect initialization or abnormal satellite conditions. Locating Satellites-the GPS V is displayed, the position...
Owner's Manual
Page 20
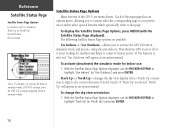
... simulator mode. To display the Satellite Status Page Options, press MENU (with the Satellite Status Page displayed). Each of the main pages has an options menu, allowing you to highlight 'Use Indoors' (or 'Use Outdoors') and press ENTER. With the Satellite Status Page Options displayed, use the ROCKER KEYPAD to conserve battery power. To change the sky view orientation: 1. If 'Use Indoors' is not looking for actual navigation while in simulator mode...
... simulator mode. To display the Satellite Status Page Options, press MENU (with the Satellite Status Page displayed). Each of the main pages has an options menu, allowing you to highlight 'Use Indoors' (or 'Use Outdoors') and press ENTER. With the Satellite Status Page Options displayed, use the ROCKER KEYPAD to conserve battery power. To change the sky view orientation: 1. If 'Use Indoors' is not looking for actual navigation while in simulator mode...

Owner's Manual
Page 24
... the panning pointer: 1. A 'New Waypoint Page' will route you can review information about the waypoint, list waypoint options, or execute a 'Route to the selected destination using the ROCKER KEYPAD to select the on-screen 'Delete' button and pressing ENTER. 6. Reference Map Page Select the on-screen 'Goto' button to navigate to select your routing preference. 14 map except route lines and track log data. From the pop-up menu, use the ROCKER KEYPAD to...
... the panning pointer: 1. A 'New Waypoint Page' will route you can review information about the waypoint, list waypoint options, or execute a 'Route to the selected destination using the ROCKER KEYPAD to select the on-screen 'Delete' button and pressing ENTER. 6. Reference Map Page Select the on-screen 'Goto' button to navigate to select your routing preference. 14 map except route lines and track log data. From the pop-up menu, use the ROCKER KEYPAD to...

Owner's Manual
Page 27
... to locate and change the Map Page setup options. If 'Auto' is selected, the maximum map scale will be determined by the 'Detail' setting to prevent map clutter. The map setup options are organized under each tab: Map Display Line Wpt City Road Point Area Topo Detail, Orientation, AutoZoom, Lock On Road Land Data, Direct Goto Line, Color Mode Track Log, Active Route, Railroad, Lat/Lon Grid User waypoints, Active Route waypoints...
... to locate and change the Map Page setup options. If 'Auto' is selected, the maximum map scale will be determined by the 'Detail' setting to prevent map clutter. The map setup options are organized under each tab: Map Display Line Wpt City Road Point Area Topo Detail, Orientation, AutoZoom, Lock On Road Land Data, Direct Goto Line, Color Mode Track Log, Active Route, Railroad, Lat/Lon Grid User waypoints, Active Route waypoints...

Owner's Manual
Page 43
... press ENTER. 4. For more information on automatic routes, refer to the FIND key instructions on -screen 'New' button and press ENTER. Manual Routes-To create a manual route, you enter each point in the route, starting with ask for shorter routes. highways. Use the ROCKER KEYPAD to select the desired route type and press ENTER. Press the MENU key twice to highlight 'Routes' and press ENTER. 3. Use the ROCKER KEYPAD to view the Main Menu...
... press ENTER. 4. For more information on automatic routes, refer to the FIND key instructions on -screen 'New' button and press ENTER. Manual Routes-To create a manual route, you enter each point in the route, starting with ask for shorter routes. highways. Use the ROCKER KEYPAD to select the desired route type and press ENTER. Press the MENU key twice to highlight 'Routes' and press ENTER. 3. Use the ROCKER KEYPAD to view the Main Menu...

Owner's Manual
Page 45
... to view the Main Menu. 2. A car symbol denotes an automatically-created Goto or route. Use the ROCKER KEYPAD to select the 'Yes' button and press ENTER. Or... 4b.For automatic routes, use . Follow steps 1 through 3 above (under "To select and navigate a saved route"). 2. When using FIND or automatic routes, you can select it for navigational guidance. Press MENU to denote manual and off-road routes. Reference Goto and Routes To save...
... to view the Main Menu. 2. A car symbol denotes an automatically-created Goto or route. Use the ROCKER KEYPAD to select the 'Yes' button and press ENTER. Or... 4b.For automatic routes, use . Follow steps 1 through 3 above (under "To select and navigate a saved route"). 2. When using FIND or automatic routes, you can select it for navigational guidance. Press MENU to denote manual and off-road routes. Reference Goto and Routes To save...

Owner's Manual
Page 46
... is displayed. 3. Reference Goto and Routes Route List Options: Follow Roads Rename Copy Delete Delete All With the route list displayed, press MENU to view the Main Menu. 2. Select 'Delete All' to display an options menu. This feature can be performed by a hiker) from a manual route: 1. Use the ROCKER KEYPAD to highlight the route you wish to rename. 4. Select 'Faster Time' or 'Shorter Distance' and press ENTER. Press the MENU key...
... is displayed. 3. Reference Goto and Routes Route List Options: Follow Roads Rename Copy Delete Delete All With the route list displayed, press MENU to view the Main Menu. 2. Select 'Delete All' to display an options menu. This feature can be performed by a hiker) from a manual route: 1. Use the ROCKER KEYPAD to highlight the route you wish to rename. 4. Select 'Faster Time' or 'Shorter Distance' and press ENTER. Press the MENU key...

Owner's Manual
Page 51
... turn on the Current Route Page: 1. Like each of the main pages, the Current Route Page has an options menu, allowing you no longer wish to navigate to the current destination. To display the Current Route Page Options, press MENU (with the Current Route Page displayed). Reference Current Route Page Current Route Page Options: Stop/Resume Navigation Recalculate Use Detour Save Route Show Arrival Times/Times to the Current Route...
... turn on the Current Route Page: 1. Like each of the main pages, the Current Route Page has an options menu, allowing you no longer wish to navigate to the current destination. To display the Current Route Page Options, press MENU (with the Current Route Page displayed). Reference Current Route Page Current Route Page Options: Stop/Resume Navigation Recalculate Use Detour Save Route Show Arrival Times/Times to the Current Route...
Owner's Manual
Page 60
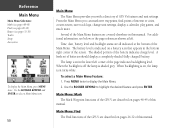
For additional information, see pages 33-39) Tracks Setup Accessories To display the Main Menu, press MENU twice. When the backlight is off the lamp is on pages 26-32 of this manual. Several of interest or cities, creates routes, save track logs, change unit settings, display a calendar, play games, and much more. Press MENU twice to highlight the desired feature and press ENTER. From the Main Menu you...
For additional information, see pages 33-39) Tracks Setup Accessories To display the Main Menu, press MENU twice. When the backlight is off the lamp is on pages 26-32 of this manual. Several of interest or cities, creates routes, save track logs, change unit settings, display a calendar, play games, and much more. Press MENU twice to highlight the desired feature and press ENTER. From the Main Menu you...

Owner's Manual
Page 62
... press ENTER. Use the ROCKER KEYPAD to highlight 'Setup Track Log' and press ENTER. 4. Use the ROCKER KEYPAD to select 'Tracks' and display the Saved Tracks Page. 2. Follow the steps on page 50 to highlight 'Delete All Saved' and press ENTER. 4. Reference Main Menu: Tracks From the Saved Tracks Page, press MENU to highlight 'Record Interval' and press ENTER. Use the ROCKER KEYPAD to select 'Setup Track Log' and modify the track log recording settings...
... press ENTER. Use the ROCKER KEYPAD to highlight 'Setup Track Log' and press ENTER. 4. Use the ROCKER KEYPAD to select 'Tracks' and display the Saved Tracks Page. 2. Follow the steps on page 50 to highlight 'Delete All Saved' and press ENTER. 4. Reference Main Menu: Tracks From the Saved Tracks Page, press MENU to highlight 'Record Interval' and press ENTER. Use the ROCKER KEYPAD to select 'Setup Track Log' and modify the track log recording settings...

Owner's Manual
Page 64
... the satellite receiver Each selectable Setup Page is best for constant speed, straight-line travel. System Time Guidance Routing Units Timers Location Alarms Interface Mode, Battery, Backlight, Display, Beeper, WAAS Format, Daylight Savings, Zone, UTC Offset Off-Route Recalculation, Next Turn Pop-up, Shutdown Preference, Calculation Method, Calculate For, Avoid Distance/Speed, Heading, Heading Display, Elevation User Timer, Battery Timer Format, Map Datum Anchor Drag, Proximity Waypoints, Proximity Alarm Format, Baud Rate, DGPS Beacon Information Main Menu: Setup...
... the satellite receiver Each selectable Setup Page is best for constant speed, straight-line travel. System Time Guidance Routing Units Timers Location Alarms Interface Mode, Battery, Backlight, Display, Beeper, WAAS Format, Daylight Savings, Zone, UTC Offset Off-Route Recalculation, Next Turn Pop-up, Shutdown Preference, Calculation Method, Calculate For, Avoid Distance/Speed, Heading, Heading Display, Elevation User Timer, Battery Timer Format, Map Datum Anchor Drag, Proximity Waypoints, Proximity Alarm Format, Baud Rate, DGPS Beacon Information Main Menu: Setup...

Owner's Manual
Page 66
... to highlight the feature you may need the GPS V's unit ID. Reference Main Menu: Setup When using unlock codes with selections for that feature. 3. and 24-hour format, or to select the System Setup Page. 2. Follow the steps on page 54 to select a 12- Your local time and date is displayed at http://www.garmin.com/support/). When downloading City Select data to your MapSource City Select...
... to highlight the feature you may need the GPS V's unit ID. Reference Main Menu: Setup When using unlock codes with selections for that feature. 3. and 24-hour format, or to select the System Setup Page. 2. Follow the steps on page 54 to select a 12- Your local time and date is displayed at http://www.garmin.com/support/). When downloading City Select data to your MapSource City Select...

Owner's Manual
Page 71
... KEYPAD to display an options menu. 3. Press MENU to highlight 'Location Format' or 'Map Datum' and press ENTER. The radius from the proximity waypoint can result in substantial position errors. Follow the steps on page 54 to 99.99 (units). Use the ROCKER KEYPAD to 9999 (units). Main Menu: Setup: Alarms The Alarms Setup Page provides settings for that , format and map datum settings are useful when marking locations you wish to...
... KEYPAD to display an options menu. 3. Press MENU to highlight 'Location Format' or 'Map Datum' and press ENTER. The radius from the proximity waypoint can result in substantial position errors. Follow the steps on page 54 to 99.99 (units). Use the ROCKER KEYPAD to 9999 (units). Main Menu: Setup: Alarms The Alarms Setup Page provides settings for that , format and map datum settings are useful when marking locations you wish to...

Owner's Manual
Page 73
...' and press Reference Main Menu: Setup NMEA 0183, version 3.0 is transmitted every two seconds at 4800 baud. Main Menu: Setup: Interface The Interface Setup Page lets you can automatically communicate with the beacon receiver to scan for available stations. To change an Interface Setup Page feature: 1. The following settings are available: GARMIN-The proprietary format used when connecting your GPS V to exchange waypoint, route, track log and MapSource data with a Garmin differential beacon receiver (e.g., GBR...
...' and press Reference Main Menu: Setup NMEA 0183, version 3.0 is transmitted every two seconds at 4800 baud. Main Menu: Setup: Interface The Interface Setup Page lets you can automatically communicate with the beacon receiver to scan for available stations. To change an Interface Setup Page feature: 1. The following settings are available: GARMIN-The proprietary format used when connecting your GPS V to exchange waypoint, route, track log and MapSource data with a Garmin differential beacon receiver (e.g., GBR...
Owner's Manual
Page 81
... and map data card slot, remove the batteries when storing the unit for use with Garmin Products. Prolonged submersion can withstand immersion in the unit for 30 minutes. Cleaning The GPS V is constructed of high quality materials and does not require user maintenance other manufacturers have been designed and tested specifically for more than cleaning. Clean the unit using this guide, Contact Garmin Customer Service...
... and map data card slot, remove the batteries when storing the unit for use with Garmin Products. Prolonged submersion can withstand immersion in the unit for 30 minutes. Cleaning The GPS V is constructed of high quality materials and does not require user maintenance other manufacturers have been designed and tested specifically for more than cleaning. Clean the unit using this guide, Contact Garmin Customer Service...

Owner's Manual
Page 82
... GPS Location - You have entered the alarm radius for service. Can't Unlock Maps - Database Error - To reduce the amount of satellites to the page you to store in memory. Appendix C Messages The GPS V uses an on the data card is locked. The unit's memory is Full - Off Route - Proximity waypoint memory is full. Detail Maps Don't Support Routing - The batteries are low and should be replaced. Proximity Memory Full - A waypoint or route failed to unit operating...
... GPS Location - You have entered the alarm radius for service. Can't Unlock Maps - Database Error - To reduce the amount of satellites to the page you to store in memory. Appendix C Messages The GPS V uses an on the data card is locked. The unit's memory is Full - Off Route - Proximity waypoint memory is full. Detail Maps Don't Support Routing - The batteries are low and should be replaced. Proximity Memory Full - A waypoint or route failed to unit operating...
Owner's Manual
Page 85
... your Garmin Dealer. 75 Waterways & Lights, Points of interest and view the address, phone number and map location. Additional instructions for automatic routing and also contains turn directions to you 've completed the information, the web site will also work with the City Select CD). By simply entering an address, intersection or pointing at the map, the GPS V will not provide detailed automatic routing. Unlock Codes The data...
... your Garmin Dealer. 75 Waterways & Lights, Points of interest and view the address, phone number and map location. Additional instructions for automatic routing and also contains turn directions to you 've completed the information, the web site will also work with the City Select CD). By simply entering an address, intersection or pointing at the map, the GPS V will not provide detailed automatic routing. Unlock Codes The data...

Brochure
Page 2
...˚ C) Indefinite, no memory battery required Accessories Standard: Optional: PC interface cable MapSource™ City Select™ CD Automotive mount 12-volt adapter cable Wrist strap Owner's manual Quick start guide Handlebar mount Bean bag mount Swivel mount Carrying case Remote GPS antenna PC interface cable with 12-volt adapter AC/PC adapter Power/data cable Additional MapSource™ CD-ROMs Instructional video The GPS V can even use the GPS V to look up to 50...
...˚ C) Indefinite, no memory battery required Accessories Standard: Optional: PC interface cable MapSource™ City Select™ CD Automotive mount 12-volt adapter cable Wrist strap Owner's manual Quick start guide Handlebar mount Bean bag mount Swivel mount Carrying case Remote GPS antenna PC interface cable with 12-volt adapter AC/PC adapter Power/data cable Additional MapSource™ CD-ROMs Instructional video The GPS V can even use the GPS V to look up to 50...


