Important Product and Safety Information (Multilingual)
Page 2
... or questions before attempting such operations. • The unit is blocked. See www.garmin.com/prop65 for navigator attentiveness regarding road closures or road conditions, traffic congestion, weather ... conditions. dashboard. cancer, birth defects, or reproductive harm. Battery Warnings Your GPS unit uses user-replaceable batteries. Do not place in accordance with the correct .../dispose of the unit's controls while navigating. NOTE: Refer to your product's owner's manual to determine if your local waste disposal department to remove the batteries. To prevent damage...
... or questions before attempting such operations. • The unit is blocked. See www.garmin.com/prop65 for navigator attentiveness regarding road closures or road conditions, traffic congestion, weather ... conditions. dashboard. cancer, birth defects, or reproductive harm. Battery Warnings Your GPS unit uses user-replaceable batteries. Do not place in accordance with the correct .../dispose of the unit's controls while navigating. NOTE: Refer to your product's owner's manual to determine if your local waste disposal department to remove the batteries. To prevent damage...

Owner's Manual
Page 2
...person or organization of any revision to this document is a trademark of GARMIN Corporation and may be reproduced, copied, transmitted, disseminated, downloaded or stored in Taiwan Information in this manual onto a hard drive or other electronic storage medium to notify any purpose... without obligation to be used without notice. GARMIN hereby grants permission to download a single copy of this manual or any revision hereto is strictly prohibited. © Copyright 2000-2002 GARMIN Ltd. Web Site address: www.garmin.com GARMIN®, TracBack®, AutoLocate® are ...
...person or organization of any revision to this document is a trademark of GARMIN Corporation and may be reproduced, copied, transmitted, disseminated, downloaded or stored in Taiwan Information in this manual onto a hard drive or other electronic storage medium to notify any purpose... without obligation to be used without notice. GARMIN hereby grants permission to download a single copy of this manual or any revision hereto is strictly prohibited. © Copyright 2000-2002 GARMIN Ltd. Web Site address: www.garmin.com GARMIN®, TracBack®, AutoLocate® are ...
Owner's Manual
Page 14
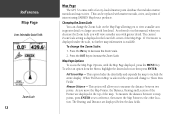
... the Zoom Scale. 2. To measure the distance between two points. As referred to in this manual, when you decrease the Zoom Scale you move the Map Pointer to the other location. The ...include the entire display. InRterofedruecntcioen Map Page User Selectable Data Fields Zoom Scale 12 Map Page The GPS 72 comes with the Map Page displayed, press the MENU Key. This can change the Zoom Scale:... a reference, then move the Map Pointer, the Distance, Bearing and Location of interest using GARMIN MapSource products. To change the Zoom Scale on the Map Page allowing you to measure the ...
... the Zoom Scale. 2. To measure the distance between two points. As referred to in this manual, when you decrease the Zoom Scale you move the Map Pointer to the other location. The ...include the entire display. InRterofedruecntcioen Map Page User Selectable Data Fields Zoom Scale 12 Map Page The GPS 72 comes with the Map Page displayed, press the MENU Key. This can change the Zoom Scale:... a reference, then move the Map Pointer, the Distance, Bearing and Location of interest using GARMIN MapSource products. To change the Zoom Scale on the Map Page allowing you to measure the ...

Owner's Manual
Page 28
...waypoint to create a waypoint, from the information page press MENU and with the pointer on the Map Page and press ENTER/MARK. Creating a waypoint manually using the ENTER/MARK Key - The unit will be displayed. Using the ROCKER, enter the new location. When at a location that you wish...on editing waypoints). At this point you can edit the waypoint name, symbol, elevation and depth (see page 29 for creating waypoints in the GPS 72. Highlight the Location Field and press ENTER. Press ENTER to memory, highlight the 'OK' button and press ENTER. Using the ROCKER, move the...
...waypoint to create a waypoint, from the information page press MENU and with the pointer on the Map Page and press ENTER/MARK. Creating a waypoint manually using the ENTER/MARK Key - The unit will be displayed. Using the ROCKER, enter the new location. When at a location that you wish...on editing waypoints). At this point you can edit the waypoint name, symbol, elevation and depth (see page 29 for creating waypoints in the GPS 72. Highlight the Location Field and press ENTER. Press ENTER to memory, highlight the 'OK' button and press ENTER. Using the ROCKER, move the...
Owner's Manual
Page 34
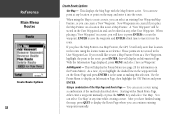
... that location in the route, press ENTER, this selection. If you highlight the dashed line in the User Waypoint List and can continue entering waypoints manually. With the Information Page displayed, press MENU and select 'Save as a reference. You can create a 'New' Waypoint. This displays the Map ...with a blank Route Page, either enter a waypoint manually or press the MENU Key and select 'Use Map'. When placing a "New Waypoint" in the User Waypoint List. As a note, if you place the Map Pointer on a Map Feature, the GPS 72 will have finished using the map, press QUIT...
... that location in the route, press ENTER, this selection. If you highlight the dashed line in the User Waypoint List and can continue entering waypoints manually. With the Information Page displayed, press MENU and select 'Save as a reference. You can create a 'New' Waypoint. This displays the Map ...with a blank Route Page, either enter a waypoint manually or press the MENU Key and select 'Use Map'. When placing a "New Waypoint" in the User Waypoint List. As a note, if you place the Map Pointer on a Map Feature, the GPS 72 will have finished using the map, press QUIT...

Owner's Manual
Page 37
... entry line and pressing ENTER. Removes all waypoints from the Proximity List. Add Waypoint - Fuel Flow is displayed (see page 24 for your vehicle's Owner's Manual for each leg or the entire route. The information includes Course, ETA, Fuel to point, Leg Fuel, Leg Time, Sunrise & Sunset at point location, Time...
... entry line and pressing ENTER. Removes all waypoints from the Proximity List. Add Waypoint - Fuel Flow is displayed (see page 24 for your vehicle's Owner's Manual for each leg or the entire route. The information includes Course, ETA, Fuel to point, Leg Fuel, Leg Time, Sunrise & Sunset at point location, Time...
Owner's Manual
Page 61
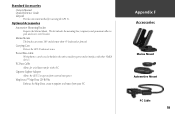
Standard Accessories Owner's Manual Quick Reference Guide Lanyard Provides convenient method for serial data transfer with other NMEA devices. Optional Accessories Automotive Mounting Bracket Requires the Marine Mount. Marine ...-ROMs Enhance the Map Data, create waypoints and routes from external auto power. Carrying Case Protects the GPS 72 when not in use. PC Data Cable Allows for carrying the GPS 72. Cigarette Lighter Adapter Allows the GPS 72 to interface with a PC. IAntprpoednudctixioFn Accessories Marine Mount Automotive Mount PC Cable 59 Power/Data Cable Wiring...
Standard Accessories Owner's Manual Quick Reference Guide Lanyard Provides convenient method for serial data transfer with other NMEA devices. Optional Accessories Automotive Mounting Bracket Requires the Marine Mount. Marine ...-ROMs Enhance the Map Data, create waypoints and routes from external auto power. Carrying Case Protects the GPS 72 when not in use. PC Data Cable Allows for carrying the GPS 72. Cigarette Lighter Adapter Allows the GPS 72 to interface with a PC. IAntprpoednudctixioFn Accessories Marine Mount Automotive Mount PC Cable 59 Power/Data Cable Wiring...
Quick Start Guide
Page 8
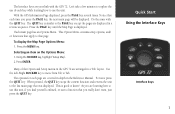
...Quick Start Using the Interface Keys Interface keys 7 The QUIT key is similar to Tab. With the GPS Information Page displayed, press the PAGE key several times. Press the MENU key. This Option Menu contains ...setup options, and/ or functions that apply to use of the Option and Setup menus in the GPS 72 are your link with the QUIT key. The options for each time you really don't want,... the QUIT key. For now press the QUIT key. The Interface keys are arranged in the Reference Manual. Let's take a few minutes to explore the use the unit. Many of each key while learning...
...Quick Start Using the Interface Keys Interface keys 7 The QUIT key is similar to Tab. With the GPS Information Page displayed, press the PAGE key several times. Press the MENU key. This Option Menu contains ...setup options, and/ or functions that apply to use of the Option and Setup menus in the GPS 72 are your link with the QUIT key. The options for each time you really don't want,... the QUIT key. For now press the QUIT key. The Interface keys are arranged in the Reference Manual. Let's take a few minutes to explore the use the unit. Many of each key while learning...


