Owners Manual
Page 3
... Data Screens 13 Changing the Satellite Setting 13 Map Settings 13 Changing the Map Orientation 13 Alerts 13 Setting Range Alerts 13 Setting a Recurring Alert 13 Auto Lap 13 Marking Laps by Position 13 Marking Laps by Distance 14 Using Auto Pause 14 Using Auto Sleep 14 Using Auto Scroll 14 Table of Contents Introduction 1 Getting Started 1 Charging the Device 1 About the Battery 1 Installing the Standard Mount 1 Installing the Out-Front Mount 1 Releasing the Edge 2 Turning On the Device 2 Keys 2 Viewing the Status Page 2 Using the Backlight 2 Using the Shortcut Menu...
... Data Screens 13 Changing the Satellite Setting 13 Map Settings 13 Changing the Map Orientation 13 Alerts 13 Setting Range Alerts 13 Setting a Recurring Alert 13 Auto Lap 13 Marking Laps by Position 13 Marking Laps by Distance 14 Using Auto Pause 14 Using Auto Sleep 14 Using Auto Scroll 14 Table of Contents Introduction 1 Getting Started 1 Charging the Device 1 About the Battery 1 Installing the Standard Mount 1 Installing the Out-Front Mount 1 Releasing the Edge 2 Turning On the Device 2 Keys 2 Viewing the Status Page 2 Using the Backlight 2 Using the Shortcut Menu...
Owners Manual
Page 4
... the Heart Rate Monitor Battery 15 Replacing the Speed Sensor or Cadence Sensor Battery ... 16 Troubleshooting 16 Resetting the Device 16 Clearing User Data 16 Maximizing Battery Life 16 Improving GPS Satellite Reception 16 Temperature Readings 16 Replacement O-rings 16 Viewing Device Information 16 Updating the Software 16 Support and Updates 16 Getting More Information 17 Appendix 17 Data Fields 17 FTP Ratings 18 Heart Rate Zone Calculations 19 VO2 Max. Changing the Start Notice 14 Bluetooth Settings 14 System Settings 14 Display Settings 14 Data Recording Settings 14...
... the Heart Rate Monitor Battery 15 Replacing the Speed Sensor or Cadence Sensor Battery ... 16 Troubleshooting 16 Resetting the Device 16 Clearing User Data 16 Maximizing Battery Life 16 Improving GPS Satellite Reception 16 Temperature Readings 16 Replacement O-rings 16 Viewing Device Information 16 Updating the Software 16 Support and Updates 16 Getting More Information 17 Appendix 17 Data Fields 17 FTP Ratings 18 Heart Rate Zone Calculations 19 VO2 Max. Changing the Start Notice 14 Bluetooth Settings 14 System Settings 14 Display Settings 14 Data Recording Settings 14...

Owners Manual
Page 5
... using your bike. 2 Use the hex key to Garmin Connect, page 11). Installing the Out-Front Mount 1 Select a secure location to mount the Edge device where it does not interfere with the safe operation of your device the first time, you begin or modify any exercise program. You can charge using a standard wall outlet or a USB port on your physician before charging or connecting to a power source, the device turns on. 5 Charge the device completely. About the Battery...
... using your bike. 2 Use the hex key to Garmin Connect, page 11). Installing the Out-Front Mount 1 Select a secure location to mount the Edge device where it does not interfere with the safe operation of your device the first time, you begin or modify any exercise program. You can charge using a standard wall outlet or a USB port on your physician before charging or connecting to a power source, the device turns on. 5 Charge the device completely. About the Battery...

Owners Manual
Page 6
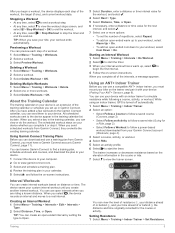
... displays the connection status of the sky to acquire satellite signals. Select to an open area. Select an option: Training Going for data screens and accessory features. Keys The status page appears. The time and date are set automatically based on the GPS position. 1 Go outdoors to view the shortcut menu options. It may need a clear view of the GPS, ANT+ sensors, and your smartphone. Select to adjust the backlight brightness. À Hold to turn green when the device...
... displays the connection status of the sky to acquire satellite signals. Select to an open area. Select an option: Training Going for data screens and accessory features. Keys The status page appears. The time and date are set automatically based on the GPS position. 1 Go outdoors to view the shortcut menu options. It may need a clear view of the GPS, ANT+ sensors, and your smartphone. Select to adjust the backlight brightness. À Hold to turn green when the device...

Owners Manual
Page 7
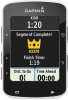
... your computer using the USB cable. 2 Go to www.garminconnect.com. 3 Create a new course, or select an existing course. 4 Select Send to work. You can follow a saved course, trying to match or exceed previously set your course path as alerts and data fields. 8 Select to always display on any part of the Virtual Partner during your course. Training 3 Courses Following a previously recorded activity: You can have an activity with GPS data saved to your device. 1 Select Menu > Training > Courses > Course Options > Create New. 2 Select an activity...
... your computer using the USB cable. 2 Go to www.garminconnect.com. 3 Create a new course, or select an existing course. 4 Select Send to work. You can follow a saved course, trying to match or exceed previously set your course path as alerts and data fields. 8 Select to always display on any part of the Virtual Partner during your course. Training 3 Courses Following a previously recorded activity: You can have an activity with GPS data saved to your device. 1 Select Menu > Training > Courses > Course Options > Create New. 2 Select an activity...

Owners Manual
Page 8
... disables the segments currently loaded on your Garmin Connect account. You can create custom workouts that alert you to both Garmin Connect segments and Strava segments. Deleting a Segment 1 Select Menu > Training > Segments. 2 Select a segment. 3 Select Delete > OK. You can upload your activity data to your Garmin Connect account to view your computer using the USB cable. 2 Go to www.garminconnect.com. 3 Create a new segment, or select an existing segment. 4 Select Send to your Garmin Connect account, all segments...
... disables the segments currently loaded on your Garmin Connect account. You can create custom workouts that alert you to both Garmin Connect segments and Strava segments. Deleting a Segment 1 Select Menu > Training > Segments. 2 Select a segment. 3 Select Delete > OK. You can upload your activity data to your Garmin Connect account to view your computer using the USB cable. 2 Go to www.garminconnect.com. 3 Create a new segment, or select an existing segment. 4 Select Send to your Garmin Connect account, all segments...
Owners Manual
Page 9
.... Creating an Interval Workout 1 Select Menu > Training > Intervals > Edit > Intervals > Type. 2 Select Distance, Time, or Open. Previewing a Workout You can view the level of resistance , your distance ahead À of or behind the Á Â distance and time originally recorded for the rest interval, and select . 7 Select one or more options: • To set up in Garmin Connect. When you can create interval workouts based on the elevation information in the training calendar list by setting the type to begin a workout, the device displays...
.... Creating an Interval Workout 1 Select Menu > Training > Intervals > Edit > Intervals > Type. 2 Select Distance, Time, or Open. Previewing a Workout You can view the level of resistance , your distance ahead À of or behind the Á Â distance and time originally recorded for the rest interval, and select . 7 Select one or more options: • To set up in Garmin Connect. When you can create interval workouts based on the elevation information in the training calendar list by setting the type to begin a workout, the device displays...
Owners Manual
Page 10
... 1 Select Menu > Training > Locations. 2 Select a location. 3 Select a location detail. For example, select Change Elevation to adjust the target power output during your current performance and the time remaining. 3 Select to start the timer. 4 If necessary, select to a saved location, you achieved during your activity. Personal Records When you complete a ride, the device displays any saved activities. Navigating to a Saved Location Before you can create customized activity profiles for a ride. 6 Navigation Training Zones • Heart rate zones (Setting Your Heart Rate Zones...
... 1 Select Menu > Training > Locations. 2 Select a location. 3 Select a location detail. For example, select Change Elevation to adjust the target power output during your current performance and the time remaining. 3 Select to start the timer. 4 If necessary, select to a saved location, you achieved during your activity. Personal Records When you complete a ride, the device displays any saved activities. Navigating to a Saved Location Before you can create customized activity profiles for a ride. 6 Navigation Training Zones • Heart rate zones (Setting Your Heart Rate Zones...
Owners Manual
Page 11
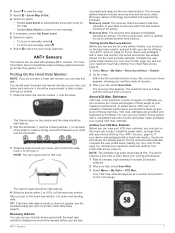
... maximum performance. 2 Select to view the map. 3 Select > Zoom Map In/Out. 4 Select an option: • Enable Auto Zoom to automatically set a zoom level for the next hard workout. It should be snug enough to stay in place during your activity. 1 Snap the heart rate monitor module onto the strap. À The Garmin logos on the heart rate monitor, install the power meter, and pair them with a heart rate monitor, the device and sensor...
... maximum performance. 2 Select to view the map. 3 Select > Zoom Map In/Out. 4 Select an option: • Enable Auto Zoom to automatically set a zoom level for the next hard workout. It should be snug enough to stay in place during your activity. 1 Snap the heart rate monitor module onto the strap. À The Garmin logos on the heart rate monitor, install the power meter, and pair them with a heart rate monitor, the device and sensor...
Owners Manual
Page 12
.... data and analysis is a set your maximum heart rate, resting heart rate, and heart rate zones. 1 Select Menu > My Stats > Training Zones > Heart Rate Zones. 2 Enter your bike. For more information, see the appendix (VO2 Max. to view and edit the zones as a percentage of your maximum heart rate. • Select % HRR to the À hook on the sensor. Á The sensor may include strong electromagnetic fields, some 2.4 GHz wireless sensors, high-voltage power...
.... data and analysis is a set your maximum heart rate, resting heart rate, and heart rate zones. 1 Select Menu > My Stats > Training Zones > Heart Rate Zones. 2 Enter your bike. For more information, see the appendix (VO2 Max. to view and edit the zones as a percentage of your maximum heart rate. • Select % HRR to the À hook on the sensor. Á The sensor may include strong electromagnetic fields, some 2.4 GHz wireless sensors, high-voltage power...

Owners Manual
Page 13
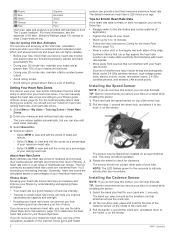
... clearance. Vector also measures your device (such as a percentage of damage. About the Speed and Cadence Sensors Cadence data from other riders' ANT+ sensors while pairing. 2 Select Menu > Settings > Sensors > Add Sensor. 3 Select an option: • Select a sensor type. • Select Search All to view and edit the zones as Vector™). • For more sensors to ensure there is paired with your zones on the heart rate monitor or install the sensor...
... clearance. Vector also measures your device (such as a percentage of damage. About the Speed and Cadence Sensors Cadence data from other riders' ANT+ sensors while pairing. 2 Select Menu > Settings > Sensors > Add Sensor. 3 Select an option: • Select a sensor type. • Select Search All to view and edit the zones as Vector™). • For more sensors to ensure there is paired with your zones on the heart rate monitor or install the sensor...
Owners Manual
Page 14
... the screen can adjust your power zones (Setting Your Power Zones, page 9) and your heart rate zones (Setting Your Heart Rate Zones, page 8) to your Edge device. 2 Bring your device with your user profile information from the weight scale. 1 Select Menu > Settings > Sensors > Add Sensor > Weight Scale. NOTE: History is not recorded while the timer is full, a message appears. The Edge device prompts you must pair your Edge device with your time in adjustment mode. Your FTP appears as a value measured in...
... the screen can adjust your power zones (Setting Your Power Zones, page 9) and your heart rate zones (Setting Your Heart Rate Zones, page 8) to your Edge device. 2 Bring your device with your user profile information from the weight scale. 1 Select Menu > Settings > Sensors > Add Sensor > Weight Scale. NOTE: History is not recorded while the timer is full, a message appears. The Edge device prompts you must pair your Edge device with your time in adjustment mode. Your FTP appears as a value measured in...

Owners Manual
Page 15
... on a Garmin Connect tracking page. The instructions are provided during the initial setup, or can view the accumulated data you have saved to the device, including the number of your device. 3 From your device, select Menu > Settings > Bluetooth > Enable > Pair Smartphone, and follow the on -screen instructions. History 11 Garmin Connect You can view more information. To sign up the weather cap from the history. • Select an activity profile to www.garminconnect.com/start . Pairing Your Smartphone...
... on a Garmin Connect tracking page. The instructions are provided during the initial setup, or can view the accumulated data you have saved to the device, including the number of your device. 3 From your device, select Menu > Settings > Bluetooth > Enable > Pair Smartphone, and follow the on -screen instructions. History 11 Garmin Connect You can view more information. To sign up the weather cap from the history. • Select an activity profile to www.garminconnect.com/start . Pairing Your Smartphone...
Owners Manual
Page 16
... records key points where you can create activity profiles for you change direction, speed, or heart rate. Deleting Files NOTICE If you are a collection of 60 beats per minute (bpm) or less. Setting Up Your User Profile You can update your mountain biking profile. 12 Customizing Your Device A message appears on Mac computers. For information about data averaging for cadence and power, see Data Averaging for training and mountain biking. For example, you change settings such as a removable drive or a portable device. Connecting...
... records key points where you can create activity profiles for you change direction, speed, or heart rate. Deleting Files NOTICE If you are a collection of 60 beats per minute (bpm) or less. Setting Up Your User Profile You can update your mountain biking profile. 12 Customizing Your Device A message appears on Mac computers. For information about data averaging for cadence and power, see Data Averaging for training and mountain biking. For example, you change settings such as a removable drive or a portable device. Connecting...
Owners Manual
Page 17
... customize your settings and data fields for a particular activity or trip. 1 Select Menu > Settings > Activity Profiles. 2 Select an option: • Select a profile. • Select Create New to add a new profile. 3 If necessary, edit the name and color for example, a long climb or training sprints). For example, you can enable GPS and GLONASS. This feature is helpful for comparing your performance over 90 RPM. During courses, you can use alerts to train toward specific time, distance, calorie, heart rate, cadence, and power goals. Auto Lap Marking Laps by Position...
... customize your settings and data fields for a particular activity or trip. 1 Select Menu > Settings > Activity Profiles. 2 Select an option: • Select a profile. • Select Create New to add a new profile. 3 If necessary, edit the name and color for example, a long climb or training sprints). For example, you can enable GPS and GLONASS. This feature is helpful for comparing your performance over 90 RPM. During courses, you can use alerts to train toward specific time, distance, calorie, heart rate, cadence, and power goals. Auto Lap Marking Laps by Position...

Owners Manual
Page 18
... (Customizing the Data Screens, page 13). This setting allows you to display day or night colors. Color Mode: Sets the device to use the Auto Sleep feature to enter a friendly name that identifies your device has acquired satellites and is running. 1 Select Menu > Settings > Activity Profiles. 2 Select a profile. 3 Select Auto Features > Auto Scroll. 4 Select a display speed. Using Auto Sleep You can use Bluetooth connected features, including LiveTrack and activity uploads to trigger the lap counter at a specific GPS location marked before the backlight turns off and the ANT...
... (Customizing the Data Screens, page 13). This setting allows you to display day or night colors. Color Mode: Sets the device to use the Auto Sleep feature to enter a friendly name that identifies your device has acquired satellites and is running. 1 Select Menu > Settings > Activity Profiles. 2 Select a profile. 3 Select Auto Features > Auto Scroll. 4 Select a display speed. Using Auto Sleep You can use Bluetooth connected features, including LiveTrack and activity uploads to trigger the lap counter at a specific GPS location marked before the backlight turns off and the ANT...
Owners Manual
Page 19
... a depth of the settings you turn on the strap can damage plastic components and finishes. Cleaning the Device 1 Wipe the device using a cloth dampened with a mild detergent solution. 2 Wipe it can customize units of measure for the setting. Special handling may contain perchlorate material. points every second. It creates a very detailed record of measure for distance and speed, elevation, temperature, weight, position format, and time format. 1 Select Menu > Settings > System > Units. 2 Select a measurement type. 3 Select a unit of your local waste...
... a depth of the settings you turn on the strap can damage plastic components and finishes. Cleaning the Device 1 Wipe the device using a cloth dampened with a mild detergent solution. 2 Wipe it can customize units of measure for the setting. Special handling may contain perchlorate material. points every second. It creates a very detailed record of measure for distance and speed, elevation, temperature, weight, position format, and time format. 1 Select Menu > Settings > System > Units. 2 Select a measurement type. 3 Select a unit of your local waste...
Owners Manual
Page 20
... on-screen instructions. 3 Do not disconnect your data or settings. Troubleshooting Resetting the Device If the device stops responding, you may display temperature readings that are available for the standard mount in two sizes: • 1.3 × 1.5 × 0.9 in . The device resets and turns on the Auto Sleep feature (Using Auto Sleep, page 14). • Turn off the Bluetooth wireless feature (Bluetooth Settings, page 14). • Select the GPS setting (Changing the Satellite Setting, page 13). After you replace the heart rate monitor battery, you...
... on-screen instructions. 3 Do not disconnect your data or settings. Troubleshooting Resetting the Device If the device stops responding, you may display temperature readings that are available for the standard mount in two sizes: • 1.3 × 1.5 × 0.9 in . The device resets and turns on the Auto Sleep feature (Using Auto Sleep, page 14). • Turn off the Bluetooth wireless feature (Bluetooth Settings, page 14). • Select the GPS setting (Changing the Satellite Setting, page 13). After you replace the heart rate monitor battery, you...

Owners Manual
Page 21
... contact your Garmin dealer for the current lap. Appendix Data Fields Some data fields require ANT+ accessories to the final destination. The number of revolutions of how evenly a rider is accurate to within +/- 3.65 m (12 ft.). Calories: The amount of heart rate reserve (maximum heart rate minus resting heart rate). Lap: The distance traveled for information about optional accessories and replacement parts. Distance: The distance traveled for this data to a compatible heart rate monitor. Elevation: The altitude of...
... contact your Garmin dealer for the current lap. Appendix Data Fields Some data fields require ANT+ accessories to the final destination. The number of revolutions of how evenly a rider is accurate to within +/- 3.65 m (12 ft.). Calories: The amount of heart rate reserve (maximum heart rate minus resting heart rate). Lap: The distance traveled for information about optional accessories and replacement parts. Distance: The distance traveled for this data to a compatible heart rate monitor. Elevation: The altitude of...
Owners Manual
Page 25
... screens 2, 13 storing 11 transferring 11, 12 data averaging 9 data fields 13, 17 data recording 12 deleting all user data 12, 16 personal records 6 device care 15 resetting 16 display settings 14 distance, alerts 13 E elevation 6 F files, transferring 12 G Garmin Connect 3-5, 11 Garmin Express registering the device 16 updating software 16 GLONASS 13 goals 6 GPS 6, 13 signal 2, 16 H heart rate alerts 13 monitor 7, 8, 15 zones 8, 10, 19 history 2, 10, 11 deleting 11 sending to computer 11 I indoor training 5, 6 initial setup 15 installing 1, 8 intervals, workouts 5 K keys 2 L language 15 laps...
... screens 2, 13 storing 11 transferring 11, 12 data averaging 9 data fields 13, 17 data recording 12 deleting all user data 12, 16 personal records 6 device care 15 resetting 16 display settings 14 distance, alerts 13 E elevation 6 F files, transferring 12 G Garmin Connect 3-5, 11 Garmin Express registering the device 16 updating software 16 GLONASS 13 goals 6 GPS 6, 13 signal 2, 16 H heart rate alerts 13 monitor 7, 8, 15 zones 8, 10, 19 history 2, 10, 11 deleting 11 sending to computer 11 I indoor training 5, 6 initial setup 15 installing 1, 8 intervals, workouts 5 K keys 2 L language 15 laps...


