
Owner's Manual
Page 3
Table of Contents Introduction 1 Getting Started 1 Charging the Device 1 About the Battery 1 Installing the Standard Mount 1 Installing the Out-Front Mount 1 Releasing the Edge 2 Turning On the Device 2 Keys 2 Acquiring Satellite Signals 2 Training 3 Going for a Ride 3 Alerts 3 Setting... Your ANT + Sensors 6 Using the Weight Scale 7 History 7 Viewing Your Ride 7 Viewing Data Totals 7 Sending Your Ride to Garmin Connect 7 Garmin Connect 7 Connected Features 7 Sending a Ride to Your Smartphone 8 Deleting History 8 Data Recording 8 Data Recording Settings 8 Data Management...
Table of Contents Introduction 1 Getting Started 1 Charging the Device 1 About the Battery 1 Installing the Standard Mount 1 Installing the Out-Front Mount 1 Releasing the Edge 2 Turning On the Device 2 Keys 2 Acquiring Satellite Signals 2 Training 3 Going for a Ride 3 Alerts 3 Setting... Your ANT + Sensors 6 Using the Weight Scale 7 History 7 Viewing Your Ride 7 Viewing Data Totals 7 Sending Your Ride to Garmin Connect 7 Garmin Connect 7 Connected Features 7 Sending a Ride to Your Smartphone 8 Deleting History 8 Data Recording 8 Data Recording Settings 8 Data Management...

Owner's Manual
Page 5
... screw. The device is oriented toward the sky. About the Battery WARNING This device contains a lithium-ion battery. You can install the bike mount on the stem or the handlebars. 1 Select a secure location to a power source, the device turns on. 5 Charge the device completely... information. A fully charged battery can charge using a standard wall outlet or a USB port on your ride to a computer. NOTE: Garmin® recommends a torque specification of the Edge is powered by a built-in the product box for a ride (page 3). 5 Charge the device (page 1). 6 Register the device...
... screw. The device is oriented toward the sky. About the Battery WARNING This device contains a lithium-ion battery. You can install the bike mount on the stem or the handlebars. 1 Select a secure location to a power source, the device turns on. 5 Charge the device completely... information. A fully charged battery can charge using a standard wall outlet or a USB port on your ride to a computer. NOTE: Garmin® recommends a torque specification of the Edge is powered by a built-in the product box for a ride (page 3). 5 Charge the device (page 1). 6 Register the device...

Owner's Manual
Page 6
...an open area. The timer overlay allows you to delete an item. The front of the page. 8 Press down slightly and turn the Edge clockwise until the timer page appears (page 3). to use the settings and search features during configuration. The connections page appears. A flashing icon... Device The first time you quick access to configure system settings and profiles (page 8). 1 Hold . 2 Follow the on and off the mount. Using the Touchscreen • When the timer is searching. to return to view the connections page. Viewing the Connections Page The connections page ...
...an open area. The timer overlay allows you to delete an item. The front of the page. 8 Press down slightly and turn the Edge clockwise until the timer page appears (page 3). to use the settings and search features during configuration. The connections page appears. A flashing icon... Device The first time you quick access to configure system settings and profiles (page 8). 1 Hold . 2 Follow the on and off the mount. Using the Touchscreen • When the timer is searching. to return to view the connections page. Viewing the Connections Page The connections page ...

Owner's Manual
Page 10
... mm of third-party ANT + sensors that are not pedaling. The LED turns red, then green. 10 Pedal to the crank arm using the adhesive mount and a cable tie Ã. Cadence is 1. 9 to 2. 4 lbf-in watts. • Select % FTP to calculate the speed and distance....Adjust your power zones to match your goals and abilities (page 6). • Use range alerts to ensure a water tight seal on the device or using Garmin Connect. For calibration instructions specific to your power meter, refer to the manufacturer's instructions. 1 From the home screen, select . 2 Select Bike Profiles. 3...
... mm of third-party ANT + sensors that are not pedaling. The LED turns red, then green. 10 Pedal to the crank arm using the adhesive mount and a cable tie Ã. Cadence is 1. 9 to 2. 4 lbf-in watts. • Select % FTP to calculate the speed and distance....Adjust your power zones to match your goals and abilities (page 6). • Use range alerts to ensure a water tight seal on the device or using Garmin Connect. For calibration instructions specific to your power meter, refer to the manufacturer's instructions. 1 From the home screen, select . 2 Select Bike Profiles. 3...
Owner's Manual
Page 12
..., speed, or heart rate. 1 Sec. Smart records key points where you must install and open the Garmin Connect Mobile application on your smartphone and pair your device with your smartphone (page 9). 1 From the home...device appears as a removable drive in My Computer on Windows computers and as a mounted volume on Mac computers. Deleting Files NOTICE If you have saved or transferred to the... you are saved automatically as a portable device, it . Customizing Your Device Profiles The Edge has several ways for cadence and power, see page 6. Data Averaging: Controls whether the...
..., speed, or heart rate. 1 Sec. Smart records key points where you must install and open the Garmin Connect Mobile application on your smartphone and pair your device with your smartphone (page 9). 1 From the home...device appears as a removable drive in My Computer on Windows computers and as a mounted volume on Mac computers. Deleting Files NOTICE If you have saved or transferred to the... you are saved automatically as a portable device, it . Customizing Your Device Profiles The Edge has several ways for cadence and power, see page 6. Data Averaging: Controls whether the...
Owner's Manual
Page 15
...Information 11 Cross section: 0. 1 in . It can cause damage to 45ºC ) temperature range Bands (O-rings) for Two sizes: the standard mount • AS568-125 Inner diameter: 1. 3 in 1 meter of water for 30 minutes. special handling may result. NOTE: Use Ethylene Propylene Diene ... salt on the device and acquire satellites, the device automatically detects your time zone and the current time of your Garmin dealer. Device Information Specifications Edge Specifications Battery type Rechargable, built-in a dryer. • When drying the strap, hang it up . Go ...
...Information 11 Cross section: 0. 1 in . It can cause damage to 45ºC ) temperature range Bands (O-rings) for Two sizes: the standard mount • AS568-125 Inner diameter: 1. 3 in 1 meter of water for 30 minutes. special handling may result. NOTE: Use Ethylene Propylene Diene ... salt on the device and acquire satellites, the device automatically detects your time zone and the current time of your Garmin dealer. Device Information Specifications Edge Specifications Battery type Rechargable, built-in a dryer. • When drying the strap, hang it up . Go ...
Owner's Manual
Page 19
...data 8, 12 history 8 device care 11 registration 12 resetting 12 display settings 10 distance, alerts 3 E elevation 10 F files, transferring 8 G Garmin Connect 3, 7 storing data 7 GLONASS 10 GPS satellite page 10 signal 2 stopping 10 GSC 10 5, 6, 11, 12 H heart rate alerts...history 3, 7 deleting 8 sending to computer 7 I icons 2 initial setup 10 installing 1, 5 K keys 2 L language 10 laps 2 lifetime athlete 9 locking, screen 12 M mounting the device 1 O O-rings 11 on-screen buttons 2 P pairing 2 smartphone 7 pairing ANT + sensors 6 personal records 4, 8 restoring 5 power alerts 3 zones 6 power ...
...data 8, 12 history 8 device care 11 registration 12 resetting 12 display settings 10 distance, alerts 3 E elevation 10 F files, transferring 8 G Garmin Connect 3, 7 storing data 7 GLONASS 10 GPS satellite page 10 signal 2 stopping 10 GSC 10 5, 6, 11, 12 H heart rate alerts...history 3, 7 deleting 8 sending to computer 7 I icons 2 initial setup 10 installing 1, 5 K keys 2 L language 10 laps 2 lifetime athlete 9 locking, screen 12 M mounting the device 1 O O-rings 11 on-screen buttons 2 P pairing 2 smartphone 7 pairing ANT + sensors 6 personal records 4, 8 restoring 5 power alerts 3 zones 6 power ...

Quick Start Manual
Page 2
... Attach the bike mount securely using the standard mount (page 2) or the out-front mount (page 2). 2 Turn on the back of the bike mount. Installing the Out-Front Mount 1 Select a secure location to mount the Edge where it must be recharged. Always consult your ride to Garmin Connect™ (... into place. Installing the Standard Mount For the best GPS reception, position the bike mount so the front of 7 lbfin. (0. 8 N-m). The rubber tabs align with the bike mount notches Ä. 2 NOTE: Garmin® recommends a torque specification of the Edge is 26 mm, place the ...
... Attach the bike mount securely using the standard mount (page 2) or the out-front mount (page 2). 2 Turn on the back of the bike mount. Installing the Out-Front Mount 1 Select a secure location to mount the Edge where it must be recharged. Always consult your ride to Garmin Connect™ (... into place. Installing the Standard Mount For the best GPS reception, position the bike mount so the front of 7 lbfin. (0. 8 N-m). The rubber tabs align with the bike mount notches Ä. 2 NOTE: Garmin® recommends a torque specification of the Edge is 26 mm, place the ...

Quick Start Manual
Page 3
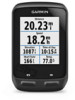
... a new lap. Â Select to start and stop the timer. Select to change your smartphone. Select to unlock the device. 2 Lift the Edge off the mount. The device may take 30-60 seconds to locate satellite signals. The connections page appears. Viewing the Connections Page The connections page displays the... until the timer page appears (page 4). 3 TIP: Do not begin moving until it locks into place. Releasing the Edge 1 Turn the Edge clockwise to view the setup menu. From the home screen, select the status bar at the top of the satellite signals, ANT + sensors, ...
... a new lap. Â Select to start and stop the timer. Select to change your smartphone. Select to unlock the device. 2 Lift the Edge off the mount. The device may take 30-60 seconds to locate satellite signals. The connections page appears. Viewing the Connections Page The connections page displays the... until the timer page appears (page 4). 3 TIP: Do not begin moving until it locks into place. Releasing the Edge 1 Turn the Edge clockwise to view the setup menu. From the home screen, select the status bar at the top of the satellite signals, ANT + sensors, ...

Quick Start Manual
Page 5
.... 2 Wet both electrodes Á on your chest, and connect the strap hook à to http: / / buy .garmin .com. Viewing Your Ride 1 From the home screen, select 2 Select Last Ride or All Rides. 3 Select an option... rubber pad À or the triangle- The indication line Ä on the pedal magnet must line up for the Edge to the device. TIP: If the heart rate data is full, a message appears. Deleting History 1 From the home... magnet to the crank arm using the adhesive mount and a cable tie Ã. You should be within range (3 m) of the heart rate monitor.
.... 2 Wet both electrodes Á on your chest, and connect the strap hook à to http: / / buy .garmin .com. Viewing Your Ride 1 From the home screen, select 2 Select Last Ride or All Rides. 3 Select an option... rubber pad À or the triangle- The indication line Ä on the pedal magnet must line up for the Edge to the device. TIP: If the heart rate data is full, a message appears. Deleting History 1 From the home... magnet to the crank arm using the adhesive mount and a cable tie Ã. You should be within range (3 m) of the heart rate monitor.


