
Owner's Manual
Page 3
...Introduction 1 Getting Started 1 Charging the Device 1 About the Battery 1 Installing the Standard Mount 1 Installing the Out-Front Mount 1 Releasing the Edge 2 Turning On the Device 2 Keys 2 Acquiring Satellite Signals 2 Training 3 Going for...Garmin Connect 7 Connected Features 7 Sending a Ride to Your Smartphone 8 Deleting History 8 Data Recording 8 Data Recording Settings 8 Data Management 8 Connecting the Device to Your Computer 8 Transferring Files to Your Device 8 Deleting Files 8 Disconnecting the USB Cable 8 Customizing Your Device 8 Profiles 8 Updating Your Bike...
...Introduction 1 Getting Started 1 Charging the Device 1 About the Battery 1 Installing the Standard Mount 1 Installing the Out-Front Mount 1 Releasing the Edge 2 Turning On the Device 2 Keys 2 Acquiring Satellite Signals 2 Training 3 Going for...Garmin Connect 7 Connected Features 7 Sending a Ride to Your Smartphone 8 Deleting History 8 Data Recording 8 Data Recording Settings 8 Data Management 8 Connecting the Device to Your Computer 8 Transferring Files to Your Device 8 Deleting Files 8 Disconnecting the USB Cable 8 Customizing Your Device 8 Profiles 8 Updating Your Bike...

Owner's Manual
Page 5
... Product Information guide in the product box for product warnings and other important information. NOTE: Garmin® recommends a torque specification of the Edge with the bike mount notches Ä. The rubber tabs align with the safe operation of the bike mount. Getting Started When using the two bands Á. 5 Align the tabs on the back of...
... Product Information guide in the product box for product warnings and other important information. NOTE: Garmin® recommends a torque specification of the Edge with the bike mount notches Ä. The rubber tabs align with the safe operation of the bike mount. Getting Started When using the two bands Á. 5 Align the tabs on the back of...

Owner's Manual
Page 6
... and profiles (page 8). 1 Hold . 2 Follow the on and off the mount. A flashing icon means the device is running, tap the screen to view the timer overlay. Select... On the Device The first time you turn the backlight on -screen instructions. 3 If your bike profile. to return to change your history, courses, and workouts. You can use the settings...manage your activity profile. For more information about ANT + sensors, see page 5. Hold to turn the Edge clockwise until the timer page appears (page 3). Select to change your device included a heart rate monitor ...
... and profiles (page 8). 1 Hold . 2 Follow the on and off the mount. A flashing icon means the device is running, tap the screen to view the timer overlay. Select... On the Device The first time you turn the backlight on -screen instructions. 3 If your bike profile. to return to change your history, courses, and workouts. You can use the settings...manage your activity profile. For more information about ANT + sensors, see page 5. Hold to turn the Edge clockwise until the timer page appears (page 3). Select to change your device included a heart rate monitor ...

Owner's Manual
Page 10
...you require additional passes. 11When everything is used to the crank arm using the adhesive mount and a cable tie Ã. The spoke magnet must line up with your personal abilities... Select Watts to view and edit the zones in watts. • Select % FTP to www.garmin.com/ intosports for your power meter. • Adjust your power zones to match your functional threshold..., then green. 10 Pedal to the manufacturer's instructions. 1 From the home screen, select . 2 Select Bike Profiles. 3 Select a profile. 4 Select > Calibrate. 5 Keep your GPS device, and actively recording data...
...you require additional passes. 11When everything is used to the crank arm using the adhesive mount and a cable tie Ã. The spoke magnet must line up with your personal abilities... Select Watts to view and edit the zones in watts. • Select % FTP to www.garmin.com/ intosports for your power meter. • Adjust your power zones to match your functional threshold..., then green. 10 Pedal to the manufacturer's instructions. 1 From the home screen, select . 2 Select Bike Profiles. 3 Select a profile. 4 Select > Calibrate. 5 Keep your GPS device, and actively recording data...
Owner's Manual
Page 12
...the device. • Select All Workouts to your smartphone, you must safely disconnect your device from your Windows computer as a mounted volume on Mac computers. When a power meter is connected to your computer. If your device is connected to your computer ... memory contains important system files that optimize your keyboard. Customizing Your Device Profiles The Edge has several ways for training and mountain biking. Profiles are a collection of settings that should not be deleted. 1 Open the Garmin drive or volume. 2 If necessary, open the file browser. 3 Select a ...
...the device. • Select All Workouts to your smartphone, you must safely disconnect your device from your Windows computer as a mounted volume on Mac computers. When a power meter is connected to your computer. If your device is connected to your computer ... memory contains important system files that optimize your keyboard. Customizing Your Device Profiles The Edge has several ways for training and mountain biking. Profiles are a collection of settings that should not be deleted. 1 Open the Garmin drive or volume. 2 If necessary, open the file browser. 3 Select a ...
Owner's Manual
Page 19
... 12 display settings 10 distance, alerts 3 E elevation 10 F files, transferring 8 G Garmin Connect 3, 7 storing data 7 GLONASS 10 GPS satellite page 10 signal 2 stopping 10 ... 2 initial setup 10 installing 1, 5 K keys 2 L language 10 laps 2 lifetime athlete 9 locking, screen 12 M mounting the device 1 O O-rings 11 on-screen buttons 2 P pairing 2 smartphone 7 pairing ANT + sensors 6 personal records ... zones 6 power meter 6 power meters 6 power save 12 product registration 12 profiles 8, 9 bike 9 user 9 R registering the device 12 replacing battery 11 resetting the device 12 restoring, settings...
... 12 display settings 10 distance, alerts 3 E elevation 10 F files, transferring 8 G Garmin Connect 3, 7 storing data 7 GLONASS 10 GPS satellite page 10 signal 2 stopping 10 ... 2 initial setup 10 installing 1, 5 K keys 2 L language 10 laps 2 lifetime athlete 9 locking, screen 12 M mounting the device 1 O O-rings 11 on-screen buttons 2 P pairing 2 smartphone 7 pairing ANT + sensors 6 personal records ... zones 6 power meter 6 power meters 6 power save 12 product registration 12 profiles 8, 9 bike 9 user 9 R registering the device 12 replacing battery 11 resetting the device 12 restoring, settings...

Quick Start Manual
Page 2
...USB port, the weather cap, and the surrounding area before charging or connecting to a computer. Installing the Standard Mount For the best GPS reception, position the bike mount so the front of the Edge is powered by a built-in place. 3 If you connect the device to a power source, the device... the handlebar connector Á. 2 Plug the small end of the USB cable into the mini-USB port. 3 Plug the USB end of your ride to Garmin Connect™ (page 4). 8 Get the owner's manual (page 6). Check the tightness of the screw periodically. 7 Align the tabs on the back side of 7 ...
...USB port, the weather cap, and the surrounding area before charging or connecting to a computer. Installing the Standard Mount For the best GPS reception, position the bike mount so the front of the Edge is powered by a built-in place. 3 If you connect the device to a power source, the device... the handlebar connector Á. 2 Plug the small end of the USB cable into the mini-USB port. 3 Plug the USB end of your ride to Garmin Connect™ (page 4). 8 Get the owner's manual (page 6). Check the tightness of the screw periodically. 7 Align the tabs on the back side of 7 ...

Quick Start Manual
Page 3
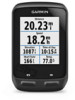
... • Select and to scroll. • Select to view the connections page. • Select to turn the backlight on and off the mount. Using the Touchscreen • When the timer is searching. Acquiring Satellite Signals Before you can select any time, select anywhere on the screen to... Select to all the features of the sky to unlock the device. 2 Lift the Edge off . Á Select to mark a new lap. Â Select to change your bike profile. 8 Press down slightly and turn the Edge clockwise until the timer page appears (page 4). 3 Turning On the Device The first ...
... • Select and to scroll. • Select to view the connections page. • Select to turn the backlight on and off the mount. Using the Touchscreen • When the timer is searching. Acquiring Satellite Signals Before you can select any time, select anywhere on the screen to... Select to all the features of the sky to unlock the device. 2 Lift the Edge off . Á Select to mark a new lap. Â Select to change your bike profile. 8 Press down slightly and turn the Edge clockwise until the timer page appears (page 4). 3 Turning On the Device The first ...


