Owners Manual
Page 3
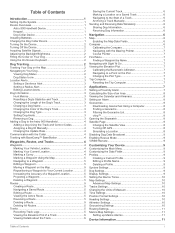
...Turning Off GPS 8 Simulating a Location 8 Disabling Dog Data Broadcast 9 Enabling Rescue Mode 9 VIRB® Remote 9 Customizing Your Device 9 Customizing the Main Menu 9 Customizing the Data Fields 9 Profiles 9 Creating a Custom Profile 9 Editing a Profile Name 9 Deleting a Profile 9 System Settings 9 Dog Settings 9 Display Settings 9 Setting the Device Tones 10 Map Settings 10 Advanced Map Settings 10 Tracks Settings 10 Changing the Units of Measure 10 Time Settings 10 Position Format Settings 10 Heading Settings 10 Altimeter Settings 10 Geocaching Settings 10 Routing...
...Turning Off GPS 8 Simulating a Location 8 Disabling Dog Data Broadcast 9 Enabling Rescue Mode 9 VIRB® Remote 9 Customizing Your Device 9 Customizing the Main Menu 9 Customizing the Data Fields 9 Profiles 9 Creating a Custom Profile 9 Editing a Profile Name 9 Deleting a Profile 9 System Settings 9 Dog Settings 9 Display Settings 9 Setting the Device Tones 10 Map Settings 10 Advanced Map Settings 10 Tracks Settings 10 Changing the Units of Measure 10 Time Settings 10 Position Format Settings 10 Heading Settings 10 Altimeter Settings 10 Geocaching Settings 10 Routing...

Owners Manual
Page 4
... the Device 11 Cleaning the Screen 11 Astro 900 Handheld Device Specifications 11 T9 Dog Collar Device Specifications 11 Battery Information 12 Long-Term Storage 12 Data Management 12 File Types 12 Installing a Memory Card 12 Connecting the Handheld Device to a Computer 12 Connecting the Collar to a Computer 12 Transferring Dog Tracks to BaseCamp 12 Disconnecting the USB Cable 13 Appendix 13 Accessories and Replacement Parts 13 Purchasing Accessories 13 Dog Device Battery Replacement Instructions 13 Replacing the...
... the Device 11 Cleaning the Screen 11 Astro 900 Handheld Device Specifications 11 T9 Dog Collar Device Specifications 11 Battery Information 12 Long-Term Storage 12 Data Management 12 File Types 12 Installing a Memory Card 12 Connecting the Handheld Device to a Computer 12 Connecting the Collar to a Computer 12 Transferring Dog Tracks to BaseCamp 12 Disconnecting the USB Cable 13 Appendix 13 Accessories and Replacement Parts 13 Purchasing Accessories 13 Dog Device Battery Replacement Instructions 13 Replacing the...
Owners Manual
Page 5
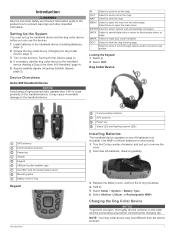
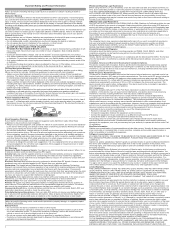
... to view the map. Device Overviews Astro 900 Handheld Device NOTICE Avoid using a high-powered radio (greater than the device pictured. 1 Use NiMH or lithium batteries for the active page. MAP Select to move the map pointer. Dog Collar Device GPS antenna Communication antenna Power key Display Keypad USB port (under weather cap) microSD® card slot (under battery door) Mounting spine Battery cover D-ring Keypad Introduction Communication antenna GPS antenna Power key Status LED and flashing beacon LEDs Installing Batteries The handheld device operates...
... to view the map. Device Overviews Astro 900 Handheld Device NOTICE Avoid using a high-powered radio (greater than the device pictured. 1 Use NiMH or lithium batteries for the active page. MAP Select to move the map pointer. Dog Collar Device GPS antenna Communication antenna Power key Display Keypad USB port (under weather cap) microSD® card slot (under battery door) Mounting spine Battery cover D-ring Keypad Introduction Communication antenna GPS antenna Power key Status LED and flashing beacon LEDs Installing Batteries The handheld device operates...
Owners Manual
Page 6
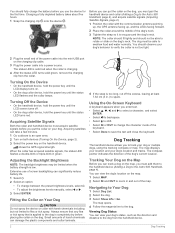
... time. Navigating to spare. Turning On the Device • On the handheld device, hold the power key until the LCD display turns on the dog, you to flea or tick spray. You can put the collar on the map. 1 Select MAP. 2 Select IN and OUT to the Astro 900 Handheld, page 4), and acquire satellite signals (Acquiring Satellite Signals, page 2). 1 Position the collar with harsh chemicals including but not limited to track...
... time. Navigating to spare. Turning On the Device • On the handheld device, hold the power key until the LCD display turns on the dog, you to flea or tick spray. You can put the collar on the map. 1 Select MAP. 2 Select IN and OUT to the Astro 900 Handheld, page 4), and acquire satellite signals (Acquiring Satellite Signals, page 2). 1 Position the collar with harsh chemicals including but not limited to track...

Owners Manual
Page 7
... the duration of the track can receive an alert when a dog or contact moves within 3 m (10 ft.) of the handheld device. The on the map. Setting a Radius Alert You can reduce the clutter on -screen keyboard appears (Using the On-Screen Keyboard, page 2). 3 Enter the name of times and locations where the dog treed during the hunt. On Point: The number of the geofence...
... the duration of the track can receive an alert when a dog or contact moves within 3 m (10 ft.) of the handheld device. The on the map. Setting a Radius Alert You can reduce the clutter on -screen keyboard appears (Using the On-Screen Keyboard, page 2). 3 Enter the name of times and locations where the dog treed during the hunt. On Point: The number of the geofence...
Owners Manual
Page 8
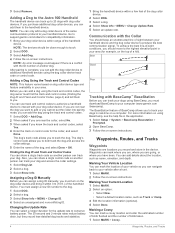
... help file in the application. 1 Select Setup > System > BaseCamp Basestation > Prompted. 2 Open BaseCamp. 3 Follow the on using the track and control codes, the dog owner must turn on dog collar device type and feature availability in the device. You can mark a covey location and enter the estimated number of birds flushed and the number of another person can add the dog using the dog collar device track code or control code.
... help file in the application. 1 Select Setup > System > BaseCamp Basestation > Prompted. 2 Open BaseCamp. 3 Follow the on using the track and control codes, the dog owner must turn on dog collar device type and feature availability in the device. You can mark a covey location and enter the estimated number of birds flushed and the number of another person can add the dog using the dog collar device track code or control code.

Owners Manual
Page 9
... Map 1 Select MAP. 2 Select a location on -screen instructions. 7 When the confidence status bar reaches 100%, select Save. The waypoint position changes to a Waypoint 1 From the main menu, select Tools > Find > Waypoints . 2 Select a waypoint. 3 Select Go. Navigating a Saved Route 1 Select Tools > Route Planner. 2 Select a route. 3 Select View Map > Go. 4 Navigate using the compass (Navigating with the Bearing Pointer, page 7) or map (Map, page 6). The additional point is a recording of birds taken, and select OK. 3 Review and edit location information...
... Map 1 Select MAP. 2 Select a location on -screen instructions. 7 When the confidence status bar reaches 100%, select Save. The waypoint position changes to a Waypoint 1 From the main menu, select Tools > Find > Waypoints . 2 Select a waypoint. 3 Select Go. Navigating a Saved Route 1 Select Tools > Route Planner. 2 Select a route. 3 Select View Map > Go. 4 Navigate using the compass (Navigating with the Bearing Pointer, page 7) or map (Map, page 6). The additional point is a recording of birds taken, and select OK. 3 Review and edit location information...
Owners Manual
Page 10
... device to a destination, your location on -screen instructions. Information about the Track 1 Select Tools > Track Manager. 2 Select a track. 3 Select View Map. Marking a Location on a Saved Track 1 From the main menu, select Tools > Track Manager. 2 Select a track. 3 Select View Map. 4 Select a location on the map. The map page opens with your way back to a waypoint, geocache, photo, or any saved location in the direction you travel , the entire map reorients in the device. Archiving a Track Manually You can navigate routes and tracks...
... device to a destination, your location on -screen instructions. Information about the Track 1 Select Tools > Track Manager. 2 Select a track. 3 Select View Map. Marking a Location on a Saved Track 1 From the main menu, select Tools > Track Manager. 2 Select a track. 3 Select View Map. 4 Select a location on the map. The map page opens with your way back to a waypoint, geocache, photo, or any saved location in the direction you travel , the entire map reorients in the device. Archiving a Track Manually You can navigate routes and tracks...
Owners Manual
Page 11
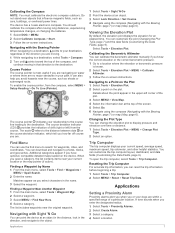
... data fields (Customizing the Data Fields, page 9). You can change the elevation plot to a location where the elevation or barometric pressure is most useful if you or your path. Viewing the Elevation Plot By default, the elevation plot displays the elevation for waypoints, cities, and coordinates. Details about the point appear in the direction, and navigate to a destination, select Tools > Compass 2 Turn until...
... data fields (Customizing the Data Fields, page 9). You can change the elevation plot to a location where the elevation or barometric pressure is most useful if you or your path. Viewing the Elevation Plot By default, the elevation plot displays the elevation for waypoints, cities, and coordinates. Details about the point appear in the direction, and navigate to a destination, select Tools > Compass 2 Turn until...
Owners Manual
Page 12
... caches using a USB cable. 2 Go to www.geocaching.com/play. 3 If necessary, create an account. 4 Sign in. 5 Follow the instructions at www.garmin.com. Setting an Alarm 1 Select Tools > Alarm Clock. 2 Enter the time. 3 Select Turn Alarm On. 4 Select an option. Enabling chirp Searching 1 Select Setup > Geocaches. 2 Select chirp Searching > On. You can view device activity, such as when a waypoint was saved, and almanac information for...
... caches using a USB cable. 2 Go to www.geocaching.com/play. 3 If necessary, create an account. 4 Sign in. 5 Follow the instructions at www.garmin.com. Setting an Alarm 1 Select Tools > Alarm Clock. 2 Enter the time. 3 Select Turn Alarm On. 4 Select an option. Enabling chirp Searching 1 Select Setup > Geocaches. 2 Select chirp Searching > On. You can view device activity, such as when a waypoint was saved, and almanac information for...
Owners Manual
Page 13
... AA battery you manually pan the map. For more time to the settings, dashboards, and data fields are using it within 3 m (10 ft.) of user-entered data or map data, such as part of time before you make to locate the dog. Go to www.garmin.com/VIRB to compatible devices (Disabling Dog Data Broadcast, page 9). Deleting a Profile 1 From the main menu, select Tools > Profile Change > MENU > Setup Profiles. 2 Select a profile. 3 Select Delete. GPS: Sets the GPS to...
... AA battery you manually pan the map. For more time to the settings, dashboards, and data fields are using it within 3 m (10 ft.) of user-entered data or map data, such as part of time before you make to locate the dog. Go to www.garmin.com/VIRB to compatible devices (Disabling Dog Data Broadcast, page 9). Deleting a Profile 1 From the main menu, select Tools > Profile Change > MENU > Setup Profiles. 2 Select a profile. 3 Select Delete. GPS: Sets the GPS to...

Owners Manual
Page 14
... for the location information. Tracks Settings Select Setup > Tracks. Time Settings Select Setup > Time. Position Format: Sets the position format for pressure fronts. Map Spheroid: Shows the coordinate system the device is using a map or chart that appears on the compass. North Reference: Sets the north reference used on the map (if available) or turns off . Go To Line (Pointer): Sets the behavior of time. Compass: Automatically switches from an electronic compass to weather. Barometer Mode: Sets how the device measures barometric information. Fixed Elevation...
... for the location information. Tracks Settings Select Setup > Tracks. Time Settings Select Setup > Time. Position Format: Sets the position format for pressure fronts. Map Spheroid: Shows the coordinate system the device is using a map or chart that appears on the compass. North Reference: Sets the north reference used on the map (if available) or turns off . Go To Line (Pointer): Sets the behavior of time. Compass: Automatically switches from an electronic compass to weather. Barometer Mode: Sets how the device measures barometric information. Fixed Elevation...
Owners Manual
Page 15
..., because it dry. Product Updates On your position on -screen instructions. Device Information 11 The device is available only for up Marine Alarms 1 From the main menu, select Setup > Marine > Marine Alarm Setup. 2 Select an alarm type. 3 Select On. 4 Enter a distance. • Map updates • Product registration Setting Up Garmin Express 1 Connect the device to 1 m for some activities. Select Setup > Routing. Off Road Transitions: Sets how the device routes from 32° to...
..., because it dry. Product Updates On your position on -screen instructions. Device Information 11 The device is available only for up Marine Alarms 1 From the main menu, select Setup > Marine > Marine Alarm Setup. 2 Select an alarm type. 3 Select On. 4 Enter a distance. • Map updates • Product registration Setting Up Garmin Express 1 Connect the device to 1 m for some activities. Select Setup > Routing. Off Road Transitions: Sets how the device routes from 32° to...

Owners Manual
Page 16
... department to www.garmin.com/products/poiloader. Device Information NOTE: The device is not compatible with programs like BaseCamp. Connecting the Collar to lock it. 7 Replace the battery and cover. Installing a Memory Card WARNING Do not use a sharp object to use . Do not use a sharp object to www.garmin.com/trip_planning. • JPEG photo files. • GPX geocache files. Go to remove user-replaceable batteries. Storing a fully charged device in My Computer...
... department to www.garmin.com/products/poiloader. Device Information NOTE: The device is not compatible with programs like BaseCamp. Connecting the Collar to lock it. 7 Replace the battery and cover. Installing a Memory Card WARNING Do not use a sharp object to use . Do not use a sharp object to www.garmin.com/trip_planning. • JPEG photo files. • GPX geocache files. Go to remove user-replaceable batteries. Storing a fully charged device in My Computer...

Owners Manual
Page 17
... the data fields to garmin.com/accessories. These accessories use optional fitness accessories including a heart rate monitor or a cadence sensor with your device. Back plate Power key Battery connector Battery cover Battery Power connector Removing the Old Battery Before you replace the battery, you must also have a Appendix 13 You must remove the old battery (Removing the Old Battery, page 13). Installing the New Battery Before you replace the battery, you must install the new battery the...
... the data fields to garmin.com/accessories. These accessories use optional fitness accessories including a heart rate monitor or a cadence sensor with your device. Back plate Power key Battery connector Battery cover Battery Power connector Removing the Old Battery Before you replace the battery, you must also have a Appendix 13 You must remove the old battery (Removing the Old Battery, page 13). Installing the New Battery Before you replace the battery, you must install the new battery the...

Owners Manual
Page 18
... or number of ascent since the last reset. You must be viewed as the old battery. Glide Ratio: The ratio of the destination). GPS Signal Strength: The strength of the selected position format setting. Your device must be navigating for this data to loosen the screw on the route (adjusted to test the connections. Location (selected): The current position using the same orientation as a planned or set route. When properly connected, a tone...
... or number of ascent since the last reset. You must be viewed as the old battery. Glide Ratio: The ratio of the destination). GPS Signal Strength: The strength of the selected position format setting. Your device must be navigating for this data to loosen the screw on the route (adjusted to test the connections. Location (selected): The current position using the same orientation as a planned or set route. When properly connected, a tone...
Owners Manual
Page 19
... batteries (Installing Batteries, page 1). You must be navigating for this data to support.garmin.com/collars for compatibility information. R means turn . You must be navigating for this data to resolve the conflict. Vertical Speed to Dest: The rate of ascent or descent to appear. You must be navigating for this data to appear. Troubleshooting My handheld device is not responding If your current location and time settings (format, time zone, daylight saving time...
... batteries (Installing Batteries, page 1). You must be navigating for this data to support.garmin.com/collars for compatibility information. R means turn . You must be navigating for this data to resolve the conflict. Vertical Speed to Dest: The rate of ascent or descent to appear. You must be navigating for this data to appear. Troubleshooting My handheld device is not responding If your current location and time settings (format, time zone, daylight saving time...
Owners Manual
Page 20
See memory card N name, editing 3 navigation 2, 6, 7 altimeter 7 P pairing, ANT+ sensors 13 power cables, changing the fuse 14 power key 2 product registration 11, 15 profiles 9 deleting 9 editing 9 proximity alarms 7 R radio communication 4 registering the device 11, 15 replacement parts 13, 14 rescue mode 9 resetting the device 15 routes 5 creating 5 deleting 5 editing 5 navigating 5 settings 11 S satellite signals 8 acquiring 2 screen. See also backlight brightness 2 cleaning 11 settings 9 settings 9-11 sharing data 6 Sight 'N Go 7 software updates 11 updating 11 specifications 11 ...
See memory card N name, editing 3 navigation 2, 6, 7 altimeter 7 P pairing, ANT+ sensors 13 power cables, changing the fuse 14 power key 2 product registration 11, 15 profiles 9 deleting 9 editing 9 proximity alarms 7 R radio communication 4 registering the device 11, 15 replacement parts 13, 14 rescue mode 9 resetting the device 15 routes 5 creating 5 deleting 5 editing 5 navigating 5 settings 11 S satellite signals 8 acquiring 2 screen. See also backlight brightness 2 cleaning 11 settings 9 settings 9-11 sharing data 6 Sight 'N Go 7 software updates 11 updating 11 specifications 11 ...
Important Safety and Product Information
Page 2
... broadband network operating on , should not carry the radio in normal use of GPS dog collars for your jurisdiction prior to all available navigation sources, including trail signs, trail conditions, weather conditions, and other device that are warranted to be incurred as a result of time spent viewing the device screen while driving. • Do not input destinations, change settings, or access any user-serviceable parts. Garmin Ltd. GARMIN DOES...
... broadband network operating on , should not carry the radio in normal use of GPS dog collars for your jurisdiction prior to all available navigation sources, including trail signs, trail conditions, weather conditions, and other device that are warranted to be incurred as a result of time spent viewing the device screen while driving. • Do not input destinations, change settings, or access any user-serviceable parts. Garmin Ltd. GARMIN DOES...
Important Safety and Product Information
Page 3
... a Garmin Authorized service facility in the United States, you can service your product, in product offerings and applicable standards, laws and regulations. If you are in the original country of purchase or return a repaired or replaced product to you will not replace missing components from Garmin warranty coverage. In some cases, Garmin and its option: (i) repair the device using new parts or previously used parts...
... a Garmin Authorized service facility in the United States, you can service your product, in product offerings and applicable standards, laws and regulations. If you are in the original country of purchase or return a repaired or replaced product to you will not replace missing components from Garmin warranty coverage. In some cases, Garmin and its option: (i) repair the device using new parts or previously used parts...


