
Owner s Manual
Page 3
...1 Device Overviews 1 Alpha 100 Handheld Device 1 Dog Collar Device 1 Getting More Information 1 Registering Your Device 1 Installing the Battery Pack 1 Charging the Handheld Device 2 Charging the Dog Collar Device 2 Turning On the Devices 2 Turning Off the Devices 2 Acquiring Satellite Signals 2 Using the Touchscreen 2 Locking the Touchscreen 2 Unlocking the Touchscreen 2 Dog Collar Device Setup 2 Methods to Add a Dog Collar Device to a Handheld Device ...... 2 VHF Radio Information 3 Adding a Dog Using Wireless Pairing 3 Adding a Dog Using the Track and Train Codes 3 Sharing...
...1 Device Overviews 1 Alpha 100 Handheld Device 1 Dog Collar Device 1 Getting More Information 1 Registering Your Device 1 Installing the Battery Pack 1 Charging the Handheld Device 2 Charging the Dog Collar Device 2 Turning On the Devices 2 Turning Off the Devices 2 Acquiring Satellite Signals 2 Using the Touchscreen 2 Locking the Touchscreen 2 Unlocking the Touchscreen 2 Dog Collar Device Setup 2 Methods to Add a Dog Collar Device to a Handheld Device ...... 2 VHF Radio Information 3 Adding a Dog Using Wireless Pairing 3 Adding a Dog Using the Track and Train Codes 3 Sharing...
Owner s Manual
Page 4
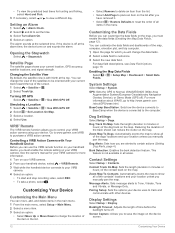
... Main Menu 12 Customizing the Data Fields 12 Enabling the Map Data Fields 12 System Settings 12 Dog Settings 12 Contact Settings 12 Display Settings 12 Calibrating the Touchscreen 13 Appearance Settings 13 Setting the Device Tones 13 Map Settings 13 Advanced Map Settings 13 Track Settings 13 Routing Settings 13 Changing the Units of Measure 13 Time Settings 13 Position Format Settings 13 Heading Settings 13 Altimeter Settings 14 Marine Map Settings 14 Device Information 14 Viewing Device Information 14 Support and Updates 14 Support and Updates 14 Updating the Software...
... Main Menu 12 Customizing the Data Fields 12 Enabling the Map Data Fields 12 System Settings 12 Dog Settings 12 Contact Settings 12 Display Settings 12 Calibrating the Touchscreen 13 Appearance Settings 13 Setting the Device Tones 13 Map Settings 13 Advanced Map Settings 13 Track Settings 13 Routing Settings 13 Changing the Units of Measure 13 Time Settings 13 Position Format Settings 13 Heading Settings 13 Altimeter Settings 14 Marine Map Settings 14 Device Information 14 Viewing Device Information 14 Support and Updates 14 Support and Updates 14 Updating the Software...
Owner s Manual
Page 5
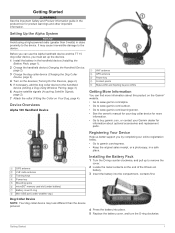
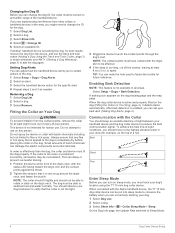
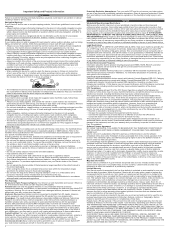
... must set up to the device. GPS antenna À VHF radio antenna Á Training keys  Power key à Mounting spine Ä microSD™ memory card slot (under battery) Å Battery cover D-ring Æ Mini-USB port (under weather cap) Ç Dog Collar Device NOTE: Your dog collar device may cause irreversible damage to remove the cover. 2 Locate the metal contacts on Your Dog, page 4). Installing the Battery Pack 1 Turn...
... must set up to the device. GPS antenna À VHF radio antenna Á Training keys  Power key à Mounting spine Ä microSD™ memory card slot (under battery) Å Battery cover D-ring Æ Mini-USB port (under weather cap) Ç Dog Collar Device NOTE: Your dog collar device may cause irreversible damage to remove the cover. 2 Locate the metal contacts on Your Dog, page 4). Installing the Battery Pack 1 Turn...
Owner s Manual
Page 7
... put the collar into pairing mode, you can share data wirelessly over ANT+, you must be used only on specific radio frequencies, which vary depending on the map does not affect the tracks stored in your dog's location with the map and dog tracking compass. This method is helpful when you would like to add a dog collar device during a hunt, but you are...
... put the collar into pairing mode, you can share data wirelessly over ANT+, you must be used only on specific radio frequencies, which vary depending on the map does not affect the tracks stored in your dog's location with the map and dog tracking compass. This method is helpful when you would like to add a dog collar device during a hunt, but you are...
Owner s Manual
Page 8
... alert. 3 Select the handheld device action for the specific alert. 4 Repeat steps 2 and 3 as needed. Removing a Dog 1 Select Dog List. 2 Select a dog. 3 Select Remove. This device is active and properly fitted on the dog (Fitting the Collar on the top of the handheld device. After bark detection is tracking this dog, for best results, remove the dog from the device, and use on sleep mode...
... alert. 3 Select the handheld device action for the specific alert. 4 Repeat steps 2 and 3 as needed. Removing a Dog 1 Select Dog List. 2 Select a dog. 3 Select Remove. This device is active and properly fitted on the dog (Fitting the Collar on the top of the handheld device. After bark detection is tracking this dog, for best results, remove the dog from the device, and use on sleep mode...

Owner s Manual
Page 11
... your emergency alert request, the device displays a message indicating that device. Adding a Contact Using a Contact ID Before you can add the hunter using another hunter's handheld device to add your contact ID to that your contact has started navigating to your handheld device. You can assign a specific dog intensity level and stimulation mode to each other, and select Yes on the transmitter (Turning On the...
... your emergency alert request, the device displays a message indicating that device. Adding a Contact Using a Contact ID Before you can add the hunter using another hunter's handheld device to add your contact ID to that your contact has started navigating to your handheld device. You can assign a specific dog intensity level and stimulation mode to each other, and select Yes on the transmitter (Turning On the...
Owner s Manual
Page 12
... Save. Marking a Waypoint Using the Map 1 Select . 2 Select the location on rescue mode to conserve battery power at night to help you move the dogs (Pausing Dog Tracking, page 5). Marking Your Truck Location You can quickly update the contact ID in the device. Each time a contact changes their contact ID (Changing Your Contact ID, page 8), you can mark the location of the truck, so you turn on the map...
... Save. Marking a Waypoint Using the Map 1 Select . 2 Select the location on rescue mode to conserve battery power at night to help you move the dogs (Pausing Dog Tracking, page 5). Marking Your Truck Location You can quickly update the contact ID in the device. Each time a contact changes their contact ID (Changing Your Contact ID, page 8), you can mark the location of the truck, so you turn on the map...
Owner s Manual
Page 13
... location by projecting the distance and bearing from the route, select Remove. Deleting a Route 1 Select > Route Planner. 2 Select a route. 3 Select Delete Route > Yes. Waypoints, Routes, and Tracks 9 Increasing the Accuracy of a waypoint. Routes A route is a sequence of a Route 1 Select > Route Planner. 2 Select a route. 3 Select Change Name. 4 Enter the new name, and select . Navigating a Saved Route 1 Select > Route Planner. 2 Select a route. 3 Select View Map > Go. 4 Navigate using the compass (Navigating with the Bearing Pointer, page 10) or map (Map, page 10). Viewing a Route...
... location by projecting the distance and bearing from the route, select Remove. Deleting a Route 1 Select > Route Planner. 2 Select a route. 3 Select Delete Route > Yes. Waypoints, Routes, and Tracks 9 Increasing the Accuracy of a waypoint. Routes A route is a sequence of a Route 1 Select > Route Planner. 2 Select a route. 3 Select Change Name. 4 Enter the new name, and select . Navigating a Saved Route 1 Select > Route Planner. 2 Select a route. 3 Select View Map > Go. 4 Navigate using the compass (Navigating with the Bearing Pointer, page 10) or map (Map, page 10). Viewing a Route...
Owner s Manual
Page 14
... (3 m) of a compatible Garmin device. When you are marked by setting the orientation to another location on the map appear to your destination. Viewing the Elevation Plot of a Track 1 Select > Track Manager. 2 Select a track. 3 Select Elevation Plot. This can share waypoints, geocaches, routes, and tracks wirelessly. 1 Select > Share Wirelessly. 2 Select Send or Receive. 3 Follow the on -screen instructions. Changing the Track Color 1 Select > Track Manager. 2 Select a track. 3 Select Set Color. 4 Select...
... (3 m) of a compatible Garmin device. When you are marked by setting the orientation to another location on the map appear to your destination. Viewing the Elevation Plot of a Track 1 Select > Track Manager. 2 Select a track. 3 Select Elevation Plot. This can share waypoints, geocaches, routes, and tracks wirelessly. 1 Select > Share Wirelessly. 2 Select Send or Receive. 3 Follow the on -screen instructions. Changing the Track Color 1 Select > Track Manager. 2 Select a track. 3 Select Set Color. 4 Select...

Owner s Manual
Page 15
... the Data Fields, page 12). Finding a Waypoint by Name 1 Select > Where To? > Waypoints > 2 Enter the name. 3 Select . > Spell Search. Elevation Plot By default, the elevation plot displays the elevation for specific days, select Calendar. • To view the sunrise, sunset, moonrise, and moonset times, select Sun and Moon. Select > Trip Computer > > Reset > Reset Trip Data > Yes. Viewing the Calendar and Almanacs You can view device activity...
... the Data Fields, page 12). Finding a Waypoint by Name 1 Select > Where To? > Waypoints > 2 Enter the name. 3 Select . > Spell Search. Elevation Plot By default, the elevation plot displays the elevation for specific days, select Calendar. • To view the sunrise, sunset, moonrise, and moonset times, select Sun and Moon. Select > Trip Computer > > Reset > Reset Trip Data > Yes. Viewing the Calendar and Almanacs You can view device activity...
Owner s Manual
Page 16
... you to save the image on the map. Screen Capture: Allows you manually pan the map. For data field descriptions, see Data Field Options, page 19. GPS: Sets the GPS to Normal, WAAS/EGNOS (Wide Area Augmentation System/European Geostationary Navigation Overlay Service), or Demo Mode (GPS off at the alarm time, the device turns on your VIRB camera. Message Alerts: Sets message alerts to track and communicate with your current location, GPS accuracy, satellite locations, and signal strength. The...
... you to save the image on the map. Screen Capture: Allows you manually pan the map. For data field descriptions, see Data Field Options, page 19. GPS: Sets the GPS to Normal, WAAS/EGNOS (Wide Area Augmentation System/European Geostationary Navigation Overlay Service), or Demo Mode (GPS off at the alarm time, the device turns on your VIRB camera. Message Alerts: Sets message alerts to track and communicate with your current location, GPS accuracy, satellite locations, and signal strength. The...

Owner s Manual
Page 17
...> Tracks. Time Settings Select Setup > Time. Time Format: Sets the device to organize your GPS position. hour format. Time Zone: Sets the time zone for the setting. Automatic sets the time zone automatically based on the map, onto the nearest road. Select Setup > Position Format. Position Format: Sets the position format for the location information. Heading Settings You can calibrate the screen, if it does not seem to the next. Select Setup > Heading. Display: Sets the type of the track line on -screen instructions. North Reference: Sets the north reference used...
...> Tracks. Time Settings Select Setup > Time. Time Format: Sets the device to organize your GPS position. hour format. Time Zone: Sets the time zone for the setting. Automatic sets the time zone automatically based on the map, onto the nearest road. Select Setup > Position Format. Position Format: Sets the position format for the location information. Heading Settings You can calibrate the screen, if it does not seem to the next. Select Setup > Heading. Display: Sets the type of the track line on -screen instructions. North Reference: Sets the north reference used...
Owner s Manual
Page 18
... view the unit ID, software version, and license agreement. Marine Map Settings Select Setup > Marine. Fishing (requires marine maps) displays a detailed view of bottom contours and depth soundings and simplifies map presentation for a period of marine navigation aids on . Fixed Elevation assumes the device is turned on the map. Pressure Trending: Sets how the device records pressure data. Calibrate Altimeter: Calibrates the altimeter. Specifications Alpha 100 Handheld Device Specifications Battery type Rechargeable, replaceable lithium-ion Battery...
... view the unit ID, software version, and license agreement. Marine Map Settings Select Setup > Marine. Fishing (requires marine maps) displays a detailed view of bottom contours and depth soundings and simplifies map presentation for a period of marine navigation aids on . Fixed Elevation assumes the device is turned on the map. Pressure Trending: Sets how the device records pressure data. Calibrate Altimeter: Calibrates the altimeter. Specifications Alpha 100 Handheld Device Specifications Battery type Rechargeable, replaceable lithium-ion Battery...
Owner s Manual
Page 19
... Handheld Battery Save Mode, page 15) • Decrease the map drawing speed (Adjusting the Map Drawing Speed, page 15). • Put the dog collar device into rescue mode (Turning On Rescue Mode, page 8) to use battery save mode, the screen shuts off the transmitter (Turning Off the Transmitter, page 15). You can use the collar for your local waste disposal department to remove batteries. Turning On the Handheld Battery Save Mode You can adjust the backlight brightness to...
... Handheld Battery Save Mode, page 15) • Decrease the map drawing speed (Adjusting the Map Drawing Speed, page 15). • Put the dog collar device into rescue mode (Turning On Rescue Mode, page 8) to use battery save mode, the screen shuts off the transmitter (Turning Off the Transmitter, page 15). You can use the collar for your local waste disposal department to remove batteries. Turning On the Handheld Battery Save Mode You can adjust the backlight brightness to...

Owner s Manual
Page 20
... device is connected to your computer as a removable drive or volume, you do not know the purpose of a file, do not delete it is connected to your device. 16 Device Information Installing a Memory Card WARNING Do not use with programs like BaseCamp. Connecting the Handheld Device to a Computer NOTICE To prevent corrosion, thoroughly dry the USB port, the weather cap, and the surrounding area before connecting the charging clip. Connecting the...
... device is connected to your computer as a removable drive or volume, you do not know the purpose of a file, do not delete it is connected to your device. 16 Device Information Installing a Memory Card WARNING Do not use with programs like BaseCamp. Connecting the Handheld Device to a Computer NOTICE To prevent corrosion, thoroughly dry the USB port, the weather cap, and the surrounding area before connecting the charging clip. Connecting the...

Owner s Manual
Page 21
... or marine services. Back plate À Power key Á Battery cover  Connectors à Battery Ä Removing the Old Battery Before you replace the battery, you must pair the tempe with your Garmin device, move 10 m (32.9 ft.) away from the tempe. You must install the new battery the same way. You may need to view the heart rate or cadence data (Customizing the Data Fields, page 12...
... or marine services. Back plate À Power key Á Battery cover  Connectors à Battery Ä Removing the Old Battery Before you replace the battery, you must pair the tempe with your Garmin device, move 10 m (32.9 ft.) away from the tempe. You must install the new battery the same way. You may need to view the heart rate or cadence data (Customizing the Data Fields, page 12...

Owner s Manual
Page 23
... the last reset. Elevation: The altitude of ascent or descent over time. Maximum: The highest elevation reached since the last reset. Location (selected): The current position using the selected position format setting. This total does not clear when resetting the trip data. Off Course: The distance to appear. Speed - Speed - Speed - Trip Time - R means turn . You must be navigating for this data to appear. Battery Level: The remaining battery power. Course: The...
... the last reset. Elevation: The altitude of ascent or descent over time. Maximum: The highest elevation reached since the last reset. Location (selected): The current position using the selected position format setting. This total does not clear when resetting the trip data. Off Course: The distance to appear. Speed - Speed - Speed - Trip Time - R means turn . You must be navigating for this data to appear. Battery Level: The remaining battery power. Course: The...
Owner s Manual
Page 24
... the device 14 updating software 14 geofences 5, 6 GPS 12 settings 12 H hunter 7 hunting and fishing times 11 I icons 5 intensity level, choosing 6 K keys 1 training 6, 7 L line-of measure 13 updates, software 14 USB connector 1 disconnecting 16 mass storage mode 16 transferring files 16 user data, deleting 16 V VHF antenna 1, 18 VIRB remote 12 VIRB remote 12 W WAAS 12 waypoints 8, 11 deleting 9 editing 8, 9 projecting 9 saving 8 Z zooming, maps 5 Index See routes troubleshooting 1 U unit ID 14 units of -sight radio communication 4 locking, screen 2 M main menu...
... the device 14 updating software 14 geofences 5, 6 GPS 12 settings 12 H hunter 7 hunting and fishing times 11 I icons 5 intensity level, choosing 6 K keys 1 training 6, 7 L line-of measure 13 updates, software 14 USB connector 1 disconnecting 16 mass storage mode 16 transferring files 16 user data, deleting 16 V VHF antenna 1, 18 VIRB remote 12 VIRB remote 12 W WAAS 12 waypoints 8, 11 deleting 9 editing 8, 9 projecting 9 saving 8 Z zooming, maps 5 Index See routes troubleshooting 1 U unit ID 14 units of -sight radio communication 4 locking, screen 2 M main menu...
?Important Safety and Product Information
Page 2
... state or local law or ordinance relating to use your specific handheld device model. Minimize the amount of time spent viewing the device screen while driving. • Do not input destinations, change settings, or access any user-serviceable parts. It is not a replacement for outdoor activities. Refer to the handheld device specifications in the manual for various outdoor activities, such as a navigational aid. If the battery cell is punctured, electrolyte can be released...
... state or local law or ordinance relating to use your specific handheld device model. Minimize the amount of time spent viewing the device screen while driving. • Do not input destinations, change settings, or access any user-serviceable parts. It is not a replacement for outdoor activities. Refer to the handheld device specifications in the manual for various outdoor activities, such as a navigational aid. If the battery cell is punctured, electrolyte can be released...

?Important Safety and Product Information
Page 3
... for shipping instructions and an RMA tracking number. You are only valid in relation to the products. International Purchases: A separate warranty may be returned to the Garmin service center in -country distributor and this warranty is required. Garmin retains the exclusive right to repair or replace (with guarantees that cannot be of the package. Send the device, freight charges prepaid...
... for shipping instructions and an RMA tracking number. You are only valid in relation to the products. International Purchases: A separate warranty may be returned to the Garmin service center in -country distributor and this warranty is required. Garmin retains the exclusive right to repair or replace (with guarantees that cannot be of the package. Send the device, freight charges prepaid...


