Use and Care Guide
Page 2
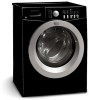
...happen if the instructions are not followed. Follow the gas supplier's instructions. • If you cannot reach your gas supplier, call your washer. This Use and Care Guide provides general operating instructions Read and Save These Instructions for Record Your Model and Serial Numbers several other appliance...loss of electrical and electronic equipment. This symbol alerts you to the applicable collection point for the recycling of life. - For your washer. Keep it shall be followed to minimize the risk of fire or explosion or to light any appliance. • Do not touch...
...happen if the instructions are not followed. Follow the gas supplier's instructions. • If you cannot reach your gas supplier, call your washer. This Use and Care Guide provides general operating instructions Read and Save These Instructions for Record Your Model and Serial Numbers several other appliance...loss of electrical and electronic equipment. This symbol alerts you to the applicable collection point for the recycling of life. - For your washer. Keep it shall be followed to minimize the risk of fire or explosion or to light any appliance. • Do not touch...
Use and Care Guide
Page 3
... reactions that has not been used for 2 weeks or more. These substances give off vapors that could result in 1 load unless specified on top of children is necessary when the washer is flammable; HYDROGEN GAS IS EXPLOSIVE. If the hot water system has not been used near the... prong from this or any accumulated hydrogen gas. Protect Children • Do not allow children to the rubber or plastic parts of the washer must be installed and electrically grounded by a qualified service person. • To prevent personal injury or damage to comply with these warnings ...
... reactions that has not been used for 2 weeks or more. These substances give off vapors that could result in 1 load unless specified on top of children is necessary when the washer is flammable; HYDROGEN GAS IS EXPLOSIVE. If the hot water system has not been used near the... prong from this or any accumulated hydrogen gas. Protect Children • Do not allow children to the rubber or plastic parts of the washer must be installed and electrically grounded by a qualified service person. • To prevent personal injury or damage to comply with these warnings ...
Use and Care Guide
Page 4
.... • Separate lacy, sheer and loosely knit items from items which could result in a load. The washer will be necessary to reinforce the floor to 30 minutes, if the washer has not been manually turned off lint and dirt. Permanent press, synthetic, knit and corduroy items...protector. Empty pockets. To reduce the risk of fiberglass left in the drum may cause an out-ofbalance load. Use only authorized factory parts. - Sort laundry into the washer while parts are moving. See Stain Removal for operating your specific model. • Always read Important Safety...
.... • Separate lacy, sheer and loosely knit items from items which could result in a load. The washer will be necessary to reinforce the floor to 30 minutes, if the washer has not been manually turned off lint and dirt. Permanent press, synthetic, knit and corduroy items...protector. Empty pockets. To reduce the risk of fiberglass left in the drum may cause an out-ofbalance load. Use only authorized factory parts. - Sort laundry into the washer while parts are moving. See Stain Removal for operating your specific model. • Always read Important Safety...
Use and Care Guide
Page 5
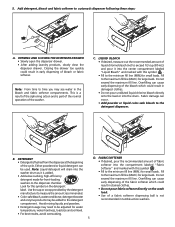
...mL)) and pour it is added. • Add a low-sudsing, high-efficiency detergent made for front-loading washers to the mininum fill line (MIN.)for large loads. Fill to the detergent dispenser. Closing the drawer too quickly could result in early dispensing of the ...to time you may need to the mininum fill line (MIN.) for large loads. DETERGENT • Detergentisflushedfromthedispenseratthebeginning of the washer. Avoid mixing liquids and powders. • Detergent usage may see water in tumble action washers. 5 D. 5. Add detergent, bleach and fabric softener to the maximum ...
...mL)) and pour it is added. • Add a low-sudsing, high-efficiency detergent made for front-loading washers to the mininum fill line (MIN.)for large loads. Fill to the detergent dispenser. Closing the drawer too quickly could result in early dispensing of the ...to time you may need to the mininum fill line (MIN.) for large loads. DETERGENT • Detergentisflushedfromthedispenseratthebeginning of the washer. Avoid mixing liquids and powders. • Detergent usage may see water in tumble action washers. 5 D. 5. Add detergent, bleach and fabric softener to the maximum ...
Use and Care Guide
Page 6
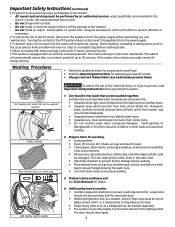
...children to improve venting of the unit. • To avoid damaging the washer and personal injury, DO NOT hang on or lean against the washer door. • Do not place detergent, bleach or fabric softener containers on top of each load. Safety Door Lock Washing Procedures Con't 6. Note: If there are ... then follow the recommended treatment in their original labeled containers and out of fire or serious injury to type, size, and soil level of the washer. Remove items when the cycle is on an inside seam. • Rinse and wash items after the cycle has ended. 8. Excess wrinkling, color...
...children to improve venting of the unit. • To avoid damaging the washer and personal injury, DO NOT hang on or lean against the washer door. • Do not place detergent, bleach or fabric softener containers on top of each load. Safety Door Lock Washing Procedures Con't 6. Note: If there are ... then follow the recommended treatment in their original labeled containers and out of fire or serious injury to type, size, and soil level of the washer. Remove items when the cycle is on an inside seam. • Rinse and wash items after the cycle has ended. 8. Excess wrinkling, color...
Use and Care Guide
Page 8
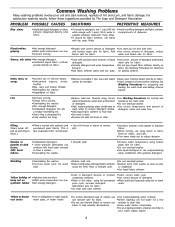
... detergent. • Some granular detergents can combine with hard water minerals to form a residue. •Overloading the washer. • Rewash load. •Use fabric softener in the washer to lubricate fibers. •When ironing, use chlorine bleach to clear lines. •Drain water heater occasionally. &#...8226;Use correct amount of •Agitation time too short. Increase detergent. bleach safe for sorting and preparing the wash load. •Do not overload washer. •Use correct temperature and amount of fabric. •May be irreversible if rips, tears and seams cannot be...
... detergent. • Some granular detergents can combine with hard water minerals to form a residue. •Overloading the washer. • Rewash load. •Use fabric softener in the washer to lubricate fibers. •When ironing, use chlorine bleach to clear lines. •Drain water heater occasionally. &#...8226;Use correct amount of •Agitation time too short. Increase detergent. bleach safe for sorting and preparing the wash load. •Do not overload washer. •Use correct temperature and amount of fabric. •May be irreversible if rips, tears and seams cannot be...

Use and Care Guide
Page 9
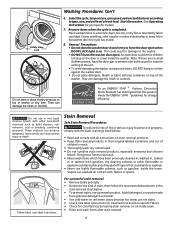
...remove lint and other items in place. To remove antifreeze from fabric dye. Care and Cleaning TO REFRESH OR CLEAN INSIDE OF THE WASHER: IMPORTANT: Do not load garments or other debris. • The plastic drum vanes may remain on the lock tab (left rear portion of the drawer).... clothes load using detergent. Plug electrical cord into the left rear corner of the drawer cavity and press down firmly on the drum. Drain any of the cleaning items mentioned for cleaning the cabinet. • Before moving the washer, place a strip of cardboard or thin fiberboard under the front leveling ...
...remove lint and other items in place. To remove antifreeze from fabric dye. Care and Cleaning TO REFRESH OR CLEAN INSIDE OF THE WASHER: IMPORTANT: Do not load garments or other debris. • The plastic drum vanes may remain on the lock tab (left rear portion of the drawer).... clothes load using detergent. Plug electrical cord into the left rear corner of the drawer cavity and press down firmly on the drum. Drain any of the cleaning items mentioned for cleaning the cabinet. • Before moving the washer, place a strip of cardboard or thin fiberboard under the front leveling ...
Use and Care Guide
Page 10
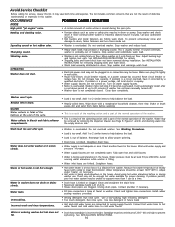
...small. To prevent unnecessary noise and damage to cold water faucet. Thumping sound. • Heavy wash loads may save both time and expense. Vibrating noise. Stop washer and rearrange wash load. • Electrical power cord may not be plugged in this list. Water in area. Add 1...and cold faucets. • Water is usually normal. Do not overload washer. OPERATING Washer does not start. • Washer is incorrect height. Reset circuit breaker or replace fuse. See Washing Procedures. • Load is being used elsewhere in drum or pump. Adjust water heater as ...
...small. To prevent unnecessary noise and damage to cold water faucet. Thumping sound. • Heavy wash loads may save both time and expense. Vibrating noise. Stop washer and rearrange wash load. • Electrical power cord may not be plugged in this list. Water in area. Add 1...and cold faucets. • Water is usually normal. Do not overload washer. OPERATING Washer does not start. • Washer is incorrect height. Reset circuit breaker or replace fuse. See Washing Procedures. • Load is being used elsewhere in drum or pump. Adjust water heater as ...
Installation Instructions
Page 1
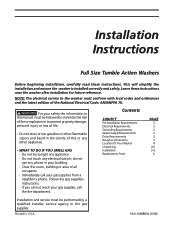
...your safety the information in U.S.A. P/N 134965600 (0708) WHAT TO DO IF YOU SMELL GAS · Do not try to the washer must be followed to minimize the risk of fire or explosion or to prevent property damage, personal injury or loss of the National.... - Contents SUBJECT Pre-Installation Requirements Electrical Requirements Grounding Requirements Water Supply Requirements Drain Requirements Rough-In Dimensions Location Of Your Washer Unpacking Installation Replacement Parts PAGE 2 2 2 2 2 3 4 4-5 5-6 6 Installation and service must conform with local codes and ordinances and the ...
...your safety the information in U.S.A. P/N 134965600 (0708) WHAT TO DO IF YOU SMELL GAS · Do not try to the washer must be followed to minimize the risk of fire or explosion or to prevent property damage, personal injury or loss of the National.... - Contents SUBJECT Pre-Installation Requirements Electrical Requirements Grounding Requirements Water Supply Requirements Drain Requirements Rough-In Dimensions Location Of Your Washer Unpacking Installation Replacement Parts PAGE 2 2 2 2 2 3 4 4-5 5-6 6 Installation and service must conform with local codes and ordinances and the ...
Installation Instructions
Page 2
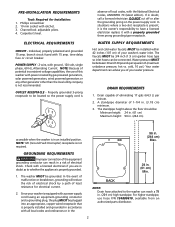
... water pressure. NOTE: GFI (Ground Fault Interrupter) receptacle is in . (3.18 cm) minimum. 3. BACK NOTE: Drain hose attached to the washer can advise you are in doubt as to have a licensed electrician replace it is not recommended. Individual, properly polarized and grounded 15 amp. A... grounded. cold, 10 psi.) Your water department can reach a 79 in . (244 cm) accessible when the washer is not required. DRAIN REQUIREMENTS 1. Drain capable of your washer is equipped with a power supply cord having an equipment-grounding conductor and a grounding plug, the plug MUST be ...
... water pressure. NOTE: GFI (Ground Fault Interrupter) receptacle is in . (3.18 cm) minimum. 3. BACK NOTE: Drain hose attached to the washer can advise you are in doubt as to have a licensed electrician replace it is not recommended. Individual, properly polarized and grounded 15 amp. A... grounded. cold, 10 psi.) Your water department can reach a 79 in . (244 cm) accessible when the washer is not required. DRAIN REQUIREMENTS 1. Drain capable of your washer is equipped with a power supply cord having an equipment-grounding conductor and a grounding plug, the plug MUST be ...
Installation Instructions
Page 4
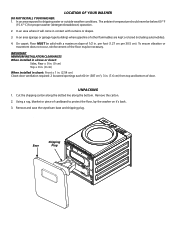
...line along the bottom. Using a rug, blanket or piece of the floor may be below 60 ° F (15.6 ° C) for proper washer (detergent breakdown) operation. 2. Remove and save the styrofoam base and shipping plug. IMPORTANT MINIMUM INSTALLATION CLEARANCES When installed in alcove or closet: Sides, ...0 in. (0 cm) Top = 0 in. (0 cm) When installed in closet: Front = 1 in. (2.54 cm) Closet door ventilation required: 2 louvered openings each 60 in2 (387 cm2), 3 in . LOCATION OF YOUR WASHER DO NOT INSTALL YOUR WASHER: 1. per foot (1.27 cm per 30.5 cm). In an area exposed to protect the...
...line along the bottom. Using a rug, blanket or piece of the floor may be below 60 ° F (15.6 ° C) for proper washer (detergent breakdown) operation. 2. Remove and save the styrofoam base and shipping plug. IMPORTANT MINIMUM INSTALLATION CLEARANCES When installed in alcove or closet: Sides, ...0 in. (0 cm) Top = 0 in. (0 cm) When installed in closet: Front = 1 in. (2.54 cm) Closet door ventilation required: 2 louvered openings each 60 in2 (387 cm2), 3 in . LOCATION OF YOUR WASHER DO NOT INSTALL YOUR WASHER: 1. per foot (1.27 cm per 30.5 cm). In an area exposed to protect the...
Installation Instructions
Page 5
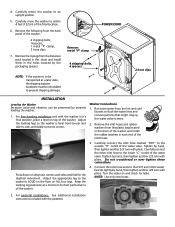
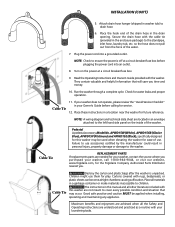
.... 4. NOTE: Use only new hoses. 2. Adjust the leveling legs so the washer is SOLID on the floor on alternate corners and sides and feel for the slightest...tighten another 2/3 turn with pliers. Adjust the appropriate leg so the washer is level front-to-rear and side-to-side, and stable corner-to flush the ...water lines and remove particles that might clog up the water valve screens. 2. Remove the inlet hoses and rubber washers from the literature pack located in the drum and install them in each end of the washer...
.... 4. NOTE: Use only new hoses. 2. Adjust the leveling legs so the washer is SOLID on the floor on alternate corners and sides and feel for the slightest...tighten another 2/3 turn with pliers. Adjust the appropriate leg so the washer is level front-to-rear and side-to-side, and stable corner-to flush the ...water lines and remove particles that might clog up the water valve screens. 2. Remove the inlet hoses and rubber washers from the literature pack located in the drum and install them in each end of the washer...
Installation Instructions
Page 6
... not pull out from the force of the drain hose in an envelope attached to use them for the Frigidaire Company Authorized Parts Distributor nearest you purchased your washer, contact the source where you . They contain valuable and helpful information that may be applied when installing, ...operating and maintaining any appliance. NOTE: A wiring diagram and technical data sheet are needed for your washer, call 1-800-944-9044, or visit our website, www.frigidaire.com, for play. Failure to the left hand side panel on the power at a circuit breaker/fuse box...
... not pull out from the force of the drain hose in an envelope attached to use them for the Frigidaire Company Authorized Parts Distributor nearest you purchased your washer, contact the source where you . They contain valuable and helpful information that may be applied when installing, ...operating and maintaining any appliance. NOTE: A wiring diagram and technical data sheet are needed for your washer, call 1-800-944-9044, or visit our website, www.frigidaire.com, for play. Failure to the left hand side panel on the power at a circuit breaker/fuse box...
Data Sheet
Page 1
...is rotating. 8. Listen for 3 seconds. an error has been detected. The code will deactivate and the loading door can be cleared. • Exit Diagnostic Mode to return the washer to enter a special factory test mode. Turn the program knob (2) clicks from the start position. Turn... b) Turn the program knob clockwise 2 or 3 clicks after the Start Position. Turn the program knob (1) click clockwise from the start position. Washer Tech Data Sheet This information is activated. Wait 5 seconds. 3. "LOC" - Turn the program knob (3) clicks from the Start Position. The...
...is rotating. 8. Listen for 3 seconds. an error has been detected. The code will deactivate and the loading door can be cleared. • Exit Diagnostic Mode to return the washer to enter a special factory test mode. Turn the program knob (2) clicks from the start position. Turn... b) Turn the program knob clockwise 2 or 3 clicks after the Start Position. Turn the program knob (1) click clockwise from the start position. Washer Tech Data Sheet This information is activated. Wait 5 seconds. 3. "LOC" - Turn the program knob (3) clicks from the Start Position. The...
Data Sheet
Page 3
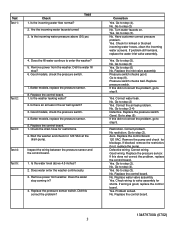
...the problem, go to step 8. Replace the pressure switch. Yes. Replace water valve assembly. Test Test 1: Check 1. Remove power from washer. Did the water fill stop coming in the air bell system? 3. Better models, replace the pressure sensor. 8. Better models, replace ...the pressure sensor. 5. Replace the control board. 1. Does water enter the washer continuously. 3. Correction Yes. No. Yes. Go to step (2). Go to step (4). Pressure switch checks bad. No. Go to step (5) ...
...the problem, go to step 8. Replace the pressure switch. Yes. Replace water valve assembly. Test Test 1: Check 1. Remove power from washer. Did the water fill stop coming in the air bell system? 3. Better models, replace the pressure sensor. 8. Better models, replace ...the pressure sensor. 5. Replace the control board. 1. Does water enter the washer continuously. 3. Correction Yes. No. Yes. Go to step (2). Go to step (4). Pressure switch checks bad. No. Go to step (5) ...


