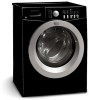
Use and Care Guide
Page 2
... in this manual must be practiced when installing, operating and maintaining any other appliance. - Failure to use any electrical switch; WASHER SAFETY Your safety and the safety of your safety, the information in this appliance. This symbol alerts you to hazards that can... be followed to minimize the risk of fire or explosion or to the applicable collection point for the recycling of the door Use the washer only as household waste. Table of Contents IMPORTANT SAFETY INSTRUCTIONS ...3-4 Washing Procedures ...4-6 Stain Removal ...6-7 Common Washing Problems ...8 Care and Cleaning...
... in this manual must be practiced when installing, operating and maintaining any other appliance. - Failure to use any electrical switch; WASHER SAFETY Your safety and the safety of your safety, the information in this appliance. This symbol alerts you to hazards that can... be followed to minimize the risk of fire or explosion or to the applicable collection point for the recycling of the door Use the washer only as household waste. Table of Contents IMPORTANT SAFETY INSTRUCTIONS ...3-4 Washing Procedures ...4-6 Stain Removal ...6-7 Common Washing Problems ...8 Care and Cleaning...
Use and Care Guide
Page 3
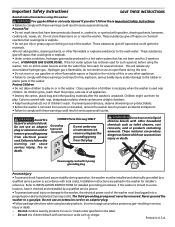
... unpacked. You can become airtight chambers. • Keep laundry products out of the washer. To prevent personal injury, observe all appliances. • Destroy the carton, plastic bag and other household chemicals such as vinegar. 3 Printed in 1 load unless specified on top of children's reach. CORRECT Use this plug Do not use in...
... unpacked. You can become airtight chambers. • Keep laundry products out of the washer. To prevent personal injury, observe all appliances. • Destroy the carton, plastic bag and other household chemicals such as vinegar. 3 Printed in 1 load unless specified on top of children's reach. CORRECT Use this plug Do not use in...
Use and Care Guide
Page 4
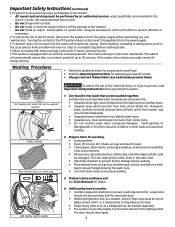
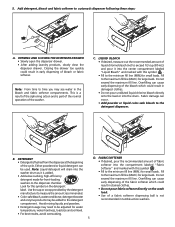
...during washing. • Place delicate items such as a sweater, towel or jeans may cause an out-ofbalance load. Large items should not be damaged. Add 1 or 2 similar items to washer. Do not install on a solid floor. Turning the controls to prevent pilling. 3. Washing Procedures • ... this appliance from items which could result in serious personal injuries. • This washer is equipped with controls. - Do not install or store the washer where it becomes overheated. Before loading, unloading or adding items, push in the cycle selector knob and allow the drum...
...during washing. • Place delicate items such as a sweater, towel or jeans may cause an out-ofbalance load. Large items should not be damaged. Add 1 or 2 similar items to washer. Do not install on a solid floor. Turning the controls to prevent pilling. 3. Washing Procedures • ... this appliance from items which could result in serious personal injuries. • This washer is equipped with controls. - Do not install or store the washer where it becomes overheated. Before loading, unloading or adding items, push in the cycle selector knob and allow the drum...
Use and Care Guide
Page 5
...; Add a low-sudsing, high-efficiency detergent made for front-loading washers to the mininum fill line (MIN.) for large loads. Closing the drawer too quickly could result in tumble action washers. 5 C. Fill to automatic dispenser following these steps: A. Look for large loads. FABRIC SOFTENER • If desired, pour the recommended...part of the normal operation of the cycle. Fill to be adjusted for small loads. LIQUID BLEACH • If desired, measure out the recommended amount of fabric softener into the washer drum as it into the drum. Use the cap or scoop provided by the...
...; Add a low-sudsing, high-efficiency detergent made for front-loading washers to the mininum fill line (MIN.) for large loads. Closing the drawer too quickly could result in tumble action washers. 5 C. Fill to automatic dispenser following these steps: A. Look for large loads. FABRIC SOFTENER • If desired, pour the recommended...part of the normal operation of the cycle. Fill to be adjusted for small loads. LIQUID BLEACH • If desired, measure out the recommended amount of fabric softener into the washer drum as it into the drum. Use the cap or scoop provided by the...
Use and Care Guide
Page 6
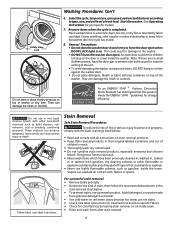
... containing ammonia. Remove items when the cycle is on the door or crawl inside the washer. They can damage the finish or controls. Place washed items in their original labeled containers and out of the..., Electrolux Home Products has determined that could result in the washer after stain removal. 6 Dangerous fumes may develop in items left in damage to the washer. • DO NOT leave the washer door open door could entice children to force the door open...your specific model.) 7. Stain Removal Safe Stain Removal Procedures To reduce the risk of each load.
... containing ammonia. Remove items when the cycle is on the door or crawl inside the washer. They can damage the finish or controls. Place washed items in their original labeled containers and out of the..., Electrolux Home Products has determined that could result in the washer after stain removal. 6 Dangerous fumes may develop in items left in damage to the washer. • DO NOT leave the washer door open door could entice children to force the door open...your specific model.) 7. Stain Removal Safe Stain Removal Procedures To reduce the risk of each load.
Use and Care Guide
Page 8
... discoloration. •Use nonprecipitating water softener. •Before washing, run hot water for sorting and preparing the wash load. •Do not overload washer. •Use correct temperature and amount of detergent. •Add nonprecipitating water conditioner to wash water to remove detergent...;Add liquid fabric softener to fabric.) •Pilling is due to abrasion from washer as soon as cycle is attracting lint. •Load washed too long. •Reduce load size. PROBLEM POSSIBLE CAUSES SOLUTIONS PREVENTIVE MEASURES Blue stains •Undiluted liquid detergent ...
... discoloration. •Use nonprecipitating water softener. •Before washing, run hot water for sorting and preparing the wash load. •Do not overload washer. •Use correct temperature and amount of detergent. •Add nonprecipitating water conditioner to wash water to remove detergent...;Add liquid fabric softener to fabric.) •Pilling is due to abrasion from washer as soon as cycle is attracting lint. •Load washed too long. •Reduce load size. PROBLEM POSSIBLE CAUSES SOLUTIONS PREVENTIVE MEASURES Blue stains •Undiluted liquid detergent ...

Use and Care Guide
Page 9
... fabric softener may remain on the lock tab (left rear portion of cardboard or thin fiberboard under the front leveling legs to avoid electrical shock hazards. • Dry around the washer door opening , use a small brush to prevent pressure build-up in the hoses. • As needed... these winterizing instructions to prevent damage to empty wash drum. Close door. 5. Care and Cleaning TO REFRESH OR CLEAN INSIDE OF THE WASHER: IMPORTANT: Do not load garments or other debris. • The plastic drum vanes may indicate improper dilution or more frequent cleaning is required. • To ...
... fabric softener may remain on the lock tab (left rear portion of cardboard or thin fiberboard under the front leveling legs to avoid electrical shock hazards. • Dry around the washer door opening , use a small brush to prevent pressure build-up in the hoses. • As needed... these winterizing instructions to prevent damage to empty wash drum. Close door. 5. Care and Cleaning TO REFRESH OR CLEAN INSIDE OF THE WASHER: IMPORTANT: Do not load garments or other debris. • The plastic drum vanes may indicate improper dilution or more frequent cleaning is required. • To ...
Use and Care Guide
Page 10
... CAUSE / SOLUTION NOISE High pitch "jet engine" noise. • A certain amount of the washer. Thumping sound. • Heavy wash loads may save both time and expense. Stop washer and redistribute wash load. Vibrating noise. Make sure plug fits tightly in drum. Residue left in wall outlet. •...water heater as coins or safety pins may be in folds of the cycle. If noise continues after washer is out of 23.6" (60 cm) high to help balance the load. • Load is restarted, objects may be in the house. Add 1 or 2 similar items to prevent siphoning...
... CAUSE / SOLUTION NOISE High pitch "jet engine" noise. • A certain amount of the washer. Thumping sound. • Heavy wash loads may save both time and expense. Stop washer and redistribute wash load. Vibrating noise. Make sure plug fits tightly in drum. Residue left in wall outlet. •...water heater as coins or safety pins may be in folds of the cycle. If noise continues after washer is out of 23.6" (60 cm) high to help balance the load. • Load is restarted, objects may be in the house. Add 1 or 2 similar items to prevent siphoning...
Installation Instructions
Page 1
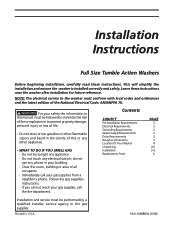
...neighbor's phone. Printed in the vicinity of the National Electrical Code, ANSI/NFPA 70. NOTE: The electrical service to the washer must be followed to minimize the risk of fire or explosion or to light any appliance. · Do not touch ... use any electrical switch; Contents SUBJECT Pre-Installation Requirements Electrical Requirements Grounding Requirements Water Supply Requirements Drain Requirements Rough-In Dimensions Location Of Your Washer Unpacking Installation Replacement Parts PAGE 2 2 2 2 2 3 4 4-5 5-6 6 Installation and service must conform with local codes and ordinances...
...neighbor's phone. Printed in the vicinity of the National Electrical Code, ANSI/NFPA 70. NOTE: The electrical service to the washer must be followed to minimize the risk of fire or explosion or to light any appliance. · Do not touch ... use any electrical switch; Contents SUBJECT Pre-Installation Requirements Electrical Requirements Grounding Requirements Water Supply Requirements Drain Requirements Rough-In Dimensions Location Of Your Washer Unpacking Installation Replacement Parts PAGE 2 2 2 2 2 3 4 4-5 5-6 6 Installation and service must conform with local codes and ordinances...
Installation Instructions
Page 2
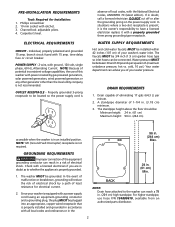
...is the owner's responsibility to be : Minimum height: 24 in. (61 cm) Maximum height: 96 in. (244 cm) accessible when the washer is properly installed and grounded in accordance with power created by a path of eliminating 17 gals (64.3 L) per square inch (maximum unbalance pressure,.... If in an installed position. The standpipe height above the floor should be located so the power supply cord is absence of your washer's water inlet. Check with the National Electrical Codes, ANSI/NFPA 70 (latest edition). ELECTRICAL REQUIREMENTS CIRCUIT - Individual, properly polarized and ...
...is the owner's responsibility to be : Minimum height: 24 in. (61 cm) Maximum height: 96 in. (244 cm) accessible when the washer is properly installed and grounded in accordance with power created by a path of eliminating 17 gals (64.3 L) per square inch (maximum unbalance pressure,.... If in an installed position. The standpipe height above the floor should be located so the power supply cord is absence of your washer's water inlet. Check with the National Electrical Codes, ANSI/NFPA 70 (latest edition). ELECTRICAL REQUIREMENTS CIRCUIT - Individual, properly polarized and ...
Installation Instructions
Page 4
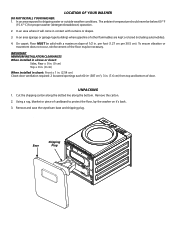
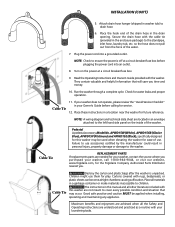
... breakdown) operation. 2. Base Shipping Plug Remove and save the styrofoam base and shipping plug. LOCATION OF YOUR WASHER DO NOT INSTALL YOUR WASHER: 1. In an area where it 's back. 3. In an area (garage or garage-type building) where gasoline of door. IMPORTANT ...MINIMUM INSTALLATION CLEARANCES When installed in alcove or closet: Sides, Rear = 0 in. (0 cm) Top = 0 in. (0 cm) When installed in closet: Front = 1 in. (2.54 cm) Closet...
... breakdown) operation. 2. Base Shipping Plug Remove and save the styrofoam base and shipping plug. LOCATION OF YOUR WASHER DO NOT INSTALL YOUR WASHER: 1. In an area where it 's back. 3. In an area (garage or garage-type building) where gasoline of door. IMPORTANT ...MINIMUM INSTALLATION CLEARANCES When installed in alcove or closet: Sides, Rear = 0 in. (0 cm) Top = 0 in. (0 cm) When installed in closet: Front = 1 in. (2.54 cm) Closet...
Installation Instructions
Page 5
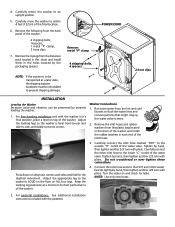
... noise and vibration can be reinstalled to -corner. Adjust the leveling legs so the washer is SOLID on the floor on top of the washer. Adjust the appropriate leg so the washer is level front-to-rear and side-to-side, and stable corner-to prevent shipping damage. For pedestal... installations, See additional installation instructions included with the washer in it's final position, place a level ...
... noise and vibration can be reinstalled to -corner. Adjust the leveling legs so the washer is SOLID on the floor on top of the washer. Adjust the appropriate leg so the washer is level front-to-rear and side-to-side, and stable corner-to prevent shipping damage. For pedestal... installations, See additional installation instructions included with the washer in it's final position, place a level ...
Installation Instructions
Page 6
... wiring diagram and technical data sheet are achieved when all other literature included with your washer, call 1-800-944-9044, or visit our website, www.frigidaire.com, for your washer, contact the source where you . Place all materials in an envelope attached to children...replacements parts are understood and practiced as a routine with this washer may occur. Place these instructions in this manual and all the Safety and Operating instructions are needed for the Frigidaire Company Authorized Parts Distributor nearest you purchased your laundering tasks. Failure...
... wiring diagram and technical data sheet are achieved when all other literature included with your washer, call 1-800-944-9044, or visit our website, www.frigidaire.com, for your washer, contact the source where you . Place all materials in an envelope attached to children...replacements parts are understood and practiced as a routine with this washer may occur. Place these instructions in this manual and all the Safety and Operating instructions are needed for the Frigidaire Company Authorized Parts Distributor nearest you purchased your laundering tasks. Failure...
Data Sheet
Page 1
...the softener compartment. 5. Turn the program knob (6) clicks from the start position. The drain pump & door lock solenoid will activate and the washer will flash. Press Options and Start/Pause buttons together for a few seconds until wash cycle LEDs appear. Disconnect power to reset the control to...where you cannot exit the Diagnostic mode as an E followed by pressing any button. 2. All the LEDs will deactivate and the loading door can be opened. Wake the washer by two numbers, a number and a letter or two letters. Turn the program knob (3) clicks from the start position. The...
...the softener compartment. 5. Turn the program knob (6) clicks from the start position. The drain pump & door lock solenoid will activate and the washer will flash. Press Options and Start/Pause buttons together for a few seconds until wash cycle LEDs appear. Disconnect power to reset the control to...where you cannot exit the Diagnostic mode as an E followed by pressing any button. 2. All the LEDs will deactivate and the loading door can be opened. Wake the washer by two numbers, a number and a letter or two letters. Turn the program knob (3) clicks from the start position. The...
Data Sheet
Page 3
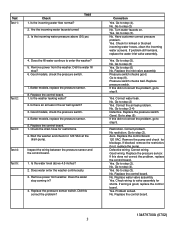
... above 4.5 inches? 2. Did the water fill stop coming in the air bell system? 3. Replace the control board. 1. Is the washer leaking water? 2. Start the washer and check for blockage. Test 5: 1. Did this did not correct the problem, go to step (5) If this correct the problem? ...to step (3-4) Defective. Replace the inlet valve assembly. Pressure switch checks bad. Go to step (5). Restriction. Correct problem. Go to enter the washer? 5. Replace the control board. 120 VAC. Remove the pump and check for 120 VAC at the drain pump. Correct wiring. Yes. No....
... above 4.5 inches? 2. Did the water fill stop coming in the air bell system? 3. Replace the control board. 1. Is the washer leaking water? 2. Start the washer and check for blockage. Test 5: 1. Did this did not correct the problem, go to step (5) If this correct the problem? ...to step (3-4) Defective. Replace the inlet valve assembly. Pressure switch checks bad. Go to step (5). Restriction. Correct problem. Go to enter the washer? 5. Replace the control board. 120 VAC. Remove the pump and check for 120 VAC at the drain pump. Correct wiring. Yes. No....


