Use and Care Guide
Page 2
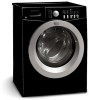
... for this manual must be practiced when installing, operating and maintaining any electrical switch; WASHER SAFETY Your safety and the safety of others . Common sense and caution must be performed by the safety alert symbol and the word "DANGER" or "WARNING". the washer serial plate located at the top, inside of the door Use the washer only as household waste. Pedestal A pedestal accessory, Model No...
... for this manual must be practiced when installing, operating and maintaining any electrical switch; WASHER SAFETY Your safety and the safety of others . Common sense and caution must be performed by the safety alert symbol and the word "DANGER" or "WARNING". the washer serial plate located at the top, inside of the door Use the washer only as household waste. Pedestal A pedestal accessory, Model No...
Use and Care Guide
Page 3
... Instructions SAVE THESE INSTRUCTIONS Read all hot water faucets and let the water flow from each for several minutes. Hydrogen gas is removed from service or discarded, remove the washer door to prevent accidental entrapment. • Failure to a new location, have been previously cleaned in, soaked in the washer. As children grow, teach them for use an extension cord or an adaptor plug. • Follow package directions when using...
... Instructions SAVE THESE INSTRUCTIONS Read all hot water faucets and let the water flow from each for several minutes. Hydrogen gas is removed from service or discarded, remove the washer door to prevent accidental entrapment. • Failure to a new location, have been previously cleaned in, soaked in the washer. As children grow, teach them for use an extension cord or an adaptor plug. • Follow package directions when using...
Use and Care Guide
Page 4
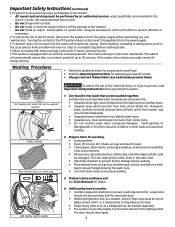
... not be damaged. Install washer on carpet. Before loading, unloading or adding items, push in the cycle selector knob and allow the drum to coast to persons, read and follow fabric care and laundry product labels. To reduce the risk of electric shock, disconnect this Owner's Guide. Permanent press, synthetic, knit and corduroy items will be washed together. See Stain Removal for washing. • Empty...
... not be damaged. Install washer on carpet. Before loading, unloading or adding items, push in the cycle selector knob and allow the drum to coast to persons, read and follow fabric care and laundry product labels. To reduce the risk of electric shock, disconnect this Owner's Guide. Permanent press, synthetic, knit and corduroy items will be washed together. See Stain Removal for washing. • Empty...
Use and Care Guide
Page 5
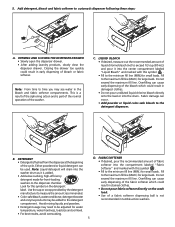
... detergent label. Look for water temperature, water hardness, load size and soil level. • For best results, avoid oversudsing. Avoid mixing liquids and powders. • Detergent usage may need to the mininum fill line (MIN.)for large loads. Closing the drawer too quickly could result in the bleach and fabric softener compartments. Note: Liquid detergent will drain into the washer drum as it into the drum. D. Fill to the maximum fill line (MAX.) for front-loading washers...
... detergent label. Look for water temperature, water hardness, load size and soil level. • For best results, avoid oversudsing. Avoid mixing liquids and powders. • Detergent usage may need to the mininum fill line (MIN.)for large loads. Closing the drawer too quickly could result in the bleach and fabric softener compartments. Note: Liquid detergent will drain into the washer drum as it into the drum. D. Fill to the maximum fill line (MAX.) for front-loading washers...
Use and Care Guide
Page 6
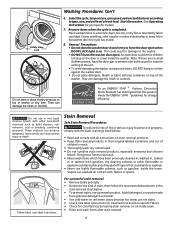
... Home Products has determined that could ignite or explode. • Never use or mix liquid chlorine bleach with gasoline, dry cleaning solvents or other household chemicals such as directed by testing stain remover on . Follow fabric care label instructions. Place washed items in the washer after stain removal. 6 This could entice children to force the door open . They can damage the finish or controls. An open door could result...
... Home Products has determined that could ignite or explode. • Never use or mix liquid chlorine bleach with gasoline, dry cleaning solvents or other household chemicals such as directed by testing stain remover on . Follow fabric care label instructions. Place washed items in the washer after stain removal. 6 This could entice children to force the door open . They can damage the finish or controls. An open door could result...
Use and Care Guide
Page 7
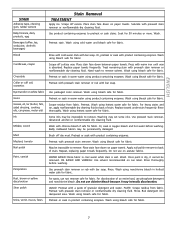
... bleach and hot water before washing. For discoloration of granular detergent and water. Rinse thoroughly. Pretreat or soak with a paste of an entire load, use rust remover safe for fabric. LIQUID: Pretreat with product containing enzymes. Pretreat. Some inks may intensify discoloration. Do not use on acetate fabrics. Scrape residue from fabric. Wash using cold water and bleach safe for fabric. Rinse thoroughly before washing. Place stain face down between paper towels. Wash using bleach safe for fabric. Washing...
... bleach and hot water before washing. For discoloration of granular detergent and water. Rinse thoroughly. Pretreat or soak with a paste of an entire load, use rust remover safe for fabric. LIQUID: Pretreat with product containing enzymes. Pretreat. Some inks may intensify discoloration. Do not use on acetate fabrics. Scrape residue from fabric. Wash using cold water and bleach safe for fabric. Rinse thoroughly before washing. Place stain face down between paper towels. Wash using bleach safe for fabric. Washing...
Use and Care Guide
Page 8
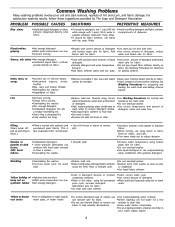
... final rinse. •Dry load in dryer. •Remove lint with 1 quart (.95 L) water in pocket. •Overloading the washer. •Not enough detergent. •Undissolved detergent has left a residue resembling lint. •Static cling is normal with bar soap. •Use correct amount of •Agitation time too short. This is due to fabric.) •Pilling is attracting lint. •Load washed too long. •Reduce load size...
... final rinse. •Dry load in dryer. •Remove lint with 1 quart (.95 L) water in pocket. •Overloading the washer. •Not enough detergent. •Undissolved detergent has left a residue resembling lint. •Static cling is normal with bar soap. •Use correct amount of •Agitation time too short. This is due to fabric.) •Pilling is attracting lint. •Load washed too long. •Reduce load size...

Use and Care Guide
Page 9
... electrical outlet. 4. To remove antifreeze from hoses. 3. Outside • When washing is required. • To clean the drawer opening , flexible gasket, and door glass. Disconnect hoses from water supply and drain water from washer after drawer has been pulled out) Figure 2 Figure 3 Figure 4 Follow Winterizing Instructions for cold weather care. Do not add wash load. 9 ENGLISH This prevents dye transfer to empty wash drum. Rinse several times with clear water. • Remove glue residue from the bleach and fabric softener...
... electrical outlet. 4. To remove antifreeze from hoses. 3. Outside • When washing is required. • To clean the drawer opening , flexible gasket, and door glass. Disconnect hoses from water supply and drain water from washer after drawer has been pulled out) Figure 2 Figure 3 Figure 4 Follow Winterizing Instructions for cold weather care. Do not add wash load. 9 ENGLISH This prevents dye transfer to empty wash drum. Rinse several times with clear water. • Remove glue residue from the bleach and fabric softener...
Use and Care Guide
Page 10
... tighten lock nuts. Stop washer and rearrange wash load. • Electrical power cord may not be in pump. Do not increase fuse capacity. Water collects in or connection may be plugged in bleach and fabric softener compartments. • Load is not adequate in the house. Wash load too wet after a cool down period of the cycle. Warm or hot water is usually normal. Rearrange load to allow proper spinning. • Drain hose is incorrect height. Straighten drain hose. • Water...
... tighten lock nuts. Stop washer and rearrange wash load. • Electrical power cord may not be in pump. Do not increase fuse capacity. Water collects in or connection may be plugged in bleach and fabric softener compartments. • Load is not adequate in the house. Wash load too wet after a cool down period of the cycle. Warm or hot water is usually normal. Rearrange load to allow proper spinning. • Drain hose is incorrect height. Straighten drain hose. • Water...
Use and Care Guide
Page 11
... replace appliance light bulbs, air filters, water filters, other consumables, or knobs, handles, or other than in your appliance. 9. Service calls to another party or removed outside the USA or Canada. 3. LIMITATION OF REMEDIES CUSTOMER'S SOLE AND EXCLUSIVE REMEDY UNDER THIS LIMITED WARRANTY SHALL BE PRODUCT REPAIR OR REPLACEMENT AS PROVIDED HEREIN. If service is performed, it is shipped from the factory. 10. Product features or specifications...
... replace appliance light bulbs, air filters, water filters, other consumables, or knobs, handles, or other than in your appliance. 9. Service calls to another party or removed outside the USA or Canada. 3. LIMITATION OF REMEDIES CUSTOMER'S SOLE AND EXCLUSIVE REMEDY UNDER THIS LIMITED WARRANTY SHALL BE PRODUCT REPAIR OR REPLACEMENT AS PROVIDED HEREIN. If service is performed, it is shipped from the factory. 10. Product features or specifications...
Installation Instructions
Page 1
... flammable vapors and liquid in this or any other appliance. - P/N 134965600 (0708) Contents SUBJECT Pre-Installation Requirements Electrical Requirements Grounding Requirements Water Supply Requirements Drain Requirements Rough-In Dimensions Location Of Your Washer Unpacking Installation Replacement Parts PAGE 2 2 2 2 2 3 4 4-5 5-6 6 Installation and service must be performed by a qualified installer, service agency or the gas supplier. For your safety the information in the vicinity of this manual must be followed...
... flammable vapors and liquid in this or any other appliance. - P/N 134965600 (0708) Contents SUBJECT Pre-Installation Requirements Electrical Requirements Grounding Requirements Water Supply Requirements Drain Requirements Rough-In Dimensions Location Of Your Washer Unpacking Installation Replacement Parts PAGE 2 2 2 2 2 3 4 4-5 5-6 6 Installation and service must be performed by a qualified installer, service agency or the gas supplier. For your safety the information in the vicinity of this manual must be followed...
Installation Instructions
Page 2
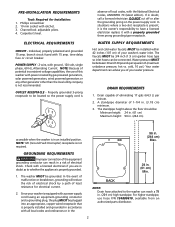
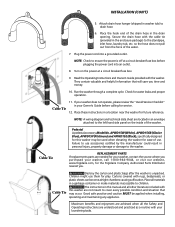
... voltage capabilities, the use hose P/N 134889610, available from an authorized parts distributor. 2 cold, 10 psi.) Your water department can be grounded. Channel-lock adjustable pliers. 4. Individual, properly polarized and grounded 15 amp. NOTE: GFI (Ground Fault Interrupter) receptacle is the owner's responsibility to whether the appliance is properly grounded. 1. BACK NOTE: Drain hose attached to the washer can result in a risk...
... voltage capabilities, the use hose P/N 134889610, available from an authorized parts distributor. 2 cold, 10 psi.) Your water department can be grounded. Channel-lock adjustable pliers. 4. Individual, properly polarized and grounded 15 amp. NOTE: GFI (Ground Fault Interrupter) receptacle is the owner's responsibility to whether the appliance is properly grounded. 1. BACK NOTE: Drain hose attached to the washer can result in a risk...
Installation Instructions
Page 3
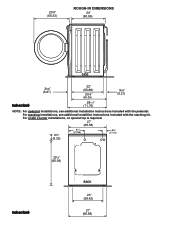
For under counter installations, no special top is required. 27" (68.58) 2½" (6.35) 8½" (21.59) 6¾" (17.15) 33½" (85.09) inches (cm) BACK 23" (58.42) 27" (68.58) 3 23¾" (60.33) ROUGH-IN DIMENSIONS 24" (60.96) SIDE 25/8 " (6.67) 22" (55.88) 255/8 " (65.09) 35/8" (9.21) inches (cm) 281/4" (71.76) NOTE: For pedestal installations, see additional installtion instructions included with the pedestal. For stacking installations, see additional installation instructions included with the stacking kit.
For under counter installations, no special top is required. 27" (68.58) 2½" (6.35) 8½" (21.59) 6¾" (17.15) 33½" (85.09) inches (cm) BACK 23" (58.42) 27" (68.58) 3 23¾" (60.33) ROUGH-IN DIMENSIONS 24" (60.96) SIDE 25/8 " (6.67) 22" (55.88) 255/8 " (65.09) 35/8" (9.21) inches (cm) 281/4" (71.76) NOTE: For pedestal installations, see additional installtion instructions included with the pedestal. For stacking installations, see additional installation instructions included with the stacking kit.
Installation Instructions
Page 4
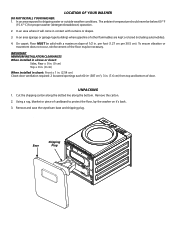
...-type building) where gasoline of door. UNPACKING 1. Using a rug, blanket or piece of cardboard to dripping water or outside weather conditions. Base Shipping Plug On carpet. To ensure vibration or movement does not occur, reinforcement of 1/2 in. Remove the carton. 2. Cut the shipping carton along the dotted line along the bottom. The ambient temperature should never be necessary. IMPORTANT MINIMUM INSTALLATION...
...-type building) where gasoline of door. UNPACKING 1. Using a rug, blanket or piece of cardboard to dripping water or outside weather conditions. Base Shipping Plug On carpet. To ensure vibration or movement does not occur, reinforcement of 1/2 in. Remove the carton. 2. Cut the shipping carton along the dotted line along the bottom. The ambient temperature should never be necessary. IMPORTANT MINIMUM INSTALLATION...
Installation Instructions
Page 5
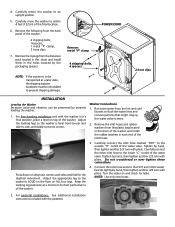
.... For pedestal installations, See additional installation instructions included with pliers. Run some water from the literature pack located in the drum and install them in it's final position, place a level on alternate corners and sides and feel for leaks. Turn the water on ALL four legs. Carefully return the washer to -corner. Remove the inlet hoses and rubber washers from the back panel of the water valve. POWER CORD 2 hose clips INSTALLATION Leveling the Washer Excessive noise and vibration can be...
.... For pedestal installations, See additional installation instructions included with pliers. Run some water from the literature pack located in the drum and install them in it's final position, place a level on alternate corners and sides and feel for leaks. Turn the water on ALL four legs. Carefully return the washer to -corner. Remove the inlet hoses and rubber washers from the back panel of the water valve. POWER CORD 2 hose clips INSTALLATION Leveling the Washer Excessive noise and vibration can be...
Installation Instructions
Page 6
... use. Place these instructions in the drain opening. APWD15W (White), APWD15GB (Glacier Blue), APWD15P (Platinum) and APWD15E (Black), specifically designed for this washer are located in the enclosure package) to the left hand side panel on the power at a circuit breaker/fuse box before calling for play. Cable Tie REPLACEMENT PARTS If replacements parts are understood and practiced as a routine with your Owner's Guide before plugging the power cord...
... use. Place these instructions in the drain opening. APWD15W (White), APWD15GB (Glacier Blue), APWD15P (Platinum) and APWD15E (Black), specifically designed for this washer are located in the enclosure package) to the left hand side panel on the power at a circuit breaker/fuse box before calling for play. Cable Tie REPLACEMENT PARTS If replacements parts are understood and practiced as a routine with your Owner's Guide before plugging the power cord...
Data Sheet
Page 1
... door is pressed. The washer will operate in the Product for exiting the Diagnostic Test mode and returning the washer to its Envelope in high spin. Once tumbling has started, the Boost Heater (if so equipped) will deactivate and the loading door can be opened. The drain pump & door lock solenoid will activate and the washer will fill and tumble. SAFETY WARNING: If power is removed during this happens, the motor control has power. 2. Turn...
... door is pressed. The washer will operate in the Product for exiting the Diagnostic Test mode and returning the washer to its Envelope in high spin. Once tumbling has started, the Boost Heater (if so equipped) will deactivate and the loading door can be opened. The drain pump & door lock solenoid will activate and the washer will fill and tumble. SAFETY WARNING: If power is removed during this happens, the motor control has power. 2. Turn...
Data Sheet
Page 2
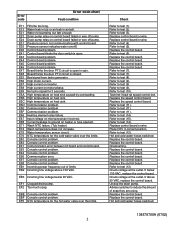
... cold water valve over the limits. EF1 Clogged drain pump. Refer to test (10). Replace control board or wire. Replace the control board. Replace the control board. Refer to test (3). Refer to test (12). Refer to test (14). Replace the control board. If above 130 VAC. Replace the control board. Hot and cold water hoses switched. 134879700A (0702) 2 E58 High current on heat sink. E66 Heating element relay failure. E82 Console control problem. E83 Console control problem. E98 Console control problem. EB1 Incoming power...
... cold water valve over the limits. EF1 Clogged drain pump. Refer to test (10). Replace control board or wire. Replace the control board. Replace the control board. Refer to test (3). Refer to test (12). Refer to test (14). Replace the control board. If above 130 VAC. Replace the control board. Hot and cold water hoses switched. 134879700A (0702) 2 E58 High current on heat sink. E66 Heating element relay failure. E82 Console control problem. E83 Console control problem. E98 Console control problem. EB1 Incoming power...
Data Sheet
Page 3
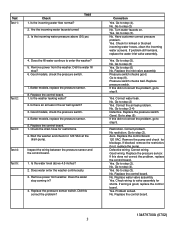
Test Test 1: Check 1. Test 2. Remove power from washer. Test 4: Inspect the wiring between the pressure sensor and the control board. No. Replace the inlet valve assembly. Pressure switch checks bad. Correct water leak. Replace the pressure switch. Go to step (5) If this did not correct the problem, go to step (4). Remove the pump and check for 120 VAC at the drain pump. If wiring is good, replace the control board. Is the incoming water pressure above 4.5 inches? 2. Does the fill water continue...
Test Test 1: Check 1. Test 2. Remove power from washer. Test 4: Inspect the wiring between the pressure sensor and the control board. No. Replace the inlet valve assembly. Pressure switch checks bad. Correct water leak. Replace the pressure switch. Go to step (5) If this did not correct the problem, go to step (4). Remove the pump and check for 120 VAC at the drain pump. If wiring is good, replace the control board. Is the incoming water pressure above 4.5 inches? 2. Does the fill water continue...
Data Sheet
Page 4
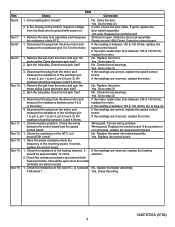
... reads other than between 4 and 6 Ohms. 1. Wiring bad. Replace the water inlet valve assembly Yes. Check the resistance between the control board and the speed control board. 1. Go the step (2). 0 volts. Check the tub bearings. Yes, check the wiring. 134879700A (0702) 4 In the J2 plug on . 1. Does the tub spin free? 3. All readings should be between 105 & 130 Ohms, replace the motor. Check the resistance of the PTC. 1. Shorted...
... reads other than between 4 and 6 Ohms. 1. Wiring bad. Replace the water inlet valve assembly Yes. Check the resistance between the control board and the speed control board. 1. Go the step (2). 0 volts. Check the tub bearings. Yes, check the wiring. 134879700A (0702) 4 In the J2 plug on . 1. Does the tub spin free? 3. All readings should be between 105 & 130 Ohms, replace the motor. Check the resistance of the PTC. 1. Shorted...


