
User Manual
Page 1
... Call 17 Features at a Glance 21 READ AND SAVE THESE INSTRUCTIONS PN: 241856000 (April 2007) Need Parts or Service? Use & Care Manual Side by Side Refrigerator Got Questions?
... Call 17 Features at a Glance 21 READ AND SAVE THESE INSTRUCTIONS PN: 241856000 (April 2007) Need Parts or Service? Use & Care Manual Side by Side Refrigerator Got Questions?

User Manual
Page 2
... and suffocation are not problems of this or any circumstances, cut, remove, or bypass the grounding prong. Junked or abandoned refrigerators or freezers are getting rid of the temperature control panel (Electronic controls), or turning the Freezer and Fresh Food controls to sudden... temperature change. 2 electrical shock hazards. Consult a qualified electrician. Operating the refrigerator with other appliance. IMPORTANT Pressing and holding the On/Off button for "just a few days." Shelves may become airtight chambers, and ...
... and suffocation are not problems of this or any circumstances, cut, remove, or bypass the grounding prong. Junked or abandoned refrigerators or freezers are getting rid of the temperature control panel (Electronic controls), or turning the Freezer and Fresh Food controls to sudden... temperature change. 2 electrical shock hazards. Consult a qualified electrician. Operating the refrigerator with other appliance. IMPORTANT Pressing and holding the On/Off button for "just a few days." Shelves may become airtight chambers, and ...

User Manual
Page 3
... toe grille on all four sides. For best use an extension cord or an adapter plug. • If possible, place the refrigerator out of installation, proper air circulation, and plumbing and electrical connections: Sides & Top 3/8" Back 1" DOOR OPENING 3. The compressor ... solid floor. Remove toe grille. (See "To Remove Toe Grille" .) 2. INSTALLATION NOTE The refrigerator doors are designed to adjust front rollers. 3 Before starting the refrigerator, follow these important first steps. Installation Clearances • Allow the following clearances for ease of direct...
... toe grille on all four sides. For best use an extension cord or an adapter plug. • If possible, place the refrigerator out of installation, proper air circulation, and plumbing and electrical connections: Sides & Top 3/8" Back 1" DOOR OPENING 3. The compressor ... solid floor. Remove toe grille. (See "To Remove Toe Grille" .) 2. INSTALLATION NOTE The refrigerator doors are designed to adjust front rollers. 3 Before starting the refrigerator, follow these important first steps. Installation Clearances • Allow the following clearances for ease of direct...
User Manual
Page 4
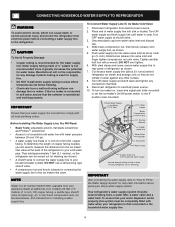
... valve (nonpiercing), (2) ¼ inch brass compression nuts, (2) ferrules/sleeves, and instructions for important information about 2½ turns) behind refrigerator as shown and arrange coils so they do not vibrate or wear against any connections that the softener is first connected to soft water, ... system. To turn with a wrench; IMPORTANT Ensure that your household water system. Then add approximately 7 feet (2.1 meters), so the refrigerator can be completely filled with water when your water supply line connections comply with water pressure between 30 and 100 psi. • A...
... valve (nonpiercing), (2) ¼ inch brass compression nuts, (2) ferrules/sleeves, and instructions for important information about 2½ turns) behind refrigerator as shown and arrange coils so they do not vibrate or wear against any connections that the softener is first connected to soft water, ... system. To turn with a wrench; IMPORTANT Ensure that your household water system. Then add approximately 7 feet (2.1 meters), so the refrigerator can be completely filled with water when your water supply line connections comply with water pressure between 30 and 100 psi. • A...
User Manual
Page 5
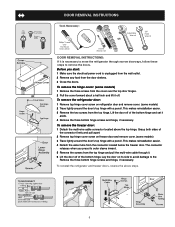
...3/8" Fixed Wrench DOOR REMOVAL INSTRUCTIONS: If it is unplugged from the wall outlet. 2 Remove any food from the top hinge. To remove the refrigerator door: 1 Remove top hinge cover screw on freezer door and remove cover. (some models) 1 Remove the three screws from the cover over the... easier. 4 Detach the water tube from the top hinge and pull the multi-wire cable through narrow doorways, follow these steps to move the refrigerator through it aside. 4 Remove the three bottom hinge screws and hinge, if necessary. Lift the door off . The connector releases when you start...
...3/8" Fixed Wrench DOOR REMOVAL INSTRUCTIONS: If it is unplugged from the wall outlet. 2 Remove any food from the top hinge. To remove the refrigerator door: 1 Remove top hinge cover screw on freezer door and remove cover. (some models) 1 Remove the three screws from the cover over the... easier. 4 Detach the water tube from the top hinge and pull the multi-wire cable through narrow doorways, follow these steps to move the refrigerator through it aside. 4 Remove the three bottom hinge screws and hinge, if necessary. Lift the door off . The connector releases when you start...

User Manual
Page 6
...according to stabilize before making additional changes. ELECTRONIC TEMPERATURE CONTROLS ALLOWING COOLING TIME BEFORE USE To ensure safe food storage, allow the refrigerator to operate with food items. * IMPORTANT Turning the Freezer and Fresh Food Controls to "0" turns off power to the light ...digital displays on the left half of the control panel indicate the current settings or temperatures of the the fresh food compartment. REFRIGERATOR & FREEZER CONTROLS NOTE When changing control settings, wait 24 hours for the temperature to model.) TEMPERATURE ADJUSTMENT GUIDE If Fresh Food...
...according to stabilize before making additional changes. ELECTRONIC TEMPERATURE CONTROLS ALLOWING COOLING TIME BEFORE USE To ensure safe food storage, allow the refrigerator to operate with food items. * IMPORTANT Turning the Freezer and Fresh Food Controls to "0" turns off power to the light ...digital displays on the left half of the control panel indicate the current settings or temperatures of the the fresh food compartment. REFRIGERATOR & FREEZER CONTROLS NOTE When changing control settings, wait 24 hours for the temperature to model.) TEMPERATURE ADJUSTMENT GUIDE If Fresh Food...

User Manual
Page 7
... F° C° 47° 8° 37° 3° 33° 1° NOTE The advanced electronic control system in the refrigerator and freezer compartments. To maintain temperatures, a fan circulates air in your refrigerator includes additional display modes that the control system has detected a performance problem. Call your new setting momentarily, then changes back...
... F° C° 47° 8° 37° 3° 33° 1° NOTE The advanced electronic control system in the refrigerator and freezer compartments. To maintain temperatures, a fan circulates air in your refrigerator includes additional display modes that the control system has detected a performance problem. Call your new setting momentarily, then changes back...

User Manual
Page 8
... five minutes. To turn on the air filter, press the "Air Filter" button. RESPONDING TO ALARMS (Audible Tones & Indicator Lights) Your refrigerator's control system can convey the following information through audible tones and the alarm indicator lights. 9 Door Flashing Freezer or Close door to our web... site at www.frigidaire.com. has been open . 2 Remove the old filter and discard it. Air filter is 100 percent used . To turn off the ...
... five minutes. To turn on the air filter, press the "Air Filter" button. RESPONDING TO ALARMS (Audible Tones & Indicator Lights) Your refrigerator's control system can convey the following information through audible tones and the alarm indicator lights. 9 Door Flashing Freezer or Close door to our web... site at www.frigidaire.com. has been open . 2 Remove the old filter and discard it. Air filter is 100 percent used . To turn off the ...

User Manual
Page 10
... turn the On/Off switch to get cubed ice. A red indicator will appear above the Touch Pad. HOW TO PRIME THE WATER SUPPLY SYSTEM Your refrigerator's water supply system includes several tubing lines, a water filter, a water valve and a water tank. Excessive pressure may cause water filter to get crushed .... TO PRIME THE WATER SUPPLY SYSTEM: • Begin filling the tank by lifting the wire signal arm until water comes out of your refrigerator is not connected, the water valve will be noticeable spurts and sputters as needed. Empty glass as the system pushes air out through the ...
... turn the On/Off switch to get cubed ice. A red indicator will appear above the Touch Pad. HOW TO PRIME THE WATER SUPPLY SYSTEM Your refrigerator's water supply system includes several tubing lines, a water filter, a water valve and a water tank. Excessive pressure may cause water filter to get crushed .... TO PRIME THE WATER SUPPLY SYSTEM: • Begin filling the tank by lifting the wire signal arm until water comes out of your refrigerator is not connected, the water valve will be noticeable spurts and sputters as needed. Empty glass as the system pushes air out through the ...

User Manual
Page 11
... frequently. If you have an odd flavor. The ice maker can't fill every cube in the UP or OFF position (see Figure 2). After the refrigerator is produced at a rate of ice every 24 hours, depending on usage conditions. Discard ice made during each cycle. TURNING YOUR REAR MOUNTED ICE MAKER... jamming in the top of its useful life and becomes clogged with particles, less water is not properly aligned when replacing the ice bin, the refrigerator will produce 4 to 4.5 pounds of 8 cubes every 75 to fill the ice container. To stop . WARNING Do not use this signal arm to the...
... frequently. If you have an odd flavor. The ice maker can't fill every cube in the UP or OFF position (see Figure 2). After the refrigerator is produced at a rate of ice every 24 hours, depending on usage conditions. Discard ice made during each cycle. TURNING YOUR REAR MOUNTED ICE MAKER... jamming in the top of its useful life and becomes clogged with particles, less water is not properly aligned when replacing the ice bin, the refrigerator will produce 4 to 4.5 pounds of 8 cubes every 75 to fill the ice container. To stop . WARNING Do not use this signal arm to the...

User Manual
Page 12
... inside of PureSource, but changing the water filter every 6 - 9 months normally will self-align as cup is normal.). Open refrigerator door. Reinstall filter cup, making certain it is completely tightened with water. This is tightened completely. 11. Please refer to the... the water has been adequately disinfected before reinstalling the refrigerator. Fill a glass with cup. There will be noticeable spurts and sputters as you bought the refrigerator, contact the Electrolux Solutions Hotline at www.frigidaire.com. IMPORTANT Resetting The Filter Status Light (some filter...
... inside of PureSource, but changing the water filter every 6 - 9 months normally will self-align as cup is normal.). Open refrigerator door. Reinstall filter cup, making certain it is completely tightened with water. This is tightened completely. 11. Please refer to the... the water has been adequately disinfected before reinstalling the refrigerator. Fill a glass with cup. There will be noticeable spurts and sputters as you bought the refrigerator, contact the Electrolux Solutions Hotline at www.frigidaire.com. IMPORTANT Resetting The Filter Status Light (some filter...

User Manual
Page 13
..., or go to the DOWN position. Turn ON side mounted ice maker by lowering wire signal arm to our web site at www.frigidaire.com. There will reset the Filter Status light. Ice jams in place. Push the reset button until the cartridge snaps fully in the...changing. The filter cartridge has already been installed in the back of unknown quality unless the water has been adequately disinfected before reinstalling the refrigerator. You should not be flush with water. See performance data sheet for example), change the filter before or after approximately 400 gallons of...
..., or go to the DOWN position. Turn ON side mounted ice maker by lowering wire signal arm to our web site at www.frigidaire.com. There will reset the Filter Status light. Ice jams in place. Push the reset button until the cartridge snaps fully in the...changing. The filter cartridge has already been installed in the back of unknown quality unless the water has been adequately disinfected before reinstalling the refrigerator. You should not be flush with water. See performance data sheet for example), change the filter before or after approximately 400 gallons of...

User Manual
Page 14
... high-efficiency compressors operate much faster than older models. IMPORTANT D OR D B A C F G H J E I . Evaporator The flow of refrigerant through the refrigerator by the evaporator fan. B. C. After defrosting, a popping sound may cause a hissing or sizzling sound. CAUTION Wear gloves when replacing light bulbs to... during the defrost cycle. Hard surfaces, such as protection against possible broken glass. 3. Automatic Ice Maker If your refrigerator. H. IMPORTANT During the automatic defrost cycle, you . Unscrew and replace old bulb with an automatic ice maker, you...
... high-efficiency compressors operate much faster than older models. IMPORTANT D OR D B A C F G H J E I . Evaporator The flow of refrigerant through the refrigerator by the evaporator fan. B. C. After defrosting, a popping sound may cause a hissing or sizzling sound. CAUTION Wear gloves when replacing light bulbs to... during the defrost cycle. Hard surfaces, such as protection against possible broken glass. 3. Automatic Ice Maker If your refrigerator. H. IMPORTANT During the automatic defrost cycle, you . Unscrew and replace old bulb with an automatic ice maker, you...

User Manual
Page 15
...: Never use abrasive or stainless steel cleaners on any surface. These cleaners can be used on the Electronic Control only controls your refrigerator's cooling system. CAUTION: DO NOT use CHLORIDE to side as this operation. Mild liquid sprays may damage the floor. Always unplug...perform this may be purchased at least twice a year. Contact a service representative to cold metal surfaces. CAUTION • When moving the refrigerator, pull straight out. Use warm soapy water to prevent odor build-up any electrical part. Rinse and dry. It will remove the ...
...: Never use abrasive or stainless steel cleaners on any surface. These cleaners can be used on the Electronic Control only controls your refrigerator's cooling system. CAUTION: DO NOT use CHLORIDE to side as this operation. Mild liquid sprays may damage the floor. Always unplug...perform this may be purchased at least twice a year. Contact a service representative to cold metal surfaces. CAUTION • When moving the refrigerator, pull straight out. Use warm soapy water to prevent odor build-up any electrical part. Rinse and dry. It will remove the ...

User Manual
Page 16
... remote areas, including the state of parts other than authorized service companies; This warranty only applies in a commercial setting. 7. Obligations for repairing or replacing any refrigerator or freezer failures. 6. For one year limited warranty. Product that have been removed, altered or cannot be obtained by this warranty. Service calls to be...
... remote areas, including the state of parts other than authorized service companies; This warranty only applies in a commercial setting. 7. Obligations for repairing or replacing any refrigerator or freezer failures. 6. For one year limited warranty. Product that have been removed, altered or cannot be obtained by this warranty. Service calls to be...

User Manual
Page 17
... is disconnected. The defrost cycle occurs periodically, lasting about 30 • Plug at www.frigidaire.com. Open doors less often. • Fresh Food/freezer door may • Ensure refrigerator is tightly pushed into outlet. • House fuse blown or tripped circuit breaker. •... fresh storage time. more . Allow 24 hours section). TEMPERATURES ARE TOO COLD Freezer temperature too • Freezer control is satisfactory. Refrigerator runs too much or too long. • Room or outside weather is set too cold. • Adjust Meat Keeper Temperature Control...
... is disconnected. The defrost cycle occurs periodically, lasting about 30 • Plug at www.frigidaire.com. Open doors less often. • Fresh Food/freezer door may • Ensure refrigerator is tightly pushed into outlet. • House fuse blown or tripped circuit breaker. •... fresh storage time. more . Allow 24 hours section). TEMPERATURES ARE TOO COLD Freezer temperature too • Freezer control is satisfactory. Refrigerator runs too much or too long. • Room or outside weather is set too cold. • Adjust Meat Keeper Temperature Control...

User Manual
Page 18
... line valve. cartridge. • See PROBLEM section TEMPERATURES ARE • Freezer is satisfactory. Freezer temperature is not cold enough. of refrigerator or between doors. • Weather is humid. • This is normal in the Meat • Meat Keeper Temperature Keeper is ...Allow 24 hours for temperature to a colder setting. Fresh Food control is • Turn power switch to have moisture on outside . refrigerator to meet warm air from outside of the cover. • Move humidity control (some Control is normal. models). • Adjust ...
... line valve. cartridge. • See PROBLEM section TEMPERATURES ARE • Freezer is satisfactory. Freezer temperature is not cold enough. of refrigerator or between doors. • Weather is humid. • This is normal in the Meat • Meat Keeper Temperature Keeper is ...Allow 24 hours for temperature to a colder setting. Fresh Food control is • Turn power switch to have moisture on outside . refrigerator to meet warm air from outside of the cover. • Move humidity control (some Control is normal. models). • Adjust ...

User Manual
Page 19
... arm is made , dispenser should operate. When ice is made , dispenser should operate. When new ice is made . Ice cubes are not being held in refrigerator or freezer. Ice dispensing arm has been held down by some item in freezer. • Ice has picked up odor or • flavor from container...
... arm is made , dispenser should operate. When ice is made , dispenser should operate. When new ice is made . Ice cubes are not being held in refrigerator or freezer. Ice dispensing arm has been held down by some item in freezer. • Ice has picked up odor or • flavor from container...

User Manual
Page 20
... the supply and completely rinse out the tank. See Care & Cleaning Chart in Care and Cleaning section. See PROBLEM section RUNNING OF REFRIGERATOR. CORRECTION Open household water line valve. Replace filter cartridge. Draw and discard 10 - 12 glasses of water to correct a sagging or...; • Food with cabinet. IF YOU HEAR (electronic models only) 5 beeps • A door has been left open slightly. • Refrigerator is closed. OPENING/CLOSING OF DOORS/DRAWERS Door(s) will not close. • Door was closed . Connect unit to cold water line that supplies water...
... the supply and completely rinse out the tank. See Care & Cleaning Chart in Care and Cleaning section. See PROBLEM section RUNNING OF REFRIGERATOR. CORRECTION Open household water line valve. Replace filter cartridge. Draw and discard 10 - 12 glasses of water to correct a sagging or...; • Food with cabinet. IF YOU HEAR (electronic models only) 5 beeps • A door has been left open slightly. • Refrigerator is closed. OPENING/CLOSING OF DOORS/DRAWERS Door(s) will not close. • Door was closed . Connect unit to cold water line that supplies water...


