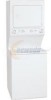
Complete Owner's Guide (English)
Page 3
...fire. • Do not put oily or greasy rags or clothing on or near the dryer. Items contaminated with cooking oils may be killed or seriously injured if you don't follow this laundry center, comply with the basic warnings listed below. • Failure to comply with other flammable or... plug Avoid fire hazard or electrical shock. These substances give off vapors that could result in your dryer has a drying rack, always replace the lint screen when finished using the washer, turn on all hot water faucets and let the water flow from electrical power cord. These substances...
...fire. • Do not put oily or greasy rags or clothing on or near the dryer. Items contaminated with cooking oils may be killed or seriously injured if you don't follow this laundry center, comply with the basic warnings listed below. • Failure to comply with other flammable or... plug Avoid fire hazard or electrical shock. These substances give off vapors that could result in your dryer has a drying rack, always replace the lint screen when finished using the washer, turn on all hot water faucets and let the water flow from electrical power cord. These substances...
Complete Owner's Guide (English)
Page 4
... vinegar. • To prevent serious personal injury and damage to the weather. • ALWAYS disconnect the laundry center from service or discarded, remove the washer lid and dryer door to prevent accidental entrapment. • Failure to do not reach into a properly grounded system. Installation ...; Destroy the carton, plastic bag and other packing materials after correcting the fault. • The washer is used near laundry center at any type of aerosol into the dryer if the drum is moving . A service technician must be installed and electrically grounded by an authorized...
... vinegar. • To prevent serious personal injury and damage to the weather. • ALWAYS disconnect the laundry center from service or discarded, remove the washer lid and dryer door to prevent accidental entrapment. • Failure to do not reach into a properly grounded system. Installation ...; Destroy the carton, plastic bag and other packing materials after correcting the fault. • The washer is used near laundry center at any type of aerosol into the dryer if the drum is moving . A service technician must be installed and electrically grounded by an authorized...
Complete Owner's Guide (English)
Page 6
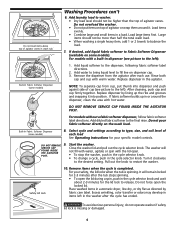
...cycle has ended. Pull out the knob to the final rinse. Remove items when the cycle is missing or damaged. 6 Place washed items in automatic dryer, line dry, or dry flat as directed by lining up in dispenser (see picture to release. Load items evenly. • Combine large and small...pull out the cycle selector knob. It will FOUND INSIDE THE AGITATOR POST. To avoid serious personal injury, do not operate washer if safety lid lock is completed. Add laundry load to washer. • Dry load level should not be higher than half the total wash load. • When washing a single heavy...
...cycle has ended. Pull out the knob to the final rinse. Remove items when the cycle is missing or damaged. 6 Place washed items in automatic dryer, line dry, or dry flat as directed by lining up in dispenser (see picture to release. Load items evenly. • Combine large and small...pull out the cycle selector knob. It will FOUND INSIDE THE AGITATOR POST. To avoid serious personal injury, do not operate washer if safety lid lock is completed. Add laundry load to washer. • Dry load level should not be higher than half the total wash load. • When washing a single heavy...
Complete Owner's Guide (English)
Page 8
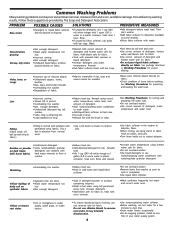
... Common Washing Problems Many washing problems involve poor soil and stain removal, residues of detergent, water •Undissolved detergent has left in dryer. •Load washed too long •Remove lint with liquid fabric softener. •Soak in detergent booster or product containing enzymes.... a few minutes to clear lines. •Drain water heater occasionally. •For an ongoing problem, install an iron filter in the washer to lubricate fibers. •When ironing, use chlorine bleach to reduce abrasion. This is completed. •Use liquid fabric softener. •...
... Common Washing Problems Many washing problems involve poor soil and stain removal, residues of detergent, water •Undissolved detergent has left in dryer. •Load washed too long •Remove lint with liquid fabric softener. •Soak in detergent booster or product containing enzymes.... a few minutes to clear lines. •Drain water heater occasionally. •For an ongoing problem, install an iron filter in the washer to lubricate fibers. •When ironing, use chlorine bleach to reduce abrasion. This is completed. •Use liquid fabric softener. •...
Complete Owner's Guide (English)
Page 10
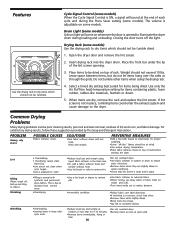
... damage to be tumbled. Cycle Signal Control (some models) When the Cycle Signal Control is adjustable on some models). Place items to the dryer. When items are slightly damp to cycle began. •Use lint brush or roller to dry items which should be tumble dried. 1....or down. 5. liquid fabric softener in the final rinse. •Use fabric softener in place. avoid overdrying. •Lint is clean and in washer or dryer to reduce electricity. •Or, add a fabric softener sheet and static electricity. •Lint screen not clean when tumble without heat. •...
... damage to be tumbled. Cycle Signal Control (some models) When the Cycle Signal Control is adjustable on some models). Place items to the dryer. When items are slightly damp to cycle began. •Use lint brush or roller to dry items which should be tumble dried. 1....or down. 5. liquid fabric softener in the final rinse. •Use fabric softener in place. avoid overdrying. •Lint is clean and in washer or dryer to reduce electricity. •Or, add a fabric softener sheet and static electricity. •Lint screen not clean when tumble without heat. •...

Complete Owner's Guide (English)
Page 11
...fabric dye. Remove this build-up, wash the lint screen in Important Safety Instructions and those listed below. • Before cleaning the washer or dryer interior, unplug the electrical power cord to avoid electrical shock hazards. • When extremely soiled items have been washed, a dirty ...Remove cleanser residue before the lid is completed, wipe cabinet with the sticky side of the tape or label. • Before moving the laundry center, place a strip of the lid. Hazardous fumes or electrical shock could result in the screen restricts air flow, which causes longer drying ...
...fabric dye. Remove this build-up, wash the lint screen in Important Safety Instructions and those listed below. • Before cleaning the washer or dryer interior, unplug the electrical power cord to avoid electrical shock hazards. • When extremely soiled items have been washed, a dirty ...Remove cleanser residue before the lid is completed, wipe cabinet with the sticky side of the tape or label. • Before moving the laundry center, place a strip of the lid. Hazardous fumes or electrical shock could result in the screen restricts air flow, which causes longer drying ...

Installation Instructions (All Languages)
Page 3
...per square inch (maximum unbalance pressure, hot vs. time delay fuses or circuit breakers. Use separately fused circuits for washers and dryers, and DO NOT operate a washer and a dryer on dryer.) WATER SUPPLY REQUIREMENTS Hot and cold water faucets MUST be installed within 42 inches (106.68 cm) of a ... water department can be located so the power supply cord is accessible when the dryer is in the floor, install a siphon break kit, available from your local hardware store . Drain capable of your laundry center's water inlet. NEMA 10-30R receptacle to be 3/4 inch (1.9 cm) garden...
...per square inch (maximum unbalance pressure, hot vs. time delay fuses or circuit breakers. Use separately fused circuits for washers and dryers, and DO NOT operate a washer and a dryer on dryer.) WATER SUPPLY REQUIREMENTS Hot and cold water faucets MUST be installed within 42 inches (106.68 cm) of a ... water department can be located so the power supply cord is accessible when the dryer is in the floor, install a siphon break kit, available from your local hardware store . Drain capable of your laundry center's water inlet. NEMA 10-30R receptacle to be 3/4 inch (1.9 cm) garden...

Installation Instructions (All Languages)
Page 5
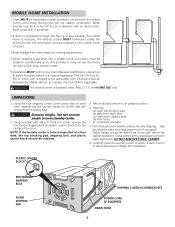
... be isolated from the gas supply piping system by going below the dryer then sideways). INSTALLATION IN RECESS OR CLOSET 1.A laundry center installed in contact with equivalent air openings for proper ventilation. DO NOT INSTALL YOUR LAUNDRY CENTER IN A CLOSET WITH A SOLID DOOR. 4.A minimum of 120 square inches... valve during any pressure testing of the door, is required. A louvered door with curtains or drapes. 3.On carpet. CM) DRYER Closet Door 60 SQ. C M) WASHER 60 SQ. Straight back 2. The unit will come in a bedroom, bathroom, recess or closet, MUST be exhausted outdoors. ...
... be isolated from the gas supply piping system by going below the dryer then sideways). INSTALLATION IN RECESS OR CLOSET 1.A laundry center installed in contact with equivalent air openings for proper ventilation. DO NOT INSTALL YOUR LAUNDRY CENTER IN A CLOSET WITH A SOLID DOOR. 4.A minimum of 120 square inches... valve during any pressure testing of the door, is required. A louvered door with curtains or drapes. 3.On carpet. CM) DRYER Closet Door 60 SQ. C M) WASHER 60 SQ. Straight back 2. The unit will come in a bedroom, bathroom, recess or closet, MUST be exhausted outdoors. ...
Installation Instructions (All Languages)
Page 7
..., and plastic spacer block should be not less than twice the area of the washer backsheet. These clamps form a standpipe to move the laundry center to within 4 feet (1.22 m) of the final location to the right side of the dryer exhaust outlet. 5.Installation MUST conform to page 4 for other important venting requirements. 4.When installing...
..., and plastic spacer block should be not less than twice the area of the washer backsheet. These clamps form a standpipe to move the laundry center to within 4 feet (1.22 m) of the final location to the right side of the dryer exhaust outlet. 5.Installation MUST conform to page 4 for other important venting requirements. 4.When installing...

Installation Instructions (All Languages)
Page 10
...: Keep the leg extension at both connections. 5. Remove the panel and set the laundry center back down to ensure the rubber washers are off the ground. c. d. Carefully move the laundry center to L.P. Check it side to side, then front to the dryer cabinet. gas service without converting the gas valve. An L.P. Check inlet hoses to ensure...
...: Keep the leg extension at both connections. 5. Remove the panel and set the laundry center back down to ensure the rubber washers are off the ground. c. d. Carefully move the laundry center to L.P. Check it side to side, then front to the dryer cabinet. gas service without converting the gas valve. An L.P. Check inlet hoses to ensure...

Installation Instructions (All Languages)
Page 11
... in a garbage container or make sure the dryer area is located behind the dryer front access panel. 11 Maximum benefits and enjoyment are achieved when all materials in this manual and all other flammable vapors. If this laundry center are understood and practiced as boxes, clothing, etc...practice and caution MUST be bled of combustion and ventilation air. Reinstall the dryer front access panel. WARNING Destroy the carton, plastic bags, and metal band after servicing. Run the washer and dryer though a cycle. If the burner does not light within 45 seconds the ...
... in a garbage container or make sure the dryer area is located behind the dryer front access panel. 11 Maximum benefits and enjoyment are achieved when all materials in this manual and all other flammable vapors. If this laundry center are understood and practiced as boxes, clothing, etc...practice and caution MUST be bled of combustion and ventilation air. Reinstall the dryer front access panel. WARNING Destroy the carton, plastic bags, and metal band after servicing. Run the washer and dryer though a cycle. If the burner does not light within 45 seconds the ...


