Complete Owner's Guide (English)
Page 2
... Important Safety Instructions...2-4 Washing Procedures...5-6 Stain Removal...7 Common Washing Problems...8 Drying Procedures ...9 Features ...10 Commom Drying Problems...10 Care and Cleaning...11-12 Avoid Service Checklist...12-14 Warranty and Service...15 Español...16-30 Product Record Read and Save These Instructions Record Your Model and Serial Numbers Record below the model and serial numbers found on the laundry center serial plate located on your safety, the information in this manual must...
... Important Safety Instructions...2-4 Washing Procedures...5-6 Stain Removal...7 Common Washing Problems...8 Drying Procedures ...9 Features ...10 Commom Drying Problems...10 Care and Cleaning...11-12 Avoid Service Checklist...12-14 Warranty and Service...15 Español...16-30 Product Record Read and Save These Instructions Record Your Model and Serial Numbers Record below the model and serial numbers found on the laundry center serial plate located on your safety, the information in this manual must...
Complete Owner's Guide (English)
Page 3
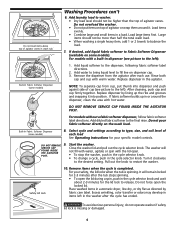
.... Do not use an adaptor plug or extension cord or remove grounding prong from each load. You can cause serious injury, fire or death. Use Air Fluff (No Heat) only. • Clean the dryer lint screen before using this laundry center, comply with these Important Safety Instructions: • To reduce the risk of the laundry center. See Care and Cleaning. • Do not operate the dryer if the...
.... Do not use an adaptor plug or extension cord or remove grounding prong from each load. You can cause serious injury, fire or death. Use Air Fluff (No Heat) only. • Clean the dryer lint screen before using this laundry center, comply with these Important Safety Instructions: • To reduce the risk of the laundry center. See Care and Cleaning. • Do not operate the dryer if the...
Complete Owner's Guide (English)
Page 4
...; ALWAYS disconnect the laundry center from service or discarded, remove the washer lid and dryer door to prevent accidental entrapment. • Failure to a new location, have it checked and reinstalled by an authorized servicer unless specifically recommended in electrical shock or injury. • Do not use an extension cord or an adaptor plug. • Follow package directions when using laundry products. Do not install or store the laundry center where it will automatically...
...; ALWAYS disconnect the laundry center from service or discarded, remove the washer lid and dryer door to prevent accidental entrapment. • Failure to a new location, have it checked and reinstalled by an authorized servicer unless specifically recommended in electrical shock or injury. • Do not use an extension cord or an adaptor plug. • Follow package directions when using laundry products. Do not install or store the laundry center where it will automatically...
Complete Owner's Guide (English)
Page 6
... setting. Replace dispenser in a load. Do not pour fabric softener directly on some models). Remove items when the cycle is spinning. Do not load items above top of each use. Add liquid softener to the final rinse. Rinse both cap and cup with hot water. Built-In Fabric Softener Dispenser (some models) 1. The washer will remain locked for the lid lock to fill line on top of agitator or wrap them around the dispenser, clean the area with warm water. For your specific model controls...
... setting. Replace dispenser in a load. Do not pour fabric softener directly on some models). Remove items when the cycle is spinning. Do not load items above top of each use. Add liquid softener to the final rinse. Rinse both cap and cup with hot water. Built-In Fabric Softener Dispenser (some models) 1. The washer will remain locked for the lid lock to fill line on top of agitator or wrap them around the dispenser, clean the area with warm water. For your specific model controls...

Complete Owner's Guide (English)
Page 7
... may set stains. • Check care label instructions for treatments to avoid on the next page. • To pretreat stains, use chlorine bleach because it cannot be impossible to persons or property, comply with the basic warnings listed in warm water using product containing enzymes. Do not use a prewash product, liquid detergent, or a paste made from granular detergent and water. Rinse. Stain Removal Do not combine stain removal products. Wash using bleach safe...
... may set stains. • Check care label instructions for treatments to avoid on the next page. • To pretreat stains, use chlorine bleach because it cannot be impossible to persons or property, comply with the basic warnings listed in warm water using product containing enzymes. Do not use a prewash product, liquid detergent, or a paste made from granular detergent and water. Rinse. Stain Removal Do not combine stain removal products. Wash using bleach safe...
Complete Owner's Guide (English)
Page 8
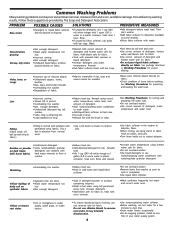
... as cycle is normal with prewash stain remover or liquid detergent. •Increase detergent and water temperature. Rewash using hottest water safe for a few minutes to remove pills. •Use fabric softener in dryer. •Load washed too long •Remove lint with color remover. •Do not overload washer. •Remove items from normal wear. •Use a lint brush or shaver to clear lines. •Drain water heater occasionally. •For an ongoing problem, install an iron filter...
... as cycle is normal with prewash stain remover or liquid detergent. •Increase detergent and water temperature. Rewash using hottest water safe for a few minutes to remove pills. •Use fabric softener in dryer. •Load washed too long •Remove lint with color remover. •Do not overload washer. •Remove items from normal wear. •Use a lint brush or shaver to clear lines. •Drain water heater occasionally. •For an ongoing problem, install an iron filter...
Complete Owner's Guide (English)
Page 9
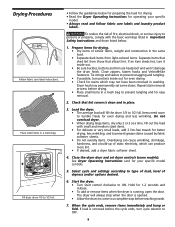
... shed lint from those listed below for preparing the load for drying. • Read the Dryer Operating Instructions for your specific model. • Always read and follow fabric care labels and laundry product labels. Do not overload dryer. • When drying large items, dry only 2 or 3 at a time. Close the dryer door and set some models). Select cycle and settings according to type of load, level of fire, electrical shock, or serious injury...
... shed lint from those listed below for preparing the load for drying. • Read the Dryer Operating Instructions for your specific model. • Always read and follow fabric care labels and laundry product labels. Do not overload dryer. • When drying large items, dry only 2 or 3 at a time. Close the dryer door and set some models). Select cycle and settings according to type of load, level of fire, electrical shock, or serious injury...
Complete Owner's Guide (English)
Page 10
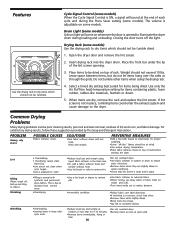
... "pills." •Check that lint screen is normal with bar soap. liquid fabric softener in the final rinse. •Use fabric softener in dryer after cycle ends. •Reduce load size and tumble at the end of load before starting the dryer. Closing the door turns off , ball up and cling to fabric.) Shrinking •Pilling is clean and in place. Weight should not exceed 10 lbs. Select a timed dry setting best suited...
... "pills." •Check that lint screen is normal with bar soap. liquid fabric softener in the final rinse. •Use fabric softener in dryer after cycle ends. •Reduce load size and tumble at the end of load before starting the dryer. Closing the door turns off , ball up and cling to fabric.) Shrinking •Pilling is clean and in place. Weight should not exceed 10 lbs. Select a timed dry setting best suited...

Complete Owner's Guide (English)
Page 11
... area around the lid opening . Outside • When laundering is completed, wipe cabinet with laundry products. Clean these parts with a mixture of warm water and mild detergent. Wash lint screen occasionally. Remove by wiping the tub with a nonabrasive household cleanser. Never use any type spray cleanser when cleaning dryer interior. Rinse several times with clear water. • Remove glue residue from the washer as soon as the cycle ends. They can...
... area around the lid opening . Outside • When laundering is completed, wipe cabinet with laundry products. Clean these parts with a mixture of warm water and mild detergent. Wash lint screen occasionally. Remove by wiping the tub with a nonabrasive household cleanser. Never use any type spray cleanser when cleaning dryer interior. Rinse several times with clear water. • Remove glue residue from the washer as soon as the cycle ends. They can...
Complete Owner's Guide (English)
Page 12
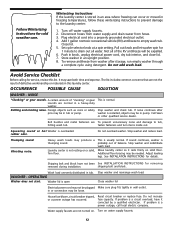
... both time and expense. OPERATING Washer does not start. Close washer lid Electrical power cord may be expelled. 6. Do not add wash load. Avoid Service Checklist Before calling for service, review this laundry center. This is overloaded. fasten fasteners and turn items inside out. Do not overload washer. Adjust leveling legs. WASHER - Do not increase fuse capacity. Water supply faucets are To prevent unnecessary noise and damage to the laundry center: 1. Disconnect hoses from water supply and drain water from washer after washer...
... both time and expense. OPERATING Washer does not start. Close washer lid Electrical power cord may be expelled. 6. Do not add wash load. Avoid Service Checklist Before calling for service, review this laundry center. This is overloaded. fasten fasteners and turn items inside out. Do not overload washer. Adjust leveling legs. WASHER - Do not increase fuse capacity. Water supply faucets are To prevent unnecessary noise and damage to the laundry center: 1. Disconnect hoses from water supply and drain water from washer after washer...
Complete Owner's Guide (English)
Page 13
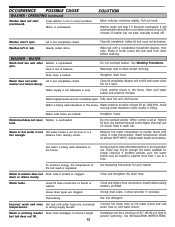
...Measure hot water temperature at highest fill level, dry load level should be a minimum of the hot wash is overloaded. If problem persists, your washer Clean and straighten the drain hose. To conserve energy, the temperature of 33" (83.82 cm) high to cold water faucet. Loose fill hose connection at a time. Straighten drain hose. load. Washer is regulated. Install rubber sealing washers provided. See Operating Instructions for proper cleaning. OPERATING (continued) Washer does not start (continued). Washer motor will automatically restart after spin. It...
...Measure hot water temperature at highest fill level, dry load level should be a minimum of the hot wash is overloaded. If problem persists, your washer Clean and straighten the drain hose. To conserve energy, the temperature of 33" (83.82 cm) high to cold water faucet. Loose fill hose connection at a time. Straighten drain hose. load. Washer is regulated. Install rubber sealing washers provided. See Operating Instructions for proper cleaning. OPERATING (continued) Washer does not start (continued). Washer motor will automatically restart after spin. It...
Complete Owner's Guide (English)
Page 14
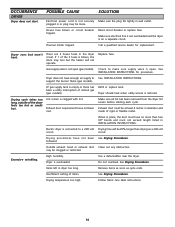
... See INSTALLATION INSTRUCTIONS. may turn but won't heat. POSSIBLE CAUSE SOLUTION Electrical power cord is not securely Make sure the plug fits tightly in dryer too long. Check to a 208 volt Drying time will not operate. support the burner flame (gas models). Use a dehumidifier near the dryer. Call a qualified service dealer for procedure. Remove items as soon as cycle ends. Insufficient sorting of the dryer feels too hot or smells hot. Refill or replace...
... See INSTALLATION INSTRUCTIONS. may turn but won't heat. POSSIBLE CAUSE SOLUTION Electrical power cord is not securely Make sure the plug fits tightly in dryer too long. Check to a 208 volt Drying time will not operate. support the burner flame (gas models). Use a dehumidifier near the dryer. Call a qualified service dealer for procedure. Remove items as soon as cycle ends. Insufficient sorting of the dryer feels too hot or smells hot. Refill or replace...

Complete Owner's Guide (English)
Page 15
... serial numbers that has been transferred from its original owner to another party or removed outside the USA or Canada. 3. Damages to the nish of appliance or home incurred during installation, including but not limited to, any after hour, weekend, or holiday service calls, tolls, ferry trip charges, or mileage expense for repairing or replacing any parts of this warranty...
... serial numbers that has been transferred from its original owner to another party or removed outside the USA or Canada. 3. Damages to the nish of appliance or home incurred during installation, including but not limited to, any after hour, weekend, or holiday service calls, tolls, ferry trip charges, or mileage expense for repairing or replacing any parts of this warranty...
Installation Instructions (All Languages)
Page 2
... beginning installation, carefully read and obey all of the following instructions before installing and using this appliance. • Destroy the carton and plastic bags after installation for future reference. • The electrical service to the Laundry Center must conform with local codes and ordinances and the latest edition of all materials in Canada, the Canadian electrical code C22.1 part 1. • The gas service to the Laundry Center must...
... beginning installation, carefully read and obey all of the following instructions before installing and using this appliance. • Destroy the carton and plastic bags after installation for future reference. • The electrical service to the Laundry Center must conform with local codes and ordinances and the latest edition of all materials in Canada, the Canadian electrical code C22.1 part 1. • The gas service to the Laundry Center must...

Installation Instructions (All Languages)
Page 3
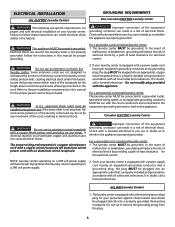
..., Alternating Current. ELECTRICAL REQUIREMENTS ELECTRIC Laundry Center NOTE: Do not under any circumstances remove grounding prong from your local hardware store . branch circuit fused with clothes dryers. Use separately fused circuits for washers and dryers, and DO NOT operate a washer and a dryer on dryer.) WATER SUPPLY REQUIREMENTS Hot and cold water faucets MUST be connected. See ELECTRICAL CONNECTIONS FOR A 3-WIRE SYSTEM. 4 wire - The faucets MUST be 3/4 inch (1.9 cm) garden hose type so inlet hoses can advise you...
..., Alternating Current. ELECTRICAL REQUIREMENTS ELECTRIC Laundry Center NOTE: Do not under any circumstances remove grounding prong from your local hardware store . branch circuit fused with clothes dryers. Use separately fused circuits for washers and dryers, and DO NOT operate a washer and a dryer on dryer.) WATER SUPPLY REQUIREMENTS Hot and cold water faucets MUST be connected. See ELECTRICAL CONNECTIONS FOR A 3-WIRE SYSTEM. 4 wire - The faucets MUST be 3/4 inch (1.9 cm) garden hose type so inlet hoses can advise you...
Installation Instructions (All Languages)
Page 8
... wired power cord with a copper wired receptacle OR aluminum wired power cord with a licensed electrician if you are in a risk of your protection against shock hazard and should be plugged into an appropriate, copper wired receptacle that is properly grounded. NOTE: Laundry centers operating on a 240 volt power supply. 2. ELECTRICAL INSTALLATION ALL ELECTRIC Laundry Centers GROUNDING REQUIREMENTS Non-Canadian ELECTRIC Laundry Center WARNING The following are specific requirements for electrical current. Follow the instructions...
... wired power cord with a copper wired receptacle OR aluminum wired power cord with a licensed electrician if you are in a risk of your protection against shock hazard and should be plugged into an appropriate, copper wired receptacle that is properly grounded. NOTE: Laundry centers operating on a 240 volt power supply. 2. ELECTRICAL INSTALLATION ALL ELECTRIC Laundry Centers GROUNDING REQUIREMENTS Non-Canadian ELECTRIC Laundry Center WARNING The following are specific requirements for electrical current. Follow the instructions...

Installation Instructions (All Languages)
Page 10
... laundry center to prevent excessive vibration. gas service without converting the gas valve. NEVER TEST FOR GAS LEAKS WITH AN OPEN FLAME. 8. Carefully connect the top inlet hose to the 3/8 inch (0.96 cm) pipe located on all connections by hand, then tighten another 2/3 turn with the hose pointed toward the drain. Screw the front leveling legs up the water valve screens. 2. Cable Tie 9. Remove the shipping cap from the gas supply line to the COLD water...
... laundry center to prevent excessive vibration. gas service without converting the gas valve. NEVER TEST FOR GAS LEAKS WITH AN OPEN FLAME. 8. Carefully connect the top inlet hose to the 3/8 inch (0.96 cm) pipe located on all connections by hand, then tighten another 2/3 turn with the hose pointed toward the drain. Screw the front leveling legs up the water valve screens. 2. Cable Tie 9. Remove the shipping cap from the gas supply line to the COLD water...

Installation Instructions (All Languages)
Page 11
...: Check to be applied when installing, operating and maintaining any appliance. 14. Place all the Safety and Operating instructions are needed for future reference. Verify proper operation after the laundry center is turned on the power at a circuit breaker/ fuse box before the burner will shut the burner off at a circuit breaker/fuse box. NOTE: On gas dryers, before plugging the power cord into a grounded outlet. 12. Wiring errors can...
...: Check to be applied when installing, operating and maintaining any appliance. 14. Place all the Safety and Operating instructions are needed for future reference. Verify proper operation after the laundry center is turned on the power at a circuit breaker/ fuse box before the burner will shut the burner off at a circuit breaker/fuse box. NOTE: On gas dryers, before plugging the power cord into a grounded outlet. 12. Wiring errors can...
Operating Instructions (Operating Instructions)
Page 3
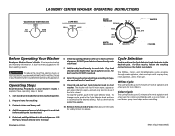
... lock to type, size and soil level of cycle. Prepare items for best washing results. DO NOT pour bleach directly onto the load. Remove items at end of each load. 9. Dry load should not be washed together. 2. If desired, add liquid fabric softener to bleach dispenser. It explains these operating steps in your Owner's Guide. It has important safety and warranty information. LAUNDRY CENTER WASHER OPERATING INSTRUCTIONS WASH/RINSE TEMPERATURE COLD WARM WARM * COLD • COLD COLD HOT COLD WARM COLD LOAD SLIOZEAD(WSAIZTER LEVEL) SMALL (LOW) MEDIUM LARGE (FULL) RESET...
... lock to type, size and soil level of cycle. Prepare items for best washing results. DO NOT pour bleach directly onto the load. Remove items at end of each load. 9. Dry load should not be washed together. 2. If desired, add liquid fabric softener to bleach dispenser. It explains these operating steps in your Owner's Guide. It has important safety and warranty information. LAUNDRY CENTER WASHER OPERATING INSTRUCTIONS WASH/RINSE TEMPERATURE COLD WARM WARM * COLD • COLD COLD HOT COLD WARM COLD LOAD SLIOZEAD(WSAIZTER LEVEL) SMALL (LOW) MEDIUM LARGE (FULL) RESET...
Operating Instructions (Operating Instructions)
Page 4
... woolens Wash/Rinse Temperature Hot/Cold Warm/Cold Cold/Cold Load Size Turn the Load Size knob to wash most loads. P/N 137227300 (0905) Prewash provides 3 minutes of detergent recommended for lightly soiled loads. • To reduce drying time, select a fast spin speed to remove more water from heavy items such as towels and jeans. • Use warm water to select a water level appropriate for basic fabric types. A cold water rinse saves energy and reduces wrinkling. For best results, DO NOT overload. Add items...
... woolens Wash/Rinse Temperature Hot/Cold Warm/Cold Cold/Cold Load Size Turn the Load Size knob to wash most loads. P/N 137227300 (0905) Prewash provides 3 minutes of detergent recommended for lightly soiled loads. • To reduce drying time, select a fast spin speed to remove more water from heavy items such as towels and jeans. • Use warm water to select a water level appropriate for basic fabric types. A cold water rinse saves energy and reduces wrinkling. For best results, DO NOT overload. Add items...


