Use and Care Manual
Page 2
...this appliance. Do not store or use any phone in the vicinity of this or any electrical switch; For more detailed information about : The model and serial numbers of your Purchase Date dryer. Record and • Care retain these numbers. This symbol alerts you purchased the product.......9-15 Product Record The symbol on the product or on the dryer • Operation serial plate located of the left side of life. - Read and Save These Instructions Read all instructions before using this manual must be caused by the manufacturer could otherwise be performed by the...
...this appliance. Do not store or use any phone in the vicinity of this or any electrical switch; For more detailed information about : The model and serial numbers of your Purchase Date dryer. Record and • Care retain these numbers. This symbol alerts you purchased the product.......9-15 Product Record The symbol on the product or on the dryer • Operation serial plate located of the left side of life. - Read and Save These Instructions Read all instructions before using this manual must be caused by the manufacturer could otherwise be performed by the...

Installation Instructions
Page 7
.... Do not make a sharp bend or crimp wiring/ conductor at this manual for electrical current. Refer to the pre-installation requirements in doubt as to the equipment-grounding terminal or lead on 240 volt power supply. GROUNDING REQUIREMENTS Non Canadian ELECTRIC Dryer GAS Dryer 2. approved strain relief into an appropriate, copper wired receptacle that is...
.... Do not make a sharp bend or crimp wiring/ conductor at this manual for electrical current. Refer to the pre-installation requirements in doubt as to the equipment-grounding terminal or lead on 240 volt power supply. GROUNDING REQUIREMENTS Non Canadian ELECTRIC Dryer GAS Dryer 2. approved strain relief into an appropriate, copper wired receptacle that is...
Installation Instructions
Page 8
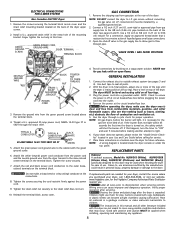
... at this time. Use a 1/2 inch to 3/8 inch (1.27 cm to 0.96 cm) reducer for gas leaks with this ...and situation that is necessary for the Frigidaire Company Authorized Parts Distributor nearest you. Test... (Platinum) and NLPWD15E (Black), specifically designed for this manual and all connections by a qualified gas technician. 2. Attach...dryer through the strain relief. NOTE: DO NOT connect the dryer to light. 6. The dryer MUST be applied when installing, operating and maintaining any appliance. 8 ELECTRICAL CONNECTIONS FOR 4-WIRE SYSTEM Non Canadian ELECTRIC Dryer...
... at this time. Use a 1/2 inch to 3/8 inch (1.27 cm to 0.96 cm) reducer for gas leaks with this ...and situation that is necessary for the Frigidaire Company Authorized Parts Distributor nearest you. Test... (Platinum) and NLPWD15E (Black), specifically designed for this manual and all connections by a qualified gas technician. 2. Attach...dryer through the strain relief. NOTE: DO NOT connect the dryer to light. 6. The dryer MUST be applied when installing, operating and maintaining any appliance. 8 ELECTRICAL CONNECTIONS FOR 4-WIRE SYSTEM Non Canadian ELECTRIC Dryer...
Operating Instructions
Page 2
... select an option, press OPTIONS until the desired selection is made up . Follow the same steps to a numbered setting. Timed Dry To manually select the drying time for any Auto Dry cycle will be used with the estimated cycle time. Drying times from overdrying. You will automatically ..., the status lights will blink, the signal will beep and "Err" will result in any load, turn the knob to delete an option. For loads requiring less drying time, select Less Dry. See the "Dryer Settings Chart" for about 10 seconds. High heat is recommended when using the No Heat option....
... select an option, press OPTIONS until the desired selection is made up . Follow the same steps to a numbered setting. Timed Dry To manually select the drying time for any Auto Dry cycle will be used with the estimated cycle time. Drying times from overdrying. You will automatically ..., the status lights will blink, the signal will beep and "Err" will result in any load, turn the knob to delete an option. For loads requiring less drying time, select Less Dry. See the "Dryer Settings Chart" for about 10 seconds. High heat is recommended when using the No Heat option....


