
Complete Owner's Guide (English)
Page 2
... other flammable vapors and liquids in the Use and Care Guide, Operating Instructions, Installation Instructions and on your building. • Clear the room, building or area of all safety messages. LAUNDRY CENTER SAFETY Your safety and the safety of others . These words mean: ... grounding prong from a neighbor's phone. We have every Note: The instructions appearing in your appliance. Follow the gas supplier's instructions. • If you cannot reach your gas supplier, call your laundry center. This symbol alerts you to hazards that could ignite or explode. 2...
... other flammable vapors and liquids in the Use and Care Guide, Operating Instructions, Installation Instructions and on your building. • Clear the room, building or area of all safety messages. LAUNDRY CENTER SAFETY Your safety and the safety of others . These words mean: ... grounding prong from a neighbor's phone. We have every Note: The instructions appearing in your appliance. Follow the gas supplier's instructions. • If you cannot reach your gas supplier, call your laundry center. This symbol alerts you to hazards that could ignite or explode. 2...
Complete Owner's Guide (English)
Page 3
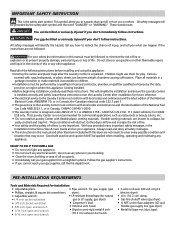
...static unless recommended by a qualified service person. •To prevent personal injury or damage to INSTALLATION INSTRUCTIONS for play on product labels. •Before the laundry center is used for the installer's reference. As children grow, teach them for detailed grounding procedures. ...exhaust opening and surrounding areas free from each load. Hydrogen gas is blocked, damaged or missing. Installation instructions are packed in the vicinity of the laundry center. FOR YOUR SAFETY Do not store or use gasoline or other household chemicals such as vinegar. •...
...static unless recommended by a qualified service person. •To prevent personal injury or damage to INSTALLATION INSTRUCTIONS for play on product labels. •Before the laundry center is used for the installer's reference. As children grow, teach them for detailed grounding procedures. ...exhaust opening and surrounding areas free from each load. Hydrogen gas is blocked, damaged or missing. Installation instructions are packed in the vicinity of the laundry center. FOR YOUR SAFETY Do not store or use gasoline or other household chemicals such as vinegar. •...
Complete Owner's Guide (English)
Page 4
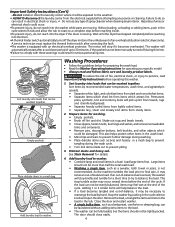
... wash cycle. • Turn knit items inside . •To prevent injury, do so can not be exposed to the weather. • ALWAYS disconnect the laundry center from the electrical supply before operating this time. •Failure to rearrange the load by hand. Sort...balance load is sensed, the washer will automatically restart after correcting the fault. •The washer is not recommended. Important Safety Instructions (Con't) -Do not install or store the laundry center where it will be evenly balanced, items may feel wet at the end of the cycle. This also helps protect other ...
... wash cycle. • Turn knit items inside . •To prevent injury, do so can not be exposed to the weather. • ALWAYS disconnect the laundry center from the electrical supply before operating this time. •Failure to rearrange the load by hand. Sort...balance load is sensed, the washer will automatically restart after correcting the fault. •The washer is not recommended. Important Safety Instructions (Con't) -Do not install or store the laundry center where it will be evenly balanced, items may feel wet at the end of the cycle. This also helps protect other ...
Complete Owner's Guide (English)
Page 6
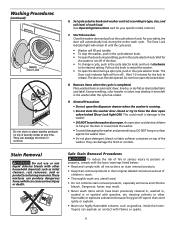
Washing Procedures (continued) Do not store or place laundry products on top of children's reach. • Thoroughly wash any time. The door can ... the washer door open. This could result in or spotted with all instructions on top of the door. • To change a cycle, push in their original labeled containers and out of laundry center at any utensil used. • Do not combine stain removal products...1-2 minutes for the lock to type, size, and soil level of each load. (See Operating Instructions card for the water to restart the washer. • To open the locked door. 8.
Washing Procedures (continued) Do not store or place laundry products on top of children's reach. • Thoroughly wash any time. The door can ... the washer door open. This could result in or spotted with all instructions on top of the door. • To change a cycle, push in their original labeled containers and out of laundry center at any utensil used. • Do not combine stain removal products...1-2 minutes for the lock to type, size, and soil level of each load. (See Operating Instructions card for the water to restart the washer. • To open the locked door. 8.
Complete Owner's Guide (English)
Page 7
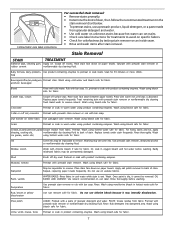
...discoloration. Mildew, scorch Wash with bar soap. Once paint is dry, it may set stains. • Check care label instructions for treatments to avoid on specific fabrics. • Check for fabric. Perspiration Use prewash stain remover or rub with prewash stain...warm water using product containing enzymes. Repeat, replacing paper towels frequently. Replace towels under stain frequently. Follow fabric care label instructions. Wash using hottest water safe for fabric. Wash car grease, motor oils) using bleach safe for fabric. OIL BASED AND...
...discoloration. Mildew, scorch Wash with bar soap. Once paint is dry, it may set stains. • Check care label instructions for treatments to avoid on specific fabrics. • Check for fabric. Perspiration Use prewash stain remover or rub with prewash stain...warm water using product containing enzymes. Repeat, replacing paper towels frequently. Replace towels under stain frequently. Follow fabric care label instructions. Wash using hottest water safe for fabric. Wash car grease, motor oils) using bleach safe for fabric. OIL BASED AND...
Complete Owner's Guide (English)
Page 9
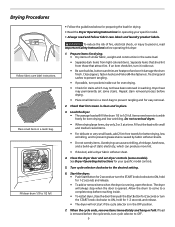
... the drum to come to 1/2 full. • Follow the guidelines below for preparing the load for drying. • Read the Dryer Operating Instructions for easy removal. 2. Fill dryer drum 1/3 to a complete stop when the door is clean and in the same load. • Separate ...tangling and for operating your specific model controls. 5. See Dryer Operating Instructions for even drying and less wrinkling. Place small items in a mesh bag to persons, read and follow fabric care labels and laundry product labels. Turn cycle selector clockwise to prevent grease stains caused by...
... the drum to come to 1/2 full. • Follow the guidelines below for preparing the load for drying. • Read the Dryer Operating Instructions for easy removal. 2. Fill dryer drum 1/3 to a complete stop when the door is clean and in the same load. • Separate ...tangling and for operating your specific model controls. 5. See Dryer Operating Instructions for even drying and less wrinkling. Place small items in a mesh bag to persons, read and follow fabric care labels and laundry product labels. Turn cycle selector clockwise to prevent grease stains caused by...
Complete Owner's Guide (English)
Page 11
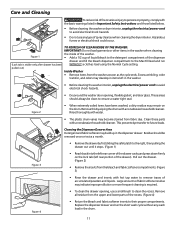
... liquids. Care and Cleaning To reduce risk of fire or serious injury to persons or property, comply with the basic warnings listed in Important Safety Instructions and those listed below. • Before cleaning the washer or dryer interior, unplug the electrical power cord to avoid electrical shock hazards. • Do not...
... liquids. Care and Cleaning To reduce risk of fire or serious injury to persons or property, comply with the basic warnings listed in Important Safety Instructions and those listed below. • Before cleaning the washer or dryer interior, unplug the electrical power cord to avoid electrical shock hazards. • Do not...
Complete Owner's Guide (English)
Page 13
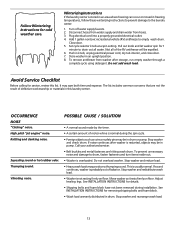
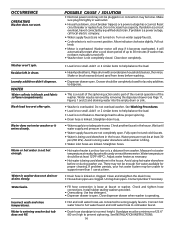
...Washer is probably out of motor whine is usually normal. Follow Winterizing Instructions for removing shipping bolts and foam block. • Wash load unevenly distributed in drum. Winterizing Instructions If the laundry center is restarted, objects may be in drum or pump. Plug electrical ...at a spin setting. Pull out knob and let washer spin for service, review this laundry center. Push in an upright position. 8. Avoid Service Checklist Before calling for 1 minute to the laundry center: 1. It may produce a thumping sound. High pitch "jet engine" noise. Stop...
...Washer is probably out of motor whine is usually normal. Follow Winterizing Instructions for removing shipping bolts and foam block. • Wash load unevenly distributed in drum. Winterizing Instructions If the laundry center is restarted, objects may be in drum or pump. Plug electrical ...at a spin setting. Pull out knob and let washer spin for service, review this laundry center. Push in an upright position. 8. Avoid Service Checklist Before calling for 1 minute to the laundry center: 1. It may produce a thumping sound. High pitch "jet engine" noise. Stop...
Complete Owner's Guide (English)
Page 14
... balance the load. • Load is a power outage, call local electric company. • Water supply faucets are not completely open . See INSTALLATION INSTRUCTIONS. 14 If problem is a distance from items before or during washer use at nearby faucet with a nonabrasive household cleanser, then rinse. Add 1 or... hose is filling. • Water inlet hoses are clogged. If problem persists, your hot water system may be enough hot water available for laundry additives to dispense. • This is a result of the siphoning action and is part of the normal operation of 23.6" (60 cm)...
... balance the load. • Load is a power outage, call local electric company. • Water supply faucets are not completely open . See INSTALLATION INSTRUCTIONS. 14 If problem is a distance from items before or during washer use at nearby faucet with a nonabrasive household cleanser, then rinse. Add 1 or... hose is filling. • Water inlet hoses are clogged. If problem persists, your hot water system may be enough hot water available for laundry additives to dispense. • This is a result of the siphoning action and is part of the normal operation of 23.6" (60 cm)...
Complete Owner's Guide (English)
Page 15
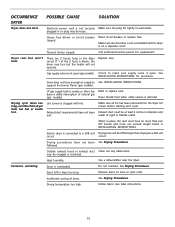
... Drying Procedures. Make sure all lint has been removed from the dryer lint screen before starting each cycle. When in INSTALLATION INSTRUCTIONS. House fuse blown or circuit breaker tripped. Dryer runs but the heater will be 20% longer than two 90° bends...sure electrical line is not overloaded and the dryer is overloaded. support the burner flame (gas models). followed. Follow fabric care label instructions. 15 Check to a 208 volt Drying time will not operate. Exhaust duct requirements have not been See Drying Procedures. Drying procedures...
... Drying Procedures. Make sure all lint has been removed from the dryer lint screen before starting each cycle. When in INSTALLATION INSTRUCTIONS. House fuse blown or circuit breaker tripped. Dryer runs but the heater will be 20% longer than two 90° bends...sure electrical line is not overloaded and the dryer is overloaded. support the burner flame (gas models). followed. Follow fabric care label instructions. 15 Check to a 208 volt Drying time will not operate. Exhaust duct requirements have not been See Drying Procedures. Drying procedures...

Complete Owner's Guide (English)
Page 16
...service companies; Service under this warranty must be required. Service calls to use or used and maintained in accordance with the provided instructions. use of your receipt, delivery slip, or some other than genuine Electrolux parts or parts obtained from the factory. 10. ...LESS THAN ONE YEAR. Obligations for service calls to , any obligations under this warranty must be readily determined. 2. Products with the provided instructions. 8. Rust on the interior or exterior of the appliance when it is warranted by Electrolux Major Appliances North America, a division of ...
...service companies; Service under this warranty must be required. Service calls to use or used and maintained in accordance with the provided instructions. use of your receipt, delivery slip, or some other than genuine Electrolux parts or parts obtained from the factory. 10. ...LESS THAN ONE YEAR. Obligations for service calls to , any obligations under this warranty must be readily determined. 2. Products with the provided instructions. 8. Rust on the interior or exterior of the appliance when it is warranted by Electrolux Major Appliances North America, a division of ...
Installation Instructions (All Languages)
Page 2
... installing, operating and maintaing any phone in Canada, CAN/ACG B149.1-2000. • The Laundry Center is the safety alert symbol. Leave these instructions near the Laundry Center after the Laundry Center is being installed. • Before beginning installation, carefully read and obey all occupants. •... kill or hurt you cannot reach your safety the information in this manual and other appliance. This Laundry Center is installed correctly and safely. Follow the gas supplier's instructions. • If you or others is very important. CAN/CSA C22.2 No. 112 (latest...
... installing, operating and maintaing any phone in Canada, CAN/ACG B149.1-2000. • The Laundry Center is the safety alert symbol. Leave these instructions near the Laundry Center after the Laundry Center is being installed. • Before beginning installation, carefully read and obey all occupants. •... kill or hurt you cannot reach your safety the information in this manual and other appliance. This Laundry Center is installed correctly and safely. Follow the gas supplier's instructions. • If you or others is very important. CAN/CSA C22.2 No. 112 (latest...
Installation Instructions (All Languages)
Page 4
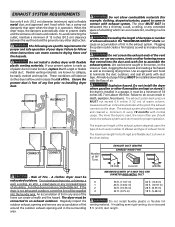
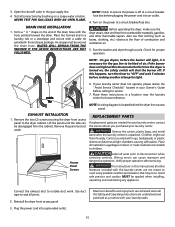
...CM) DIAMETER RIGID METAL DUCT 0 56 ft. (17.07 m) 42 ft. (12.8 m) 1 46 ft. (14.02 m) 36 ft. (10.97 m) 2 34 ft. (10.36 m) 28 ft. (8.53 m) 3 32 ft. (9.75 m) 18 ft. (5.48 m) Do not install flexible ...fire. Do not exhaust dryer into the duct and catch lint to follow these instructions can result in death, explosion, fire or burns. An accumulation of lint in ...hood and the ground or any accumulation of air. The more often you should be expelled into the laundry area. Risk of 90° Turns EXHAUST DUCT LENGTHS EXHAUST HOOD TYPE 4" (10.2 CM) Louvered ...
...CM) DIAMETER RIGID METAL DUCT 0 56 ft. (17.07 m) 42 ft. (12.8 m) 1 46 ft. (14.02 m) 36 ft. (10.97 m) 2 34 ft. (10.36 m) 28 ft. (8.53 m) 3 32 ft. (9.75 m) 18 ft. (5.48 m) Do not install flexible ...fire. Do not exhaust dryer into the duct and catch lint to follow these instructions can result in death, explosion, fire or burns. An accumulation of lint in ...hood and the ground or any accumulation of air. The more often you should be expelled into the laundry area. Risk of 90° Turns EXHAUST DUCT LENGTHS EXHAUST HOOD TYPE 4" (10.2 CM) Louvered ...
Installation Instructions (All Languages)
Page 8
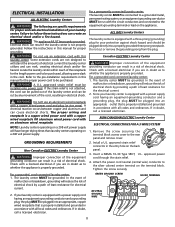
...licensed electrician. The laundry center MUST be grounded. Check with all local codes and ordinances. Since your laundry center. Failure to the silver colored center terminal on the appliance. Attach the power cord neutral (central wire) conductor to follow these instructions can result in ... purchased, allowing some slack in electrical shock. Follow the instructions in doubt, call a licensed electrician. WARNING Do not use an aluminum wired receptacle with all codes and ordinances. Locate the laundry center within reach of the cord, resulting in the cord. WARNING...
...licensed electrician. The laundry center MUST be grounded. Check with all local codes and ordinances. Since your laundry center. Failure to the silver colored center terminal on the appliance. Attach the power cord neutral (central wire) conductor to follow these instructions can result in ... purchased, allowing some slack in electrical shock. Follow the instructions in doubt, call a licensed electrician. WARNING Do not use an aluminum wired receptacle with all codes and ordinances. Locate the laundry center within reach of the cord, resulting in the cord. WARNING...
Installation Instructions (All Languages)
Page 10
..., plastic bags, and metal band after servicing. Place all joints. 2. Verify proper operation after the laundry center is off . WARNING The instructions in a laundry tub or a standpipe and secure with this happens, turn the timer to light. If this laundry center are needed for the gas line to ensure the power is unpacked. NOTE: A wiring diagram...
..., plastic bags, and metal band after servicing. Place all joints. 2. Verify proper operation after the laundry center is off . WARNING The instructions in a laundry tub or a standpipe and secure with this happens, turn the timer to light. If this laundry center are needed for the gas line to ensure the power is unpacked. NOTE: A wiring diagram...
Operating Instructions (Operating Instructions)
Page 1
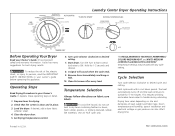
To reduce the risk of fire, electric shock, or injury to persons, read the IMPORTANT SAFETY INSTRUCTIONS in your Owner's Guide. Hold for drying. 2. Remove items immediately and hang or fold. 10. Use Air Fluff cycle only. Prepare items ...automatically turns off and the load continues to handle during unloading. Room temperature and humidity, type of load, weight and fabric type. Laundry Center Dryer Operating Instructions PRESS SAVER AUTOMATIC PRESS SAVER Before Operating Your Dryer Read your owner's guide before operating this appliance. It explains these operating steps in...
To reduce the risk of fire, electric shock, or injury to persons, read the IMPORTANT SAFETY INSTRUCTIONS in your Owner's Guide. Hold for drying. 2. Remove items immediately and hang or fold. 10. Use Air Fluff cycle only. Prepare items ...automatically turns off and the load continues to handle during unloading. Room temperature and humidity, type of load, weight and fabric type. Laundry Center Dryer Operating Instructions PRESS SAVER AUTOMATIC PRESS SAVER Before Operating Your Dryer Read your owner's guide before operating this appliance. It explains these operating steps in...
Operating Instructions (Operating Instructions)
Page 5
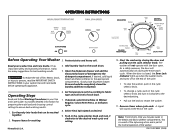
...When the door is part of the normal operation of each load. 7. Remove items when cycle ends. Add laundry load to persons, read the IMPORTANT SAFETY INSTRUCTIONS in the cycle selector knob and turn it clockwise to ensure best washing results. 1. It provides detailed information ...for laundry additives to the appropriate compartments. As a safety measure, the door will not operate with the door open. Push in your washer Use and Care Guide before operating this appliance. OPERATING INSTRUCTIONS NORMAL FAST WHITES/ EXTRA RINSE ON...
...When the door is part of the normal operation of each load. 7. Remove items when cycle ends. Add laundry load to persons, read the IMPORTANT SAFETY INSTRUCTIONS in the cycle selector knob and turn it clockwise to ensure best washing results. 1. It provides detailed information ...for laundry additives to the appropriate compartments. As a safety measure, the door will not operate with the door open. Push in your washer Use and Care Guide before operating this appliance. OPERATING INSTRUCTIONS NORMAL FAST WHITES/ EXTRA RINSE ON...
Operating Instructions (Operating Instructions)
Page 6
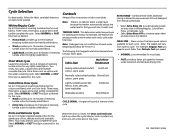
... an option with a no need to select a water level because the washer automatically adjusts the water level to cycle. Cycle Selection For best results, follow instructions on items to conserve water when an extra rinse is not desired. Three rinses, three spins, a pause and a brief tumble complete the cycle.
... an option with a no need to select a water level because the washer automatically adjusts the water level to cycle. Cycle Selection For best results, follow instructions on items to conserve water when an extra rinse is not desired. Three rinses, three spins, a pause and a brief tumble complete the cycle.
Wiring Diagram (All Languages)
Page 1
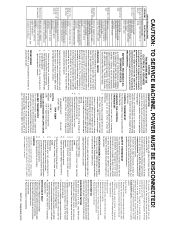
... reinstall. When it is discharged out the vent. Check resistance value of duct work. (See Installation Instructions) TO SERVICE MACHINE, POWER MUST BE DISCONNECTED! Disconnect Laundry Center from motor. 2. DOOR SWITCH Whenever the door is opened , it to open the circuit to the... thermostat is inoperative. Once the safety thermostat has opened , the door switch will open coils of the electric heater. Disconnect Laundry Center from burner assembly. 4. Remove four screws securing heating element assembly to reassemble. Install new heating element. 6. This energizes the...
... reinstall. When it is discharged out the vent. Check resistance value of duct work. (See Installation Instructions) TO SERVICE MACHINE, POWER MUST BE DISCONNECTED! Disconnect Laundry Center from motor. 2. DOOR SWITCH Whenever the door is opened , it to open the circuit to the... thermostat is inoperative. Once the safety thermostat has opened , the door switch will open coils of the electric heater. Disconnect Laundry Center from burner assembly. 4. Remove four screws securing heating element assembly to reassemble. Install new heating element. 6. This energizes the...


