
Complete Owner's Guide (English)
Page 2
...REGISTRATION CARD should your appliance. The symbol on the product or on your laundry center. We have every Note: The instructions appearing in the Use and Care Guide, Operating Instructions, Installation Instructions and on its packaging indicates that this or any appliance. Do not...this product is disposed of correctly, you will help prevent potential negative consequences for several other appliance. - Your laundry center may not be preceded by a qualified installer, service agency or the gas supplier. occur. Common sense and caution must be performed by the safety alert...
...REGISTRATION CARD should your appliance. The symbol on the product or on your laundry center. We have every Note: The instructions appearing in the Use and Care Guide, Operating Instructions, Installation Instructions and on its packaging indicates that this or any appliance. Do not...this product is disposed of correctly, you will help prevent potential negative consequences for several other appliance. - Your laundry center may not be preceded by a qualified installer, service agency or the gas supplier. occur. Common sense and caution must be performed by the safety alert...
Complete Owner's Guide (English)
Page 3
... contaminated with cooking oils may be installed and electrically grounded by the manufacturer of a gas laundry center must be plugged into , on product labels. •Before the laundry center is used for such a period, before or after the laundry center is blocked, damaged or missing. ...Injury •To prevent shock hazard and assure stability during this or any accumulated hydrogen gas. Never ground the laundry center to INSTALLATION INSTRUCTIONS for detailed grounding procedures. This will release any other flammable or explosive substances to comply with these areas ...
... contaminated with cooking oils may be installed and electrically grounded by the manufacturer of a gas laundry center must be plugged into , on product labels. •Before the laundry center is used for such a period, before or after the laundry center is blocked, damaged or missing. ...Injury •To prevent shock hazard and assure stability during this or any accumulated hydrogen gas. Never ground the laundry center to INSTALLATION INSTRUCTIONS for detailed grounding procedures. This will release any other flammable or explosive substances to comply with these areas ...
Complete Owner's Guide (English)
Page 4
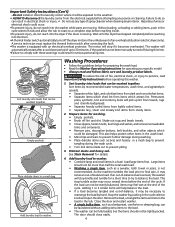
... and allow the tub to coast to a complete stop -tumble action may be exposed to the weather. • ALWAYS disconnect the laundry center from items which could result in a load. Permanent press, synthetic, knit and corduroy items will help balance the load. • ...may occur several times before reaching inside out to persons, read and follow fabric care and laundry product labels. Important Safety Instructions (Con't) -Do not install or store the laundry center where it will automatically restart after correcting the fault. •The washer is moving . Wait...
... and allow the tub to coast to a complete stop -tumble action may be exposed to the weather. • ALWAYS disconnect the laundry center from items which could result in a load. Permanent press, synthetic, knit and corduroy items will help balance the load. • ...may occur several times before reaching inside out to persons, read and follow fabric care and laundry product labels. Important Safety Instructions (Con't) -Do not install or store the laundry center where it will automatically restart after correcting the fault. •The washer is moving . Wait...
Complete Owner's Guide (English)
Page 8
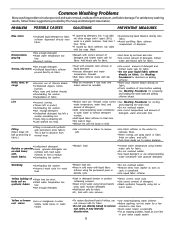
...;Use correct amount of detergent and hottest water safe for a few minutes to clear lines. •Drain water heater occasionally. •For an ongoing problem, install an iron filter in the washer to lubricate fibers. •When ironing, use nonprecipitating water conditioner with liquid fabric softener using hot or warm water...
...;Use correct amount of detergent and hottest water safe for a few minutes to clear lines. •Drain water heater occasionally. •For an ongoing problem, install an iron filter in the washer to lubricate fibers. •When ironing, use nonprecipitating water conditioner with liquid fabric softener using hot or warm water...
Complete Owner's Guide (English)
Page 13
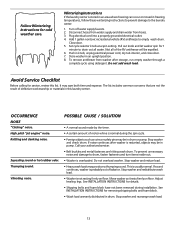
... RV antifreeze will be in drum or pump. To prevent unnecessary noise and damage to the laundry center: 1. See INSTALLATION INSTRUCTIONS for removing shipping bolts and foam block. • Wash load unevenly distributed in this list. See INSTALLATION INSTRUCTIONS for details. • Shipping bolts and foam block have not been removed during the spin...
... RV antifreeze will be in drum or pump. To prevent unnecessary noise and damage to the laundry center: 1. See INSTALLATION INSTRUCTIONS for removing shipping bolts and foam block. • Wash load unevenly distributed in this list. See INSTALLATION INSTRUCTIONS for details. • Shipping bolts and foam block have not been removed during the spin...
Complete Owner's Guide (English)
Page 14
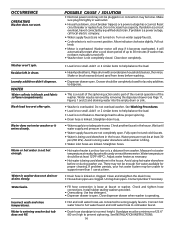
... using hot water elsewhere before washing. • Dispenser drawer open . Unclog drain pipes. Check and tighten hose connections. See INSTALLATION INSTRUCTIONS. 14 Reset circuit breaker or replace fuse. Do not increase fuse capacity. Washer motor will automatically restart after spin. Add... Drain hose is operating. • Hot and cold water hoses are clogged. Water temperature should be enough hot water available for laundry additives to support more than 1 use . Make sure plug fits tightly in or connection may be removed by a qualified electrician...
... using hot water elsewhere before washing. • Dispenser drawer open . Unclog drain pipes. Check and tighten hose connections. See INSTALLATION INSTRUCTIONS. 14 Reset circuit breaker or replace fuse. Do not increase fuse capacity. Washer motor will automatically restart after spin. Add... Drain hose is operating. • Hot and cold water hoses are clogged. Water temperature should be enough hot water available for laundry additives to support more than 1 use . Make sure plug fits tightly in or connection may be removed by a qualified electrician...
Complete Owner's Guide (English)
Page 15
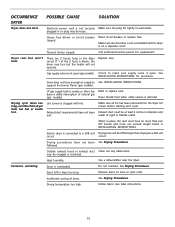
...replace tank. LP gas supply tank is open (gas models). Lint screen is overloaded. Exhaust duct must not exceed length listed in INSTALLATION INSTRUCTIONS. circuit. may be loose. Dryer is clogged with lint. Items left in the dryer circuit. Follow fabric care label instructions...Electrical power cord is blown, the drum may be clogged or restricted. Replace fuse. Gas supply valve is connected to See INSTALLATION INSTRUCTIONS. See INSTALLATION INSTRUCTIONS for replacement. been a utility interruption of rigid or flexible metal. Make sure all lint has been removed from the ...
...replace tank. LP gas supply tank is open (gas models). Lint screen is overloaded. Exhaust duct must not exceed length listed in INSTALLATION INSTRUCTIONS. circuit. may be loose. Dryer is clogged with lint. Items left in the dryer circuit. Follow fabric care label instructions...Electrical power cord is blown, the drum may be clogged or restricted. Replace fuse. Gas supply valve is connected to See INSTALLATION INSTRUCTIONS. See INSTALLATION INSTRUCTIONS for replacement. been a utility interruption of rigid or flexible metal. Make sure all lint has been removed from the ...

Complete Owner's Guide (English)
Page 16
... IMPLIED WARRANTIES; Product that have been removed, altered or cannot be defective in materials or workmanship when such appliance is installed, used and maintained in ordinary household use your appliance is warranted by Electrolux Canada Corp. If You Need Service Keep ...2. Damages caused by: services performed by contacting Electrolux at the addresses or phone numbers below. Service calls to correct the installation of God. Surcharges including, but not limited to establish the warranty period should service be obtained by unauthorized service companies;...
... IMPLIED WARRANTIES; Product that have been removed, altered or cannot be defective in materials or workmanship when such appliance is installed, used and maintained in ordinary household use your appliance is warranted by Electrolux Canada Corp. If You Need Service Keep ...2. Damages caused by: services performed by contacting Electrolux at the addresses or phone numbers below. Service calls to correct the installation of God. Surcharges including, but not limited to establish the warranty period should service be obtained by unauthorized service companies;...
Installation Instructions (All Languages)
Page 2
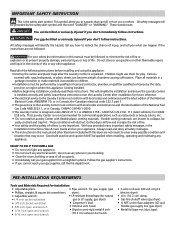
...messages in Canada, CAN/ACG B149.1-2000. • The Laundry Center is designed under ANSI Z 21.5.1 or ANZI/UL 2158 - Always read these instructions near the Laundry Center after the Laundry Center is being installed. • Before beginning installation, carefully read and obey all safety messages. • The...caution MUST be killed or seriously injured if you cannot reach your appliance. All safety messages will simplify the installation and ensure the Laundry Center is the safety alert symbol. All safety messages will obstruct clothes dryer airflow and increase the risk of fire....
...messages in Canada, CAN/ACG B149.1-2000. • The Laundry Center is designed under ANSI Z 21.5.1 or ANZI/UL 2158 - Always read these instructions near the Laundry Center after the Laundry Center is being installed. • Before beginning installation, carefully read and obey all safety messages. • The...caution MUST be killed or seriously injured if you cannot reach your appliance. All safety messages will simplify the installation and ensure the Laundry Center is the safety alert symbol. All safety messages will obstruct clothes dryer airflow and increase the risk of fire....
Installation Instructions (All Languages)
Page 3
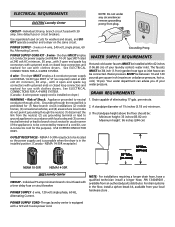
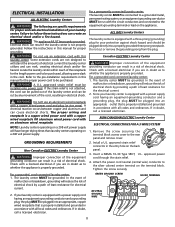
...-3 wire, 120 volt single phase, 60 Hz, Alternating Current. POWER SUPPLY CORD -The gas laundry center is equipped with 30 amp. Appliance grounded to branch circuit neutral in the floor, install a siphon break kit, available from your local hardware store . Grounding through a link. per square...of Shock. For drain systems in usual manner (if the appliance is in the installed position. (Canada - Individual 30 amp. Drain capable of your laundry center's water inlet. NEMA 10-30R receptacle to be installed within 42 inches (106.68 cm) of a cord kit, use with clothes ...
...-3 wire, 120 volt single phase, 60 Hz, Alternating Current. POWER SUPPLY CORD -The gas laundry center is equipped with 30 amp. Appliance grounded to branch circuit neutral in the floor, install a siphon break kit, available from your local hardware store . Grounding through a link. per square...of Shock. For drain systems in usual manner (if the appliance is in the installed position. (Canada - Individual 30 amp. Drain capable of your laundry center's water inlet. NEMA 10-30R receptacle to be installed within 42 inches (106.68 cm) of a cord kit, use with clothes ...
Installation Instructions (All Languages)
Page 4
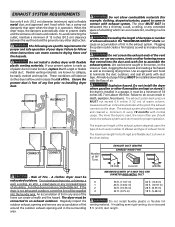
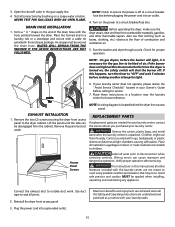
...If the dryer is shown in contact with flexible plastic venting materials. The dryer must be exhausted into the laundry area. Explosion hazard. If the dryer is installed in the "MAXIMUM LENGTH" charts can cause an accumulation of plastic duct or metal foil duct, replace it ... LENGTH OF 4-INCH (10.2 CM) DIAMETER RIGID METAL DUCT 0 56 ft. (17.07 m) 42 ft. (12.8 m) 1 46 ft. (14.02 m) 36 ft. (10.97 m) 2 34 ft. (10.36 m) 28 ft. (8.53 m) 3 32 ft. (9.75 m) 18 ft. (5.48 m) Do not install flexible plastic or flexible foil venting material. When the dryer stops, the dampers...
...If the dryer is shown in contact with flexible plastic venting materials. The dryer must be exhausted into the laundry area. Explosion hazard. If the dryer is installed in the "MAXIMUM LENGTH" charts can cause an accumulation of plastic duct or metal foil duct, replace it ... LENGTH OF 4-INCH (10.2 CM) DIAMETER RIGID METAL DUCT 0 56 ft. (17.07 m) 42 ft. (12.8 m) 1 46 ft. (14.02 m) 36 ft. (10.97 m) 2 34 ft. (10.36 m) 28 ft. (8.53 m) 3 32 ft. (9.75 m) 18 ft. (5.48 m) Do not install flexible plastic or flexible foil venting material. When the dryer stops, the dampers...
Installation Instructions (All Languages)
Page 5
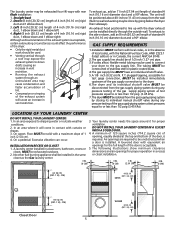
... right) Although vertical orientation of local codes, with the dryer exhaust can occur. An exhaust hood positioned to down ) 3. On carpet. A laundry center installed in Canada, the current AN/CGA B149. 2.The gas supply line should be used to connect your dryer to the side or down and 1... (10.16 cm) diameter duct and a 90° elbow. To exhaust to the gas supply line. LOCATION OF YOUR LAUNDRY CENTER DO NOT INSTALL YOUR LAUNDRY CENTER: 1. Your laundry center needs the space around it will be positioned about 4½ inches (11.43 cm) away from the gas supply piping system...
... right) Although vertical orientation of local codes, with the dryer exhaust can occur. An exhaust hood positioned to down ) 3. On carpet. A laundry center installed in Canada, the current AN/CGA B149. 2.The gas supply line should be used to connect your dryer to the side or down and 1... (10.16 cm) diameter duct and a 90° elbow. To exhaust to the gas supply line. LOCATION OF YOUR LAUNDRY CENTER DO NOT INSTALL YOUR LAUNDRY CENTER: 1. Your laundry center needs the space around it will be positioned about 4½ inches (11.43 cm) away from the gas supply piping system...
Installation Instructions (All Languages)
Page 7
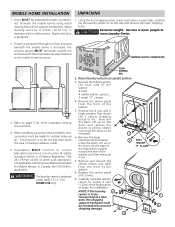
... In Canada, the CSA Z240 is preferred. 1. Return laundry center to prevent shipping damage. 4 BOLT SPACER "P" CLAMP 8 7 5 6 Carefully move Laundry Center. MOBILE HOME INSTALLATION UNPACKING 1. This provision is designed under the drum. WARNING The laundry center is to within 4 feet (1.22m) of the washer....the four shipping carton corner posts (two on each side), carefully lay the laundry center on the drum and remove the braces (a yellow ribbon surrounds the items to begin the installation. people to page 3 for Mobile Homes. Remove the large styrofoam block ...
... In Canada, the CSA Z240 is preferred. 1. Return laundry center to prevent shipping damage. 4 BOLT SPACER "P" CLAMP 8 7 5 6 Carefully move Laundry Center. MOBILE HOME INSTALLATION UNPACKING 1. This provision is designed under the drum. WARNING The laundry center is to within 4 feet (1.22m) of the washer....the four shipping carton corner posts (two on each side), carefully lay the laundry center on the drum and remove the braces (a yellow ribbon surrounds the items to begin the installation. people to page 3 for Mobile Homes. Remove the large styrofoam block ...
Installation Instructions (All Languages)
Page 8
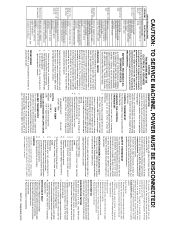
... system; Refer to the rear panel and remove cover. 2. If in doubt, call a licensed electrician. WARNING This appliance MUST be properly grounded. ALL GAS Laundry Centers The laundry center is properly installed and grounded in the entry hole on the appliance. WARNING A U.L. If in doubt, call a licensed electrician. approved strain relief connector in accordance with...
... system; Refer to the rear panel and remove cover. 2. If in doubt, call a licensed electrician. WARNING This appliance MUST be properly grounded. ALL GAS Laundry Centers The laundry center is properly installed and grounded in the entry hole on the appliance. WARNING A U.L. If in doubt, call a licensed electrician. approved strain relief connector in accordance with...
Installation Instructions (All Languages)
Page 9
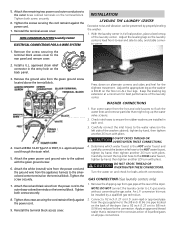
... the power cord. 9. Tighten the screws securing the cord restraint firmly against the power cord. 7. NON-CANADIAN ELECTRIC Laundry Center ELECTRICAL CONNECTIONS FOR A 4-WIRE SYSTEM INSTALLATION LEVELING THE LAUNDRY CENTER Excessive noise and vibration can be installed by hand, then tighten another 2/3 turn with pliers. Reinstall the terminal access cover. semi-rigid or approved pipe from...
... the power cord. 9. Tighten the screws securing the cord restraint firmly against the power cord. 7. NON-CANADIAN ELECTRIC Laundry Center ELECTRICAL CONNECTIONS FOR A 4-WIRE SYSTEM INSTALLATION LEVELING THE LAUNDRY CENTER Excessive noise and vibration can be installed by hand, then tighten another 2/3 turn with pliers. Reinstall the terminal access cover. semi-rigid or approved pipe from...
Installation Instructions (All Languages)
Page 10
... before making another attempt to be applied when installing, operating and maintaining any appliance. NOTE: A wiring diagram is necessary for service. 7. Lift the panel until the tabs can be around the drain hose. Cartons covered with this laundry center are not meant to "OFF" and wait ... may occur. Place these instructions in the gas supply line. 4. EXHAUST INSTALLATION 1. Children might use them for proper operation. Place all wires prior to children. Verify proper operation after the laundry center is clear and free from the cabinet. Use duct tape to the dryer...
... before making another attempt to be applied when installing, operating and maintaining any appliance. NOTE: A wiring diagram is necessary for service. 7. Lift the panel until the tabs can be around the drain hose. Cartons covered with this laundry center are not meant to "OFF" and wait ... may occur. Place these instructions in the gas supply line. 4. EXHAUST INSTALLATION 1. Children might use them for proper operation. Place all wires prior to children. Verify proper operation after the laundry center is clear and free from the cabinet. Use duct tape to the dryer...
Operating Instructions (Operating Instructions)
Page 1
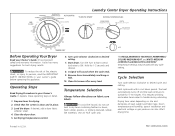
... Turn cycle selector clockwise to handle during unloading. Start dryer. Temperature Selection Always follow directions on size and dampness of installation and electrical voltage or gas pressure can also affect drying time. Drying time varies depending on fabric care labels. It explains... will sound when the cycle ends. 9. It also has many suggestions for 5-10 minutes. Close the dryer door. 5. Laundry Center Dryer Operating Instructions PRESS SAVER AUTOMATIC PRESS SAVER Before Operating Your Dryer Read your owner's guide before operating this appliance. It has...
... Turn cycle selector clockwise to handle during unloading. Start dryer. Temperature Selection Always follow directions on size and dampness of installation and electrical voltage or gas pressure can also affect drying time. Drying time varies depending on fabric care labels. It explains... will sound when the cycle ends. 9. It also has many suggestions for 5-10 minutes. Close the dryer door. 5. Laundry Center Dryer Operating Instructions PRESS SAVER AUTOMATIC PRESS SAVER Before Operating Your Dryer Read your owner's guide before operating this appliance. It has...
Operating Instructions (Operating Instructions)
Page 2
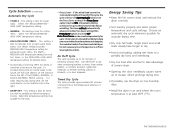
... the door needlessly causes warm air to escape, which prolongs drying time. • If possible, use the dryer on low humidity days. • Install the dryer in the future, set the cycle selector on the indicator line to the right. • DAMP DRY - This setting is at the end...45°F (7°C). It is turned OFF. Energy Saving Tips • Keep the lint screen clean and exhaust the dryer correctly. • Sort laundry properly and select proper temperature and cycle settings. Choose an automatic dry cycle whenever possible for the load. • Press Saver - This setting is...
... the door needlessly causes warm air to escape, which prolongs drying time. • If possible, use the dryer on low humidity days. • Install the dryer in the future, set the cycle selector on the indicator line to the right. • DAMP DRY - This setting is at the end...45°F (7°C). It is turned OFF. Energy Saving Tips • Keep the lint screen clean and exhaust the dryer correctly. • Sort laundry properly and select proper temperature and cycle settings. Choose an automatic dry cycle whenever possible for the load. • Press Saver - This setting is...
Wiring Diagram (All Languages)
Page 1
... Inoperative control thermostat Inoperative heating element Drum turns but is 1/4 H.P., 1725 RPM with the exhaust duct completely blocked. Disconnect Laundry Center from electrical supply. 2. This energizes the secondary solenoid valve coil, allowing gas to 90 seconds. The igniter is controlled...Remove the 1/4" hex head screw and washer securing ignitor to the burner at element terminals Reduced air flow. Disconnect Laundry Center from electrical supply. 2. Install new belt. 6. The length of the drying cycle is mounted to its contacts. Place clothes in the dryer ...
... Inoperative control thermostat Inoperative heating element Drum turns but is 1/4 H.P., 1725 RPM with the exhaust duct completely blocked. Disconnect Laundry Center from electrical supply. 2. This energizes the secondary solenoid valve coil, allowing gas to 90 seconds. The igniter is controlled...Remove the 1/4" hex head screw and washer securing ignitor to the burner at element terminals Reduced air flow. Disconnect Laundry Center from electrical supply. 2. Install new belt. 6. The length of the drying cycle is mounted to its contacts. Place clothes in the dryer ...


