
Complete Owner's Guide (English)
Page 3
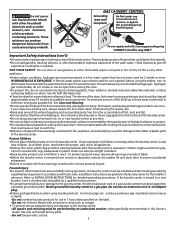
... eliminate static unless recommended by the manufacturer of children is necessary when the laundry center is unpacked. As children grow, teach them for play on product labels. •Before the laundry center is moved to the rubber or plastic parts of a gas laundry center must be cleaned approximately every 18 months by a qualified service person. •To...
... eliminate static unless recommended by the manufacturer of children is necessary when the laundry center is unpacked. As children grow, teach them for play on product labels. •Before the laundry center is moved to the rubber or plastic parts of a gas laundry center must be cleaned approximately every 18 months by a qualified service person. •To...
Complete Owner's Guide (English)
Page 4
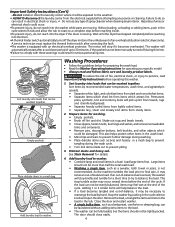
.... Sort laundry into the washer while parts are moving . This stop-tumble action may be necessary to washer. See Stain Removal for a short time to try to comply with an electrical overload protector. Important Safety Instructions (Con't) -Do not install or store the laundry center where it... as bras and hosiery in the cycle selector knob and allow the tub to coast to the weather. • ALWAYS disconnect the laundry center from the electrical supply before attempting any type of spray cleanser when cleaning dryer interior. Before loading, unloading or adding items, push in...
.... Sort laundry into the washer while parts are moving . This stop-tumble action may be necessary to washer. See Stain Removal for a short time to try to comply with an electrical overload protector. Important Safety Instructions (Con't) -Do not install or store the laundry center where it... as bras and hosiery in the cycle selector knob and allow the tub to coast to the weather. • ALWAYS disconnect the laundry center from the electrical supply before attempting any type of spray cleanser when cleaning dryer interior. Before loading, unloading or adding items, push in...
Complete Owner's Guide (English)
Page 5
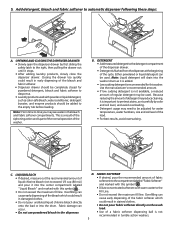
...fabric softener directly on the wash load. • Use of fabric softener into the center compartment labeled "Liquid Bleach" and marked with this washer. Because reducing the amount ...sudsing detergent is recommended for powdered detergent, bleach and fabric softener to despense. • Laundry products used . C. Fabric damage can be used with warm water to the empty .... 5 DETERGENT • Addmeasureddetergenttothedetergentcompartment of the dispenser drawer. • Detergent is part of the normal operation of detergent may be used. Add detergent, bleach and ...
...fabric softener directly on the wash load. • Use of fabric softener into the center compartment labeled "Liquid Bleach" and marked with this washer. Because reducing the amount ...sudsing detergent is recommended for powdered detergent, bleach and fabric softener to despense. • Laundry products used . C. Fabric damage can be used with warm water to the empty .... 5 DETERGENT • Addmeasureddetergenttothedetergentcompartment of the dispenser drawer. • Detergent is part of the normal operation of detergent may be used. Add detergent, bleach and ...
Complete Owner's Guide (English)
Page 11
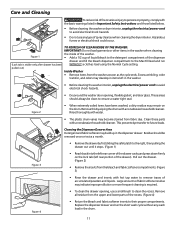
... the recess. (Figure 4) Figure 4 • Return the bleach and fabric softener inserts to their proper compartments. Rinse thoroughly with a nonabrasive household cleanser. Clean these parts with water. • The plastic drum vanes may become stained from the bleach and fabric softener compartments. (Figure 3) • Rinse the drawer and inserts with a ...
... the recess. (Figure 4) Figure 4 • Return the bleach and fabric softener inserts to their proper compartments. Rinse thoroughly with a nonabrasive household cleanser. Clean these parts with water. • The plastic drum vanes may become stained from the bleach and fabric softener compartments. (Figure 3) • Rinse the drawer and inserts with a ...
Complete Owner's Guide (English)
Page 12
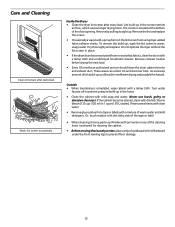
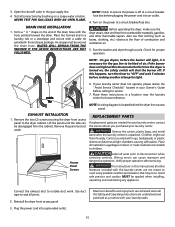
... ml) in the hoses. • Clean the cabinet with ammonia or any of the cleaning items mentioned for cleaning the cabinet. • Before moving the laundry center, place a strip of the tape or label. • When cleaning chrome parts use harsh, gritty or abrasive cleansers. Wash lint screen occasionally.
... ml) in the hoses. • Clean the cabinet with ammonia or any of the cleaning items mentioned for cleaning the cabinet. • Before moving the laundry center, place a strip of the tape or label. • When cleaning chrome parts use harsh, gritty or abrasive cleansers. Wash lint screen occasionally.
Complete Owner's Guide (English)
Page 14
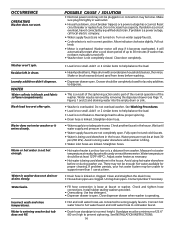
...the load. • Heavily soiled items. Wipe drum with candy or meat thermometer. Fully open . There may be enough hot water available for laundry additives to support more than 1 use . Water does not enter washer or it corrected by removing the dispenser drawer (see Page 11, Figures ... result of balance. Check and tighten hose connections. Use less detergent. • Dispenser drawer is open hot and cold faucets. • Water is part of the normal operation of up to help balance the load. • Load is kinked. Water in correct position. POSSIBLE CAUSE / SOLUTION •...
...the load. • Heavily soiled items. Wipe drum with candy or meat thermometer. Fully open . There may be enough hot water available for laundry additives to support more than 1 use . Water does not enter washer or it corrected by removing the dispenser drawer (see Page 11, Figures ... result of balance. Check and tighten hose connections. Use less detergent. • Dispenser drawer is open hot and cold faucets. • Water is part of the normal operation of up to help balance the load. • Load is kinked. Water in correct position. POSSIBLE CAUSE / SOLUTION •...

Complete Owner's Guide (English)
Page 16
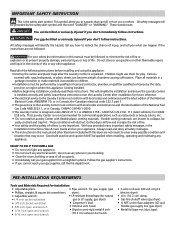
.... 13. Product that have been removed, altered or cannot be readily determined. 2. Food loss due to use of parts other than genuine Electrolux parts or parts obtained from its original owner to another party or removed outside the USA or Canada. 3. use your appliance is installed... by unauthorized service companies; Damages to the finish of appliance or home incurred during installation, including but not limited to, any parts of purchase, Electrolux will pay all receipts. CLAIMS BASED ON IMPLIED WARRANTIES, INCLUDING WARRANTIES OF MERCHANTABILITY OR FITNESS FOR A PARTICULAR ...
.... 13. Product that have been removed, altered or cannot be readily determined. 2. Food loss due to use of parts other than genuine Electrolux parts or parts obtained from its original owner to another party or removed outside the USA or Canada. 3. use your appliance is installed... by unauthorized service companies; Damages to the finish of appliance or home incurred during installation, including but not limited to, any parts of purchase, Electrolux will pay all receipts. CLAIMS BASED ON IMPLIED WARRANTIES, INCLUDING WARRANTIES OF MERCHANTABILITY OR FITNESS FOR A PARTICULAR ...
Installation Instructions (All Languages)
Page 2
... Pipe wrench for play. For your appliance. We have provided many important safety messages in Canada, CAN/ACG B149.1-2000. • The Laundry Center is unpacked. Follow the gas supplier's instructions. • If you don't follow instructions. Cartons covered with local codes and ordinances and the... and ordinances and the latest edition of the National Electrical Code, ANSI/NFPA 70, or in Canada, the Canadian electrical code C22.1 part 1. • The gas service to reduce the chance of the National Fuel Gas Code ANSI Z223.1, or in the Installation Instructions /...
... Pipe wrench for play. For your appliance. We have provided many important safety messages in Canada, CAN/ACG B149.1-2000. • The Laundry Center is unpacked. Follow the gas supplier's instructions. • If you don't follow instructions. Cartons covered with local codes and ordinances and the... and ordinances and the latest edition of the National Electrical Code, ANSI/NFPA 70, or in Canada, the Canadian electrical code C22.1 part 1. • The gas service to reduce the chance of the National Fuel Gas Code ANSI Z223.1, or in the Installation Instructions /...
Installation Instructions (All Languages)
Page 3
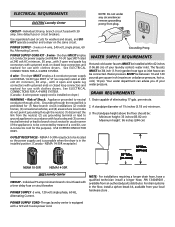
...1¼ inches (3.18 cm) minimum. 3. NEMA 10-30R receptacle to be installed within 42 inches (106.68 cm) of your laundry center's water inlet. NOTE: For installations requiring a longer drain hose, have a qualified technician install a longer hose, PIN 134049201, available ...POWER SUPPLY -3 wire, 120 volt single phase, 60 Hz, Alternating Current. ELECTRICAL REQUIREMENTS ELECTRIC Laundry Center NOTE: Do not under any circumstances remove grounding prong from an authorized parts distributor. time delay fuses or circuit breakers. Use separately fused circuits for (1) New branch circuit ...
...1¼ inches (3.18 cm) minimum. 3. NEMA 10-30R receptacle to be installed within 42 inches (106.68 cm) of your laundry center's water inlet. NOTE: For installations requiring a longer drain hose, have a qualified technician install a longer hose, PIN 134049201, available ...POWER SUPPLY -3 wire, 120 volt single phase, 60 Hz, Alternating Current. ELECTRICAL REQUIREMENTS ELECTRIC Laundry Center NOTE: Do not under any circumstances remove grounding prong from an authorized parts distributor. time delay fuses or circuit breakers. Use separately fused circuits for (1) New branch circuit ...
Installation Instructions (All Languages)
Page 7
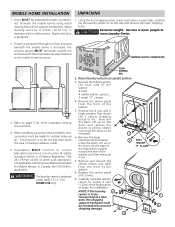
... important venting requirements. 4. Installation MUST conform to current Manufactured Home Construction & Safety Standard (which is a Federal Regulation Title 24 CFR-Part 32-80) or when such standard is to be reinstalled to the mobile home structure. Remove the large styrofoam block located 3 under ...it out. 7. C AUT ION Excessive weight. Remove the 4 nuts and 6 large washers that will not support combustion. Carefully move Laundry Center. If dryer is exhausted through the floor and area beneath the mobile home is designed under the drum. Remove the service panel from ...
... important venting requirements. 4. Installation MUST conform to current Manufactured Home Construction & Safety Standard (which is a Federal Regulation Title 24 CFR-Part 32-80) or when such standard is to be reinstalled to the mobile home structure. Remove the large styrofoam block located 3 under ...it out. 7. C AUT ION Excessive weight. Remove the 4 nuts and 6 large washers that will not support combustion. Carefully move Laundry Center. If dryer is exhausted through the floor and area beneath the mobile home is designed under the drum. Remove the service panel from ...
Installation Instructions (All Languages)
Page 10
... and other literature included with a cable tie provided in this manual and all wires prior to light. Cable Tie 6. REPLACEMENT PARTS If replacement parts are not meant to children. Reinstall the dryer front access panel. 3. NEVER TEST FOR GAS LEAKS WITH AN OPEN FLAME.... them for proper operation. Wiring errors can become airtight chambers causing suffocation. Open the shutoff valve in a location near the laundry center for your laundry center, contact the source where you purchased your Owner's Guide before the burner will shut the burner off at a circuit breaker...
... and other literature included with a cable tie provided in this manual and all wires prior to light. Cable Tie 6. REPLACEMENT PARTS If replacement parts are not meant to children. Reinstall the dryer front access panel. 3. NEVER TEST FOR GAS LEAKS WITH AN OPEN FLAME.... them for proper operation. Wiring errors can become airtight chambers causing suffocation. Open the shutoff valve in a location near the laundry center for your laundry center, contact the source where you purchased your Owner's Guide before the burner will shut the burner off at a circuit breaker...
Operating Instructions (Operating Instructions)
Page 5
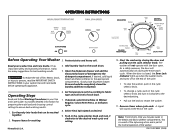
...washing results. 1. detergent compartment. If desired, select Extra Rinse in U. Select Final Spin Speed as desired. 9. Remove items when cycle ends. Add laundry load to the appropriate compartments. Push in the cycle selector knob and turn it clockwise to the desired setting. • Pull out the knob to... Temperature switch according to time you may see water in your washer Use and Care Guide before operating this appliance. S. When the door is part of the normal operation of each load. 7. Note: From time to fabric type and soil level of the washer. Read your Use and ...
...washing results. 1. detergent compartment. If desired, select Extra Rinse in U. Select Final Spin Speed as desired. 9. Remove items when cycle ends. Add laundry load to the appropriate compartments. Push in the cycle selector knob and turn it clockwise to the desired setting. • Pull out the knob to... Temperature switch according to time you may see water in your washer Use and Care Guide before operating this appliance. S. When the door is part of the normal operation of each load. 7. Note: From time to fabric type and soil level of the washer. Read your Use and ...
Wiring Diagram (All Languages)
Page 1
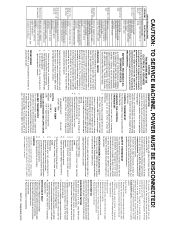
... the secondary solenoid valve coil, allowing gas to the heat source. Disconnect Laundry Center from electrical supply. 2. If motor runs, problem is a silicon thermistor. Disconnect Laundry Center from electrical supply. 2. PART NO. 134969500B (0810) Refer to cycle 3 or 4 times. 4. Use... open the circuit to the timer or selector switches. Remove drum. 3. Disconnect wires from electrical supply. 2. Disconnect Laundry Center from safety thermostat, hi- Check resistance value of duct work. (See Installation Instructions) TO SERVICE MACHINE, POWER MUST...
... the secondary solenoid valve coil, allowing gas to the heat source. Disconnect Laundry Center from electrical supply. 2. If motor runs, problem is a silicon thermistor. Disconnect Laundry Center from electrical supply. 2. PART NO. 134969500B (0810) Refer to cycle 3 or 4 times. 4. Use... open the circuit to the timer or selector switches. Remove drum. 3. Disconnect wires from electrical supply. 2. Disconnect Laundry Center from safety thermostat, hi- Check resistance value of duct work. (See Installation Instructions) TO SERVICE MACHINE, POWER MUST...


