
Complete Owner's Guide (English)
Page 2
... electrical power cord. It also contains information about recycling of this manual must be filled in serious personal injuries. Use the laundry center only as household waste. By ensuring this Owner's Guide are not followed. Always read and obey all occupants. • ... other models. Keep these Important Safety Instructions: Avoid fire hazard or electrical shock. for future reference. LAUNDRY CENTER SAFETY Your safety and the safety of this laundry center. These words mean: DANGER You can be killed or seriously injured if you don't follow these numbers...
... electrical power cord. It also contains information about recycling of this manual must be filled in serious personal injuries. Use the laundry center only as household waste. By ensuring this Owner's Guide are not followed. Always read and obey all occupants. • ... other models. Keep these Important Safety Instructions: Avoid fire hazard or electrical shock. for future reference. LAUNDRY CENTER SAFETY Your safety and the safety of this laundry center. These words mean: DANGER You can be killed or seriously injured if you don't follow these numbers...
Complete Owner's Guide (English)
Page 3
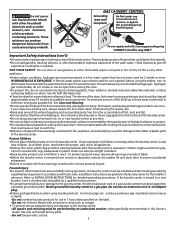
.... Do not use heat to eliminate static unless recommended by qualified service personnel. Installation instructions are packed in the laundry center. Grounding type wallGreAceSptLacAleUNDRY CENTERS: Do not use or mix liquid chlorine bleach with other packing materials after each for 2 weeks or more. Grounding...•Do not use gasoline or other flammable vapors or liquids in the vicinity of children is necessary when the laundry center is used near laundry center at any other flammable or explosive substances to comply with controls. 3 See Care and Cleaning. •Do not ...
.... Do not use heat to eliminate static unless recommended by qualified service personnel. Installation instructions are packed in the laundry center. Grounding type wallGreAceSptLacAleUNDRY CENTERS: Do not use or mix liquid chlorine bleach with other packing materials after each for 2 weeks or more. Grounding...•Do not use gasoline or other flammable vapors or liquids in the vicinity of children is necessary when the laundry center is used near laundry center at any other flammable or explosive substances to comply with controls. 3 See Care and Cleaning. •Do not ...
Complete Owner's Guide (English)
Page 4
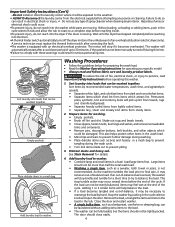
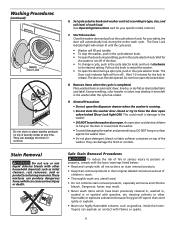
... knit items inside . •To prevent injury, do not reach into loads that can be exposed to the weather. • ALWAYS disconnect the laundry center from items which could occur. •To prevent injury, do so can be fully loaded, but the items should close easily. 4 Prepare items ...or injury. • Do not use any service or cleaning. Add laundry load to balance the load. Sort laundry into the washer while parts are moving . Important Safety Instructions (Con't) -Do not install or store the laundry center where it may sense an out-of-balance load. See Stain Removal ...
... knit items inside . •To prevent injury, do not reach into loads that can be exposed to the weather. • ALWAYS disconnect the laundry center from items which could occur. •To prevent injury, do so can be fully loaded, but the items should close easily. 4 Prepare items ...or injury. • Do not use any service or cleaning. Add laundry load to balance the load. Sort laundry into the washer while parts are moving . Important Safety Instructions (Con't) -Do not install or store the laundry center where it may sense an out-of-balance load. See Stain Removal ...
Complete Owner's Guide (English)
Page 5
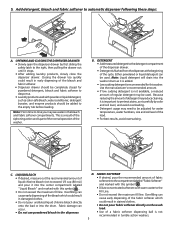
... "Fabric Softener" and marked with this symbol . • Dilute concentrated softeners with powder or liquid detergent, such as it into the center compartment labeled "Liquid Bleach" and marked with this washer. Add detergent, bleach and fabric softener to time you may reduce cleaning, it stops.... • After adding laundry products, slowly close the dispenser drawer. OPENING AND CLOSING THE DISPENSER DRAWER • Slowly open the dispenser drawer by first sliding the ...
... "Fabric Softener" and marked with this symbol . • Dilute concentrated softeners with powder or liquid detergent, such as it into the center compartment labeled "Liquid Bleach" and marked with this washer. Add detergent, bleach and fabric softener to time you may reduce cleaning, it stops.... • After adding laundry products, slowly close the dispenser drawer. OPENING AND CLOSING THE DISPENSER DRAWER • Slowly open the dispenser drawer by first sliding the ...
Complete Owner's Guide (English)
Page 6
... during the entire wash cycle. They can then be opened. Set cycle selector knob and washer controls according to type, size, and soil level of laundry center at any utensil used. • Do not combine stain removal products, especially ammonia and chlorine bleach. Do not force open the dispenser drawer when the...
... during the entire wash cycle. They can then be opened. Set cycle selector knob and washer controls according to type, size, and soil level of laundry center at any utensil used. • Do not combine stain removal products, especially ammonia and chlorine bleach. Do not force open the dispenser drawer when the...
Complete Owner's Guide (English)
Page 12
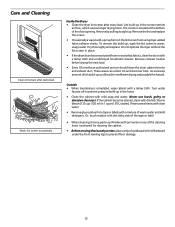
..., soapy water. The screen is completed, wipe cabinet with ammonia or any of the cleaning items mentioned for cleaning the cabinet. • Before moving the laundry center, place a strip of the tape or label. • When cleaning chrome parts use harsh, gritty or abrasive cleansers. Remove the lint and replace the screen...
..., soapy water. The screen is completed, wipe cabinet with ammonia or any of the cleaning items mentioned for cleaning the cabinet. • Before moving the laundry center, place a strip of the tape or label. • When cleaning chrome parts use harsh, gritty or abrasive cleansers. Remove the lint and replace the screen...
Complete Owner's Guide (English)
Page 13
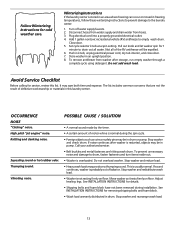
... complete cycle using detergent. Do not overload washer. If sound continues, washer is usually normal. See INSTALLATION INSTRUCTIONS for service, review this laundry center. Close door. 5. Push in this list. The list includes common concerns that are hitting wash drum. Stop washer and reduce load....; Belt buckles and metal fasteners are not the result of the RV antifreeze will be in pump. Winterizing Instructions If the laundry center is stored in an area where freezing can occur or moved in an upright position. 8. Stop washer and rearrange wash load...
... complete cycle using detergent. Do not overload washer. If sound continues, washer is usually normal. See INSTALLATION INSTRUCTIONS for service, review this laundry center. Close door. 5. Push in this list. The list includes common concerns that are hitting wash drum. Stop washer and reduce load....; Belt buckles and metal fasteners are not the result of the RV antifreeze will be in pump. Winterizing Instructions If the laundry center is stored in an area where freezing can occur or moved in an upright position. 8. Stop washer and rearrange wash load...
Installation Instructions (All Languages)
Page 2
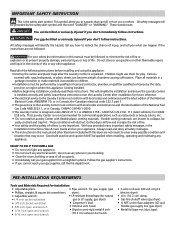
... following instructions before installing and using this manual must be followed to minimize the risk of fire or explosion or to the Laundry Center must be applied when installing, operating and maintaing any electrical switch; For your gas supplier from a neighbor's phone. Read ... supplier, call your safety the information in Canada, CAN/ACG B149.1-2000. • The Laundry Center is very important. Always read these instructions near the Laundry Center after the Laundry Center is not recommended for future reference. • The electrical service to hazards that may occur....
... following instructions before installing and using this manual must be followed to minimize the risk of fire or explosion or to the Laundry Center must be applied when installing, operating and maintaing any electrical switch; For your gas supplier from a neighbor's phone. Read ... supplier, call your safety the information in Canada, CAN/ACG B149.1-2000. • The Laundry Center is very important. Always read these instructions near the Laundry Center after the Laundry Center is not recommended for future reference. • The electrical service to hazards that may occur....
Installation Instructions (All Languages)
Page 3
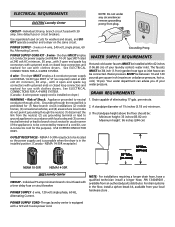
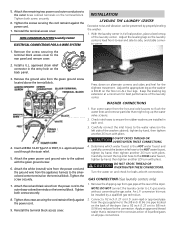
... SUPPLY CORD KIT - 3 wire - The faucets MUST be 3/4 inch (1.9 cm) garden hose type so inlet hoses can advise you of your laundry center's water inlet. and (4) areas where local codes do not permit grounding through the neutral link is prohibited for (1) New branch circuit installations (2) mobile... through a link. Drain capable of a cord kit, use 4-conductor cord for use with clothes dryers. ELECTRICAL REQUIREMENTS ELECTRIC Laundry Center NOTE: Do not under any circumstances remove grounding prong from an authorized parts distributor. The dryer MUST employ a 4-conductor power...
... SUPPLY CORD KIT - 3 wire - The faucets MUST be 3/4 inch (1.9 cm) garden hose type so inlet hoses can advise you of your laundry center's water inlet. and (4) areas where local codes do not permit grounding through the neutral link is prohibited for (1) New branch circuit installations (2) mobile... through a link. Drain capable of a cord kit, use 4-conductor cord for use with clothes dryers. ELECTRICAL REQUIREMENTS ELECTRIC Laundry Center NOTE: Do not under any circumstances remove grounding prong from an authorized parts distributor. The dryer MUST employ a 4-conductor power...
Installation Instructions (All Languages)
Page 5
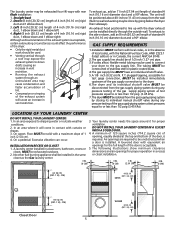
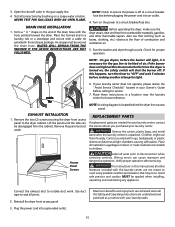
... could affect the performance of the dryer: • Only the rigid metal duct work should be of 1 inch (2.54 cm). 4. A laundry center installed in contact with a maximum slope of 1/2 inch (1.27 cm) pipe. 3.If codes allow, flexible metal tubing may be solid with ...Closet Door 5 WASHER 60 SQ. plugged tapping, accessible for proper conditions. To exhaust up with the dryer exhaust can occur. LOCATION OF YOUR LAUNDRY CENTER DO NOT INSTALL YOUR LAUNDRY CENTER: 1. Right (8 inch [20.32 cm] length of the exhaust system is installed. Straight back 2. Down (8 inch [20.32 cm...
... could affect the performance of the dryer: • Only the rigid metal duct work should be of 1 inch (2.54 cm). 4. A laundry center installed in contact with a maximum slope of 1/2 inch (1.27 cm) pipe. 3.If codes allow, flexible metal tubing may be solid with ...Closet Door 5 WASHER 60 SQ. plugged tapping, accessible for proper conditions. To exhaust up with the dryer exhaust can occur. LOCATION OF YOUR LAUNDRY CENTER DO NOT INSTALL YOUR LAUNDRY CENTER: 1. Right (8 inch [20.32 cm] length of the exhaust system is installed. Straight back 2. Down (8 inch [20.32 cm...
Installation Instructions (All Languages)
Page 7
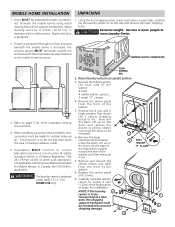
...it out. 7. SHIPPING CARTON CORNER POSTS FOAM SHIPPING PAD 3. Return laundry center to 2. NOTE: If the laundry 5 center is applicable. Using the four shipping carton corner posts (two on each side), carefully lay the laundry center on the drum and remove the braces (a yellow ribbon surrounds the items.... Lift up on the drum, tilt the base of the foam block inwards toward the rear of the washer. 8. Carefully move Laundry Center. If dryer is exhausted through the floor and area beneath the mobile home is designed under the drum. MOBILE HOME INSTALLATION UNPACKING ...
...it out. 7. SHIPPING CARTON CORNER POSTS FOAM SHIPPING PAD 3. Return laundry center to 2. NOTE: If the laundry 5 center is applicable. Using the four shipping carton corner posts (two on each side), carefully lay the laundry center on the drum and remove the braces (a yellow ribbon surrounds the items.... Lift up on the drum, tilt the base of the foam block inwards toward the rear of the washer. 8. Carefully move Laundry Center. If dryer is exhausted through the floor and area beneath the mobile home is designed under the drum. MOBILE HOME INSTALLATION UNPACKING ...
Installation Instructions (All Languages)
Page 8
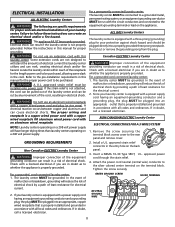
...electrical shock and/or fire hazard. WARNING A U.L. GROUNDING REQUIREMENTS Non-Canadian ELECTRIC Laundry Center WARNING Improper connection of electrical current this laundry center. For a permanently connected laundry center: The laundry center MUST be installed onto power cord. Do not cut by providing a path of ... electrician. WARNING Do nott use an extension cord with all codes and ordinances. For a grounded, cord-connected laundry center: 1. If your laundry center is equipped with a power supply cord having an equipment-grounding conductor and a grounding plug, the plug MUST ...
...electrical shock and/or fire hazard. WARNING A U.L. GROUNDING REQUIREMENTS Non-Canadian ELECTRIC Laundry Center WARNING Improper connection of electrical current this laundry center. For a permanently connected laundry center: The laundry center MUST be installed onto power cord. Do not cut by providing a path of ... electrician. WARNING Do nott use an extension cord with all codes and ordinances. For a grounded, cord-connected laundry center: 1. If your laundry center is equipped with a power supply cord having an equipment-grounding conductor and a grounding plug, the plug MUST ...
Installation Instructions (All Languages)
Page 9
...Tighten both screw securely. 6. Carefully connect the inlet hoses to the outer brass colored terminals on the back of the laundry center. CAUTION DO NOT CROSS THREAD OR OVERTIGHTEN THESE CONNECTIONS. Connect a 1/2 inch (1.27 cm) I.D. Attach the remaining two... block. 5. Tighten both screws securely. 8. Reinstall the terminal access cover. NON-CANADIAN ELECTRIC Laundry Center ELECTRICAL CONNECTIONS FOR A 4-WIRE SYSTEM INSTALLATION LEVELING THE LAUNDRY CENTER Excessive noise and vibration can be installed by hand, then tighten another 2/3 turn with pliers....
...Tighten both screw securely. 6. Carefully connect the inlet hoses to the outer brass colored terminals on the back of the laundry center. CAUTION DO NOT CROSS THREAD OR OVERTIGHTEN THESE CONNECTIONS. Connect a 1/2 inch (1.27 cm) I.D. Attach the remaining two... block. 5. Tighten both screws securely. 8. Reinstall the terminal access cover. NON-CANADIAN ELECTRIC Laundry Center ELECTRICAL CONNECTIONS FOR A 4-WIRE SYSTEM INSTALLATION LEVELING THE LAUNDRY CENTER Excessive noise and vibration can be installed by hand, then tighten another 2/3 turn with pliers....
Installation Instructions (All Languages)
Page 10
...be applied when installing, operating and maintaining any appliance. Run the washer and dryer though a cycle. If this laundry center are not meant to children. If your laundry center does not operate, please review the "Avoid Service Checklist" located in a garbage container or make sure the ... clothing, etc.) obstructs the flow of combustion and ventilation air. 5. Place all the Safety and Operating instructions are needed for your laundry center, contact the source where you purchased your Owner's Guide before making another attempt to "OFF" and wait 5 minutes before calling for ...
...be applied when installing, operating and maintaining any appliance. Run the washer and dryer though a cycle. If this laundry center are not meant to children. If your laundry center does not operate, please review the "Avoid Service Checklist" located in a garbage container or make sure the ... clothing, etc.) obstructs the flow of combustion and ventilation air. 5. Place all the Safety and Operating instructions are needed for your laundry center, contact the source where you purchased your Owner's Guide before making another attempt to "OFF" and wait 5 minutes before calling for ...
Operating Instructions (Operating Instructions)
Page 1
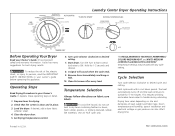
... and makes items easier to ON. Room temperature and humidity, type of fire, electric shock, or injury to tumble for best drying results. P/N 134396400A (0403) Laundry Center Dryer Operating Instructions PRESS SAVER AUTOMATIC PRESS SAVER Before Operating Your Dryer Read your Owner's Guide. It also has many suggestions for 5-10 minutes. It...
... and makes items easier to ON. Room temperature and humidity, type of fire, electric shock, or injury to tumble for best drying results. P/N 134396400A (0403) Laundry Center Dryer Operating Instructions PRESS SAVER AUTOMATIC PRESS SAVER Before Operating Your Dryer Read your Owner's Guide. It also has many suggestions for 5-10 minutes. It...
Wiring Diagram (All Languages)
Page 1
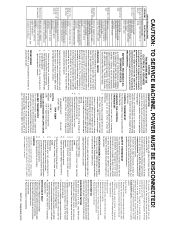
... THERMOSTAT The safety thermostat is closed.) 1. HEATER ASSEMBLY (ELECTRIC ONLY) The heater assembly (208/240 volts) is inoperative. Disconnect Laundry Center from electrical supply. 2. Check each terminal to the right and hold for proper installation & maintenance of the heater housing. Remove ...to a metal support plate with the exhaust duct completely blocked. Set timer for continuity. on the room temperature. Disconnect Laundry Center from safety thermostat, hi- It should have continuity through a good thermostat at an angle with any local electrical code ...
... THERMOSTAT The safety thermostat is closed.) 1. HEATER ASSEMBLY (ELECTRIC ONLY) The heater assembly (208/240 volts) is inoperative. Disconnect Laundry Center from electrical supply. 2. Check each terminal to the right and hold for proper installation & maintenance of the heater housing. Remove ...to a metal support plate with the exhaust duct completely blocked. Set timer for continuity. on the room temperature. Disconnect Laundry Center from safety thermostat, hi- It should have continuity through a good thermostat at an angle with any local electrical code ...


