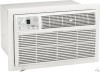
Frigidaire GAH085Q1T - GIBSON 8000BTU 115V 8.0A 9.4EE3 SPD 4 WAY AIR DIRECTION Support and Manuals
Get Help and Manuals for this Frigidaire item
View All Support Options Below
Free Frigidaire GAH085Q1T manuals!
Problems with Frigidaire GAH085Q1T?
Ask a Question
Free Frigidaire GAH085Q1T manuals!
Problems with Frigidaire GAH085Q1T?
Ask a Question
Most Recent Frigidaire GAH085Q1T Questions

Popular Frigidaire GAH085Q1T Manual Pages
Use and Care Manual - Page 2

... or add to any costs for repairing or replacing parts of this appliance which are required because of service.
Costs of the technician's travel to the Sealed Refrigeration System. Replacement of God. 4. or external causes such as described or illustrated are listed under this warranty. Products with the product. 2. The date on models with respect to the home...
Use and Care Manual - Page 3
...
#ONTENTS
./4% 4HIS 53%#!2%-!.5!, PROVIDESSPECIFIC OPERATING INSTRUCTIONS FOR YOURMODEL 5SE THE ROOM AIR CONDITIONER ONLYASINSTRUCTEDINTHIS53% #!2%-!.5!,4HESEINSTRUCTIONS ARE NOT MEANT TO COVER EVERYPOSSIBLE CONDITION AND SITUATION THAT MAYOCCUR #OMMONSENSEANDCAUTIONMUSTBE PRACTICED WHEN INSTALLING OPERATING ANDMAINTAININGANYAPPLIANCE
7ARRANTY 0RODUCT2EGISTRATION .ORMAL3OUNDS...
Use and Care Manual - Page 4
Avoid fire hazard or electric shock.
Read all instructions before installation. • Be sure the air conditioner has been securely and correctly installed according to the separate installation instructions provided with this manual. This information
can be replaced with a cord from the Product Manufacturer. The power supply cord contains a current device that the power supply cord ...
Use and Care Manual - Page 5
...43 -/$%3
FAN SPEED
%.%2'9 3!6%2 -/$%
Mode Energy Saver
Fan Timer
#,%!.!)2 -/$%
2%-/4% 3%.3).'&/,,/7 -%-/$%
Clean Air
Cancel
Follow Me Reset Lock
Clock
Sleep
Light
452.35.)4 /./2/&&
3%4&!. 30%%$3
!#4)6!4% 4)-%23
!$*5343...Lock
Clock
Sleep
Light
3%4&!. 30%%$3
!#4)6!4% 4)-%23
!$*5343 4%-0 4)-%3
SET TEMP. 3SGI 30
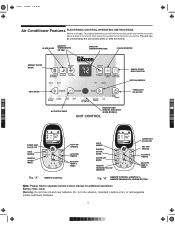
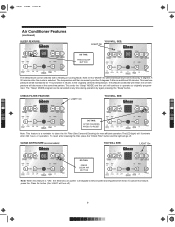
!IR#ONDITIONER&EATURES %,%#42/.)##/.42/,/0%2!4).').3425#4)/.3 "...
Use and Care Manual - Page 7

"544/.
3%,%#4 !54/4%-0
.OTE&ANSTARTSAT(IGH3PEEDANDADJUSTSTOASLOWERSPEEDAS THE ROOM TEMPERATURE DICTATES &OR EXAMPLE IF THE ROOMDOESNTGETTOO WARM ITWILLSTAYATTHESLOWESTSPEED)FTHEROOMTEMPERATURERISESQUICKLY SUCHASADOORBEINGOPENED ITWILLAUTOMATICALLYGOTOTHE HIGHESTSPEED4HEFANSPEEDSWILLRE ADJUSTBACKTOTHESLOWESTSPEEDASTHEROOMRETURNSTOTHEORIGINALSETTEMPERATURE0RESSTHEFAN ...
Use and Care Manual - Page 8

3SGI 0
!IR#ONDITIONER&EATURES
CONTINUED
4//0%2!4%/.&!./.,9
,)'(4 /N
9/57),,3%%
$/4()3
02%33-/$% "544/.
#(//3%&!.
.OTE5SETHISFUNCTIONONLYWHENCOOLINGISNOTDESIRED SUCHASFORROOMAIRCIRCULATION9OUCANCHOOSEANYFANSPEEDYOUPREFER EXCEPT !UTO4EMP$URINGTHISFUNCTION THEDISPLAYWILLSHOWTHEACTUALROOMTEMPERATURE NOTTHESETTEMPERATUREASINTHECOOLINGMODE
4/53%4(%%.%2'93!6%2 &%!452%
,)'(4 /N
9/57...
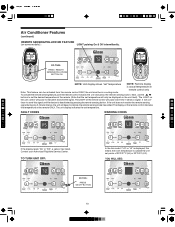
Use and Care Manual - Page 9
3
SGI 0
Air Conditioner Features
(continued)
SLEEP FEATURE:
YOU WILL SEE: LIGHT On
DO THIS: PRESS SLEEP
BUTTON
The Sleep Mode can be selected with Heat, the set temperature will illuminate after 250 ... same time pattern. CLEAN AIR FEATURE (on some models):
YOU WILL SEE:
LIGHT On
DO THIS: PRESS CLEAN AIR BUTTON
Note: When this Mode is a reminder to clean the Air Filter (See Care and ...
Use and Care Manual - Page 10
ON
F
OFF
FAN SPEED
Mode
Fan
Energy Saver
Timer
Clean Air
Cancel
Follow Me Reset Lock
Clock
Sleep
Light
$/4()3
02%332%-/4% 3%.3).'&/,,/7-%
"544/./. SET TEMP.
ON
F
OFF
FAN SPEED
Mode
Fan
Energy Saver
Timer
Clean Air
Cancel
Follow Me Reset Lock
Clock
Sleep
Light
./4%5NITDISPLAYSHOWShSETvTEMPERATURE ./4%2EMOTEDISPLAY
ISACTUALTEMPERATUREAT
REMOTECONTROLONLY
.OTE...
Use and Care Manual - Page 11
...
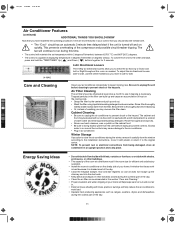
7INTER3TORAGE
)FYOUPLANTOSTORETHEAIRCONDITIONERDURINGTHEWINTER REMOVEITCAREFULLYFROMTHEWINDOW ACCORDING TO THE INSTALLATION INSTRUCTIONS #OVER IT WITH PLASTIC OR RETURN IT TO THE ORIGINAL CARTON ./4% 4O PREVENT RUST OR ELECTRICAL CONNECTIONS FROM BEING DAMAGED STORE AIR CONDITIONERINANUPRIGHTPOSITIONANDADRYPLACE
%NERGY3AVING)DEAS
s $ONOTBLOCKAIRFLOWINSIDEWITHBLINDS CURTAINSORFURNITURE...
Use and Care Manual - Page 12
...SETTING 7INDOWVIBRATION POORINSTALLATION2EFERTOINSTALLATIONINSTRUCTIONSORCHECKWITHINSTALLER
7ATERDRIPPING).3)$%WHENUNITIS COOLING
)MPROPER INSTALLATION 4ILT AIR CONDITIONER SLIGHTLY TO THE OUTSIDE TO ALLOW WATER DRAINAGE 2EFER TO INSTALLATION INSTRUCTIONS...
3ETTEMPERATURETOOLOW)NCREASESETTEMPERATURE 2EMOTE 3ENSING ACTIVATED ON SOME MODELS AND REMOTE CONTROL LOCATED IN (OT 3POT 2ELOCATE...
Installation Instructions - Page 1
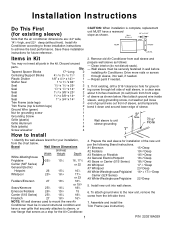
... wall before
installing Air Conditioner. Discard unused
parts. Identify the wall-sleeve brand for installation of sleeve.
3"
Max. Assemble and install the Trim Frame (see instruction).
1
P/N 220218A029 Save these installation instructions to achieve the best performance.
Repair paint if needed . -
Prepare the wall sleeve for your installation,
from wall sleeve and prepare...
Installation Instructions - Page 2
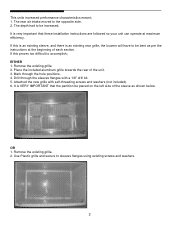
The rear air intake moved to sleeves flanges using existing screws and washers.
2 It is an existing rear grille, the louvers will...on the left side of the sleeve as per the instructions at maximum efficiency. If this is an existing sleeve, and there is very important that the partition be increased. It is VERY IMPORTANT that these installation instructions are followed so your unit ...
Installation Instructions - Page 4
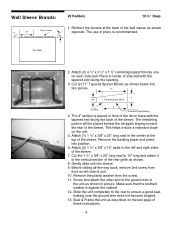
... 4 ½" x 3 ½" x 1 ½" centering/support blocks one on the unit.
5. Remove the plastic washer from
front on the last page of the sleeve. Seal & Frame the unit as shown below into
two pieces.
... of these instructions.
4 This helps induce a rearward slope on each side wall. Gently slide unit into position.
6. The use of the sleeve. Wall Sleeve Brands:
#2...
Installation Instructions - Page 5
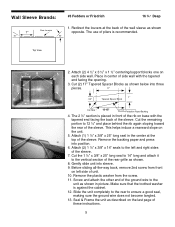
... Remove the backing paper and press
into sleeve.
9. Attach (2) 4 ½" x 3 ½" x 1 ½" centering/support blocks one on left and right sides
of the sleeve. Before sliding all-the-way back, remove... facing the back of
these instructions.
5 Seal & Frame the unit as shown.
8. This helps induce a rearward slope on the last page of the sleeve. Redirect the louvers at the...
Installation Instructions - Page 10

... and screws to the inside of the wall sleeve at the top
of
these instructions.
10 If some are missing replacements are (4) plastic nuts in the center at ...does not become tangled.
10. If the wall sleeve does not have a rear grille or louvered panel, install the plastic grille from the screw.
8. Wall Sleeve Brands:
#8 White Westinghouse/Frigidaire/ Carrier 52F Series
16 + 17 ½...
Frigidaire GAH085Q1T Reviews
We have not received any reviews for Frigidaire yet.