Frigidaire GAH12ER2T - GIBSON 12000BTU 115V 5.7A 9.0E3 SPD 4 WAY AIR DIRECTION Support and Manuals
Get Help and Manuals for this Frigidaire item

View All Support Options Below
Free Frigidaire GAH12ER2T manuals!
Problems with Frigidaire GAH12ER2T?
Ask a Question
Free Frigidaire GAH12ER2T manuals!
Problems with Frigidaire GAH12ER2T?
Ask a Question
Most Recent Frigidaire GAH12ER2T Questions

I Need The Cover Plate That Goes Over The Circuit Board Controller Appx 4 By 5 I
(Posted by spikekelley2004 8 years ago)
I Need A Control Cover Plate For Model Gah12ert Appx 5 By 4 Inches
(Posted by spikekelley2004 8 years ago)
Popular Frigidaire GAH12ER2T Manual Pages
Installation Instructions - Page 1

..., drill a 3/16"clearance hole for your installation,
from the left side of sleeve. Repair paint if needed . -
Qty. Prepare the wall sleeve for grounding screw
1
Grounding Screw
1
Grille (plastic)
1
Nuts (plastic)
4
Screw w/washer
4
2. Save these installation instructions to sleeve, or
rear flange that the air conditioner dimensions are: 24"wide, 141⁄2"high...
Installation Instructions - Page 2
...putty knife is recommended.
60°
Top View
← 101⁄4"‹→
2. Assemble and install the Trim Frame. (see Trim Frame) 2 Attach the (2) 11⁄2"x 3/8"x 14"long seals...illustration.
4. Attach the
3
3 (2) 41⁄2"x 31⁄2"x 11⁄2"Centering/Support Blocks, one on the blocks.
Install the new unit into the wall sleeve.
6
6. Cut the 11⁄2"x 3/8"x...
Installation Instructions - Page 3
...install as shown in place.
3. The remaining portion to the inside of the
louvered panel as illustrate with tapered end facing the opening of the side walls. Attach the (2) 41⁄2"x 31⁄2"x 11⁄2"Centering/Support... of the walls of pliers is recommended.
8
8
9. Install the new unit into the wall sleeve. 5
7. Install the 1"x 11⁄2"x 84"long stuffer seal between the ...
Installation Instructions - Page 4

...the illustration. The 4"portion to be placed in the illustration.
5. Install the new unit into the wall sleeve. Install the 1"x 11⁄2"x 84"long stuffer seal between the wall sleeve... 41⁄2"x 31⁄2"x 11⁄2"Centering/Support Blocks to be located approximately in the illustration. Cut (2) 17"Tapered Spacer Blocks and install as shown.
7. Cut the remaining portion to ...
Installation Instructions - Page 5

...;2"long seals to the unit as shown in the illustration.
4. Attach (2) 11⁄2"x 3/8"x 14"long seals as shown. Install the 1"x 11⁄2"x 84"long stuffer seal between the wall sleeve and the unit. Install the new unit into the wall sleeve. A flat bladed screwdriver or putty knife is recommended.
60°
Top...
Installation Instructions - Page 6

...to the inside of the wall sleeve as shown in the illustration.
4. Install the 1"x 11⁄2"x 84"long stuffer seal between the wall sleeve and the unit. Assemble and install the Trim Frame. (see Trim Frame)
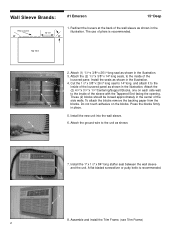
6 Wall Sleeve Brands:
#5 Sears...8249; →
2. Attach (2) Tapered Spacer Blocks to inside of pliers is recommended.
6 6
7. Install the new unit into the wall sleeve.
4
5.
Installation Instructions - Page 7

...Backing
3. Do not touch adhesive on the blocks. Press the blocks firmly
in the
illustration. Install the new unit into the wall sleeve. Cut and attach the (1) 11⁄2"x 3/8"x 261&#...8249; →
← 61⁄2"‹→
2
3
← 61⁄2"‹→
2. Install the 1"x 11⁄2"x 84"long stuffer seal between the wall sleeve and the unit. Attach the ground ...
Installation Instructions - Page 8

..."
illustration. Redirect the louvers at the back of the (2) foam blocks.
← 61⁄2"‹→
← 61⁄2"‹→
←
14 8"‹ →
5
5
5
5. Install the 1/8"x 41⁄2"x 14"long plastic divider to the unit as shown. A flat bladed screwdriver or putty knife is recommended.
60°
9-1/2" Top View
2 3 2
←...
Installation Instructions - Page 9

...at the rear flanges.
Wall Sleeve Brands:
1
← 2 91⁄2
→
#8 White-Westinghouse/Frigidaire/
16"+ 171⁄2"Deep
Carrier (52F Series)
1. The plastic grille panel is mounted to the unit ... wall sleeve does not have a rear grille or louvered panel, install the plastic grille panel from the seal. Replacement nuts and grille mounting screws are pressed into the wall sleeve. ...
Installation Instructions - Page 10

...the plastic divider.
7. Attach the ground wire to 131⁄2"install the seals as shown.
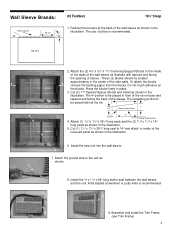
8. Wall Sleeve Brands:
1
#9 White-Westinghouse or Frigidaire
22"Deep
1. Seals should be flush with the kit. ... the unit as
6
shown. If your sleeve is missing these nuts or they are damaged, replacement nuts and grille mounting screws are (4) plastic nuts in the slots of the wall sleeve at...
Installation Instructions - Page 11

... bottom legs.
2. To install trim frame to sleeves, slide frame over cabinet until it is made of four parts:
1. Each frame is ...flush with the wall sleeve.
Trim Frame Assembly
The purpose of trim frame is to route the cord through the trim frame before placing the trim frame on the unit.
11 NOTE: Be sure to cover space between wall sleeve and replacement...
Frigidaire GAH12ER2T Reviews
We have not received any reviews for Frigidaire yet.