Frigidaire GAH085Q1T Support Question
Frigidaire GAH085Q1T Support Question
Find answers below for this question about Frigidaire GAH085Q1T - GIBSON 8000BTU 115V 8.0A 9.4EE3 SPD 4 WAY AIR DIRECTION.Need a Frigidaire GAH085Q1T manual? We have 3 online manuals for this item!
Question posted by Ravelb on November 2nd, 2011
Help
I can't get this to turn on. What am I doing wrong.
Current Answers
Answer #1: Posted by OnlineOutreachSpecialist on November 3rd, 2011 8:57 AM
OnlineOutreachSpecialist

Member since:
March 30th, 2011 Points: 2,848,320

Member since:
March 30th, 2011 Points: 2,848,320
If you have the unit in the correct outlet, that will carry the correct amps and voltage, and the GFI red plug is not tripped on the unit, and still are not receiving enough power, you may have an issue with the unit itself. Contact your manufacturer for assistance. They tend to have a limited warranty from the 2nd-5th year.
Online Outreach Specialist
Related Frigidaire GAH085Q1T Manual Pages
Use and Care Manual - Page 2

.... All warranties are required because of this warranty must be required. Expenses for making the appliance accessible for appliances not in materials or workmanship. ROOM AIR CONDITIONER WARRANTY
Your product is protected by this warranty.
Proper installation by Electrolux. Keep your best interest to you specific legal rights. You may not apply...
Use and Care Manual - Page 3
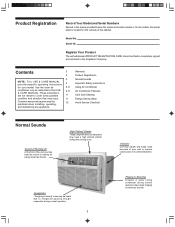
...42%')342!4)/.#!2$SHOULDBEFILLEDINCOMPLETELY SIGNED ANDRETURNEDTOTHE&RIGIDAIRE#OMPANY
#ONTENTS
./4% 4HIS 53%#!2%-!.5!, PROVIDESSPECIFIC OPERATING INSTRUCTIONS FOR YOURMODEL 5SE THE ROOM AIR CONDITIONER ONLYASINSTRUCTEDINTHIS53% #!2%-!.5!,4HESEINSTRUCTIONS ARE NOT MEANT TO COVER EVERYPOSSIBLE CONDITION AND SITUATION THAT MAYOCCUR #OMMONSENSEANDCAUTIONMUSTBE PRACTICED WHEN INSTALLING...
Use and Care Manual - Page 4
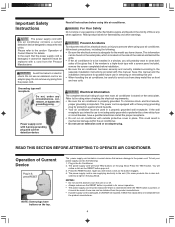
... basic precautions, including the following : 1.
To test your new room air conditioner is important. Press the RESET button. The power supply cord is now supplying electricity to the unit. (On some products this device to turn the unit on or off. • Always make sure the RESET button is pushed, or
it fails...
Use and Care Manual - Page 5
...0<
5.)4#/ .42/,
&<
&0<
.
452.35.)4 /./2/&&
3%43 -/$%3
%.%2'9 3!6%2 -/$%
SET TEMP. ON
F
OFF
3%43 -/$%3
FAN SPEED
%.%2'9 3!6%2 -/$%
Mode Energy Saver
Fan Timer
#,%!.!)2 -/$%
2%-/4% 3%.3).'&/,,/7 -%-/$%
Clean Air
Cancel
Follow Me Reset Lock
Clock
Sleep
Light
452.35.)4 /./2/&&
3%4&!. 30%%$3
!#4)6!4% 4)-%23
!$*5343 4%-0 4)-%3
&IGh!v
2%-/4%#/.42/,
&IGh"v
2%-/4%#/.42/,W$)30...
Use and Care Manual - Page 6

77:
(QJOLVK SGI 30
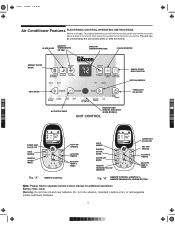
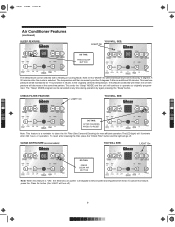
!IR#ONDITIONER&EATURES
CONTINUED
4/452.5.)4/.
./4%4HEFOLLOWINGINSTRUCTIONSREPRESENTTHE5NIT#ONTROL THESAMEINSTRUCTIONS CANBEUSEDFORTHE2EMOTE#ONTROL
9/57),,3%%
$/4()3
02%33/. /&& "544/.
.OTE 4HEUNITWILLTURNONINTHECOOLMODEANDHIGHFANSPEED
4/#(!.'%4%-0%2!452% 3%44).'
9/57),,3%%
&
0
$/4()3
<
&0
02%334/
2!)3%
0<
02%334/
&<
,/7%2
&0<
.
.OTE ...
Use and Care Manual - Page 8

3SGI 0
!IR#ONDITIONER&EATURES
CONTINUED
4//0%2!4%/.&!./.,9
,)'(4 /N
9/57),,3%%
$/4()3
02%33-/$% "544/.
#(//3%&!.
.OTE5SETHISFUNCTIONONLYWHENCOOLINGISNOTDESIRED SUCHASFORROOMAIRCIRCULATION9OUCANCHOOSEANYFANSPEEDYOUPREFER EXCEPT !UTO4EMP$URINGTHISFUNCTION THEDISPLAYWILLSHOWTHEACTUALROOMTEMPERATURE NOTTHESETTEMPERATUREASINTHECOOLINGMODE
4/53%4(%%.%2'93!6%2 &%!452%
,)'(4 /N
9/57...
Use and Care Manual - Page 9
... cleaning the filter, press the "Check Filter" button and the light will turn off . The "Sleep" MODE program can be selected with Heat, the set temperature will then increase by 2 degrees F, 30 minutes after 250 hours of operation. 3
SGI 0
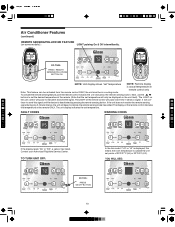
Air Conditioner Features
(continued)
SLEEP FEATURE:
YOU WILL SEE: LIGHT On
DO THIS: PRESS...
Use and Care Manual - Page 10
...
Follow Me Reset Lock
Clock
Sleep
Light
$/4()3
02%332%-/4% 3%.3).'&/,,/7-%
"544/./. ON
F
OFF
FAN SPEED
Mode
Fan
Energy Saver
Timer
Clean Air
Cancel
Follow Me Reset Lock
Clock
Sleep
Light
./4%5NITDISPLAYSHOWShSETvTEMPERATURE ./4%2EMOTEDISPLAY
ISACTUALTEMPERATUREAT
REMOTECONTROLONLY
.OTE4HIS FEATURE CAN BE ACTIVATED FROM THE REMOTE CONTROL/.,9 THEUNITMUSTBEINACOOLINGMODE...
Use and Care Manual - Page 11
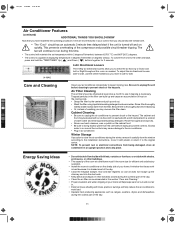
... ./4% 4O PREVENT RUST OR ELECTRICAL CONNECTIONS FROM BEING DAMAGED STORE AIR CONDITIONERINANUPRIGHTPOSITIONANDADRYPLACE
%NERGY3AVING)DEAS
s $ONOTBLOCKAIRFLOWINSIDEWITHBLINDS CURTAINSORFURNITUREOROUTSIDEWITHSHRUBS ENCLOSURES OROTHERBUILDINGS
s 4HECAPACITYOFTHEROOMAIRCONDITIONERMUSTFITTHEROOMSIZEFOREFFICIENTANDSATISFACTORY OPERATION
s )NSTALLTHEROOMAIRCONDITIONERONTHESHADYSIDEOFYOURHOME...
Use and Care Manual - Page 12
...
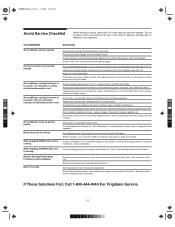
.OISEWHENUNITISCOOLING
!IRMOVEMENTSOUND4HISISNORMAL)FTOOLOUD SETTOASLOWER&!.SETTING 7INDOWVIBRATION POORINSTALLATION2EFERTOINSTALLATIONINSTRUCTIONSORCHECKWITHINSTALLER
7ATERDRIPPING).3)$%WHENUNITIS COOLING
)MPROPER INSTALLATION 4ILT AIR CONDITIONER SLIGHTLY TO THE OUTSIDE TO ALLOW WATER DRAINAGE 2EFER TO INSTALLATION INSTRUCTIONS CHECKWITHINSTALLER
7ATERDRIPPING/543)$%WHENUNIT...
Installation Instructions - Page 1
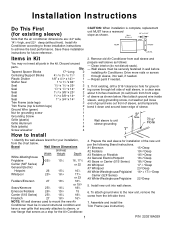
...;2x 3/8x 14
2
Seal
1" x 3/4x 14 1
Trim Frame (side legs)
2
Trim Frame (top & bottom legs)
2
Ground Wire (green)
1
Nut for installation of wall sleeve, in wall before
installing Air Conditioner. Brand
Wall Sleeve Dimensions
(inches)
Width Height
Depth
} White-Westinghouse
Frigidaire
251⁄2
151⁄4
Carrier (52F Series)
General Electric/
16, 171⁄2 or 22...
Installation Instructions - Page 2
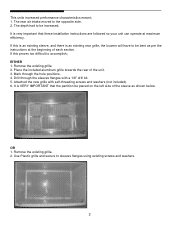
... at the beginning of the unit. 3. Remove the existing grille. 2. Drill through the hole positions. 4. EITHER 1. The depth had to the opposite side. 2. The rear air intake moved to be bent as shown below. This units increased performance characteristics meant; 1.
Installation Instructions - Page 3

....
3. Make sure that the toothed
washer is recommended.
60o
Top View
k7m 3 4
5
2
2. Redirect the louvers at the top of
these instructions.
3 Before sliding all-the-way back, remove 2nd screw from the screw.
9. Seal & Frame the unit as shown.
5. Attach (1) 1 ½" x 3/8" x 25" long seal in picture. Slide the unit completely to...
Installation Instructions - Page 4
... sure the ground wire does not become tangled. 13. The 4" section is against the cabinet. 12. This helps induce a rearward slope on each side wall. Redirect the louvers at the top of side wall with the tapered... sloping toward the rear of the wall sleeve as shown.
8. Before sliding all-the-way back, remove 2nd screw from the screw. 11. Make sure that the toothed washer is...
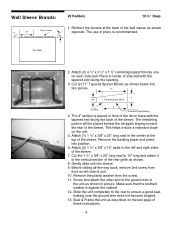
Installation Instructions - Page 5
...3. Attach (1) 1 ½" x 3/8" x 25" long seal in picture. Before sliding all-the-way back, remove 2nd screw from the screw.
11. Make sure that the toothed washer
is recommended.
60o
Top View
k7m ...6 7
2 3
5
2. This helps induce a rearward slope on each side wall. Attach (2) 1 ½" x 3/8" x 14" seals to the...
Installation Instructions - Page 6

... x 25" long seal to 14" long and attach it to the
unit as shown.
7. This helps induce a rearward slope on the last page of the sleeve. Remove the backing paper and press into ...ensure a good seal, making sure the ground wire does not become tangled. 12. Before sliding all-the-way back, remove 2nd screw from the screw. 10. Remove the plastic washer from front
on left and right...
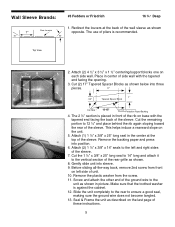
Installation Instructions - Page 7

...with the tapered end ½" from the back of
these instructions.
7 This helps induce
a rearward slope on the unit.
4. Before sliding all-the-way back, remove 2nd screw from the screw.
10. Wall Sleeve Brands:
#5... of the rear grille as shown in the center at the back of unit.
9. This helps induce a rearward slope on the unit.
3. Screw and attach the other end of the ...
Installation Instructions - Page 8

... 1/8 Deep
7"
60o
Rear Louvers
1. Slide the unit completely to the rear to the
unit as shown. Before sliding all-the-way back, remove 2nd screw from the screw. 10. This helps induce a rearward slope on left and right sides of pliers is against the cabinet. 11. Remove the backing paper and press...
Installation Instructions - Page 9

....
15. The pieces must be fitted flush to the left and right sides of the ground wire to ensure a good seal,
making sure all -the-way back, remove 1st screw from the left side of the sleeve. Screw and attach the other end of the sleeve. 6. Remove the backing paper and...
Installation Instructions - Page 10

... sure that the toothed washer
is mounted to ensure a good seal,
making sure the ground wire does not become tangled.
10. Before sliding all-the-way back, remove 2nd screw from the left and right sides
of the wall sleeve. If the wall sleeve does not have a rear grille or louvered...
Similar Questions

Gibson Gah126r2t Replacement
what is comparable to Gibson GAH126R2T for thru the wall air and heat,What are sleeve dimensions?
what is comparable to Gibson GAH126R2T for thru the wall air and heat,What are sleeve dimensions?
(Posted by denise80241 1 year ago)

Frigidaire Mini Split Question
I have a frs12pyc1 condenser unit, I need the head or evaporator that matches to it. Can anyone help...
I have a frs12pyc1 condenser unit, I need the head or evaporator that matches to it. Can anyone help...
(Posted by jostjc 10 years ago)

Won't Cool. Resetting Doesn't Help.
Unit does not cool. Cooling cycle just blows aire.
Unit does not cool. Cooling cycle just blows aire.
(Posted by joanchana 10 years ago)

Wall Install
Can the Frigidaire FRA064VU1 be installed in a wall?
Can the Frigidaire FRA064VU1 be installed in a wall?
(Posted by randycrozier2012 11 years ago)

How Do I Clean The Vents And Behind The Vents?
I notice some black dirt or grime on and behind the vents and would like to know how to take the fro...
I notice some black dirt or grime on and behind the vents and would like to know how to take the fro...
(Posted by jackiedale 12 years ago)