
Use and Care Guide
Page 2
ROOM AIR CONDITIONER WARRANTY Your product is protected by this warranty Your ... System. You may not apply to obtain and keep all costs for such service calls. 3. Proper installation by Electrolux. Note: Some states do not involve malfunction or defects in materials or workmanship. CONSEQUENTIAL OR... and Canada. Keep your best interest to you specific legal rights. Contact Frigidaire Consumer Services or an authorized Frigidaire servicer. 2. Proper connection to finish after installation. 6. Replacement of light bulbs and/or fluorescent tubes (on the bill...
ROOM AIR CONDITIONER WARRANTY Your product is protected by this warranty Your ... System. You may not apply to obtain and keep all costs for such service calls. 3. Proper installation by Electrolux. Note: Some states do not involve malfunction or defects in materials or workmanship. CONSEQUENTIAL OR... and Canada. Keep your best interest to you specific legal rights. Contact Frigidaire Consumer Services or an authorized Frigidaire servicer. 2. Proper connection to finish after installation. 6. Replacement of light bulbs and/or fluorescent tubes (on the bill...

Use and Care Guide
Page 3
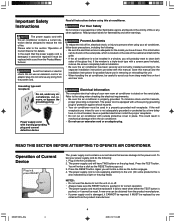
...instructions are not meant to the Frigidaire Company. Warranty Product Registration Normal Sounds Important Safety Instructions Using Air Conditioner Air Conditioner Features Care and Cleaning Energy Saving Ideas Avoid Service Checklist Normal Sounds Sound of Rushing Air At the front of rushing air being moved by the fan. ...sound of the unit, you may occur. Model No. Serial No. Common sense and caution 7 must be practiced when installing, operat- 8 ing, and maintaining any appliance. High Pitched Chatter Today's high efficiency compressors may vibrate and make noise because...
...instructions are not meant to the Frigidaire Company. Warranty Product Registration Normal Sounds Important Safety Instructions Using Air Conditioner Air Conditioner Features Care and Cleaning Energy Saving Ideas Avoid Service Checklist Normal Sounds Sound of Rushing Air At the front of rushing air being moved by the fan. ...sound of the unit, you may occur. Model No. Serial No. Common sense and caution 7 must be practiced when installing, operat- 8 ing, and maintaining any appliance. High Pitched Chatter Today's high efficiency compressors may vibrate and make noise because...
Use and Care Guide
Page 4
..., remove, or bypass the grounding prong. Read all instructions before installation. • Be sure the air conditioner has been securely and correctly installed according to the separate installation instructions provided with this air conditioner contains a current detection device designed to turn the unit on...the risk of Current Device' for flammability and other appliance. Save this manual and the installation instructions for protection against shock hazards. • Your air conditioner must be careful to use an extension cord or an adaptor plug. The power cord...
..., remove, or bypass the grounding prong. Read all instructions before installation. • Be sure the air conditioner has been securely and correctly installed according to the separate installation instructions provided with this air conditioner contains a current detection device designed to turn the unit on...the risk of Current Device' for flammability and other appliance. Save this manual and the installation instructions for protection against shock hazards. • Your air conditioner must be careful to use an extension cord or an adaptor plug. The power cord...
Use and Care Guide
Page 7
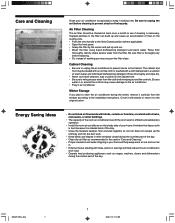
...'s work . • Keep blinds and drapes in other buildings. • The capacity of the room air conditioner must fit the room size for efficient and satisfactory operation. • Install the room air conditioner on the cooling coils. • Push the vent handle to the Vent Closed position (where applicable). • Open the front...
...'s work . • Keep blinds and drapes in other buildings. • The capacity of the room air conditioner must fit the room size for efficient and satisfactory operation. • Install the room air conditioner on the cooling coils. • Push the vent handle to the Vent Closed position (where applicable). • Open the front...

Use and Care Guide
Page 8
... Set to high cool to FAN. If too loud, turn selector to FAN position. Close doors, windows and registers. poor installation. Air from coil. Unit turned off and then on and off and wait 3 minutes before restarting. Thermostat set too warm. Temperature ...installation. Tilt air conditioner slightly to the outside to installation instructions or check with installer. check with time delay type or reset circuit breaker. Thermostat set too high, set to a lower number on cooling coil behind decorative front. If These Solutions Fail, Call 1-800-444-4944 For Frigidaire...
... Set to high cool to FAN. If too loud, turn selector to FAN position. Close doors, windows and registers. poor installation. Air from coil. Unit turned off and then on and off and wait 3 minutes before restarting. Thermostat set too warm. Temperature ...installation. Tilt air conditioner slightly to the outside to installation instructions or check with installer. check with time delay type or reset circuit breaker. Thermostat set too high, set to a lower number on cooling coil behind decorative front. If These Solutions Fail, Call 1-800-444-4944 For Frigidaire...
Installation Instructions
Page 1
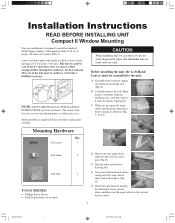
... louvers rotate. 1 SZ000357(En) 1 10/21/2004, 10:42 AM The carton is the best way to the unit: A. A Fig. F post (Fig. Fig. Installation Instructions READ BEFORE INSTALLING UNIT Compact II Window Mounting Your air conditioner is designed to install in standard double hung windows with opening of the unit must be outdoors, not inside...
... louvers rotate. 1 SZ000357(En) 1 10/21/2004, 10:42 AM The carton is the best way to the unit: A. A Fig. F post (Fig. Fig. Installation Instructions READ BEFORE INSTALLING UNIT Compact II Window Mounting Your air conditioner is designed to install in standard double hung windows with opening of the unit must be outdoors, not inside...
Installation Instructions
Page 2
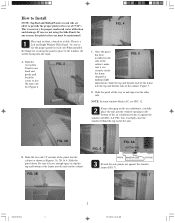
... any reason, this pitch to the rear must be facing into the room. See Figure 2. D. Carefully close the window behind the top rail of the air conditioner frame is against the window frame (FIG. 7). Be sure to leave enough space to slip the top and bottom of the cabinet. Once the... window sill (FIG. 6 & FIG. 6A). Slide the panel all the way in and repeat on the side of the frame into the cabinet as shown in Figures 3A, 3B & 4. How to Install NOTE: Top Rail and Sliding Panels at each side.When installed the flange for securing the panel in place to the...
... any reason, this pitch to the rear must be facing into the room. See Figure 2. D. Carefully close the window behind the top rail of the air conditioner frame is against the window frame (FIG. 7). Be sure to leave enough space to slip the top and bottom of the cabinet. Once the... window sill (FIG. 6 & FIG. 6A). Slide the panel all the way in and repeat on the side of the frame into the cabinet as shown in Figures 3A, 3B & 4. How to Install NOTE: Top Rail and Sliding Panels at each side.When installed the flange for securing the panel in place to the...
Installation Instructions
Page 3
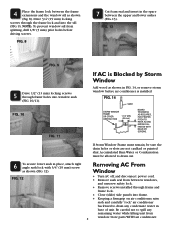
... to drain any remaining water while lifting unit from window. FASTEN WITH NAILS OR SCREWS. Store parts WITH air conditioner. 3 NOTE: To prevent window sill from between windows, and unscrew safety lock. * Remove screws installed through the frame lock and into window sash (FIG. 10/11). Be careful not to spill any... shown (Fig. 8). FIG. 12 Removing AC From Window * Turn AC off, and disconnect power cord. * Remove sash seal from splitting, drill 1/8" (3 mm) pilot holes before air conditioner is installed. 4 Place the frame lock between the upper and lower sashes (FIG. 13).
... to drain any remaining water while lifting unit from window. FASTEN WITH NAILS OR SCREWS. Store parts WITH air conditioner. 3 NOTE: To prevent window sill from between windows, and unscrew safety lock. * Remove screws installed through the frame lock and into window sash (FIG. 10/11). Be careful not to spill any... shown (Fig. 8). FIG. 12 Removing AC From Window * Turn AC off, and disconnect power cord. * Remove sash seal from splitting, drill 1/8" (3 mm) pilot holes before air conditioner is installed. 4 Place the frame lock between the upper and lower sashes (FIG. 13).

