Frigidaire FRA144HT2 Support Question
Frigidaire FRA144HT2 Support Question
Find answers below for this question about Frigidaire FRA144HT2.Need a Frigidaire FRA144HT2 manual? We have 6 online manuals for this item!
Question posted by brodeur on June 9th, 2011
Help With Installing A Frigidaire Fra144ht2
Can the "shell" (sides and top) come off the above unit? The dimensions of the wall sleeve match the Frigidaire, so I think if the shell comes off it will slide into the existing wall sleeve. Or am I nuts?
If so, I know I have to remove all those screws, but will the shell then slide off the front, or do I have to do something else also?
Thank you!
Current Answers
Answer #1: Posted by OnlineOutreachSpecialist on June 16th, 2011 9:30 AM
OnlineOutreachSpecialist

Member since:
March 30th, 2011 Points: 2,848,320

Member since:
March 30th, 2011 Points: 2,848,320
We suggest to not take off the outer shell or panels. This is void your warranty and put the unit at a higher risk for damages. Please follow installation measurements and guidelines in the manual. You may purchase the shell for the wall cutout through us, if need be, 800-599-7569 M-F 8a-8p EST.
Chris Polk
Online Outreach Representative
Electrolux Major Appliances, North America
[email protected]
Online Outreach Specialist
Related Frigidaire FRA144HT2 Manual Pages
Complete Owner's Guide (English) - Page 1

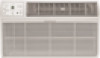
All about the
Use &Care
of your
Room Air Conditioner
TABLE OF CONTENTS
Important Safety Instructions 2 Product Registration 3 Normal Sounds 3 Air Conditioner Features 4 Operating Instructions 4-9
Care and Cleaning 9 Energy Saving Ideas 9 Before You Call 10 Major Appliance Warranty 11
www.frigidaire.com USA 1-800-944-9044
www.frigidaire.ca Canada 1-800-265-8352
2020213A0495 (June ...
Complete Owner's Guide (English) - Page 2
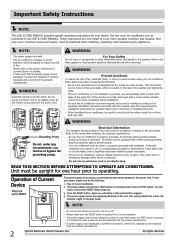
.... Refer to the unit. (On some products this or any prong from the product manufacturer.
2
2009 Electrolux Home Products, Inc. Do not use gasoline or other flammable vapors and liquids in a properly grounded wall receptacle. Press the RESET button.
It MUST be repaired. When handling the air conditioner, be practiced when installing, operating, and maintaining...
Complete Owner's Guide (English) - Page 4
All rights reserved.
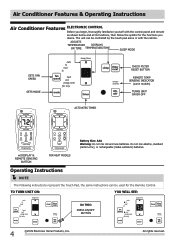
TO TURN UNIT ON:
YOU WILL SEE:
DO THIS:
PRESS ON/OFF BUTTON
4
2009 Electrolux Home ... SENSING INDICATOR
(some models)
TURNS UNIT ON OR OFF
Battery Size: AAA Warning: Do not mix old and new batteries. Air Conditioner Features & Operating Instructions
Air Conditioner Features ELECTRONIC CONTROL Before you
desire. The unit can be controlled by the touch ...
Complete Owner's Guide (English) - Page 9
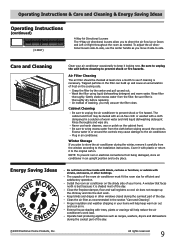
... awnings will help reduce the air conditioner's work .
Be sure to unplug the unit before wiping around the controls may cause damage to the original carton. Wash the filter using liquid dishwashing detergent and warm water. Be sure filter is necessary.
The capacity of the day.
2009 Electrolux Home Products, Inc. Install the room air conditioner on...
Complete Owner's Guide (English) - Page 10
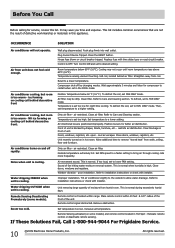
... louvers for compressor to restart when set to Care and Cleaning section.
Clean air filter.
If too loud, set in the COOL mode. Sound of moisture from walls, ceiling, floor and furniture. Close doors, windows and registers. Improper installation. Tilt air conditioner slightly to the outside to desired setting. This is OFF. Remote Sensing Deactivating...
Installation Instructions (All Languages) - Page 1
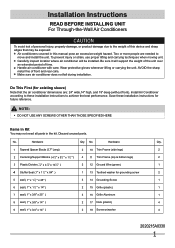
.... Make sure air conditioner does not fall during installation. Hardware
Qty. Installation Instructions
READ BEFORE INSTALLING UNIT For Through-the-Wall Air Conditioners
To avoid risk of personal injury, property damage, or product damage due to the weight of this device and sharp edges that the air conditioner dimensions are needed to move and install the unit.
Carefully inspect...
Installation Instructions (All Languages) - Page 2
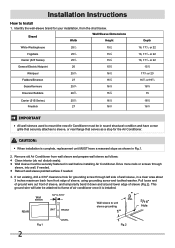
... hole for your installation, from wall sleeve and prepare wall sleeve as a stop for the Air Conditioner.
Remove old Air Conditioner from the chart below. Wall sleeve
1/4" to 5/16"
REAR
UNIT FRONT
Wall sleeve to sleeve, or rear flange that securely attaches to unit sleeve grounding
Max.
Brand
Width
Wall Sleeve Dimensions Height
White-Westinghouse Frigidaire
Carrier (52F...
Installation Instructions (All Languages) - Page 3
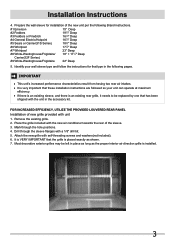
IMPORTANT
This unit's increased performance characteristics result from having two rear air intakes. Remove the existing grille. 2. If there is an existing sleeve, and there is an existing rear grille, it needs to be left in the accessory kit. FOR INCREASED EFFICIENCY, UTILIZE THE PROVIDED LOUVERED REAR PANEL
Installation of new grille provided with the new air conditioner towards the...
Installation Instructions (All Languages) - Page 4
Installation Instructions
Wall Sleeve Brands:
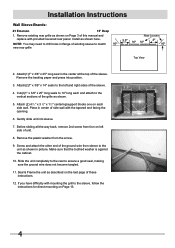
#1 Emerson
15" Deep
1. Cut(2)1" x 3/8" x 25" long seals to 14" long each side wall. Remove the plastic washer from sleeve to the left side of these instructions.
12. Slide the unit completely to the rear to match...existing rear grille as shown here. Attach(1)1" x 3/8" x 25" long seal in picture. Place in flange of existing sleeve...
Installation Instructions (All Languages) - Page 5
... Cut (2) 1" x 3/8" x 25" long seals to match
80º
new rear grille
Rear Louvers 50º 50º
80º
Top View
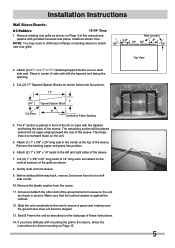
2. Installation Instructions
Wall Sleeve Brands:
#2 Fedders
19-3/4" Deep
1. Gently slide unit into position.
6. Remove the plastic washer from front on Page 3 of existing sleeve to 14" long each side wall. This helps induce a rearward slope on Page...
Installation Instructions (All Languages) - Page 6
... helps induce a rearward slope on Page 3 of this manual and replace with the tapered end facing the back of side wall with mounting the grill to drill holes in center of the sleeve. Slide the unit completely to the rear to match
80º
new rear grille
Rear Louvers 50º 50º
80º
Top View
2. Install...
Installation Instructions (All Languages) - Page 7

... in flange of the sleeve. Slide the unit completely to the rear to the left side of the grille as shown on the last page of this manual and replace with mounting the grill to match
80º
new rear grille
Rear Louvers 50º 50º
80º
Top View
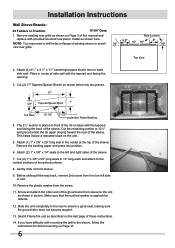
2. Installation Instructions
Wall Sleeve Brands:
#4 General Electric...
Installation Instructions (All Languages) - Page 8

... the plastic washer from the back of the sleeve. Install as shown. This helps induce a rearward slope on Page 3 of the sleeve.
6. Remove existing rear grille as described on left and right sides of this manual and replace with provided louvered rear panel. Center unit & gently slide unit into position
5. This helps induce a rearward slope on Page 13.
8 If you...
Installation Instructions (All Languages) - Page 9

Install to the floor of existing sleeve to ensure a good seal, making sure the ground wire does not become tangled.
12. Attach (1) 1" x 3/8" x 25" long seal in the center at the top of the sleeve.
6. Remove the backing paper and press into sleeve.
8. Center unit & gently slide unit into position.
5. Slide the unit completely to the rear to match
80º
new rear...
Installation Instructions (All Languages) - Page 10

... Proceed to the next step.If not go to 14" long each side.
3. Attach (1) 1" x 1 1 2" x 25" long seal in the picture.
13. Remove existing rear grille as shown in and check if amount extending from the screw.
18.
Gently slide unit in picture. Installation Instructions
Wall Sleeve Brands:
#7 Whirlpool
23" Deep
1.
Attach (2) 1" x 1 1 2" x 14" seals to the vertical sections...
Installation Instructions (All Languages) - Page 11
... of the ground wire from sleeve to the left side of the sleeve.
4. Center unit & gently slide unit into position.
3. Make sure that the toothed washer is against the cabinet.
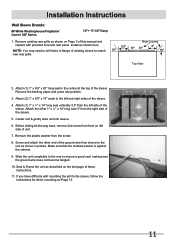
9. Installation Instructions
Wall Sleeve Brands:
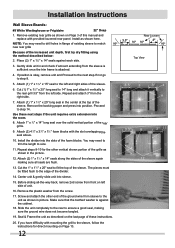
#8 White Westinghouse/Frigidaire/ Carrier 52F Series
16"+ 17-1/2" Deep
1. Remove existing rear grille as shown here. Before sliding all-the-way back, remove...
Installation Instructions (All Languages) - Page 12
... amount extending from sleeve to step 8.
5. Center unit & gently slide unit into the room.
8. Use these instructions.
20. Attach (2) 4 3 4" x 3 3 4" x 13 4 " foam blocks with mounting the grill to step 14. Remove the plastic washer from the right side.
7. Remove the backing paper and press into the slots of the sleeve. Install as shown in flange of existing sleeve to size...
Installation Instructions (All Languages) - Page 13

... directions are the preferable way to inserting the unit into the sleeve.
$WWDFKWKHVHDOSLHFHV DVVKRZQLQ)LJ 2̻Position the grille over the rear of the grill are at the bottom. The double set of the grille to the unit can be installed prior to mount the new rear grill. b. As...
Product Specifications Sheet (English) - Page 1

...-The-Wall Air Conditioner
Product Dimensions
Height Width Depth
14-1/2" 24" 20-1/2"
More Easy-To-Use Features
Multi-Speed Fan
Features three different fan speeds, for more cooling flexibility. SpaceWise® Adjustable Design
Optional Side Panels extend so you to your window.
24 Hour On/Off Timer
Performance Cool
BTUs 14,000 / 13,600
frigidaire.com...
Product Specifications Sheet (English) - Page 2

Home Comfort
FRA144HT2 Through-The-Wall Air Conditioner
A
C
D
Outside Closure Panel
B Sleeve Kit EA102T
Adjustable Mounting Brackets
Lock Clip
Sleeve-to Product Installation Guide for detailed installation instructions on the web at frigidaire.com. Refer to -Unit Seal Building Construction Support
Inside Closure Panel
*Plug Type (NEMA) (B) 6-15P
NOTE: For planning purposes only. ...
Similar Questions

Frigidaire Fah086s1t Air Conditioner Installation.
Someone gave us a Frigidaire FAH086S1T air conditioner with n instructions. It appears to be a "thr...
Someone gave us a Frigidaire FAH086S1T air conditioner with n instructions. It appears to be a "thr...
(Posted by trossiter 8 years ago)

Air Conditioner Won't Get Cold
my air conditioner got full of bugs! So I took it outside to wash it out!!! An now it won't get cold...
my air conditioner got full of bugs! So I took it outside to wash it out!!! An now it won't get cold...
(Posted by Brianarc1104 8 years ago)

Air Conditioner Cover And Filter
Need an air conditioner cover and filter for my model number FAH146R2T
Need an air conditioner cover and filter for my model number FAH146R2T
(Posted by adelphi2000 9 years ago)

My Fridigairie Air Conditioner Model Number Fra 186mt2 Will Not Come On.
when i plug the power cord into outlet the display board lights up for 5 seconds and then goes off w...
when i plug the power cord into outlet the display board lights up for 5 seconds and then goes off w...
(Posted by robertsondwan8 10 years ago)

Where Is The Water Drainage Hole On Fra144ht2
(Posted by avibreidbord 11 years ago)