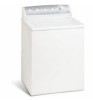
Complete Owner's Guide (English)
Page 2
.... Model Number Serial Number Purchase Date This Use and Care Guide provides general operating instructions for several minutes. Use the washer only as described below . If the hot water system has not been used for future reference. Hydrogen gas is &#...models. These substances give off vapors or chemical reactions that may not have been previously cleaned in, soaked in the vicinity of the washer. 2 Table of Contents Product Registration 2 Important Safety Instructions 2-3 Washing Procedures 4-5 Operating Instructions 6-7 Stain Removal Guide 8-9 Care and ...
.... Model Number Serial Number Purchase Date This Use and Care Guide provides general operating instructions for several minutes. Use the washer only as described below . If the hot water system has not been used for future reference. Hydrogen gas is &#...models. These substances give off vapors or chemical reactions that may not have been previously cleaned in, soaked in the vicinity of the washer. 2 Table of Contents Product Registration 2 Important Safety Instructions 2-3 Washing Procedures 4-5 Operating Instructions 6-7 Stain Removal Guide 8-9 Care and ...
Complete Owner's Guide (English)
Page 3
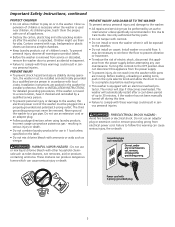
... supply. • To prevent injury, do not reach into a properly grounded and polarized 3-prong outlet. Installation instructions are moving. Install washer on the label. • Do not mix chlorine bleach with ammonia or acids such as toilet cleaners, rust removers, acid or products ...containing ammonia. Power cord with controls. • Do not install or store the washer where it will stop before attempting any circumstances, cut, remove, or bypass the grounding prong. As children grow, teach them for detailed...
... supply. • To prevent injury, do not reach into a properly grounded and polarized 3-prong outlet. Installation instructions are moving. Install washer on the label. • Do not mix chlorine bleach with ammonia or acids such as toilet cleaners, rust removers, acid or products ...containing ammonia. Power cord with controls. • Do not install or store the washer where it will stop before attempting any circumstances, cut, remove, or bypass the grounding prong. As children grow, teach them for detailed...

Complete Owner's Guide (English)
Page 4
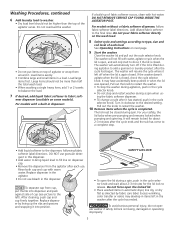
... small items such as bras, hosiery and baby socks in a mesh bag. Small 4 Add a measured amount of detergent to the wash tub before operating your washer. 1 Sort laundry into loads that attract ful stain removal instructions. particles of fiberglass left front corner under the lid: • Empty pockets. • Brush...
... small items such as bras, hosiery and baby socks in a mesh bag. Small 4 Add a measured amount of detergent to the wash tub before operating your washer. 1 Sort laundry into loads that attract ful stain removal instructions. particles of fiberglass left front corner under the lid: • Empty pockets. • Brush...
Complete Owner's Guide (English)
Page 5
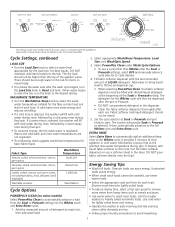
...Replace dispenser in the agitator. • Do not use granular detergent in this dispenser. To separate cap from the agitator after each load. ate washer if safety lid lock is closed during a spin, push in the cycle selector knob. • Do not stop . • Add liquid softener...; Combine large and small items in the cycle selector knob. For models without a fabric softener dispenser, follow fabric softener label directions. The washer will remain locked for the lid lock to release. It will automatically turn off when the lid is completed. Do not pour fabric softener...
...Replace dispenser in the agitator. • Do not use granular detergent in this dispenser. To separate cap from the agitator after each load. ate washer if safety lid lock is closed during a spin, push in the cycle selector knob. • Do not stop . • Add liquid softener...; Combine large and small items in the cycle selector knob. For models without a fabric softener dispenser, follow fabric softener label directions. The washer will remain locked for the lid lock to release. It will automatically turn off when the lid is completed. Do not pour fabric softener...
Complete Owner's Guide (English)
Page 7
...hot water washes to the full Whites cycle and Extra Rinse cycle. Use cold water for lightly soiled items and rinsing. • Operate the washer in early morning and late evening when utility demands are low. • Follow proper laundry procedures to this rinse (not the fabric softener ... liquid fabric softener to avoid rewashing. 7 For best results, DO NOT overload. Add water to bring liquid level to the Whites cycle. The washer will fill with cold water during rinse, followed by a warm spray rinse during spin. EXTRA RINSE Select Extra Rinse to automatically add an...
...hot water washes to the full Whites cycle and Extra Rinse cycle. Use cold water for lightly soiled items and rinsing. • Operate the washer in early morning and late evening when utility demands are low. • Follow proper laundry procedures to this rinse (not the fabric softener ... liquid fabric softener to avoid rewashing. 7 For best results, DO NOT overload. Add water to bring liquid level to the Whites cycle. The washer will fill with cold water during rinse, followed by a warm spray rinse during spin. EXTRA RINSE Select Extra Rinse to automatically add an...
Complete Owner's Guide (English)
Page 9
...face down on can damage the finish or controls. 9 Rinse. Use rust remover safe for fabric. PASTE: Scrape residue from the washer as soon as the cycle ends. Pretreat with a nonabrasive household cleanser. Clean these parts with prewash stain remover. Never use harsh, gritty... Pretreat or soak with prewash stain remover or nonflammable dry cleaning fluid. Apply nail polish remover to back of washer at any time. Pretreat with product containing enzymes. Rub detergent into dampened area. Wash using bleach safe for fabric. Excess wrinkling, ...
...face down on can damage the finish or controls. 9 Rinse. Use rust remover safe for fabric. PASTE: Scrape residue from the washer as soon as the cycle ends. Pretreat with a nonabrasive household cleanser. Clean these parts with prewash stain remover. Never use harsh, gritty... Pretreat or soak with prewash stain remover or nonflammable dry cleaning fluid. Apply nail polish remover to back of washer at any time. Pretreat with product containing enzymes. Rub detergent into dampened area. Wash using bleach safe for fabric. Excess wrinkling, ...
Complete Owner's Guide (English)
Page 10
...fabric softener poured directly on fabric. • Check condition of fabric. • Incorrect sorting. • Tissues left in pocket. • Overloading the washer. • Not enough detergent. • Undissolved detergent has left a residue resembling lint. • Static cling is attracting lint. • Load ...amount of detergent, water and wash time. • Use a lint brush or shaver to remove pills. • Use fabric softener in the washer to lubricate fibers. • When ironing, use of chlorine bleach. • Unfastened zippers, hooks, buckles. • Rips, tears...
...fabric softener poured directly on fabric. • Check condition of fabric. • Incorrect sorting. • Tissues left in pocket. • Overloading the washer. • Not enough detergent. • Undissolved detergent has left a residue resembling lint. • Static cling is attracting lint. • Load ...amount of detergent, water and wash time. • Use a lint brush or shaver to remove pills. • Use fabric softener in the washer to lubricate fibers. • When ironing, use of chlorine bleach. • Unfastened zippers, hooks, buckles. • Rips, tears...
Complete Owner's Guide (English)
Page 11
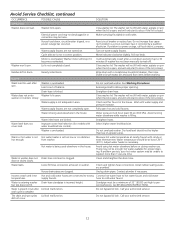
... defective workmanship or materials in this list. It may produce a thumping sound. OCCURRENCE NOISE "Clunking" or gear sounds. Do not overload washer. Adjust leveling legs. Belt buckles and metal fasteners are not the result of detergent. • Wash synthetics frequently using hottest water safe ...for fabric. • Do not overload washer. • Use liquid detergent or use chlorine bleach to remove rust stains. Squealing sound or hot rubber odor. The list includes ...
... defective workmanship or materials in this list. It may produce a thumping sound. OCCURRENCE NOISE "Clunking" or gear sounds. Do not overload washer. Adjust leveling legs. Belt buckles and metal fasteners are not the result of detergent. • Wash synthetics frequently using hottest water safe ...for fabric. • Do not overload washer. • Use liquid detergent or use chlorine bleach to remove rust stains. Squealing sound or hot rubber odor. The list includes ...
Complete Owner's Guide (English)
Page 12
... elsewhere before washing WATER Wash load too wet after Lid lock malfunction. Water leaks. Check and tighten hose connections. Water is entering washer Drain hose standpipe is kinked. Standpipe must be loose. Do not bypass lid lock. Reset circuit breaker or replace fuse. If problem.... If problem persists, your hot water system may be higher than 1 use . Unclog drain pipes. supply faucets. Call your authorized servicer. Washer lid is a power outage, call local electric company. Make sure plug fits tightly in correct position. Cycle selector is not in wall...
... elsewhere before washing WATER Wash load too wet after Lid lock malfunction. Water leaks. Check and tighten hose connections. Water is entering washer Drain hose standpipe is kinked. Standpipe must be loose. Do not bypass lid lock. Reset circuit breaker or replace fuse. If problem.... If problem persists, your hot water system may be higher than 1 use . Unclog drain pipes. supply faucets. Call your authorized servicer. Washer lid is a power outage, call local electric company. Make sure plug fits tightly in correct position. Cycle selector is not in wall...
Installation Instructions (All Languages)
Page 1
P/N 137153100A (0903) Installation Instructions Washer Instructions d'Installation Laveuse Printed in U.S.A.
P/N 137153100A (0903) Installation Instructions Washer Instructions d'Installation Laveuse Printed in U.S.A.
Installation Instructions (All Languages)
Page 2
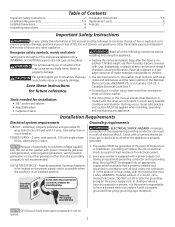
... is properly grounded. Do not store or use them for electrical current. 2. Children might use gasoline or other literature included with this washer with a properly grounded three prong grounding type receptacle. Place all other flammable vapors and liquids in a garbage container or make...pliers • Carpenter's level • The instructions in this or any other generator other than one person move or lift the washer. The washer MUST be applied when installing, operating and maintaining any circumstances, cut off or alter the grounding prong on the risk type as ...
... is properly grounded. Do not store or use them for electrical current. 2. Children might use gasoline or other literature included with this washer with a properly grounded three prong grounding type receptacle. Place all other flammable vapors and liquids in a garbage container or make...pliers • Carpenter's level • The instructions in this or any other generator other than one person move or lift the washer. The washer MUST be applied when installing, operating and maintaining any circumstances, cut off or alter the grounding prong on the risk type as ...
Installation Instructions (All Languages)
Page 3
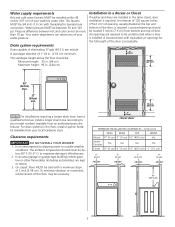
... and 120 psi. The standpipe height above the floor should be installed within 42 inches (107 cm) of your washer's water inlet. Clearance requirements DO NOT INSTALL YOUR WASHER: 1. In an area (garage or garage-type building) where gasoline or other flammables (including automobiles) are kept or... water faucets MUST be : Minimum height: 33 in. (84 cm) Maximum height: 96 in. (244 cm) Installation in a Recess or Closet If washer and dryer are installed in the same closet, door ventilation is required: A minimum of 120 square inches (774.2 cm²) of opening, equally divided...
... and 120 psi. The standpipe height above the floor should be installed within 42 inches (107 cm) of your washer's water inlet. Clearance requirements DO NOT INSTALL YOUR WASHER: 1. In an area (garage or garage-type building) where gasoline or other flammables (including automobiles) are kept or... water faucets MUST be : Minimum height: 33 in. (84 cm) Maximum height: 96 in. (244 cm) Installation in a Recess or Closet If washer and dryer are installed in the same closet, door ventilation is required: A minimum of 120 square inches (774.2 cm²) of opening, equally divided...

Installation Instructions (All Languages)
Page 4
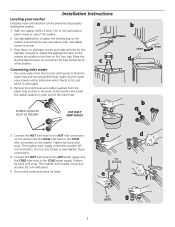
... tape holding the lid shut and open lid drain hose retention clamp on rear of cardboard to protect the floor, carefully lay the washer on rear of washer approximately 59" (150 cm) 43 5/8" (111 cm) 36" (91.5 cm) 51" (129.5 cm) to clear open the lid. 6. It helps form a ... be transported at a later date, the tub blocking pad, shipping bolt, and plastic spacer block should be completed. 1. Using a rug, blanket or piece of washer, loose hose length beyond clamp approximately 54" (137 cm) 24" (61 cm) 27" (68.6 cm) 27" (68.6 cm) Unpacking Instructions To prevent vibration, ...
... tape holding the lid shut and open lid drain hose retention clamp on rear of cardboard to protect the floor, carefully lay the washer on rear of washer approximately 59" (150 cm) 43 5/8" (111 cm) 36" (91.5 cm) 51" (129.5 cm) to clear open the lid. 6. It helps form a ... be transported at a later date, the tub blocking pad, shipping bolt, and plastic spacer block should be completed. 1. Using a rug, blanket or piece of washer, loose hose length beyond clamp approximately 54" (137 cm) 24" (61 cm) 27" (68.6 cm) 27" (68.6 cm) Unpacking Instructions To prevent vibration, ...
Installation Instructions (All Languages)
Page 5
...supply and the COLD inlet hose to the COLD inlet connection on the water and check for the slightest movement. Turn on the washer. Installation Instructions Leveling your washer Excessive noise and vibration can be prevented by hand until snug. Then tighten each supply connection another 2/3 turn with pliers. 5. ... on ALL four legs. Do not cross thread or over-tighten these connections. 4. Use adjustable pliers to adjust the leveling legs so the washer is level front-to-rear and side-to-side, and stable corner-to determine which faucet is hot and which is cold supply. 2. ...
...supply and the COLD inlet hose to the COLD inlet connection on the water and check for the slightest movement. Turn on the washer. Installation Instructions Leveling your washer Excessive noise and vibration can be prevented by hand until snug. Then tighten each supply connection another 2/3 turn with pliers. 5. ... on ALL four legs. Do not cross thread or over-tighten these connections. 4. Use adjustable pliers to adjust the leveling legs so the washer is level front-to-rear and side-to-side, and stable corner-to determine which faucet is hot and which is cold supply. 2. ...
Installation Instructions (All Languages)
Page 6
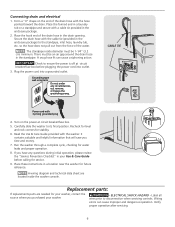
...box before calling for water leaks and proper operation. 8. Read the Use & Care Guide provided with 3-prong grounded plug 4. Run the washer through a complete cycle, checking for service. 9. Replacement parts: If replacements parts are located inside diameter must be 1-1/4" (3.2 cm) minimum... type wall receptacle Do not, under any questions during initial operation, please review the "Service Prevention Checklist" in a location near the washer for stability. 6. Turn on the end of the drain hose with a cable tie provided in the drain opening. Verify proper operation after...
...box before calling for water leaks and proper operation. 8. Read the Use & Care Guide provided with 3-prong grounded plug 4. Run the washer through a complete cycle, checking for service. 9. Replacement parts: If replacements parts are located inside diameter must be 1-1/4" (3.2 cm) minimum... type wall receptacle Do not, under any questions during initial operation, please review the "Service Prevention Checklist" in a location near the washer for stability. 6. Turn on the end of the drain hose with a cable tie provided in the drain opening. Verify proper operation after...


