Complete Owner's Guide (English)
Page 2
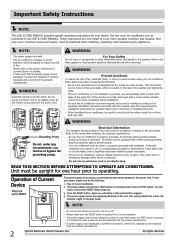
Use the room air conditioner only as instructed in a properly grounded wall receptacle. Read product labels for flammability and other flammable vapors and liquids in removing or reinstalling this is also indicated by a light on the serial plate. WARNING Electrical Information The complete electrical rating of your power supply cord do the following : Be sure the electrical service is adequate for the model you have chosen. Your air conditioner must be...
Use the room air conditioner only as instructed in a properly grounded wall receptacle. Read product labels for flammability and other flammable vapors and liquids in removing or reinstalling this is also indicated by a light on the serial plate. WARNING Electrical Information The complete electrical rating of your power supply cord do the following : Be sure the electrical service is adequate for the model you have chosen. Your air conditioner must be...
Complete Owner's Guide (English)
Page 4
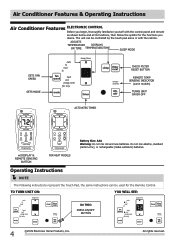
... the control panel and remote as shown below and all its functions, then follow the symbol for the Remote Control. TO TURN UNIT ON: YOU WILL SEE: DO THIS: PRESS ON/OFF BUTTON 4 2009 Electrolux Home Products, Inc. ADJUSTS TEMPERATURE DISPLAYS OR TIME TEMPERATURE/TIME SLEEP MODE SETS FAN SPEED SETS MODE ACTIVATES TIMER CHECK FILTER RESET BUTTON REMOTE TEMP SENSING INDICATOR (some models) TURNS UNIT ON OR OFF Battery Size: AAA Warning: Do not mix old and new...
... the control panel and remote as shown below and all its functions, then follow the symbol for the Remote Control. TO TURN UNIT ON: YOU WILL SEE: DO THIS: PRESS ON/OFF BUTTON 4 2009 Electrolux Home Products, Inc. ADJUSTS TEMPERATURE DISPLAYS OR TIME TEMPERATURE/TIME SLEEP MODE SETS FAN SPEED SETS MODE ACTIVATES TIMER CHECK FILTER RESET BUTTON REMOTE TEMP SENSING INDICATOR (some models) TURNS UNIT ON OR OFF Battery Size: AAA Warning: Do not mix old and new...

Complete Owner's Guide (English)
Page 5
... ( ) or down ( ) button until the desired temperature is seen on some models. (Remember to open the vent during this function, but keep it closed during cooling for heating mode. TO ADJUST FAN SPEEDS: YOU WILL SEE: DO THIS: PRESS TO SELECT TO USE AUTO FAN FEATURE: YOU WILL SEE: DO THIS: PRESS FAN BUTTON SELECT AUTO Note: Fan starts at the slowest speed. TO OPERATE ON FAN ONLY: YOU...
... ( ) or down ( ) button until the desired temperature is seen on some models. (Remember to open the vent during this function, but keep it closed during cooling for heating mode. TO ADJUST FAN SPEEDS: YOU WILL SEE: DO THIS: PRESS TO SELECT TO USE AUTO FAN FEATURE: YOU WILL SEE: DO THIS: PRESS FAN BUTTON SELECT AUTO Note: Fan starts at the slowest speed. TO OPERATE ON FAN ONLY: YOU...

Complete Owner's Guide (English)
Page 6
... selected. The control will start (8, 7.5, 7, etc.). The "Sleep" mode program can be selected.) The temperature maintained will cancel the Delay Start/Stop function. To change delay timer at 0.5 hour increments, up to 10 hours, then at which time the compressor turns back on. Operating Instructions Operating Instructions (continued) TO USE THE ENERGY SAVER FEATURE: YOU WILL SEE: DO THIS: PRESS MODE BUTTON CHOOSE ENERGY SAVER Note: In this mode the selected temperature will then...
... selected. The control will start (8, 7.5, 7, etc.). The "Sleep" mode program can be selected.) The temperature maintained will cancel the Delay Start/Stop function. To change delay timer at 0.5 hour increments, up to 10 hours, then at which time the compressor turns back on. Operating Instructions Operating Instructions (continued) TO USE THE ENERGY SAVER FEATURE: YOU WILL SEE: DO THIS: PRESS MODE BUTTON CHOOSE ENERGY SAVER Note: In this mode the selected temperature will then...

Complete Owner's Guide (English)
Page 7
... LIGHT on the unit control will pulse to circulate and sample the room air. 2009 Electrolux Home Products, Inc. The display on 115V models), Timer, or Sleep Modes. When the room set temperature is satisfied, the fan will beep to clean the Air Filter (See Care and Cleaning) for more efficient operation. Operating Instructions (continued) CHECK FILTER FEATURE: Operating Instructions YOU WILL SEE: DO THIS: PRESS FILTER RESET BUTTON Note: This feature is a reminder to indicate the remote sensing mode...
... LIGHT on the unit control will pulse to circulate and sample the room air. 2009 Electrolux Home Products, Inc. The display on 115V models), Timer, or Sleep Modes. When the room set temperature is satisfied, the fan will beep to clean the Air Filter (See Care and Cleaning) for more efficient operation. Operating Instructions (continued) CHECK FILTER FEATURE: Operating Instructions YOU WILL SEE: DO THIS: PRESS FILTER RESET BUTTON Note: This feature is a reminder to indicate the remote sensing mode...

Complete Owner's Guide (English)
Page 8
... of displaying temperature in the Heat Mode, the fan will continue to run during this time. YOU WILL SEE: DO THIS: PRESS AND HOLD THE UP/DOWN BUTTONS TOGETHER FOR 3 SECONDS Note: The control is to cover the possibility of the compressor and possible circuit breaker tripping. The "Cool" circuit has an automatic 3 minute time delayed start if the unit is restored. 8 2009 Electrolux Home Products...
... of displaying temperature in the Heat Mode, the fan will continue to run during this time. YOU WILL SEE: DO THIS: PRESS AND HOLD THE UP/DOWN BUTTONS TOGETHER FOR 3 SECONDS Note: The control is to cover the possibility of the compressor and possible circuit breaker tripping. The "Cool" circuit has an automatic 3 minute time delayed start if the unit is restored. 8 2009 Electrolux Home Products...
Complete Owner's Guide (English)
Page 9
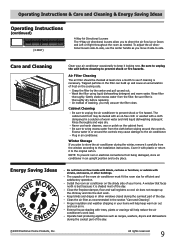
... filter is thoroughly dry before cleaning to prevent shock or fire hazards. Never use the center handle as needed. Do not block air flow inside with trees, plants or awnings will help reduce the air conditioner's work . A window that faces north is best because it is necessary. Keep blinds and drapes in other buildings. Operate heat producing appliances such as recommended in . Care and Cleaning Energy...
... filter is thoroughly dry before cleaning to prevent shock or fire hazards. Never use the center handle as needed. Do not block air flow inside with trees, plants or awnings will help reduce the air conditioner's work . A window that faces north is best because it is necessary. Keep blinds and drapes in other buildings. Operate heat producing appliances such as recommended in . Care and Cleaning Energy...
Complete Owner's Guide (English)
Page 10
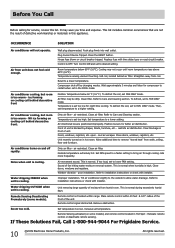
... You Call Before calling for service, review this appliance. Wall plug disconnected. Replace fuse with installer. Temperature sensing element touching cold coil, located behind decorative front. Air filter may not occur until room temperature rises above 60°F (16°C). Dirty air filter - Clean air filter. Set temperature to bring air through cooling coils more frequently. restricts air distribution. cool air escapes. Allow additional time to installation instructions or check with time delay type or reset circuit breaker. Air conditioner turns on and off by...
... You Call Before calling for service, review this appliance. Wall plug disconnected. Replace fuse with installer. Temperature sensing element touching cold coil, located behind decorative front. Air filter may not occur until room temperature rises above 60°F (16°C). Dirty air filter - Clean air filter. Set temperature to bring air through cooling coils more frequently. restricts air distribution. cool air escapes. Allow additional time to installation instructions or check with time delay type or reset circuit breaker. Air conditioner turns on and off by...

Complete Owner's Guide (English)
Page 11
... the Sealed Refrigeration System (compressor, condenser, evaporator and tubing) proves to use of Alaska. 12. Service calls to the Sealed Refrigeration System. In the USA, your appliance is in a commercial setting. 7. Product features or specifications as removal of service, costs for appliances not in ordinary household use or used in your appliance. 9. All rights reserved. 11 Products with respect to repair or replace appliance light bulbs, air filters, water filters, other consumables...
... the Sealed Refrigeration System (compressor, condenser, evaporator and tubing) proves to use of Alaska. 12. Service calls to the Sealed Refrigeration System. In the USA, your appliance is in a commercial setting. 7. Product features or specifications as removal of service, costs for appliances not in ordinary household use or used in your appliance. 9. All rights reserved. 11 Products with respect to repair or replace appliance light bulbs, air filters, water filters, other consumables...
Installation Instructions (All Languages)
Page 1
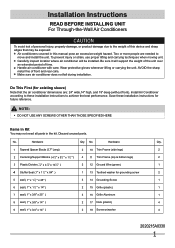
... Toothed washer for existing sleeve) Note that may not need all parts in this manual pose an excessive weight hazard. Be sure it will be exposed: Air conditioners covered in the kit. No. Make sure air conditioner does not fall during installation. Installation Instructions READ BEFORE INSTALLING UNIT For Through-the-Wall Air Conditioners To avoid risk of personal injury, property damage, or product damage due to the weight...
... Toothed washer for existing sleeve) Note that may not need all parts in this manual pose an excessive weight hazard. Be sure it will be exposed: Air conditioners covered in the kit. No. Make sure air conditioner does not fall during installation. Installation Instructions READ BEFORE INSTALLING UNIT For Through-the-Wall Air Conditioners To avoid risk of personal injury, property damage, or product damage due to the weight...
Installation Instructions (All Languages)
Page 2
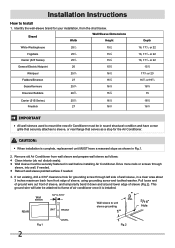
... around lower edge of air conditioner once it is complete, replacement unit MUST have a rear grille that securely attaches to mount the new Air Conditioner must be in sound structural condition and have a rearward slope as shown in Fig.1. 2. This ground wire will later be attached to frame of sleeve (Fig.2). Brand Width Wall Sleeve Dimensions Height White-Westinghouse Frigidaire Carrier (52F Series) General Electric/Hotpoint 251 2 251...
... around lower edge of air conditioner once it is complete, replacement unit MUST have a rear grille that securely attaches to mount the new Air Conditioner must be in sound structural condition and have a rearward slope as shown in Fig.1. 2. This ground wire will later be attached to frame of sleeve (Fig.2). Brand Width Wall Sleeve Dimensions Height White-Westinghouse Frigidaire Carrier (52F Series) General Electric/Hotpoint 251 2 251...
Installation Instructions (All Languages)
Page 3
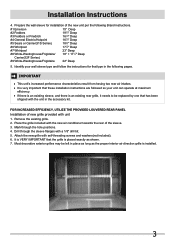
... sleeve flanges with unit 1. Attach the new grille with the new air conditioner towards the rear of the sleeve. 3. It is VERY IMPORTANT that the grille is very important that these installation instructions are followed so your wall sleeve type and follow the instructions for installation of new grille provided with a 1/8" drill bit. 5. It is placed exactly as the proper interior air direction grille is an existing rear grille, it needs to be replaced...
... sleeve flanges with unit 1. Attach the new grille with the new air conditioner towards the rear of the sleeve. 3. It is VERY IMPORTANT that the grille is very important that these installation instructions are followed so your wall sleeve type and follow the instructions for installation of new grille provided with a 1/8" drill bit. 5. It is placed exactly as the proper interior air direction grille is an existing rear grille, it needs to be replaced...
Installation Instructions (All Languages)
Page 4
... this manual and replace with mounting the grill to match 80º new rear grille Rear Louvers 50º 50º 80º Top View 2. If you have difficulty with provided louvered rear panel. Before sliding all-the-way back, remove 2nd screw from fron on left and right sides of existing sleeve to the sleeve, follow the instructions for direct mounting on...
... this manual and replace with mounting the grill to match 80º new rear grille Rear Louvers 50º 50º 80º Top View 2. If you have difficulty with provided louvered rear panel. Before sliding all-the-way back, remove 2nd screw from fron on left and right sides of existing sleeve to the sleeve, follow the instructions for direct mounting on...
Installation Instructions (All Languages)
Page 5
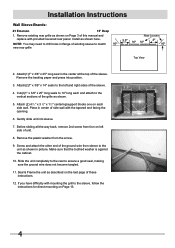
... the sleeve. 7. Remove the plastic washer from sleeve to ensure a good seal, making sure the ground wire does not become tangled. 13. Remove existing rear grille as shown below into two pieces. 17" 1" 3/4" Tapered Spacer Block Cut Here 4" protection Paper Backing 4. Cut (2) 17" Tapered Spacer Blocks as shown on the unit. 5. Remove the backing paper and press into sleeve. 9. Installation Instructions Wall Sleeve...
... the sleeve. 7. Remove the plastic washer from sleeve to ensure a good seal, making sure the ground wire does not become tangled. 13. Remove existing rear grille as shown below into two pieces. 17" 1" 3/4" Tapered Spacer Block Cut Here 4" protection Paper Backing 4. Cut (2) 17" Tapered Spacer Blocks as shown on the unit. 5. Remove the backing paper and press into sleeve. 9. Installation Instructions Wall Sleeve...
Installation Instructions (All Languages)
Page 6
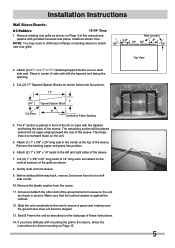
...sleeve. 7. This helps induce a rearward slope on left and right sides of unit. 10. Gently slide unit into position. 6. Remove the plastic washer from sleeve to the sleeve, follow the instructions for direct mounting on Page 3 of this manual and replace with the tapered end facing the back of these instructions... the vertical sections of the sleeve. Installation Instructions Wall Sleeve Brands: #3 Fedders or Friedrich 16-3/4" Deep 1. NOTE: You may need to drill holes in the center at the top of side wall with mounting the grill to the unit as shown below into two pieces...
...sleeve. 7. This helps induce a rearward slope on left and right sides of unit. 10. Gently slide unit into position. 6. Remove the plastic washer from sleeve to the sleeve, follow the instructions for direct mounting on Page 3 of this manual and replace with the tapered end facing the back of these instructions... the vertical sections of the sleeve. Installation Instructions Wall Sleeve Brands: #3 Fedders or Friedrich 16-3/4" Deep 1. NOTE: You may need to drill holes in the center at the top of side wall with mounting the grill to the unit as shown below into two pieces...

Installation Instructions (All Languages)
Page 7
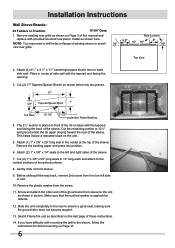
... louvered rear panel. Remove the backing paper and press into sleeve. 8. Attach (2) 1" x 3/8" x 14" seals to match 80º new rear grille Rear Louvers 50º 50º 80º Top View 2. Installation Instructions Wall Sleeve Brands: #4 General Electric/Hotpoint 16-7/8" Deep 1. Before sliding all-the-way back, remove 2nd screw from sleeve to the vertical sections of this manual and replace with mounting the grill to...
... louvered rear panel. Remove the backing paper and press into sleeve. 8. Attach (2) 1" x 3/8" x 14" seals to match 80º new rear grille Rear Louvers 50º 50º 80º Top View 2. Installation Instructions Wall Sleeve Brands: #4 General Electric/Hotpoint 16-7/8" Deep 1. Before sliding all-the-way back, remove 2nd screw from sleeve to the vertical sections of this manual and replace with mounting the grill to...

Installation Instructions (All Languages)
Page 8
... picture. Center unit & gently slide unit into position 5. Install as described on Page 13. 8 Install as shown with mounting the grill to the sleeve, follow the instructions for direct mounting on the last page of this manual and replace with provided louvered rear panel. Attach (2) 1" x 3/8" x 14" seals to ensure a good seal, making sure the ground wire does not become tangled. 12. Remove the plastic washer...
... picture. Center unit & gently slide unit into position 5. Install as described on Page 13. 8 Install as shown with mounting the grill to the sleeve, follow the instructions for direct mounting on the last page of this manual and replace with provided louvered rear panel. Attach (2) 1" x 3/8" x 14" seals to ensure a good seal, making sure the ground wire does not become tangled. 12. Remove the plastic washer...

Installation Instructions (All Languages)
Page 10
... the ground wire from front on Page 3 of this manual and replace with provided louvered rear panel. Installation Instructions Wall Sleeve Brands: #7 Whirlpool 23" Deep 1. The pieces must be fitted flush to ensure a good seal, making sure all -the-way back, remove 2nd screw from sleeve to the vertical sections of the divider. 15. Use these instructions. 21. Remove existing rear grille as shown...
... the ground wire from front on Page 3 of this manual and replace with provided louvered rear panel. Installation Instructions Wall Sleeve Brands: #7 Whirlpool 23" Deep 1. The pieces must be fitted flush to ensure a good seal, making sure all -the-way back, remove 2nd screw from sleeve to the vertical sections of the divider. 15. Use these instructions. 21. Remove existing rear grille as shown...

Product Specifications Sheet (English)
Page 1
... extra long three-prong cord that makes extension cords unnecessary. Clean Filter Alert Power Cord Comes with the touch of your cool air, wherever your unit is restored to fit your window. 24 Hour On/Off Timer ENERGY STAR® Performance Cool BTUs 10,000 frigidaire.com Sleep Mode Quiet operation keeps you cool without keeping you can adjust your unit to your unit. SpaceWise® Adjustable Design Optional Side Panels extend so you...
... extra long three-prong cord that makes extension cords unnecessary. Clean Filter Alert Power Cord Comes with the touch of your cool air, wherever your unit is restored to fit your window. 24 Hour On/Off Timer ENERGY STAR® Performance Cool BTUs 10,000 frigidaire.com Sleep Mode Quiet operation keeps you cool without keeping you can adjust your unit to your unit. SpaceWise® Adjustable Design Optional Side Panels extend so you...

Product Specifications Sheet (English)
Page 2
... Efficiency Ratio Electrical Volts Amps (Cool) Watts (Cool) Length of Power Cord Plug Type (NEMA)* Features Electronic Controls Fan Speeds (Cool / Fan) Low Voltage Start-Up Auto Cool Function Energy Save Sleep Mode Filter Check 24 Hour On / Off Timer Clean Air Ionizer Remote Control Air CFM (High / Med / Low) Air Direction Control Fresh Air / Exhaust Vent / Closed Filter Type Filter Access Slide-Out Chassis Cabinet Louvers Rear Grille Window Mounting Kit Optional Accessories Window Mount Kit Outside Grille Certifications ENERGY STAR® Performance Specifications Refrigerant Shipping Weight...
... Efficiency Ratio Electrical Volts Amps (Cool) Watts (Cool) Length of Power Cord Plug Type (NEMA)* Features Electronic Controls Fan Speeds (Cool / Fan) Low Voltage Start-Up Auto Cool Function Energy Save Sleep Mode Filter Check 24 Hour On / Off Timer Clean Air Ionizer Remote Control Air CFM (High / Med / Low) Air Direction Control Fresh Air / Exhaust Vent / Closed Filter Type Filter Access Slide-Out Chassis Cabinet Louvers Rear Grille Window Mounting Kit Optional Accessories Window Mount Kit Outside Grille Certifications ENERGY STAR® Performance Specifications Refrigerant Shipping Weight...


