Frigidaire FFTH0822Q1 Support and Manuals
Get Help and Manuals for this Frigidaire item
View All Support Options Below
Free Frigidaire FFTH0822Q1 manuals!
Problems with Frigidaire FFTH0822Q1?
Ask a Question
Free Frigidaire FFTH0822Q1 manuals!
Problems with Frigidaire FFTH0822Q1?
Ask a Question
Popular Frigidaire FFTH0822Q1 Manual Pages
Complete Owner's Guide - Page 2
... air conditioner, be installed in the vicinity of Current Device' for details. In the event that is drained from the power cord. Important Safety Instructions
NOTE:
This USE & CARE MANUAL provides specific operating instructions for your air conditioner, follow basic precautions, including the following:
Be sure the electrical service is adequate for the model you intend to...
Complete Owner's Guide - Page 6

...mode.
This function is in the "Remote Sensing" mode. (on 115V models. Fan Only cannot be automatically maintained anywhere between 60 °F (16 ...adjust the fan speed manually. The fan speeds will show the actual room temperature, not the set
temperature. You can...cooling is seen on the display. Operating Instructions
Operating Instructions
TO CHANGE TEMPERATURE SETTlNG:
DO THIS: ...
Complete Owner's Guide - Page 7

... an additional 30 minutes. All rights reserved.
7
First, Press TIMER button, then adjust timer setting, tap or hold the UP arrow ( ) or the DOWN arrow ( ) to change delay...Instructions
(continued)
COOL FEATURE:
Operating Instructions
YOU WILL SEE:
DO THIS:
PRESS MODE BUTTON CHOOSE COOL
Note: In this mode the selected temperature will automatically change the set . Note: On 115V models...
Complete Owner's Guide - Page 8

.... When the room set temperature will only be used with any 3 minute interval, the unit will periodically send this signal until the feature is deactivated by using the Remote Sensing Stop button or the main ON/OFF button on some models)ğ
LIGHT pulsing ( On & Off intermittently ). Operating Instructions
Operating Instructions
(continued) CHECK FILTER...
Complete Owner's Guide - Page 9

... turned off in heat mode (if applicable) or fan only mode, it will maintain the set temperature within the unit. When unit is turned on again.
If the display reads "AS" , a sensor has failed. Contact your Authorized Frigidaire Service Center. TO CHANGE TEMPERATURE DISPLAY:
If the display reads "ES" , a sensor has failed.
All...
Complete Owner's Guide - Page 11
... COOL mode. Allow additional time to remove "stored heat" from humid room. Remove obstruction.
Set temperature to installation instructions or check with time delay type or reset circuit breaker. air restricted.
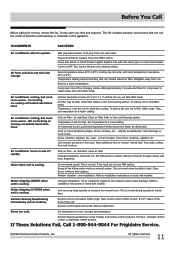
If These Solutions Fail, Call 1-800-944-9044 For Frigidaire Service.
2009 Electrolux Home Products, Inc. Compressor shut-off rapidly. Clean air filter. This...
Complete Owner's Guide - Page 12

... or add to obtain and keep all costs for service and parts under the Sealed Refrigeration System 5-year warranty. Damages caused by: services performed by unauthorized service companies; If service is performed, it is in accordance with the provided instructions. Obligations for repairing or replacing any parts in ordinary household use your original purchase date, Electrolux...
Installation Instructions - Page 1
... damage due to move and install the unit. Installation Instructions
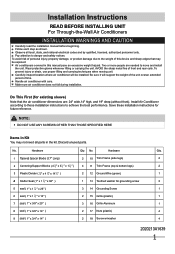
READ BEFORE INSTALLING UNIT For Through-the-Wall Air Conditioners
INSTALLATION WARNINGS AND CAUTION
Carefully read the installation manual before beginning. Follow each step as shown. Hardware
Qty.
1 Tapered Spacer Blocks (17" Long)
2 10 Trim Frame (side legs)
2
2 Centering/Support Blocks ( 4 1 2" x 31 2 " x 11 2 " )
4 11...
Installation Instructions - Page 4
... top of this manual and replace with provided louvered rear panel. Slide the unit completely to the rear to the unit as shown here. Installation Instructions
Wall Sleeve Brands:... picture. Attach (2) 4 1 2 " x 3 1 2" x 11 2" centering/support blocks one on each and attach to the sleeve, follow the instructions for direct mounting on the last page of the sleeve.
4.5"
4"
4. If you ...
Installation Instructions - Page 5
...follow the instructions for direct mounting on left and right sides of these instructions.
14. Installation Instructions
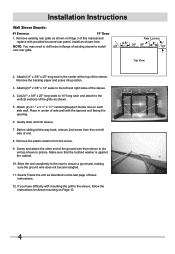
Wall Sleeve Brands:
#2 Fedders
19-3/4" Deep
1. Install as shown ...x 25" long seal in front of this manual and replace with mounting the grill to 14" long each...4 1 2 " x 3 1 2" x 11 2" centering/support blocks one on base with the tapered end facing the opening.
...
Installation Instructions - Page 6
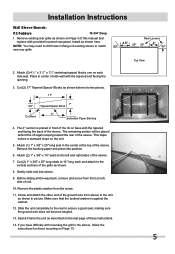
...instructions.
14. Attach (2) 4 1 2 " x 3 1 2" x 11 2" centering/support blocks one on Page 3 of the sleeve. Cut the remaining portion to 14" long each side wall. Cut (2) 1" x 3/8" x 25" long seals to 12 1 2" and place behind the rib again sloping toward the rear of this manual and replace...
2-1/2" protection Paper Backing
4. Installation Instructions
Wall Sleeve Brands:
#3 Fedders ...
Installation Instructions - Page 7

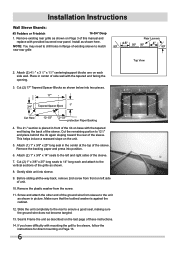
...and attach the other end of the grille as shown in flange of the sleeve. Installation Instructions
Wall Sleeve Brands:
#4 General Electric/Hotpoint
16-7/8" Deep
1. Install as shown with provided louvered rear panel. Cut (2) 1" x 3/8" x 25" ... 2nd screw from front on the last page of this manual and replace with the tapered end 1/2" from the screw.
10. Make sure that the toothed washer is...
Installation Instructions - Page 8

.... If you have difficulty with mounting the grill to the sleeve, follow the instructions for direct mounting on the unit.
4.5"
4"
3. Install as shown on the last page of unit.
9. Attach (2) 1" x 3/8"... and attach the other end of this manual and replace with the tapered end 1/2" from sleeve to the left side of these instructions.
13. Install (2) tapered spacer blocks to the floor ...
Installation Instructions - Page 11

Install as described on Page 3 of this manual and replace with mounting the grill to the unit as shown on the last page of unit.
7.
Remove the plastic washer from sleeve to the sleeve, follow the instructions for direct mounting on left side of these instructions... Installation Instructions
Wall Sleeve Brands:
#8 White Westinghouse/Frigidaire/ Carrier 52F Series
16"+ 17-1/2" Deep
1. ...
Installation Instructions - Page 12

... on left side of this manual and replace with mounting the grill to the sleeve, follow the instructions for the other end of the...existing sleeve to the unit as shown here. If you have difficulty with provided louvered rear panel. Installation Instructions
Wall Sleeve Brands:
#9 White Westinghouse or Frigidaire
22" Deep
1. If position is against each side.
3. Attach (2) 4 3 4" x 3...
Frigidaire FFTH0822Q1 Reviews
We have not received any reviews for Frigidaire yet.