Complete Owner's Guide (English)
Page 3
... THE LIQUID. SAVE THESE INSTRUCTIONS. 3 Obey all instructions before removing the container. - Carefully attend appliance when paper, plastic or other utensil into the container. • Clean ventilation openings and grease filters frequently. If materials inside the microwave oven ignite, keep microwave oven door closed glass jars-are placed inside the microwave oven to facilitate cooking. - Do not leave paper products, cooking utensils or food in the cavity when not...
... THE LIQUID. SAVE THESE INSTRUCTIONS. 3 Obey all instructions before removing the container. - Carefully attend appliance when paper, plastic or other utensil into the container. • Clean ventilation openings and grease filters frequently. If materials inside the microwave oven ignite, keep microwave oven door closed glass jars-are placed inside the microwave oven to facilitate cooking. - Do not leave paper products, cooking utensils or food in the cavity when not...

Complete Owner's Guide (English)
Page 4
... bent door, damaged door seals and sealing surfaces, broken or loose door hinges and latches and dents inside the cabinet directly above the Microwave Oven mounting location as shown in the microwave oven cavity. Lift carton off microwave oven and remove all packing materials, Installation Instructions, Wall Template, Top Template, Charcoal Filter, Turntable and Turntable Support. Read enclosures and SAVE the Use and Care Manual. Electrical Requirements Check Installation Instructions for proper location for any liability for more details. If the power supply cord is...
... bent door, damaged door seals and sealing surfaces, broken or loose door hinges and latches and dents inside the cabinet directly above the Microwave Oven mounting location as shown in the microwave oven cavity. Lift carton off microwave oven and remove all packing materials, Installation Instructions, Wall Template, Top Template, Charcoal Filter, Turntable and Turntable Support. Read enclosures and SAVE the Use and Care Manual. Electrical Requirements Check Installation Instructions for proper location for any liability for more details. If the power supply cord is...
Complete Owner's Guide (English)
Page 6
.... Remove food from outside to center of time indicated and add more as needed. IMPORTANT SAFETY INSTRUCTIONS ABOUT YOUR MICROWAVE OVEN This Use and Care Manual is valuable: read it carefully and always save it for the popping to slow to prevent boilovers. • Heat or cook in closed glass jars or air tight containers. • Can in the microwave as harmful bacteria may hear the magnetron...
.... Remove food from outside to center of time indicated and add more as needed. IMPORTANT SAFETY INSTRUCTIONS ABOUT YOUR MICROWAVE OVEN This Use and Care Manual is valuable: read it carefully and always save it for the popping to slow to prevent boilovers. • Heat or cook in closed glass jars or air tight containers. • Can in the microwave as harmful bacteria may hear the magnetron...
Complete Owner's Guide (English)
Page 7
... COVERINGS It is kept near the food to hasten cooking. • Microwave oven cooking bags are good for large meats or foods that need to learn that there is no time should anyone be used. Many pieces already in the microwave oven and microwave on the microwave oven door. Make sure the utensil does not touch the interior walls during cooking, unless it 's in contact with metallic trim • non-heat-resistant glass...
... COVERINGS It is kept near the food to hasten cooking. • Microwave oven cooking bags are good for large meats or foods that need to learn that there is no time should anyone be used. Many pieces already in the microwave oven and microwave on the microwave oven door. Make sure the utensil does not touch the interior walls during cooking, unless it 's in contact with metallic trim • non-heat-resistant glass...
Complete Owner's Guide (English)
Page 8
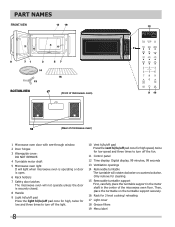
.... 11 Control panel 12 Time display: Digital display, 99 minutes, 99 seconds 13 Ventilation openings 14 Removable turntable The turntable will rotate clockwise or counterclockwise. Only remove for cleaning. 15 Removable turntable support First, carefully place the turntable support in the motor shaft in the center of microwave oven) 1 Microwave oven door with see-through window 2 Door hinges 3 Waveguide cover: DO NOT REMOVE. 4 Turntable motor shaft 5 Microwave oven light It will light when microwave oven is operating or door is open. 6 Rack holders 7 Safety door latches The microwave oven...
.... 11 Control panel 12 Time display: Digital display, 99 minutes, 99 seconds 13 Ventilation openings 14 Removable turntable The turntable will rotate clockwise or counterclockwise. Only remove for cleaning. 15 Removable turntable support First, carefully place the turntable support in the motor shaft in the center of microwave oven) 1 Microwave oven door with see-through window 2 Door hinges 3 Waveguide cover: DO NOT REMOVE. 4 Turntable motor shaft 5 Microwave oven light It will light when microwave oven is operating or door is open. 6 Rack holders 7 Safety door latches The microwave oven...

Complete Owner's Guide (English)
Page 11
... one time. Reposition the foods and reverse them from the rack to cook for the best cooking and reheating, use Turntable ON function and cook with the rack. • Cooking directly on the rack-use . • Popping popcorn with the rack in the display. NOTE Turntable on the rack. • Using SENSOR COOKING and AUTO COOKING with SENSOR COOKING or AUTO COOKING without the rack. Step Press 1. Press the START enter +30 sec pad. Pay close attention to enter a power level...
... one time. Reposition the foods and reverse them from the rack to cook for the best cooking and reheating, use Turntable ON function and cook with the rack. • Cooking directly on the rack-use . • Popping popcorn with the rack in the display. NOTE Turntable on the rack. • Using SENSOR COOKING and AUTO COOKING with SENSOR COOKING or AUTO COOKING without the rack. Step Press 1. Press the START enter +30 sec pad. Pay close attention to enter a power level...
Complete Owner's Guide (English)
Page 12
..., popcorn would be interrupted. Any Sensor Settings selection can defrost any microwave cookbook. 6. To continue cooking, press the STOP clear pad and cook manually. Door may stir or season food, as it heats. Cover dish loosely; Plastic wrap should be opened when remaining cooking time appears on the Defrost chart (see page 22), you need to defrost manually. If dish is wider than the quantity listed in the chart should not touch food. 3. MANUAL COOKING Manual Defrost...
..., popcorn would be interrupted. Any Sensor Settings selection can defrost any microwave cookbook. 6. To continue cooking, press the STOP clear pad and cook manually. Door may stir or season food, as it heats. Cover dish loosely; Plastic wrap should be opened when remaining cooking time appears on the Defrost chart (see page 22), you need to defrost manually. If dish is wider than the quantity listed in the chart should not touch food. 3. MANUAL COOKING Manual Defrost...
Complete Owner's Guide (English)
Page 13
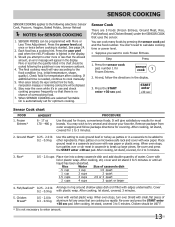
...'t need to calculate cooking time or power level. • Suppose you attempt to enter more or less than the quantity listed in casserole to other ingredients. Rice Water Size of aluminum foil any microwave cookbook. 4. See page 24. 2. At end, follow package directions for most brands. START enter +30 sec Sensor Cook chart FOOD 1. Frozen Entrees* AMOUNT 6 - 17 oz 170 - 480 g PROCEDURE Use this setting...
...'t need to calculate cooking time or power level. • Suppose you attempt to enter more or less than the quantity listed in casserole to other ingredients. Rice Water Size of aluminum foil any microwave cookbook. 4. See page 24. 2. At end, follow package directions for most brands. START enter +30 sec Sensor Cook chart FOOD 1. Frozen Entrees* AMOUNT 6 - 17 oz 170 - 480 g PROCEDURE Use this setting...
Complete Owner's Guide (English)
Page 16
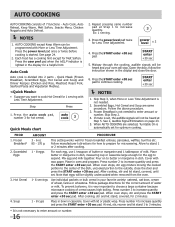
... not needed to the outside, close the door. 6. Frozen Breakfast* 2. Note that eggs will not be slightly undercooked when removed from the oven. 1- 6 servings Use individual packets or bulk cereal in the display for the correct amount of milk. Scrambled Eggs, Hot Cereal and Soup are selected, Turntable On is lighted in your oven will stop. Scrambled Eggs 3. Midway through the cooking, audible...
... not needed to the outside, close the door. 6. Frozen Breakfast* 2. Note that eggs will not be slightly undercooked when removed from the oven. 1- 6 servings Use individual packets or bulk cereal in the display for the correct amount of milk. Scrambled Eggs, Hot Cereal and Soup are selected, Turntable On is lighted in your oven will stop. Scrambled Eggs 3. Midway through the cooking, audible...
Complete Owner's Guide (English)
Page 25
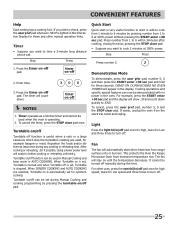
... .30 and count down . Quick Start Quick start is very useful function to start when heat rises from range surface units or burners. Fan The fan will stay on is set, Turntable is turned and when Turntable off 2. It cannot be used in Manual Cooking and keep warm in AUTO COOKING. Press the timer on -off is operating. 2. To cancel the timer, press the STOP clear pad once. After cooking or reheating, stir if...
... .30 and count down . Quick Start Quick start is very useful function to start when heat rises from range surface units or burners. Fan The fan will stay on is set, Turntable is turned and when Turntable off 2. It cannot be used in Manual Cooking and keep warm in AUTO COOKING. Press the timer on -off is operating. 2. To cancel the timer, press the STOP clear pad once. After cooking or reheating, stir if...
Complete Owner's Guide (English)
Page 26
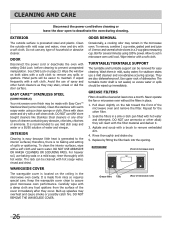
... using 100% power. Avoid the use of household or abrasive cleaner. Clean the stainless with setting Child Lock before cleaning or leave the door open to set in microwave oven until cool. It is located on both sides with hot water and detergent. To clean the interior surfaces, wipe with hot soapy water, rinsed and dried. The rack can be removed for several whole cloves in place. 1. WAVEGUIDE COVER The waveguide cover is recommended to use...
... using 100% power. Avoid the use of household or abrasive cleaner. Clean the stainless with setting Child Lock before cleaning or leave the door open to set in microwave oven until cool. It is located on both sides with hot water and detergent. To clean the interior surfaces, wipe with hot soapy water, rinsed and dried. The rack can be removed for several whole cloves in place. 1. WAVEGUIDE COVER The waveguide cover is recommended to use...
Complete Owner's Guide (English)
Page 27
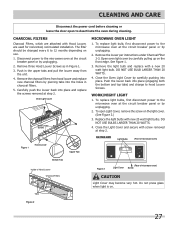
... and replace the screws removed at step 2. DO NOT USE BULB LARGER THAN 20 WATTS. 4. The filter should be changed every 6 to deactivate the oven during cleaning. To open to 12 months depending on use. 1. Carefully push the louver back into place. DO NOT USE BULBS LARGER THAN 20 WATTS. 4. CLEANING AND CARE Disconnect the power cord before cleaning or leave the door open Light Cover, remove the screw on the light cover. (See Figure 3.) 3. Oven Light Cover Hood Louver Screws MICROWAVE OVEN LIGHT 1. Replace the light bulbs with screw removed at...
... and replace the screws removed at step 2. DO NOT USE BULB LARGER THAN 20 WATTS. 4. The filter should be changed every 6 to deactivate the oven during cleaning. To open to 12 months depending on use. 1. Carefully push the louver back into place. DO NOT USE BULBS LARGER THAN 20 WATTS. 4. CLEANING AND CARE Disconnect the power cord before cleaning or leave the door open Light Cover, remove the screw on the light cover. (See Figure 3.) 3. Oven Light Cover Hood Louver Screws MICROWAVE OVEN LIGHT 1. Replace the light bulbs with screw removed at...
Complete Owner's Guide (English)
Page 28
... SERVICER. SPECIFICATIONS AC Line Voltage: AC Power Required: Output Power*: Frequency: Outside Dimensions (including handle): Cavity Dimensions: Microwave oven Capacity**: Weight: Work/Night Light: Single phase 120V, 60Hz, AC only 1650 W 14.3 amps. 1000 watts 2450 MHz 29 15/16"(W) x 17 1/16"(H) x 18 15/32"(D) 22 1/2"(W) x 10 1/16"(H) x 14 31/32"(D) 1.8 Cu.Ft. DHHS - If time appearing in the display is the answer to avoid overcooking. B Does the cooling fan work...
... SERVICER. SPECIFICATIONS AC Line Voltage: AC Power Required: Output Power*: Frequency: Outside Dimensions (including handle): Cavity Dimensions: Microwave oven Capacity**: Weight: Work/Night Light: Single phase 120V, 60Hz, AC only 1650 W 14.3 amps. 1000 watts 2450 MHz 29 15/16"(W) x 17 1/16"(H) x 18 15/32"(D) 22 1/2"(W) x 10 1/16"(H) x 14 31/32"(D) 1.8 Cu.Ft. DHHS - If time appearing in the display is the answer to avoid overcooking. B Does the cooling fan work...
Complete Owner's Guide (English)
Page 29
... Need Service Keep your appliance. 9. Exclusions This warranty does not cover the following: 1. Rust on the interior or exterior of the appliance when it is installed, used and maintained in Thailand Products used other than in the USA and Canada. Expenses for making the appliance accessible for service and parts under this warranty must be readily determined. 2. Service calls to repair or replace appliance light bulbs...
... Need Service Keep your appliance. 9. Exclusions This warranty does not cover the following: 1. Rust on the interior or exterior of the appliance when it is installed, used and maintained in Thailand Products used other than in the USA and Canada. Expenses for making the appliance accessible for service and parts under this warranty must be readily determined. 2. Service calls to repair or replace appliance light bulbs...
Installation Instructions (All Languages)
Page 2
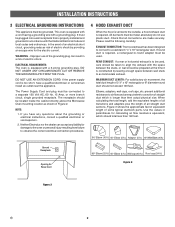
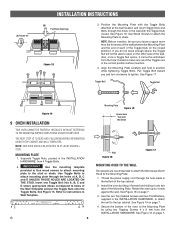
... electrical instructions, consult a qualified electrician or serviceperson. 2. present additional resistance to -round adapter must be used , care should be located inside the cabinet directly above the Microwave Oven mounting location as shown in Figure 2. Improper use plastic duct. DO NOT USE AN EXTENSION CORD. The Power Supply Cord and plug must be metal; If round duct is required, a rectangular-to air flow and are made securely. REAR EXHAUST...
... electrical instructions, consult a qualified electrician or serviceperson. 2. present additional resistance to -round adapter must be used , care should be located inside the cabinet directly above the Microwave Oven mounting location as shown in Figure 2. Improper use plastic duct. DO NOT USE AN EXTENSION CORD. The Power Supply Cord and plug must be metal; If round duct is required, a rectangular-to air flow and are made securely. REAR EXHAUST...
Installation Instructions (All Languages)
Page 3
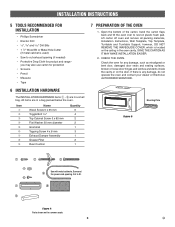
... Tapping Screw 4 x 8 mm Exhaust Damper Assembly Grease Filter Rear Cushion Quantity 6 4 2 2 1 3 1 2 1 7 PREPARATION OF THE OVEN 1. Lift carton off oven and remove all packing materials, Installation Instructions, Wall Template, Top Template, Turntable and Turntable Support; Check the oven for product and range - Surround the power cord opening (if needed) • Protective Drop Cloth for any damage, do not operate the oven and contact your dealer or Electrolux AUTHORIZED SERVICER. All items are in the oven cavity. Cut to fit. 9 Figure 4 Parts...
... Tapping Screw 4 x 8 mm Exhaust Damper Assembly Grease Filter Rear Cushion Quantity 6 4 2 2 1 3 1 2 1 7 PREPARATION OF THE OVEN 1. Lift carton off oven and remove all packing materials, Installation Instructions, Wall Template, Top Template, Turntable and Turntable Support; Check the oven for product and range - Surround the power cord opening (if needed) • Protective Drop Cloth for any damage, do not operate the oven and contact your dealer or Electrolux AUTHORIZED SERVICER. All items are in the oven cavity. Cut to fit. 9 Figure 4 Parts...
Installation Instructions (All Languages)
Page 4
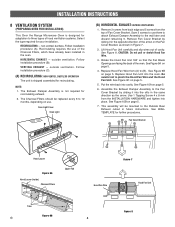
... Charcoal Filters should be mounted to pinch the Hood Fan Wire and the Hood Fan Unit. Remove Fan Cover Bracket by sliding it in future instructions. CAUTION: Do not pull or stretch Hood Fan Wire. 3. See Figure 10A on use. Assemble the Exhaust Damper Assembly to the Fan Cover Bracket by sliding it into place. See WALL TEMPLATE for your installation. Recirculating requires the use them to attach Exhaust Damper Assembly to the wall later and discard remaining 5. Oven Light Cover Oven Light (B) HORIZONTAL EXHAUST: OUTSIDE VENTILATION 1. Lift Hood Fan Unit carefully...
... Charcoal Filters should be mounted to pinch the Hood Fan Wire and the Hood Fan Unit. Remove Fan Cover Bracket by sliding it in future instructions. CAUTION: Do not pull or stretch Hood Fan Wire. 3. See Figure 10A on use. Assemble the Exhaust Damper Assembly to the Fan Cover Bracket by sliding it into place. See WALL TEMPLATE for your installation. Recirculating requires the use them to attach Exhaust Damper Assembly to the wall later and discard remaining 5. Oven Light Cover Oven Light (B) HORIZONTAL EXHAUST: OUTSIDE VENTILATION 1. Lift Hood Fan Unit carefully...
Installation Instructions (All Languages)
Page 6
... D UNLESS THOSE HOLES ARE LOCATED ON THE STUD. NOTE: THIS OVEN SHOULD BE ATTACHED TO AT LEAST ONE WALL STUD. See Figure 15. Thread the power supply cord through the holes in the closed . Use the two Top Cabinet Screws and two Flat Washers, supplied in position while tightening Toggle Bolts. (A) Rotate 90° INSTALLATION INSTRUCTIONS (B) Fan Blade Openings Figure 13 3. NOTE...
... D UNLESS THOSE HOLES ARE LOCATED ON THE STUD. NOTE: THIS OVEN SHOULD BE ATTACHED TO AT LEAST ONE WALL STUD. See Figure 15. Thread the power supply cord through the holes in the closed . Use the two Top Cabinet Screws and two Flat Washers, supplied in position while tightening Toggle Bolts. (A) Rotate 90° INSTALLATION INSTRUCTIONS (B) Fan Blade Openings Figure 13 3. NOTE...
Product Specifications Sheet (English)
Page 1
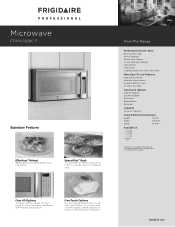
... a button. One-Touch Options Our microwaves feature easy-to 56,000 total BTU output. Microwave FPMV189K F Signature Features Effortless™ Reheat Reheat almost anything at once. frigidaire.com Ft. Over-The-Range Performance-Driven Style Real Stainless Steel Sensor Cooking 9 Auto Cook Options 7 User Preference Options Side Controls 1,000 Watts 2-Speed Hidden Vent ( 350 / 150 CFM )1 More Easy-To-Use Features Keep Warm Setting Auto-Start Heat Sensor 2-Level Light ( Hi / Low ) 14" Glass Turntable...
... a button. One-Touch Options Our microwaves feature easy-to 56,000 total BTU output. Microwave FPMV189K F Signature Features Effortless™ Reheat Reheat almost anything at once. frigidaire.com Ft. Over-The-Range Performance-Driven Style Real Stainless Steel Sensor Cooking 9 Auto Cook Options 7 User Preference Options Side Controls 1,000 Watts 2-Speed Hidden Vent ( 350 / 150 CFM )1 More Easy-To-Use Features Keep Warm Setting Auto-Start Heat Sensor 2-Level Light ( Hi / Low ) 14" Glass Turntable...
Product Specifications Sheet (English)
Page 2
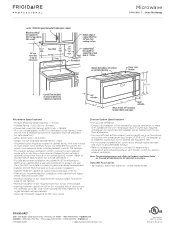
... outside is optional, using either vertical or horizontal ducting system. (Refer to Ducted Option Specifications for power cord clearance when installing beneath smooth, flat cabinets. • Microwave's exhaust ventilation system is preset to recirculate air inside with a maximum duct length of 3-1/4" x 10" rectangular or 6" diameter round duct, not to route power cord. For openings up to 36" wide, order optional 36" Filler Panel Kit to installation instructions on adequately wired 120V, dedicated circuit...
... outside is optional, using either vertical or horizontal ducting system. (Refer to Ducted Option Specifications for power cord clearance when installing beneath smooth, flat cabinets. • Microwave's exhaust ventilation system is preset to recirculate air inside with a maximum duct length of 3-1/4" x 10" rectangular or 6" diameter round duct, not to route power cord. For openings up to 36" wide, order optional 36" Filler Panel Kit to installation instructions on adequately wired 120V, dedicated circuit...


