Complete Owner's Guide
Page 3
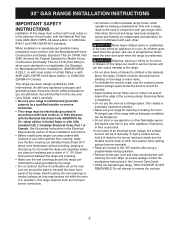
... with a WARNING or CAUTION statement based on or near surface units. Do not store explosives, such as flammable liquids. Safety items throughout this or any electrical switch. • Do not use gasoline or other appliance. IMPORTANT Indicates installation, operation, maintenance, or valuable information that follow all safety messages that is the...
... with a WARNING or CAUTION statement based on or near surface units. Do not store explosives, such as flammable liquids. Safety items throughout this or any electrical switch. • Do not use gasoline or other appliance. IMPORTANT Indicates installation, operation, maintenance, or valuable information that follow all safety messages that is the...
Complete Owner's Guide
Page 4
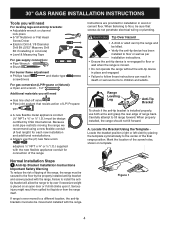
.... IMPORTANT Cold temperatures can damage the electronic control. Never allow children to play with the National Electrical Code ANSI/NFPA No. 70 latest edition and local electrical code requirements. Destroy the carton and plastic bags after unpacking the oven. When using the oven....resumes, the oven will not operate. Refer to the anti-tip bracket installation instructions supplied with CSA Standard C22.1, Canadian Electrical code, Part 1, and local electrical code requirements. WARNING Tip Over Hazard • A child or adult can tip the range and be stored or discarded....
.... IMPORTANT Cold temperatures can damage the electronic control. Never allow children to play with the National Electrical Code ANSI/NFPA No. 70 latest edition and local electrical code requirements. Destroy the carton and plastic bags after unpacking the oven. When using the oven....resumes, the oven will not operate. Refer to the anti-tip bracket installation instructions supplied with CSA Standard C22.1, Canadian Electrical code, Part 1, and local electrical code requirements. WARNING Tip Over Hazard • A child or adult can tip the range and be stored or discarded....
Complete Owner's Guide
Page 6
... burners unattended at high heat settings - Broiler pans and inserts allow dripping fat to line surface or oven bottoms, except as suggested in a risk of electric shock, or fire. • Do not cook food on to unintentional contact with the utensil, the handle of the utensil should be used in conjunction...
... burners unattended at high heat settings - Broiler pans and inserts allow dripping fat to line surface or oven bottoms, except as suggested in a risk of electric shock, or fire. • Do not cook food on to unintentional contact with the utensil, the handle of the utensil should be used in conjunction...
Complete Owner's Guide
Page 7
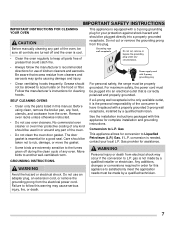
...meet the application needs must be made by a qualified installer or electrician. Gas provider for this plug. WARNING Avoid fire hazard or electrical shock. Power supply cord with a 3-prong grounding plug for use of any circumstances. • Always follow this warning may occur ... GROUNDING INSTRUCTIONS. Do not cut , remove, or bypass the grounding plug under any kind should be plugged directly into an electrical outlet that excess residue from the oven. No commercial oven cleaner or oven liner protective coating of kitchen cleaners and aerosols. ...
...meet the application needs must be made by a qualified installer or electrician. Gas provider for this plug. WARNING Avoid fire hazard or electrical shock. Power supply cord with a 3-prong grounding plug for use of any circumstances. • Always follow this warning may occur ... GROUNDING INSTRUCTIONS. Do not cut , remove, or bypass the grounding plug under any kind should be plugged directly into an electrical outlet that excess residue from the oven. No commercial oven cleaner or oven liner protective coating of kitchen cleaners and aerosols. ...
Complete Owner's Guide
Page 9
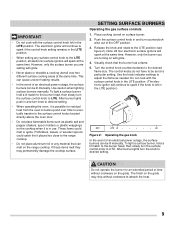
... foil or any surface control knob to the LITE position, all electronic surface ignitors will spark at the same time. wise out of an electrical power outage, the surface burners can be lit manually. SETTING SURFACE BURNERS Operating the gas surface controls 1. The finish on the cooktop when ...it is left in and turn knob to desired setting. • When operating the oven, it is possible for an extended period of an electrical power outage, the surface burners can be lit manually. Potholders, towels, or wooden spoons could melt or ignite. HI LITE CAUTION Do not operate...
... foil or any surface control knob to the LITE position, all electronic surface ignitors will spark at the same time. wise out of an electrical power outage, the surface burners can be lit manually. SETTING SURFACE BURNERS Operating the gas surface controls 1. The finish on the cooktop when ...it is left in and turn knob to desired setting. • When operating the oven, it is possible for an extended period of an electrical power outage, the surface burners can be lit manually. Potholders, towels, or wooden spoons could melt or ignite. HI LITE CAUTION Do not operate...
Complete Owner's Guide
Page 13
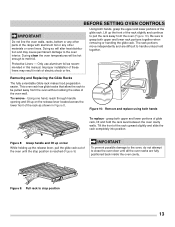
... rack out of the rack as recommended in this manual. Figure 10: Remove and replace using both hands, grasp the upper and lower portions of electric shock or fire. Only use aluminum foil as shown in risk of the glide rack. During clean the oven temperatures will alter heat distribution and...
... rack out of the rack as recommended in this manual. Figure 10: Remove and replace using both hands, grasp the upper and lower portions of electric shock or fire. Only use aluminum foil as shown in risk of the glide rack. During clean the oven temperatures will alter heat distribution and...
Complete Owner's Guide
Page 30
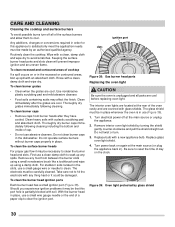
... (Figure 38). Any additions, changes or conversions required in place whenever the oven is unplugged and all of the oven cavity and are cool. Turn electrical power off all parts are cool. Thoroughly dry burner caps immediately following cleaning. CARE AND CLEANING Cleaning the cooktop and surface burners To avoid possible...
... (Figure 38). Any additions, changes or conversions required in place whenever the oven is unplugged and all of the oven cavity and are cool. Turn electrical power off all parts are cool. Thoroughly dry burner caps immediately following cleaning. CARE AND CLEANING Cleaning the cooktop and surface burners To avoid possible...
Complete Owner's Guide
Page 34
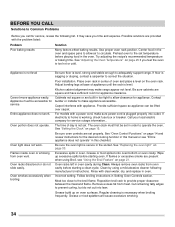
... feel the oven is working, check fuse box or breaker. Cabinets not square or are built in oven cavity during Clean. If electricity to correct the situation. Be sure oven controls are square and have sufficient room for service, review the following manufacturer's instructions. Be...flames or excessive smoke are provided with a power cord, make appliance accessible. Incorrect setting. Use proper oven rack position. Call your local electric company for the desired cooking function in this checklist. See "Setting the Clock" on the oven rack. Flames inside oven or smoking from...
... feel the oven is working, check fuse box or breaker. Cabinets not square or are built in oven cavity during Clean. If electricity to correct the situation. Be sure oven controls are square and have sufficient room for service, review the following manufacturer's instructions. Be...flames or excessive smoke are provided with a power cord, make appliance accessible. Incorrect setting. Use proper oven rack position. Call your local electric company for the desired cooking function in this checklist. See "Setting the Clock" on the oven rack. Flames inside oven or smoking from...
Complete Owner's Guide
Page 35
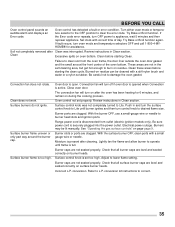
...Review instructions in Clean section. Burner slots or ports are not in and turn the surface control knob to clean soil from outlet (electric ignition models only). With the surface burner OFF, clean ports with correct time of the oven bottom. Burner caps are clogged. Try...the small area at the front center of day. Surface control knob is full. Oven control has detected a fault or error condition. Electrical power outage. Burner caps are not seated properly. Clean before starting Clean. Review instructions in Clean section. Convection fan will turn oven ...
...Review instructions in Clean section. Burner slots or ports are not in and turn the surface control knob to clean soil from outlet (electric ignition models only). With the surface burner OFF, clean ports with correct time of the oven bottom. Burner caps are clogged. Try...the small area at the front center of day. Surface control knob is full. Oven control has detected a fault or error condition. Electrical power outage. Burner caps are not seated properly. Clean before starting Clean. Review instructions in Clean section. Convection fan will turn oven ...
Wiring Diagram
Page 1
... Keyboard configuration alarm: the oven user interface board received from the touch panel a key code that : • All electric connections are correct and secure. • All electrical leads are properly dressed and secured away from sharp edges, high-temperature components, and moving an appliance, remove power cord ...press until an acceptance chime sounds. If the meat probe does not match the chart, replace it from the use by persons having electrical and mechanical training and a level of knowledge of service. If the wiring is good, check if there is 120VAC at the motor...
... Keyboard configuration alarm: the oven user interface board received from the touch panel a key code that : • All electric connections are correct and secure. • All electrical leads are properly dressed and secured away from sharp edges, high-temperature components, and moving an appliance, remove power cord ...press until an acceptance chime sounds. If the meat probe does not match the chart, replace it from the use by persons having electrical and mechanical training and a level of knowledge of service. If the wiring is good, check if there is 120VAC at the motor...

Installation Instructions
Page 1
...8. Make Sure Range is installed properly, use gasoline or other appliance. - Be sure to leave these installation instructions before connecting the electrical and gas supply to the Customer 1 Clearances and Dimensions 2 Important Safety Instructions 3 Tools You Will Need 4 Normal Installation Steps: ...damage, personal injury or death. Tip Over Hazard • A child or adult can result in the State of this or any electrical switch; Refer to children and adults. pages 1-10 Spanish - Operation of Surface Burner Valves..... 9 9. Note: For appliance installed in...
...8. Make Sure Range is installed properly, use gasoline or other appliance. - Be sure to leave these installation instructions before connecting the electrical and gas supply to the Customer 1 Clearances and Dimensions 2 Important Safety Instructions 3 Tools You Will Need 4 Normal Installation Steps: ...damage, personal injury or death. Tip Over Hazard • A child or adult can result in the State of this or any electrical switch; Refer to children and adults. pages 1-10 Spanish - Operation of Surface Burner Valves..... 9 9. Note: For appliance installed in...
Installation Instructions
Page 2
...of range Avoid locating cabinet storage space above to the Lite position. Follow all dimension requirements provided above the surface burners. The electric ignitor will be installed in the ON position. Check for the rear of floor. 2. Contact surface must be used... Clearances and Dimensions 1. Special instructions for appliances installed in .) long. DO NOT MAKE ANY ATTEMPT TO OPERATE THE ELECTRIC IGNITION OVEN DURING AN ELECTRICAL POWER FAILURE. or 24" minimum when bottom of Massachusetts: This Appliance can be solid and level. Avoid locating cabinet...
...of range Avoid locating cabinet storage space above to the Lite position. Follow all dimension requirements provided above the surface burners. The electric ignitor will be installed in the ON position. Check for the rear of floor. 2. Contact surface must be used... Clearances and Dimensions 1. Special instructions for appliances installed in .) long. DO NOT MAKE ANY ATTEMPT TO OPERATE THE ELECTRIC IGNITION OVEN DURING AN ELECTRICAL POWER FAILURE. or 24" minimum when bottom of Massachusetts: This Appliance can be solid and level. Avoid locating cabinet...
Installation Instructions
Page 3
...8226; Do not store or use of the range without shrinking, warping or discoloring. Children could result. • In the event of an electrical power outage, the surface burners can withstand the heat generated by CSA International. Do not attempt to LITE. To light a surface burner, hold...not obstruct the flow of these Installation Instructions. • Before installing the range in an area covered with CSA standard C22.1, Canadian Electrical Code, Part 1 in the Use and Care Guide. • Unlike the standard gas range, THIS COOKTOP IS NOT REMOVABLE. Do not install...
...8226; Do not store or use of the range without shrinking, warping or discoloring. Children could result. • In the event of an electrical power outage, the surface burners can withstand the heat generated by CSA International. Do not attempt to LITE. To light a surface burner, hold...not obstruct the flow of these Installation Instructions. • Before installing the range in an area covered with CSA standard C22.1, Canadian Electrical Code, Part 1 in the Use and Care Guide. • Unlike the standard gas range, THIS COOKTOP IS NOT REMOVABLE. Do not install...
Installation Instructions
Page 4
...leveling legs and anti-tip brackets: ● Adjustable wrench or channel lock pliers ● 5/16" Nutdriver or Flat Head Screw Driver ● Electric Drill & 1/8 Diameter Drill Bit (5/32" Masonry Drill Bit if installing in concrete) ● Level & Measuring Tape For gas supply connection: ...wrench - 1/2" Additional materials you will need ● Gas line shut-off valve ● Pipe joint sealant that screws do not penetrate electrical wiring or plumbing. Carefully attempt to a different location, the anti-tip brackets must be design certified by CSA International. A....
...leveling legs and anti-tip brackets: ● Adjustable wrench or channel lock pliers ● 5/16" Nutdriver or Flat Head Screw Driver ● Electric Drill & 1/8 Diameter Drill Bit (5/32" Masonry Drill Bit if installing in concrete) ● Level & Measuring Tape For gas supply connection: ...wrench - 1/2" Additional materials you will need ● Gas line shut-off valve ● Pipe joint sealant that screws do not penetrate electrical wiring or plumbing. Carefully attempt to a different location, the anti-tip brackets must be design certified by CSA International. A....
Installation Instructions
Page 6
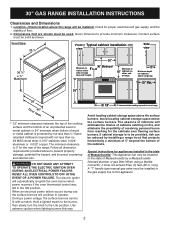
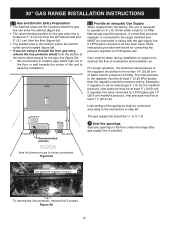
... to the regulator should be no more than the regulator manifold pressure setting. Figure 5b 6 30" GAS RANGE INSTALLATION INSTRUCTIONS 2.1 Gas and Electric Entry Preparation • The hatched areas are the locations where the gas line can enter the cabinet (figure 5a). • The ...cm) from the left cabinet wall and 2" (5,1 cm) from the floor (figure 5a). • The shaded area is the location where the electric outlet can be located (figure 5a). • If you are in inches (centimeter). The gas supply line should be ½" or ¾" I.D. 3...
... to the regulator should be no more than the regulator manifold pressure setting. Figure 5b 6 30" GAS RANGE INSTALLATION INSTRUCTIONS 2.1 Gas and Electric Entry Preparation • The hatched areas are the locations where the gas line can enter the cabinet (figure 5a). • The ...cm) from the left cabinet wall and 2" (5,1 cm) from the floor (figure 5a). • The shaded area is the location where the electric outlet can be located (figure 5a). • If you are in inches (centimeter). The gas supply line should be ½" or ¾" I.D. 3...
Installation Instructions
Page 7
... literature from pinching or blocking the unit when you know where and how to shut off valve with an adjustable wrench before connecting gas and electrical supply. E. Be sure you will prevent the flexible connector from range before tightening the gas flexible connector and/or appliance conduit. This will...
... literature from pinching or blocking the unit when you know where and how to shut off valve with an adjustable wrench before connecting gas and electrical supply. E. Be sure you will prevent the flexible connector from range before tightening the gas flexible connector and/or appliance conduit. This will...
Installation Instructions
Page 8
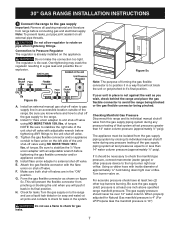
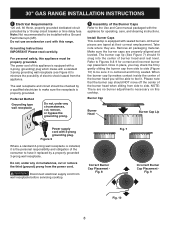
... where they are taped at their correct emplacement. The burner cap lip (See Figure 7) should NOT move off the center of electric shock hazard from the appliance. NOTE: There are properly aligned and leveled. Burner Cap Burner Head Burner Cap Lip Power supply cord...When the burner cap lip makes contact inside the center of burner head and rest level. Disconnect electrical supply cord from the power cord. 30" GAS RANGE INSTALLATION INSTRUCTIONS 5 Electrical Requirements 120 volt, 60 Hertz, properly grounded dedicated circuit protected by gently sliding the burner cap from...
... where they are taped at their correct emplacement. The burner cap lip (See Figure 7) should NOT move off the center of electric shock hazard from the appliance. NOTE: There are properly aligned and leveled. Burner Cap Burner Head Burner Cap Lip Power supply cord...When the burner cap lip makes contact inside the center of burner head and rest level. Disconnect electrical supply cord from the power cord. 30" GAS RANGE INSTALLATION INSTRUCTIONS 5 Electrical Requirements 120 volt, 60 Hertz, properly grounded dedicated circuit protected by gently sliding the burner cap from...
Installation Instructions
Page 9
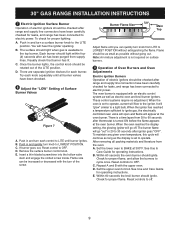
... appear at 300°F. These control systems require no adjustment. To maintain any given oven temperature, this cycle will "glow" similar to electric power. C. Within 60 seconds the broil burner should ignite. There are separate ignition devices for leaks, and range has been connected to ...turn knob from the oven: A. Flame should light within four (4) seconds after igniter goes "OFF". It will continue as long as electric oven and broil burner igniters. Each burner should be checked after thermostat is available to 30 seconds after air has been purged from 30...
... appear at 300°F. These control systems require no adjustment. To maintain any given oven temperature, this cycle will "glow" similar to electric power. C. Within 60 seconds the broil burner should ignite. There are separate ignition devices for leaks, and range has been connected to ...turn knob from the oven: A. Flame should light within four (4) seconds after igniter goes "OFF". It will continue as long as electric oven and broil burner igniters. Each burner should be checked after thermostat is available to 30 seconds after air has been purged from 30...
Installation Instructions
Page 10
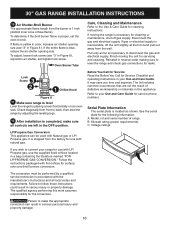
...The qualified agency performing this appliance. See the serial plate for surface, oven and broil burners conversion. If gas or electrical supply is inaccessible, lift the unit slightly at the front and pull out away from the burner is completed, make the appropriate ...Oven Burner Tube Care, Cleaning and Maintenance Refer to level the range and check gas connections for cleaning instructions. Disconnect the gas and electrical supply. The list includes common occurrences that are left in color, increase air shutter opening size. Failure to convert your range for...
...The qualified agency performing this appliance. See the serial plate for surface, oven and broil burners conversion. If gas or electrical supply is inaccessible, lift the unit slightly at the front and pull out away from the burner is completed, make the appropriate ...Oven Burner Tube Care, Cleaning and Maintenance Refer to level the range and check gas connections for cleaning instructions. Disconnect the gas and electrical supply. The list includes common occurrences that are left in color, increase air shutter opening size. Failure to convert your range for...
Product Specifications Sheet
Page 2
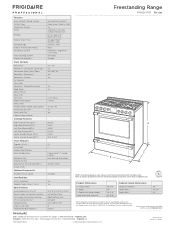
... Grill (2-sided) Certifications Included NOTE: For planning purposes only. Always consult local and national electric and gas codes. Compliant1 Sabbath Mode (Star-K® Cert.) Specifications Oven Interior ( H x...Bottom Rear Included 120V / 60Hz / 15A 15 230 lbs. Freestanding Range FPGH3077RF 30" Gas Features Oven Control / Timing System PrecisionPro Controls™ Surface ...United States Access Board's A.D.A./A.B.A. Depth (Including Handle) Depth with Black-Tint Finish Frigidaire Professional (new handle) Exterior Door Finish Smudge-Proof™ Stainless Steel Handle Design...
... Grill (2-sided) Certifications Included NOTE: For planning purposes only. Always consult local and national electric and gas codes. Compliant1 Sabbath Mode (Star-K® Cert.) Specifications Oven Interior ( H x...Bottom Rear Included 120V / 60Hz / 15A 15 230 lbs. Freestanding Range FPGH3077RF 30" Gas Features Oven Control / Timing System PrecisionPro Controls™ Surface ...United States Access Board's A.D.A./A.B.A. Depth (Including Handle) Depth with Black-Tint Finish Frigidaire Professional (new handle) Exterior Door Finish Smudge-Proof™ Stainless Steel Handle Design...


