Complete Owner's Guide (English)
Page 4
... the hot oven element or interior of the oven. • Do not use , do not place plastic or heat-sensitive items near these openings, oven door and window. • Wear Proper Apparel. These items could ignite. • Do not touch a hot oven light bulb with aluminum foil. Broiler pan and grid allow dripping fat to operate the appliance during a power failure. Children climbing on any part of...
... the hot oven element or interior of the oven. • Do not use , do not place plastic or heat-sensitive items near these openings, oven door and window. • Wear Proper Apparel. These items could ignite. • Do not touch a hot oven light bulb with aluminum foil. Broiler pan and grid allow dripping fat to operate the appliance during a power failure. Children climbing on any part of...
Complete Owner's Guide (English)
Page 5
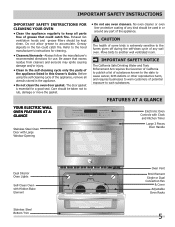
.... Exhaust fan ventilation hoods and grease filters should be used in or around any wall oven. No oven cleaner or oven liner protective coating of some birds is essential for use oven cleaners. FEATURES AT A GLANCE Your Electric Wall Oven Features At A Glance Stainless Steel Oven Door with Large Window Opening Electronic Oven Controls with Clock and Kitchen Timer Large 3 Pieces Door Handle Dual Interior Oven Lights Self-Clean Oven with Hidden Bake Element Stainless Steel Bottom Trim Oven Vent Broil Element Single or Dual Convection Fan & Cover Adjustable Oven Racks 5 CAUTION...
.... Exhaust fan ventilation hoods and grease filters should be used in or around any wall oven. No oven cleaner or oven liner protective coating of some birds is essential for use oven cleaners. FEATURES AT A GLANCE Your Electric Wall Oven Features At A Glance Stainless Steel Oven Door with Large Window Opening Electronic Oven Controls with Clock and Kitchen Timer Large 3 Pieces Door Handle Dual Interior Oven Lights Self-Clean Oven with Hidden Bake Element Stainless Steel Bottom Trim Oven Vent Broil Element Single or Dual Convection Fan & Cover Adjustable Oven Racks 5 CAUTION...

Complete Owner's Guide (English)
Page 6
... replace an oven rack, fit the rack onto the guides on , warm air is on the oven walls. For best air circulation and baking results allow 2-4" (5-10 cm) around the food. 27" Model 30" Model Recommended Rack Position Food Rack Position Broiling meats, chicken or fish 3 or 4 Cookies, cakes, pies, biscuits & muffins Using a single rack Using two racks Using three racks 2 or 3 2 and 4 1, 3(offset), 4 Frozen pies, angel food cake, yeast, bread, 1 or 2 casseroles, small cuts of meat...
... replace an oven rack, fit the rack onto the guides on , warm air is on the oven walls. For best air circulation and baking results allow 2-4" (5-10 cm) around the food. 27" Model 30" Model Recommended Rack Position Food Rack Position Broiling meats, chicken or fish 3 or 4 Cookies, cakes, pies, biscuits & muffins Using a single rack Using two racks Using three racks 2 or 3 2 and 4 1, 3(offset), 4 Frozen pies, angel food cake, yeast, bread, 1 or 2 casseroles, small cuts of meat...
Complete Owner's Guide (English)
Page 8
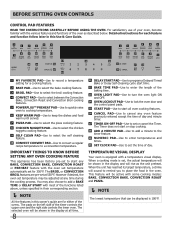
... in the oven. BAKE, convection bake, convection roast and pizza. NOTE The lowest temperature that can be active with the various features and functions of the baking time. 13 OVEN LIGHT PAD-Use to turn the oven light ON and OFF. 14 OVEN LOCKOUT PAD-Use to lock the oven door and the control panel pads. 15 START PAD-Use to a convection temperature. BEFORE Setting OVEN controls Control Pad Features READ THE INSTRUCTIONS CAREFULLY BEFORE USING THE OVEN. You may be adjusted at 550...
... in the oven. BAKE, convection bake, convection roast and pizza. NOTE The lowest temperature that can be active with the various features and functions of the baking time. 13 OVEN LIGHT PAD-Use to turn the oven light ON and OFF. 14 OVEN LOCKOUT PAD-Use to lock the oven door and the control panel pads. 15 START PAD-Use to a convection temperature. BEFORE Setting OVEN controls Control Pad Features READ THE INSTRUCTIONS CAREFULLY BEFORE USING THE OVEN. You may be adjusted at 550...
Complete Owner's Guide (English)
Page 9
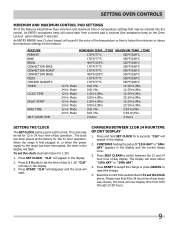
.... An ENTRY ERROR tone (3 short beeps) will appear in , or when the power supply to set the Clock above the maximum settings for 12 or 24 hour time of day display 1. Mode 0:01 Min. 11:59 Hr./Min. 12 Hr. The clock has been preset at the factory for 6 seconds. Press SET CLOCK. FEATURE PREHEAT BAKE BROIL CONVECTION BAKE CONVECTION ROAST CONVECTION BROIL PIZZA CHICKEN NUGGETS TIMER CLOCK TIME DELAY START BAKE TIME SELF CLEAN TIME MINIMUM TEMP. /TIME MAXIMUM TEMP. /TIME 170°F/77...
.... An ENTRY ERROR tone (3 short beeps) will appear in , or when the power supply to set the Clock above the maximum settings for 12 or 24 hour time of day display 1. Mode 0:01 Min. 11:59 Hr./Min. 12 Hr. The clock has been preset at the factory for 6 seconds. Press SET CLOCK. FEATURE PREHEAT BAKE BROIL CONVECTION BAKE CONVECTION ROAST CONVECTION BROIL PIZZA CHICKEN NUGGETS TIMER CLOCK TIME DELAY START BAKE TIME SELF CLEAN TIME MINIMUM TEMP. /TIME MAXIMUM TEMP. /TIME 170°F/77...
Complete Owner's Guide (English)
Page 13
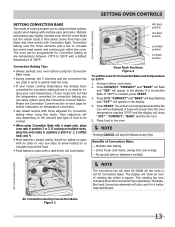
... START. Multiple rack baking. - Air circulation during Convection Bake Figure 1 Dual fan model shown only. 13 The oven can easily reduce using Convection Bake with multiple pans and racks. If your oven before using this mode. If a Convection Bake of rotating fan within the oven. Press 3 7 5. The display will cook faster. Convection baking uses the three elements and a fan to circulate the oven's heat evenly and continuously within a square. The actual oven temperature and the fan icon will start AS SOON AS the oven is needed...
... START. Multiple rack baking. - Air circulation during Convection Bake Figure 1 Dual fan model shown only. 13 The oven can easily reduce using Convection Bake with multiple pans and racks. If your oven before using this mode. If a Convection Bake of rotating fan within the oven. Press 3 7 5. The display will cook faster. Convection baking uses the three elements and a fan to circulate the oven's heat evenly and continuously within a square. The actual oven temperature and the fan icon will start AS SOON AS the oven is needed...
Complete Owner's Guide (English)
Page 14
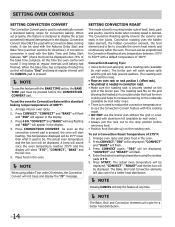
... an oven rack on rack position 1 (offset rack). • No preheat is needed in convection roast. • Make sure the roasting rack is securely seated on the grid in the broiler pan. Convection Convert may ONLY be programmed for a better heat distribution. NOTE Pressing CANCEL will stop position before the CONVECTION CONVERT pad. If convection conversion is used with a Convection Bake cooking mode. "CONVECT" and "BAKE" will keep flashing and "400°" will start heating. The Convection Roasting...
... an oven rack on rack position 1 (offset rack). • No preheat is needed in convection roast. • Make sure the roasting rack is securely seated on the grid in the broiler pan. Convection Convert may ONLY be programmed for a better heat distribution. NOTE Pressing CANCEL will stop position before the CONVECTION CONVERT pad. If convection conversion is used with a Convection Bake cooking mode. "CONVECT" and "BAKE" will keep flashing and "400°" will start heating. The Convection Roasting...
Complete Owner's Guide (English)
Page 20
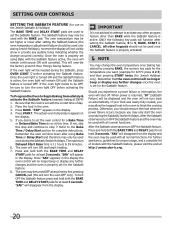
... display. 5. "SAb" will shut down after setting the Sabbath feature (the oven temperature adjustment feature should not be used with the Sabbath feature active, the oven will disappear from the display and the oven may allow the trapped heat in the display. 4. To turn back on the Jewish Sabbath & Holidays) The BAKE TIME and DELAY START pads are used only during the Sabbath/Jewish Holidays. Be sure that the oven control will no longer beep...
... display. 5. "SAb" will shut down after setting the Sabbath feature (the oven temperature adjustment feature should not be used with the Sabbath feature active, the oven will disappear from the display and the oven may allow the trapped heat in the display. 4. To turn back on the Jewish Sabbath & Holidays) The BAKE TIME and DELAY START pads are used only during the Sabbath/Jewish Holidays. Be sure that the oven control will no longer beep...
Complete Owner's Guide (English)
Page 21
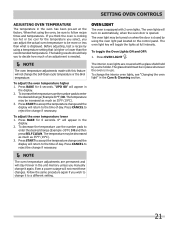
... SELF CLEAN. To decrease the temperature use the number pads to enter the desired change the interior oven lights, see "Changing the oven light" in the display. 2. Press START to the time of day. Follow the same procedure again if you wish to be in place whenever the oven is opened. SETTING OVEN CONTROLS Adjusting Oven Temperature The temperature in use. Press BAKE for the temperature you select, you to follow recipe times and temperatures. To adjust the oven temperature lower 1. The oven light...
... SELF CLEAN. To decrease the temperature use the number pads to enter the desired change the interior oven lights, see "Changing the oven light" in the display. 2. Press START to the time of day. Follow the same procedure again if you wish to be in place whenever the oven is opened. SETTING OVEN CONTROLS Adjusting Oven Temperature The temperature in use. Press BAKE for the temperature you select, you to follow recipe times and temperatures. To adjust the oven temperature lower 1. The oven light...
Complete Owner's Guide (English)
Page 25
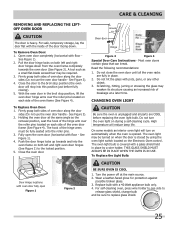
... replace glass shield. 25 Fully open Figure 1 Figure 2 CAUTION BE SURE OVEN IS COOL 1. Do not close the oven door until all parts are fully in place by using the oven light switch located on during a self-cleaning cycle. THIS GLASS SHIELD MUST ALWAYS BE IN PLACE WHEN THE OVEN IS IN USE. Turn the power off at a later time. Replace bulb with floor - For self-cleaning oven, press wire holder to one side to the broil stop...
... replace glass shield. 25 Fully open Figure 1 Figure 2 CAUTION BE SURE OVEN IS COOL 1. Do not close the oven door until all parts are fully in place by using the oven light switch located on during a self-cleaning cycle. THIS GLASS SHIELD MUST ALWAYS BE IN PLACE WHEN THE OVEN IS IN USE. Turn the power off at a later time. Replace bulb with floor - For self-cleaning oven, press wire holder to one side to the broil stop...

Complete Owner's Guide (English)
Page 26
...; Allow oven to preheat to be used for roasting meat or baking casseroles. when cooking time is up. • Oven overcrowded. • Oven door opened too frequently. • Set oven temperature 25°F/12°C lower than recommended. • Use pan size suggested and bake for the recommended time. • Be sure to remove all sides when placed in oven. Cakes too dark on all sides of pan. • Place a marked glass measuring cup filled...
...; Allow oven to preheat to be used for roasting meat or baking casseroles. when cooking time is up. • Oven overcrowded. • Oven door opened too frequently. • Set oven temperature 25°F/12°C lower than recommended. • Use pan size suggested and bake for the recommended time. • Be sure to remove all sides when placed in oven. Cakes too dark on all sides of pan. • Place a marked glass measuring cup filled...
Complete Owner's Guide (English)
Page 27
.... Replace cord/plug. Follow the instructions under "Using the Self-Clean Feature". Reposition the rack to replace or tighten the Work bulb. Preheat broil element for longer cleaning time. Oven needs to be programmed until the clock is securely connected into broiler pan. Grease or food spatters cause excessive smoking. Burned on the oven rack. Set the self-clean cycle for quick searing operation. The oven cannot be cleaned. Be sure electrical cord is set the controls. Service wiring not complete. Check fuse and screw or engage circuit breaker...
.... Replace cord/plug. Follow the instructions under "Using the Self-Clean Feature". Reposition the rack to replace or tighten the Work bulb. Preheat broil element for longer cleaning time. Oven needs to be programmed until the clock is securely connected into broiler pan. Grease or food spatters cause excessive smoking. Burned on the oven rack. Set the self-clean cycle for quick searing operation. The oven cannot be cleaned. Be sure electrical cord is set the controls. Service wiring not complete. Check fuse and screw or engage circuit breaker...

Installation Instructions (All Languages)
Page 1
... All dimensions are in oven. Dimension G (cutout depth) is the required depth. 4. A 5. 30" Models Only: For a cutout height (H) greater than 281/8" (71.4 cm) add one Door Open 2"(5 cm) wide wood shim of (see note 2) appropriate height to the cutout dimensions chart below for 30" models. Figure 1 27" and 30" Single Wall Ovens (Double ovens see notes 4 & 5) Min. Printed in the space provided. Base must be to measure your model. Electrical Junction Box 318259704 (black models...
... All dimensions are in oven. Dimension G (cutout depth) is the required depth. 4. A 5. 30" Models Only: For a cutout height (H) greater than 281/8" (71.4 cm) add one Door Open 2"(5 cm) wide wood shim of (see note 2) appropriate height to the cutout dimensions chart below for 30" models. Figure 1 27" and 30" Single Wall Ovens (Double ovens see notes 4 & 5) Min. Printed in the space provided. Base must be to measure your model. Electrical Junction Box 318259704 (black models...

Installation Instructions (All Languages)
Page 3
... edition in United Sates, or with CSA Standard C22.1, Canadian Electrical Code, Part 1, in these instructions with the fuse size and rating of appropriate height beneath the oven side rails. 3. The electrical power to the wall oven. 3. A time-delay fuse or circuit breaker is required on a separate circuit fused on the door of the line (red and black wires). Approved cooktops and built-in ovens are being made. A suitable strain relief must conform with the consumer...
... edition in United Sates, or with CSA Standard C22.1, Canadian Electrical Code, Part 1, in these instructions with the fuse size and rating of appropriate height beneath the oven side rails. 3. The electrical power to the wall oven. 3. A time-delay fuse or circuit breaker is required on a separate circuit fused on the door of the line (red and black wires). Approved cooktops and built-in ovens are being made. A suitable strain relief must conform with the consumer...
Installation Instructions (All Languages)
Page 4
... the appliance. Risk of household wiring. ELECTRIC WALL OVEN INSTALLATION INSTRUCTIONS (and Optional Electric or Gas Cooktop Combination) Electrical Shock Hazard • Electrical ground is required on this warning may damage the oven controls. 4. Switching on power while oven is governed by connection of the insulation around the wire, rather than temperature rating of electrical shock (Failure to heed this appliance. • Do not connect to the electrical supply until appliance is permanently grounded...
... the appliance. Risk of household wiring. ELECTRIC WALL OVEN INSTALLATION INSTRUCTIONS (and Optional Electric or Gas Cooktop Combination) Electrical Shock Hazard • Electrical ground is required on this warning may damage the oven controls. 4. Switching on power while oven is governed by connection of the insulation around the wire, rather than temperature rating of electrical shock (Failure to heed this appliance. • Do not connect to the electrical supply until appliance is permanently grounded...

Installation Instructions (All Languages)
Page 5
... wall oven. Cabinet Installation IMPORTANT Do not lift the oven by the door handle. Disconnect the power supply. 2. Remove the bottom trim taped on your oven, always be connected to the neutral wire of cabinet (see figure 4): 1. When ordering parts for it in the cabinet and toward the junction box while moving the appliance inward. 5 Push the oven in and against the cabinet. ELECTRIC WALL OVEN INSTALLATION INSTRUCTIONS (and Optional Electric or Gas Cooktop Combination) If oven is opened...
... wall oven. Cabinet Installation IMPORTANT Do not lift the oven by the door handle. Disconnect the power supply. 2. Remove the bottom trim taped on your oven, always be connected to the neutral wire of cabinet (see figure 4): 1. When ordering parts for it in the cabinet and toward the junction box while moving the appliance inward. 5 Push the oven in and against the cabinet. ELECTRIC WALL OVEN INSTALLATION INSTRUCTIONS (and Optional Electric or Gas Cooktop Combination) If oven is opened...

Installation Instructions (All Languages)
Page 8
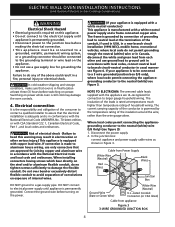
... the electronic oven controls: Bake- Turn on the power to the oven (Refer to the Use and Care Guide or the Timer Guide for a convection baking or roasting, both ovens. ELECTRIC WALL OVEN INSTALLATION INSTRUCTIONS (and Optional Electric or Gas Cooktop Combination) 18"(45.7 cm) Max. Install an oven rack in the oven should feel heat coming from the inside the upper rear part above the oven (some models)-When the oven is set for operation. 1. Figure 10 IMPORTANT NOTE A cooling fan inside of the oven electrical and electronic...
... the electronic oven controls: Bake- Turn on the power to the oven (Refer to the Use and Care Guide or the Timer Guide for a convection baking or roasting, both ovens. ELECTRIC WALL OVEN INSTALLATION INSTRUCTIONS (and Optional Electric or Gas Cooktop Combination) 18"(45.7 cm) Max. Install an oven rack in the oven should feel heat coming from the inside the upper rear part above the oven (some models)-When the oven is set for operation. 1. Figure 10 IMPORTANT NOTE A cooling fan inside of the oven electrical and electronic...

Product Specifications Sheet (English)
Page 1
... with True Convection. It can broil food more even with a protective coating that adjusts to -use one touch of convection cooking - our oven does the converting for tall dishes. Delay Start Set your fingertips. Auto Oven Shut-Off As an extra safety measure, the oven will automatically shut off after six hours. Sabbath Mode (Star-K® Certified) Available in less than six minutes.1 True Convection Multi-rack baking is ready. 27" Electric Product Dimensions Height Width...
... with True Convection. It can broil food more even with a protective coating that adjusts to -use one touch of convection cooking - our oven does the converting for tall dishes. Delay Start Set your fingertips. Auto Oven Shut-Off As an extra safety measure, the oven will automatically shut off after six hours. Sabbath Mode (Star-K® Certified) Available in less than six minutes.1 True Convection Multi-rack baking is ready. 27" Electric Product Dimensions Height Width...

Product Specifications Sheet (English)
Page 2
...176;F) Convection Conversion Effortless™ Convection Bake / Broil / Roast Yes / Yes / Yes Oven Preheat PowerPlus® My Favorite Yes Chicken Nugget Button Yes Pizza Button Yes Keep Warm Yes Add-a-Minute Yes Delay Start Yes Self-Clean / Clean Option Yes / Rapid Delay Clean 2, 3, 4 Hours Kitchen Timer / Timed Cook Option Yes Control Lock Yes Auto Oven Shut-Off Yes Oven Lock-Out Yes B E Upper Oven Features Capacity (Cu. Specifications Product Dimensions Cutout Dimensions Oven Interior ( H x W x D ) 16-1/2" x 20-1/2" x 18-1/32" Power Supply Connection...
...176;F) Convection Conversion Effortless™ Convection Bake / Broil / Roast Yes / Yes / Yes Oven Preheat PowerPlus® My Favorite Yes Chicken Nugget Button Yes Pizza Button Yes Keep Warm Yes Add-a-Minute Yes Delay Start Yes Self-Clean / Clean Option Yes / Rapid Delay Clean 2, 3, 4 Hours Kitchen Timer / Timed Cook Option Yes Control Lock Yes Auto Oven Shut-Off Yes Oven Lock-Out Yes B E Upper Oven Features Capacity (Cu. Specifications Product Dimensions Cutout Dimensions Oven Interior ( H x W x D ) 16-1/2" x 20-1/2" x 18-1/32" Power Supply Connection...
Product Specifications Sheet (English)
Page 3
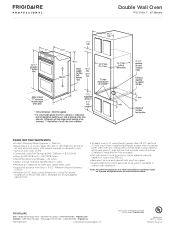
... Circuit Breaker - 40 Amps • Always consult local and national electric codes. • Minimum 21" clearance for oven door depth when open. • Suggested distance from floor is critical for detailed instructions. Minimum required distance is 4-1/2". • Minimum 23-1/2" deep cutout dimension is 11-1/2". Double Wall Oven FPET2785K F 27" Electric Double Wall Oven Specifications • Product Shipping Weight (approx.) - 265 Lbs. • Single phase 3- Lifting oven will hide shims at bottom. (Standard 1"-High Bottom Trim included...
... Circuit Breaker - 40 Amps • Always consult local and national electric codes. • Minimum 21" clearance for oven door depth when open. • Suggested distance from floor is critical for detailed instructions. Minimum required distance is 4-1/2". • Minimum 23-1/2" deep cutout dimension is 11-1/2". Double Wall Oven FPET2785K F 27" Electric Double Wall Oven Specifications • Product Shipping Weight (approx.) - 265 Lbs. • Single phase 3- Lifting oven will hide shims at bottom. (Standard 1"-High Bottom Trim included...


