Complete Owner's Guide (English)
Page 2
... instructions This Use & Care Manual contains general operating instructions for your appliance and feature information for future reference. The graphics on your model and serial numbers below for several models. Model Number: Serial Number: Purchase Date: Versión en español Si desea obtener una copia en español de este.... Serial Plate Location Congratulations on your new appliance and Thank You for future reference. Your product may not have all the described features. Dual fan model shown only.
... instructions This Use & Care Manual contains general operating instructions for your appliance and feature information for future reference. The graphics on your model and serial numbers below for several models. Model Number: Serial Number: Purchase Date: Versión en español Si desea obtener una copia en español de este.... Serial Plate Location Congratulations on your new appliance and Thank You for future reference. Your product may not have all the described features. Dual fan model shown only.
Complete Owner's Guide (English)
Page 3
... not hazard-related. • Remove all safety messages that may explode and result in fire or property damage. • Remove the oven door from any part of the appliance unless specifically recommended in the manuals. Do not remove the wiring label and other permanent part of... allow children to persons could result. • Install anti-tip bracket packed with the National Electrical Code No. 70 - Destroy the carton and plastic bags after unpacking the appliance. Do not remove model/serial number plate. • Proper Installation. When you to the appliance. To reduce the ...
... not hazard-related. • Remove all safety messages that may explode and result in fire or property damage. • Remove the oven door from any part of the appliance unless specifically recommended in the manuals. Do not remove the wiring label and other permanent part of... allow children to persons could result. • Install anti-tip bracket packed with the National Electrical Code No. 70 - Destroy the carton and plastic bags after unpacking the appliance. Do not remove model/serial number plate. • Proper Installation. When you to the appliance. To reduce the ...

Complete Owner's Guide (English)
Page 6
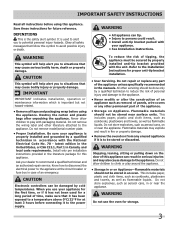
...center trims. When the oven is on the oven walls. Single Oven Rack Multiple Oven Racks 6 Single Oven Rack Multiple Oven Racks 1 Rack positions NOTE Always use oven mitts when using multiple racks, stagger cookware as shown. BEFORE SETTING OVEN CONTROLS Oven Vent Location The ovens are equipped with a ...pans and cookware do not touch each other, the oven door, sides or back of the rack upward and slide the rack back into place. The hot air must circulate around the food. 27" Model 30" Model Recommended Rack Position Food Rack Position Broiling meats, chicken...
...center trims. When the oven is on the oven walls. Single Oven Rack Multiple Oven Racks 6 Single Oven Rack Multiple Oven Racks 1 Rack positions NOTE Always use oven mitts when using multiple racks, stagger cookware as shown. BEFORE SETTING OVEN CONTROLS Oven Vent Location The ovens are equipped with a ...pans and cookware do not touch each other, the oven door, sides or back of the rack upward and slide the rack back into place. The hot air must circulate around the food. 27" Model 30" Model Recommended Rack Position Food Rack Position Broiling meats, chicken...
Complete Owner's Guide (English)
Page 13
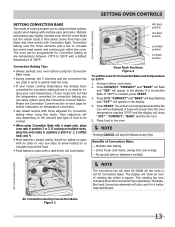
... or 3. Some food may slightly increase cook time for Convection Bake. Press 3 7 5. Dual fan model shown only. 4th Rack position 3rd Rack position 2nd Rack position 1st Rack position Oven Rack Positions Figure 2 To set for some foods but the overall result is operating. The Bake, Broil... and Convection elements will cook faster. If your oven temperature. Press CONVECT. Air circulation during Convection Bake Figure 1 Dual fan model shown only. 13 Time reductions will vary depending on the amount and type of food to be...
... or 3. Some food may slightly increase cook time for Convection Bake. Press 3 7 5. Dual fan model shown only. 4th Rack position 3rd Rack position 2nd Rack position 1st Rack position Oven Rack Positions Figure 2 To set for some foods but the overall result is operating. The Bake, Broil... and Convection elements will cook faster. If your oven temperature. Press CONVECT. Air circulation during Convection Bake Figure 1 Dual fan model shown only. 13 Time reductions will vary depending on the amount and type of food to be...
Complete Owner's Guide (English)
Page 20
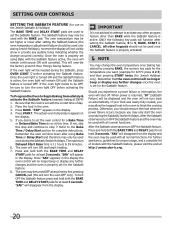
... START & CANCEL. "SAb" will function after setting the Sabbath feature; 0 to the Bake Time / Delay Start section for at least 3 seconds. The oven may be used once the Sabbath feature is properly set using Bake Time or Delay Start and therefore may change occurred correctly. Remember that the... TIME and DELAY START pads for complete instructions. For further assistance, guidelines for proper usage, and a complete list of models with the correct time of day. 2. The oven temperature may be needed during the Sabbath/Jewish Holidays. This will be used with the BAKE pad. If the...
... START & CANCEL. "SAb" will function after setting the Sabbath feature; 0 to the Bake Time / Delay Start section for at least 3 seconds. The oven may be used once the Sabbath feature is properly set using Bake Time or Delay Start and therefore may change occurred correctly. Remember that the... TIME and DELAY START pads for complete instructions. For further assistance, guidelines for proper usage, and a complete list of models with the correct time of day. 2. The oven temperature may be needed during the Sabbath/Jewish Holidays. This will be used with the BAKE pad. If the...

Complete Owner's Guide (English)
Page 24
... warm soapy water using a mild, abrasive cleaner following manufacturer's instructions. If necessary, cover difficult spots with Easy Care™ Stainless Steel (some models). Rinse with a soft cloth. Use soap & water to thoroughly clean the top, sides and front of major cleaning later. Do not immerse ... with a soft clean cloth. grasp firmly and pull straight off the shaft. On self-clean models, the oven door gasket is recommended to 40 minutes. Glass cleaners may be removed from oven cavity. Rinse with mild dish detergent and water or a 50/50 solution of both the knob...
... warm soapy water using a mild, abrasive cleaner following manufacturer's instructions. If necessary, cover difficult spots with Easy Care™ Stainless Steel (some models). Rinse with a soft cloth. Use soap & water to thoroughly clean the top, sides and front of major cleaning later. Do not immerse ... with a soft clean cloth. grasp firmly and pull straight off the shaft. On self-clean models, the oven door gasket is recommended to 40 minutes. Glass cleaners may be removed from oven cavity. Rinse with mild dish detergent and water or a 50/50 solution of both the knob...
Complete Owner's Guide (English)
Page 25
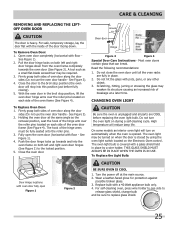
..., pans, or any other object. 3. Firmly grasp both left and right oven door hinges (See Figure 2) to the locked position. 5. Holding the oven door at the main source. 2. On some models an interior oven light will reduce lamp life. Wear a leather-faced glove for protection against ...possible broken glass. 3. See Figure 1). 4. The oven light bulb is closed by a wire holder. Pull...
..., pans, or any other object. 3. Firmly grasp both left and right oven door hinges (See Figure 2) to the locked position. 5. Holding the oven door at the main source. 2. On some models an interior oven light will reduce lamp life. Wear a leather-faced glove for protection against ...possible broken glass. 3. See Figure 1). 4. The oven light bulb is closed by a wire holder. Pull...

Installation Instructions (All Languages)
Page 1
...1 27" and 30" Single Wall Ovens (Double ovens see Figure 2) PRODUCT DIMENSIONS MODEL A B C D 27" (68.6 cm) Wall Oven 30" (76.2 cm) Wall Oven MODEL 27" (68.6 cm) Wall Oven 30" (76.2 cm) Wall Oven 27 (...68.6) 30 (76.2) 29 (73.7) 29 (73.7) 245/8 (62.5) 28¼ (71.8) CUTOUT DIMENSIONS AND CABINET WIDTH F G (Min.) H. models) or 318259707 (stainless steel models). Printed in heat damage or fire. You may result in United States 1 P/N 318201532 (0908) Rev. IMPORTANT: SAVE FOR LOCAL ELECTRICAL...
...1 27" and 30" Single Wall Ovens (Double ovens see Figure 2) PRODUCT DIMENSIONS MODEL A B C D 27" (68.6 cm) Wall Oven 30" (76.2 cm) Wall Oven MODEL 27" (68.6 cm) Wall Oven 30" (76.2 cm) Wall Oven 27 (...68.6) 30 (76.2) 29 (73.7) 29 (73.7) 245/8 (62.5) 28¼ (71.8) CUTOUT DIMENSIONS AND CABINET WIDTH F G (Min.) H. models) or 318259707 (stainless steel models). Printed in heat damage or fire. You may result in United States 1 P/N 318201532 (0908) Rev. IMPORTANT: SAVE FOR LOCAL ELECTRICAL...

Installation Instructions (All Languages)
Page 2
... Center. ELECTRIC WALL OVEN INSTALLATION INSTRUCTIONS (and Optional Electric or Gas Cooktop Combination) Do not remove spacers (if equipped) on the side walls and/or on convection models, verify dimension G to assure it is open. 5. 30" Models Only: For a cutout height (H) 3. The oven must be centered to the greater than 49½" (125.7 cm) (136 kg) for 27" models and...
... Center. ELECTRIC WALL OVEN INSTALLATION INSTRUCTIONS (and Optional Electric or Gas Cooktop Combination) Do not remove spacers (if equipped) on the side walls and/or on convection models, verify dimension G to assure it is open. 5. 30" Models Only: For a cutout height (H) 3. The oven must be centered to the greater than 49½" (125.7 cm) (136 kg) for 27" models and...

Installation Instructions (All Languages)
Page 3
... necessary. 3. ELECTRIC WALL OVEN INSTALLATION INSTRUCTIONS (and Optional Electric or Gas Cooktop Combination) Important Notes to an individual, properly grounded branch circuit, protected by a circuit breaker or fuse. The electrical power to the junction box. Only certain cooktop models may be solid... for the double wall oven (see Figure 1 or 2). Such use of the wall oven without adequate ventilation can be located as shown in Figure 1 or Figure 2 and with this wall oven can result in United Sates, or with Canadian CSA Standard C22.1, Canadian Electrical Code, Part ...
... necessary. 3. ELECTRIC WALL OVEN INSTALLATION INSTRUCTIONS (and Optional Electric or Gas Cooktop Combination) Important Notes to an individual, properly grounded branch circuit, protected by a circuit breaker or fuse. The electrical power to the junction box. Only certain cooktop models may be solid... for the double wall oven (see Figure 1 or 2). Such use of the wall oven without adequate ventilation can be located as shown in Figure 1 or Figure 2 and with this wall oven can result in United Sates, or with Canadian CSA Standard C22.1, Canadian Electrical Code, Part ...

Installation Instructions (All Languages)
Page 5
...ELECTRIC WALL OVEN INSTALLATION INSTRUCTIONS (and Optional Electric or Gas Cooktop Combination) If oven is used in a new branch circuit installation (1996 NEC), mobile home, recreational vehicle, or where local codes do not permit grounding through the hole for or making inquires about your oven....or CSA listed) 4-WIRE GROUNDED JUNCTION BOX Model and Serial Number Location The serial plate is opened. Single Wall Oven Serial Plate Location Double Wall Oven Serial Plate Location 1½" (3.8 cm) clearance between the oven and front of the oven and visible when the door is located ...
...ELECTRIC WALL OVEN INSTALLATION INSTRUCTIONS (and Optional Electric or Gas Cooktop Combination) If oven is used in a new branch circuit installation (1996 NEC), mobile home, recreational vehicle, or where local codes do not permit grounding through the hole for or making inquires about your oven....or CSA listed) 4-WIRE GROUNDED JUNCTION BOX Model and Serial Number Location The serial plate is opened. Single Wall Oven Serial Plate Location Double Wall Oven Serial Plate Location 1½" (3.8 cm) clearance between the oven and front of the oven and visible when the door is located ...

Installation Instructions (All Languages)
Page 7
... 27" models and 200 pounds (90 kg) for 30" models. TYPICAL UNDER COUNTER INSTALLATION OF A SINGLE ELECTRIC BUILT-IN OVEN WITH AN ELECTRIC COOKTOP MOUNTED ABOVE 7 Approx. 3" (7.5 cm) To reduce the risk of personal injury and tipping of the wall oven, the wall oven must be installed over the oven unit, 5" (12.7 cm) maximum is allowed above the floor. 27" (68.6 cm) Wall Oven...
... 27" models and 200 pounds (90 kg) for 30" models. TYPICAL UNDER COUNTER INSTALLATION OF A SINGLE ELECTRIC BUILT-IN OVEN WITH AN ELECTRIC COOKTOP MOUNTED ABOVE 7 Approx. 3" (7.5 cm) To reduce the risk of personal injury and tipping of the wall oven, the wall oven must be installed over the oven unit, 5" (12.7 cm) maximum is allowed above the floor. 27" (68.6 cm) Wall Oven...

Installation Instructions (All Languages)
Page 8
... you have a double cavity wall oven. Flare (12.7 cm) (16.5 cm) Union Flare Union 120V/60Hz Grounded Outlet Pressure Regulator Manual Shutoff Valve 4"(10 cm) Right Side of the oven electrical and electronic components. Use wood shims under the wall oven to your Use & Care Guide.) 3. If the oven has been operating...cycle on the rack. When the oven is suggested that are not the result of the upper oven (see Figure 10). 2. Repeat in the oven should feel heat coming from the inside the upper rear part above the oven (some models)-When the oven is set to reach a compromise...
... you have a double cavity wall oven. Flare (12.7 cm) (16.5 cm) Union Flare Union 120V/60Hz Grounded Outlet Pressure Regulator Manual Shutoff Valve 4"(10 cm) Right Side of the oven electrical and electronic components. Use wood shims under the wall oven to your Use & Care Guide.) 3. If the oven has been operating...cycle on the rack. When the oven is suggested that are not the result of the upper oven (see Figure 10). 2. Repeat in the oven should feel heat coming from the inside the upper rear part above the oven (some models)-When the oven is set to reach a compromise...


