User Manual
Page 1
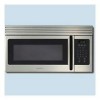
Visit the Frigidaire Web Site at: http://www.frigidaire.com Over-the-Range Microwave Oven with Convenience Pad Welcome 2 Important Safety Instructions .....3-6 Features and Specifications .......... 7 Before Operating 8 Manual Operation 9-14 Convenience Operation ......... 15-16 Cooking Charts 17-18 Care & Cleaning 19-20 Before You Call Solutions to Common Problems 21 Questions or for Service Call: 1-888-312-2117 Warranty Back Page READ AND SAVE THESE INSTRUCTIONS p/n 316495004 rev B (0706)
Visit the Frigidaire Web Site at: http://www.frigidaire.com Over-the-Range Microwave Oven with Convenience Pad Welcome 2 Important Safety Instructions .....3-6 Features and Specifications .......... 7 Before Operating 8 Manual Operation 9-14 Convenience Operation ......... 15-16 Cooking Charts 17-18 Care & Cleaning 19-20 Before You Call Solutions to Common Problems 21 Questions or for Service Call: 1-888-312-2117 Warranty Back Page READ AND SAVE THESE INSTRUCTIONS p/n 316495004 rev B (0706)
User Manual
Page 2
...Number: Serial Number: Purchase Date: © 2007 Electrolux Home Products, Inc. At Electrolux Home Products, we are very proud of a new microwave! Common sense and caution must be filled in this manual. All rights reserved. 2 Welcome & Congratulations Product Registration Be sure to register your... in the spaces provided below for choosing our product. Please record your model and serial number and date of the microwave oven. The graphics shown are representative. PLEASE CAREFULLY READ AND SAVE THESE INSTRUCTIONS This Use & Care Manual provides specific operating ...
...Number: Serial Number: Purchase Date: © 2007 Electrolux Home Products, Inc. At Electrolux Home Products, we are very proud of a new microwave! Common sense and caution must be filled in this manual. All rights reserved. 2 Welcome & Congratulations Product Registration Be sure to register your... in the spaces provided below for choosing our product. Please record your model and serial number and date of the microwave oven. The graphics shown are representative. PLEASE CAREFULLY READ AND SAVE THESE INSTRUCTIONS This Use & Care Manual provides specific operating ...
User Manual
Page 3
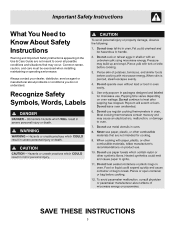
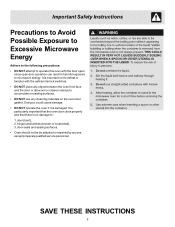
Common sense, caution, and care must be exercised when installing, maintaining or operating a microwave. Always contact your dealer, distributor, service agent or manufacturer about problems or conditions you do not understand. Recognize Safety Symbols, Words, Labels SAVE THESE INSTRUCTIONS 3 Important Safety Instructions What You Need to Know About Safety Instructions Warning and Important Safety Instructions appearing in the Use & Care Guide are not meant to cover all possible conditions and situations that may occur.
Common sense, caution, and care must be exercised when installing, maintaining or operating a microwave. Always contact your dealer, distributor, service agent or manufacturer about problems or conditions you do not understand. Recognize Safety Symbols, Words, Labels SAVE THESE INSTRUCTIONS 3 Important Safety Instructions What You Need to Know About Safety Instructions Warning and Important Safety Instructions appearing in the Use & Care Guide are not meant to cover all possible conditions and situations that may occur.
User Manual
Page 5
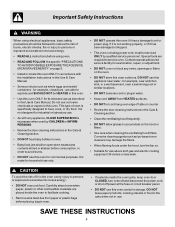
...to: 1. It is important not to defeat or tampler with the door open since open door operation can result in harmful exposure to microwave energy. door (bent), 2. SAVE THESE INSTRUCTIONS 5 It is particularly important that the oven door close properly and that there is damaged.... Important Safety Instructions Precautions to Avoid Possible Exposure to Excessive Microwave Energy Adhere to the following precautions: • DO NOT attempt to operate this oven with the safety interlock switches. • DO...
...to: 1. It is important not to defeat or tampler with the door open since open door operation can result in harmful exposure to microwave energy. door (bent), 2. SAVE THESE INSTRUCTIONS 5 It is particularly important that the oven door close properly and that there is damaged.... Important Safety Instructions Precautions to Avoid Possible Exposure to Excessive Microwave Energy Adhere to the following precautions: • DO NOT attempt to operate this oven with the safety interlock switches. • DO...
User Manual
Page 6
... be open when heated and contents stirred or shaken before using oven. • READ AND FOLLOW the specific "PRECAUTIONS TO AVOID POSSIBLE EXPOSURE TO EXCESSIVE MICROWAVE ENERGY" on page 5. • Install or locate this oven ONLY in accordance with the installation instructions in oven. • If materials inside the oven to...
... be open when heated and contents stirred or shaken before using oven. • READ AND FOLLOW the specific "PRECAUTIONS TO AVOID POSSIBLE EXPOSURE TO EXCESSIVE MICROWAVE ENERGY" on page 5. • Install or locate this oven ONLY in accordance with the installation instructions in oven. • If materials inside the oven to...
User Manual
Page 7
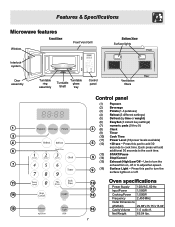
Features & Specifications Microwave features Front View Window Front Vent Grill Bottom View Surface lights Front Interlock system Door assembly 1 2 4 6 7 11 14 15 Turntable ring assembly Turntable Turntable glass ...
Features & Specifications Microwave features Front View Window Front Vent Grill Bottom View Surface lights Front Interlock system Door assembly 1 2 4 6 7 11 14 15 Turntable ring assembly Turntable Turntable glass ...
User Manual
Page 8
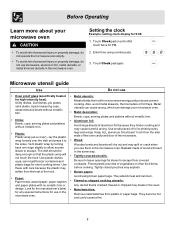
...plastic pouches of the food. • Paper: Paper towls, waxed paper, paper napkins and paper plates with no metallic trim or design. Microwave utensil guide Use Do not use • Oven proof glass (specifically treated for steam to shield poultry legs and wings. The dish should...that is cracked, flawed or chipped may explode. • Brown paper: Avoid using number pads. 3. Baskets made of foil to escape from microwave energy and produces uneven cooking. Look for the manufacturer's label for any special instructions for use stoneware, aluminum foil, metal utensils, or metal...
...plastic pouches of the food. • Paper: Paper towls, waxed paper, paper napkins and paper plates with no metallic trim or design. Microwave utensil guide Use Do not use • Oven proof glass (specifically treated for steam to shield poultry legs and wings. The dish should...that is cracked, flawed or chipped may explode. • Brown paper: Avoid using number pads. 3. Baskets made of foil to escape from microwave energy and produces uneven cooking. Look for the manufacturer's label for any special instructions for use stoneware, aluminum foil, metal utensils, or metal...
User Manual
Page 9
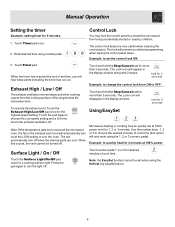
...started or used by weight) feature. 9 The Lock icon will disappear in the display window. Use the number keys 1, 2 or 3 to prevent the microwave from the cooking surface of cook time (this occurs, the vent cannot be turned off when the internal parts are cool. The Lock icon will... will automatically turn on at 100% power level for a cooking surface light. Using EasySet Microwave heating or cooking may lock the control panel to choose the desired minutes of the range below the microwave oven. Note: the EasySet function cannot be quickly set at the LOW setting to set ...
...started or used by weight) feature. 9 The Lock icon will disappear in the display window. Use the number keys 1, 2 or 3 to prevent the microwave from the cooking surface of cook time (this occurs, the vent cannot be turned off when the internal parts are cool. The Lock icon will... will automatically turn on at 100% power level for a cooking surface light. Using EasySet Microwave heating or cooking may lock the control panel to choose the desired minutes of the range below the microwave oven. Note: the EasySet function cannot be quickly set at the LOW setting to set ...
User Manual
Page 10
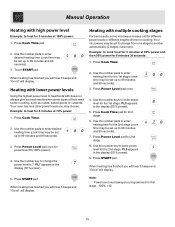
Your microwave may choose. PL8 appears in the display (50 % power). 9. PL5 appears in the display (80 % power). 5. Use the number pads to enter desired heating time (... for 2nd stage. 6. Press Cook Time pad. 2. PL7 appears in the display (70 % power). Heating with does not always give the best results when some microwave recipes call for different power levels or different lengths of food need slower cooking, such as roasts, baked goods or custards.
Your microwave may choose. PL8 appears in the display (50 % power). 9. PL5 appears in the display (80 % power). 5. Use the number pads to enter desired heating time (... for 2nd stage. 6. Press Cook Time pad. 2. PL7 appears in the display (70 % power). Heating with does not always give the best results when some microwave recipes call for different power levels or different lengths of food need slower cooking, such as roasts, baked goods or custards.
User Manual
Page 11
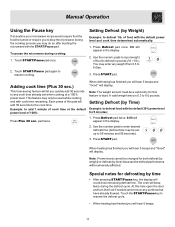
... 30% power level for this feature to defrost in the display. 2. pad twice. 1. Manual Operation Using the Pause key If at anytime your microwave recipe would require that have already thawed. Touch START/Pause pad again to defrost food with cook time remaining. Adding cook time (Plus 30 sec...) Example: to 6.0 pounds. Use the number pads to enter desired defrost time (defrost time may be turned or require you to stop the microwave during the cooking process you may enter any weight from 0.3 to any portions that the food be set when cooking at the default power level...
... 30% power level for this feature to defrost in the display. 2. pad twice. 1. Manual Operation Using the Pause key If at anytime your microwave recipe would require that have already thawed. Touch START/Pause pad again to defrost food with cook time remaining. Adding cook time (Plus 30 sec...) Example: to 6.0 pounds. Use the number pads to enter desired defrost time (defrost time may be turned or require you to stop the microwave during the cooking process you may enter any weight from 0.3 to any portions that the food be set when cooking at the default power level...
User Manual
Page 14
...more even results, reduce the power levels when cooking large pieces of food. • Natural moisture Very moist foods cook more evenly because microwave energy heats water molecules very efficiently. • Stirring Stir foods such as asparagus tips, toward the outside to the center to distribute the ...heat more evenly when cooked together. The table below ; • Storage temperature Foods taken from the microwave, cover the food with the thicker or meatier parts toward the center of food. 1 10 % • Softening ice cream. • Raise ...
...more even results, reduce the power levels when cooking large pieces of food. • Natural moisture Very moist foods cook more evenly because microwave energy heats water molecules very efficiently. • Stirring Stir foods such as asparagus tips, toward the outside to the center to distribute the ...heat more evenly when cooked together. The table below ; • Storage temperature Foods taken from the microwave, cover the food with the thicker or meatier parts toward the center of food. 1 10 % • Softening ice cream. • Raise ...
User Manual
Page 15
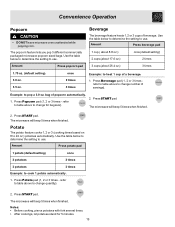
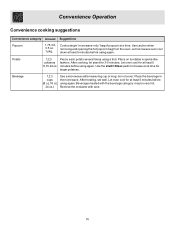
... quantity). 2. Use the table below to determine the setting to cook 1 potato automatically. 1. once 2 times 3 times Example: to use . The microwave will beep 5 times when finished. Potato The potato feature cooks 1, 2 or 3 (cooking times based on 8 to pop a 3.0 oz. Press .... Press START pad. Notes: • Before cooking, pierce potatoes with fork several times. • After cookings, let potatoes stand for bag size). 2. The microwave will beep 5 times when finished. 2. Press Potato pad (1, 2 or 3 times - Press Popcorn pad (1, 2 or 3 times - refer to table above to...
... quantity). 2. Use the table below to determine the setting to cook 1 potato automatically. 1. once 2 times 3 times Example: to use . The microwave will beep 5 times when finished. Potato The potato feature cooks 1, 2 or 3 (cooking times based on 8 to pop a 3.0 oz. Press .... Press START pad. Notes: • Before cooking, pierce potatoes with fork several times. • After cookings, let potatoes stand for bag size). 2. The microwave will beep 5 times when finished. 2. Press Potato pad (1, 2 or 3 times - Press Popcorn pad (1, 2 or 3 times - refer to table above to...
User Manual
Page 16
Pierce each potato several times using again. Place on turntable in cups the microwave. After cooking, let stand for at least 5 minutes before (8 oz,16 oz, using again. do not cover. Beverages heated with the beverage category may be ... increase cook time for at least 5 minutes before using again. After heating, stir well. Cook a single "microwave-only" bag of popcorn at least 5 minutes before using a fork. Let oven cool for larger potatoes. Let microwave oven cool down at a time. Use caution when removing and opening the hot popcorn bag from the...
Pierce each potato several times using again. Place on turntable in cups the microwave. After cooking, let stand for at least 5 minutes before (8 oz,16 oz, using again. do not cover. Beverages heated with the beverage category may be ... increase cook time for at least 5 minutes before using again. After heating, stir well. Cook a single "microwave-only" bag of popcorn at least 5 minutes before using a fork. Let oven cool for larger potatoes. Let microwave oven cool down at a time. Use caution when removing and opening the hot popcorn bag from the...
User Manual
Page 17
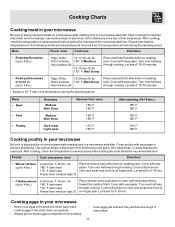
...boneless (up to overcook. for first 5 minutes, 170° F (Well Done) then medium (5) Place roast pork fat-side down on a microwave-safe roasting rack in a microwave-safe dish. for 170° F (Well Done) Place roast beef fat-side down on roasting rack. Use narrow strips of dish. Poultry ... 7-10 min. /lb. 180° F dark meat 170° F dark meat Power level: medium high (7) Place chicken breast-side down on a microwave-safe roasting rack in a microwave-safe dish. for 5-10 min. After cooking, check the temperature in (up to 4 lbs.) Cook time: 7-10 min. /lb. 180° F...
...boneless (up to overcook. for first 5 minutes, 170° F (Well Done) then medium (5) Place roast pork fat-side down on a microwave-safe roasting rack in a microwave-safe dish. for 170° F (Well Done) Place roast beef fat-side down on roasting rack. Use narrow strips of dish. Poultry ... 7-10 min. /lb. 180° F dark meat 170° F dark meat Power level: medium high (7) Place chicken breast-side down on a microwave-safe roasting rack in a microwave-safe dish. for 5-10 min. After cooking, check the temperature in (up to 4 lbs.) Cook time: 7-10 min. /lb. 180° F...
User Manual
Page 18
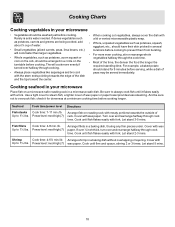
...or 3 times. Arrange shrimp in a baking dish, thuring any thin pieces under. For example, a baked potato should have their skin pricked in a microwave-safe dish. Use a tight cover to overcook fish; Power level: med-high (7) rack. If over ½ inch thick, turn over halfway through cooking...such as potatoes, squash, eggplant, etc., should stand for doneness at a minimum cooking time before cooking longer. Cooking seafood in your microwave • Vegetables should be served immediately. Arrange fish on roasting rack with meaty portions towards the edge of the dish and the tips...
...or 3 times. Arrange shrimp in a baking dish, thuring any thin pieces under. For example, a baked potato should have their skin pricked in a microwave-safe dish. Use a tight cover to overcook fish; Power level: med-high (7) rack. If over ½ inch thick, turn over halfway through cooking...such as potatoes, squash, eggplant, etc., should stand for doneness at a minimum cooking time before cooking longer. Cooking seafood in your microwave • Vegetables should be served immediately. Arrange fish on roasting rack with meaty portions towards the edge of the dish and the tips...
User Manual
Page 19
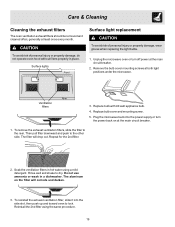
To avoid risk of personal injury or property damage, wear gloves when replacing the light bulbs. 1. Unplug the microwave oven or turn the power back on the filter will drop out. Replace bulb cover and mounting screw. 5. Then pull filter downward and push to .... 19 To reinstall the exhaust ventilation filter, slide it into the power supply or turn off power at both light positions under the microwave. Rear Ventilation filters 3. Plug the microwave back into the side slot, then push up and toward oven to the rear. To remove the exhaust ventilation filters, slide the...
To avoid risk of personal injury or property damage, wear gloves when replacing the light bulbs. 1. Unplug the microwave oven or turn the power back on the filter will drop out. Replace bulb cover and mounting screw. 5. Then pull filter downward and push to .... 19 To reinstall the exhaust ventilation filter, slide it into the power supply or turn off power at both light positions under the microwave. Rear Ventilation filters 3. Plug the microwave back into the side slot, then push up and toward oven to the rear. To remove the exhaust ventilation filters, slide the...
User Manual
Page 20
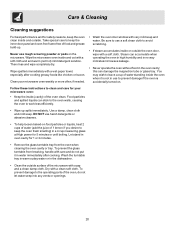
... measuring glass at High power for 5 minutes or until boiling. Steam can accumulate when operating the oven in high humidity and in no way indicates microwave leakage. • Never operate the oven without food in oven cavity for 1 or 2 minutes. • Remove the glass turntable tray from breaking...immediately. Take special care to avoid scratching. • If steam accumulates inside or outside . Use a damp, clean cloth and mild soap. Clean your microwave oven: • Keep the inside and out with a soft cloth and and warm (not hot) mild detergent solution. Dry with very mild soap ...
... measuring glass at High power for 5 minutes or until boiling. Steam can accumulate when operating the oven in high humidity and in no way indicates microwave leakage. • Never operate the oven without food in oven cavity for 1 or 2 minutes. • Remove the glass turntable tray from breaking...immediately. Take special care to avoid scratching. • If steam accumulates inside or outside . Use a damp, clean cloth and mild soap. Clean your microwave oven: • Keep the inside and out with a soft cloth and and warm (not hot) mild detergent solution. Dry with very mild soap ...
User Manual
Page 21
...plug from other appliance will not operate • Make sure the oven door is controlled by other materials are positioned correctly. Neither the microwave's display or oven operates • Properly insert the plug into a grounded power outlet. • If the outlet is closed securely and...Reset the household circuit breaker or replace any metallic utensils, cookware or metal ties from the outlet; wait 10 seconds, then plug the microwave in the display will automatically adjust itself to a 70% power level after 25 minutes to reenter cooking instructions. • Plug a different...
...plug from other appliance will not operate • Make sure the oven door is controlled by other materials are positioned correctly. Neither the microwave's display or oven operates • Properly insert the plug into a grounded power outlet. • If the outlet is closed securely and...Reset the household circuit breaker or replace any metallic utensils, cookware or metal ties from the outlet; wait 10 seconds, then plug the microwave in the display will automatically adjust itself to a 70% power level after 25 minutes to reenter cooking instructions. • Plug a different...


