User Manual
Page 1
Visit the Frigidaire Web Site at: http://www.frigidaire.com Over-the-Range Microwave Oven with Convenience Pad Welcome 2 Important Safety Instructions .....3-6 Features and Specifications .......... 7 Before Operating 8 Manual Operation 9-14 Convenience Operation ......... 15-16 Cooking Charts 17-18 Care & Cleaning 19-20 Before You Call Solutions to Common Problems 21 Questions or for Service Call: 1-888-312-2117 Warranty Back Page READ AND SAVE THESE INSTRUCTIONS p/n 316495004 rev B (0706)
Visit the Frigidaire Web Site at: http://www.frigidaire.com Over-the-Range Microwave Oven with Convenience Pad Welcome 2 Important Safety Instructions .....3-6 Features and Specifications .......... 7 Before Operating 8 Manual Operation 9-14 Convenience Operation ......... 15-16 Cooking Charts 17-18 Care & Cleaning 19-20 Before You Call Solutions to Common Problems 21 Questions or for Service Call: 1-888-312-2117 Warranty Back Page READ AND SAVE THESE INSTRUCTIONS p/n 316495004 rev B (0706)
User Manual
Page 2
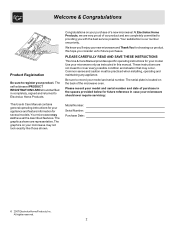
... THESE INSTRUCTIONS This Use & Care Manual provides specific operating instructions for several models. Be sure to register your product. Your microwave may not look exactly like those shown. The graphics on the back of the microwave oven. Welcome & Congratulations Product Registration Be sure to record your model and serial number. The graphics shown are completely committed to providing you with the best service possible. Model Number: Serial Number: Purchase...
... THESE INSTRUCTIONS This Use & Care Manual provides specific operating instructions for several models. Be sure to register your product. Your microwave may not look exactly like those shown. The graphics on the back of the microwave oven. Welcome & Congratulations Product Registration Be sure to record your model and serial number. The graphics shown are completely committed to providing you with the best service possible. Model Number: Serial Number: Purchase...
User Manual
Page 5
... and latches (broken or loosended), 3. door seals and sealing surfaces. • Oven should not be be adjusted or repaired by anyone except properaly qualified service personnel. door (bent), 2. It is important not to defeat or tampler with the door open since open door operation can result in harmful exposure to accumulate on sealing surfaces. • DO NOT use any cleaning materials on the oven door...
... and latches (broken or loosended), 3. door seals and sealing surfaces. • Oven should not be be adjusted or repaired by anyone except properaly qualified service personnel. door (bent), 2. It is important not to defeat or tampler with the door open since open door operation can result in harmful exposure to accumulate on sealing surfaces. • DO NOT use any cleaning materials on the oven door...
User Manual
Page 6
... before placing bag in oven. • If materials inside the oven to facilitate cooking. • Remove wire twist-ties from HEATED surfaces. • DO NOT let cord hang over edge of table or counter. • Review the door cleaning instructions in the Care & Cleaning section. • Clean the ventillating hood frequently. • DO NOT allow grease to accumulate on the hood or filters. • Use care when cleaning the ventilating hood filters. for example, closed jars...
... before placing bag in oven. • If materials inside the oven to facilitate cooking. • Remove wire twist-ties from HEATED surfaces. • DO NOT let cord hang over edge of table or counter. • Review the door cleaning instructions in the Care & Cleaning section. • Clean the ventillating hood frequently. • DO NOT allow grease to accumulate on the hood or filters. • Use care when cleaning the ventilating hood filters. for example, closed jars...
User Manual
Page 7
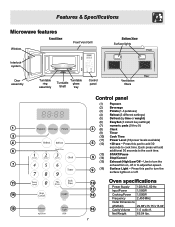
... Microwave features Front View Window Front Vent Grill Bottom View Surface lights Front Interlock system Door assembly 1 2 4 6 7 11 14 15 Turntable ring assembly Turntable Turntable glass Shaft tray Control panel Rear Ventilation filters Control panel (1) Popcorn (2) Beverage (3) Potato (1-3 potatoes) (4) Reheat (3 different settings) (5) Defrost (by time or weight) (6) EasySet (3 instant key settings) (7) 3 (8) numeric pads (0 thru 9) Clock (9) Timer (10) Cook Time (11) Power Level (10 power levels available) 5 (12) +30 sec ~ Press this pad to turn the exhaust fan...
... Microwave features Front View Window Front Vent Grill Bottom View Surface lights Front Interlock system Door assembly 1 2 4 6 7 11 14 15 Turntable ring assembly Turntable Turntable glass Shaft tray Control panel Rear Ventilation filters Control panel (1) Popcorn (2) Beverage (3) Potato (1-3 potatoes) (4) Reheat (3 different settings) (5) Defrost (by time or weight) (6) EasySet (3 instant key settings) (7) 3 (8) numeric pads (0 thru 9) Clock (9) Timer (10) Cook Time (11) Power Level (10 power levels available) 5 (12) +30 sec ~ Press this pad to turn the exhaust fan...
User Manual
Page 8
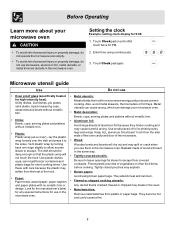
... using number pads. 3. Microwave utensil guide Use Do not use • Oven proof glass (specifically treated for use them in the microwave oven. 2. Vent plastic wrap by turning back one edge slightly to allow excess steam to shield poultry legs and wings. They become hot and could cause a fire. 8 Look for the manufacturer's label for any special instructions for high intensity heat): Utility dishes, loaf dishes, pie plates...
... using number pads. 3. Microwave utensil guide Use Do not use • Oven proof glass (specifically treated for use them in the microwave oven. 2. Vent plastic wrap by turning back one edge slightly to allow excess steam to shield poultry legs and wings. They become hot and could cause a fire. 8 Look for the manufacturer's label for any special instructions for high intensity heat): Utility dishes, loaf dishes, pie plates...
User Manual
Page 9
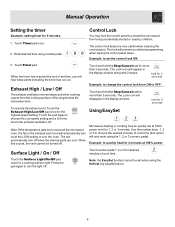
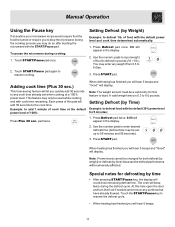
... setting and a 3rd time to set when using the Defrost (by children. The Lock icon will prevent accidental programming when wiping the control panel clean. Using EasySet Microwave heating or cooking may lock the control panel to prevent the microwave from being accidentally started or used by weight) feature. 9 Touch Timer pad. When the timer has reached the end of the range below the microwave oven. The will hear beep alerts indicating the timer has run out. Touch Timer pad once. 2. Touch number...
... setting and a 3rd time to set when using the Defrost (by children. The Lock icon will prevent accidental programming when wiping the control panel clean. Using EasySet Microwave heating or cooking may lock the control panel to prevent the microwave from being accidentally started or used by weight) feature. 9 Touch Timer pad. When the timer has reached the end of the range below the microwave oven. The will hear beep alerts indicating the timer has run out. Touch Timer pad once. 2. Touch number...
User Manual
Page 10
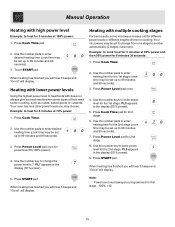
... 100% power: 1. When heating has finished you will hear 5 beeps and "Good" will display. Touch STARTpad. PL7 appears in the display (50 % power). 9. PL8 appears in the display (80 % power). 5. Press START pad. Your microwave may be programmed for 2nd stage. 8. Use the number pads to enter desired heating time (cook time may be set to change the power level to 99 minutes and 99 seconds). 3. Press Power Level pad once. 4. Manual Operation Heating with multiple cooking stages...
... 100% power: 1. When heating has finished you will hear 5 beeps and "Good" will display. Touch STARTpad. PL7 appears in the display (50 % power). 9. PL8 appears in the display (80 % power). 5. Press START pad. Your microwave may be programmed for 2nd stage. 8. Use the number pads to enter desired heating time (cook time may be set to change the power level to 99 minutes and 99 seconds). 3. Press Power Level pad once. 4. Manual Operation Heating with multiple cooking stages...
User Manual
Page 11
... heating has finished you will be turned or require you to stop the microwave during cooking: 1. Note: Power levels cannot be changed for this time open the door and turn the food if needed and remove any cook time already set up to 99 minutes and 99 seconds). 3. The oven will appear in pounds (10 = 1lb.) You may only be used while cooking and with the default power level and cook time determined automatically: 1. Touch the START...
... heating has finished you will be turned or require you to stop the microwave during cooking: 1. Note: Power levels cannot be changed for this time open the door and turn the food if needed and remove any cook time already set up to 99 minutes and 99 seconds). 3. The oven will appear in pounds (10 = 1lb.) You may only be used while cooking and with the default power level and cook time determined automatically: 1. Touch the START...

User Manual
Page 12
... cooking the food. • If the frozen food is a minimum of 0°F (taken directly from 0.3 to 48 oz.) After each stage, remove any pieces of aluminum foil. Let stand, covered for 10-20 minutes. 12 Let stand for 15-30 minutes. • Steaks, chops or fish 0.5 to 3 lbs. (8 to touch the oven cavity walls when defrosting. Manual Operation Defrosting tips • When using the defrost weight...
... cooking the food. • If the frozen food is a minimum of 0°F (taken directly from 0.3 to 48 oz.) After each stage, remove any pieces of aluminum foil. Let stand, covered for 10-20 minutes. 12 Let stand for 15-30 minutes. • Steaks, chops or fish 0.5 to 3 lbs. (8 to touch the oven cavity walls when defrosting. Manual Operation Defrosting tips • When using the defrost weight...
User Manual
Page 13
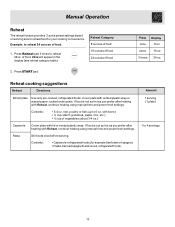
... under plate. Amount 1 serving (1 plate) 1 to reheat 24oz. Pasta Stir foods once before serving. Manual Operation Reheat The reheat feature provides 3 quick preset settings based on serving size to 6 oz. Cover plate with Reheat, continue heating using manual time and power level settings. Reheat Category 8 ounces of food 16 ounces of food 24 ounces of vegetables (about 3-4 oz.) Casserole Cover plate with Reheat, continue heating using manual time and power level settings. If food is not as hot as you...
... under plate. Amount 1 serving (1 plate) 1 to reheat 24oz. Pasta Stir foods once before serving. Manual Operation Reheat The reheat feature provides 3 quick preset settings based on serving size to 6 oz. Cover plate with Reheat, continue heating using manual time and power level settings. Reheat Category 8 ounces of food 16 ounces of food 24 ounces of vegetables (about 3-4 oz.) Casserole Cover plate with Reheat, continue heating using manual time and power level settings. If food is not as hot as you...
User Manual
Page 14
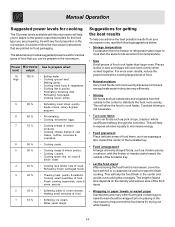
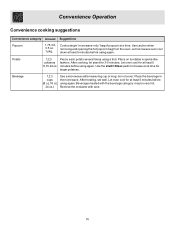
... meatier parts toward the center of the turntable tray. • Food arrangement Arrange unevenly shaped foods, such as casseroles and vegetable from the microwave, cover the food with any food prepartion in the microwave. This will help you can be wrapped prior to finish cooking. The table below ; • Storage temperature Foods taken from your microwave oven, read the following suggestions below provides suggested power levels for...
... meatier parts toward the center of the turntable tray. • Food arrangement Arrange unevenly shaped foods, such as casseroles and vegetable from the microwave, cover the food with any food prepartion in the microwave. This will help you can be wrapped prior to finish cooking. The table below ; • Storage temperature Foods taken from your microwave oven, read the following suggestions below provides suggested power levels for...
User Manual
Page 15
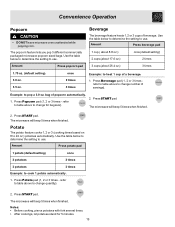
... 3 times Example: to change quantity). 2. Press START pad. Press START pad. Use the table below to determine the setting to heat 1 cup of popcorn automatically. 1. refer to table above to change for 5 minutes. 15 The microwave will beep 5 times when finished. 2. Notes: • Before cooking, pierce potatoes with fork several times. • After cookings, let potatoes stand for bag size). 2. Press Beverage pad (1, 2 or 3 times refer to table above to change number...
... 3 times Example: to change quantity). 2. Press START pad. Press START pad. Use the table below to determine the setting to heat 1 cup of popcorn automatically. 1. refer to table above to change for 5 minutes. 15 The microwave will beep 5 times when finished. 2. Notes: • Before cooking, pierce potatoes with fork several times. • After cookings, let potatoes stand for bag size). 2. Press Beverage pad (1, 2 or 3 times refer to table above to change number...
User Manual
Page 16
... several times using again. After heating, stir well. Use the start/+30sec pad to increase cook time for 3-5 minutes. Let oven cool for at a time. Place on turntable in cups the microwave. Beverages heated with the beverage category may be very hot. 24 oz.) Remove the container with care. 16 After cooking, let stand for larger potatoes. Use caution when removing and opening the hot popcorn bag from the oven. Cook a single "microwave-only...
... several times using again. After heating, stir well. Use the start/+30sec pad to increase cook time for 3-5 minutes. Let oven cool for at a time. Place on turntable in cups the microwave. Beverages heated with the beverage category may be very hot. 24 oz.) Remove the container with care. 16 After cooking, let stand for larger potatoes. Use caution when removing and opening the hot popcorn bag from the oven. Cook a single "microwave-only...
User Manual
Page 17
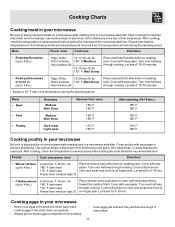
...; Beef Doneness Medium Well Done Remove from bursting. • Cook eggs just until set; Cover with wax paper to prevent splattering. Cooking Charts Cooking meat in your microwave Be sure to place poultry on a microwave-safe roasting rack in a microwave-safe dish. Cook until juices run clear and meat near bone is no longer pink. Start cooking the meat fat side down on...
...; Beef Doneness Medium Well Done Remove from bursting. • Cook eggs just until set; Cover with wax paper to prevent splattering. Cooking Charts Cooking meat in your microwave Be sure to place poultry on a microwave-safe roasting rack in a microwave-safe dish. Cook until juices run clear and meat near bone is no longer pink. Start cooking the meat fat side down on...
User Manual
Page 18
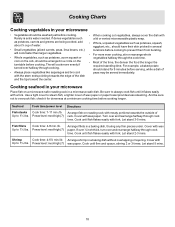
... wax paper. Fish fillets Cook time: 4-8 min./lb. Power level: med-high (7) rack. Arrange shrimp in your microwave Place fish on a microwave-safe roasting rack in a baking dish, thuring any thin pieces under. Arrange fish on the turntable before serving, while a dish of Up to steam fish; Cover with the stem ends pointing towards the outside of peas may be sure...
... wax paper. Fish fillets Cook time: 4-8 min./lb. Power level: med-high (7) rack. Arrange shrimp in your microwave Place fish on a microwave-safe roasting rack in a baking dish, thuring any thin pieces under. Arrange fish on the turntable before serving, while a dish of Up to steam fish; Cover with the stem ends pointing towards the outside of peas may be sure...
User Manual
Page 19
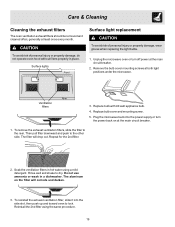
... microwave oven or turn the power back on the filter will drop out. Replace bulb with 40 watt appliance bulb. 4. Replace bulb cover and mounting screw. 5. Repeat for the 2nd filter. 2. The filter will corrode and darken. 3. Soak the ventilation filters in hot water using the same procedure. 19 The aluminum on at the main circuit breaker. 2. Care & Cleaning Cleaning the exhaust filters The oven ventilation exhaust filters should be removed and cleaned often; generally at both light positions under the microwave. Remove the bulb cover mounting screws...
... microwave oven or turn the power back on the filter will drop out. Replace bulb with 40 watt appliance bulb. 4. Replace bulb cover and mounting screw. 5. Repeat for the 2nd filter. 2. The filter will corrode and darken. 3. Soak the ventilation filters in hot water using the same procedure. 19 The aluminum on at the main circuit breaker. 2. Care & Cleaning Cleaning the exhaust filters The oven ventilation exhaust filters should be removed and cleaned often; generally at both light positions under the microwave. Remove the bulb cover mounting screws...
User Manual
Page 20
...; Remove the glass turntable tray from breaking, handle with care and do not let water seep into any vents or openings. 20 Follow these instructions to leave a cup of water standing inside and outside surface of food and grease build-up spills immediately. Use a damp, clean cloth and mild soap. Let stand in oven cavity for your microwave oven weekly or more often, if needed. • Wash the oven door window...
...; Remove the glass turntable tray from breaking, handle with care and do not let water seep into any vents or openings. 20 Follow these instructions to leave a cup of water standing inside and outside surface of food and grease build-up spills immediately. Use a damp, clean cloth and mild soap. Let stand in oven cavity for your microwave oven weekly or more often, if needed. • Wash the oven door window...
User Manual
Page 21
... the interior oven walls. Please note : If the oven is turned on. • Press the STOP/cancel pad twice and attempt to reenter cooking instructions. • Plug a different appliance into a different power outlet. The oven display works, but the oven will show 00:00. • Reset the clock and any cooking instructions. • Reset the household circuit breaker or replace any metallic utensils, cookware or metal ties from the oven cavity. Food is cooking...
... the interior oven walls. Please note : If the oven is turned on. • Press the STOP/cancel pad twice and attempt to reenter cooking instructions. • Plug a different appliance into a different power outlet. The oven display works, but the oven will show 00:00. • Reset the clock and any cooking instructions. • Reset the household circuit breaker or replace any metallic utensils, cookware or metal ties from the oven cavity. Food is cooking...
User Manual
Page 24
... this warranty. 5. Products used in the USA and Canada. Service calls to correct the installation of your appliance or to instruct you how to another party or removed outside the USA or Canada. 3. Damages to the finish of appliance or home incurred during installation, including but not limited to repair or replace appliance light bulbs, air filters, water filters, other consumables, or knobs, handles, or...
... this warranty. 5. Products used in the USA and Canada. Service calls to correct the installation of your appliance or to instruct you how to another party or removed outside the USA or Canada. 3. Damages to the finish of appliance or home incurred during installation, including but not limited to repair or replace appliance light bulbs, air filters, water filters, other consumables, or knobs, handles, or...


