User Manual
Page 2
... THESE INSTRUCTIONS This Use & Care Manual provides specific operating instructions for your microwave only as instructed in this manual. Common sense and caution must be filled in case your microwave should be practiced when installing, operating and maintaining any appliance. The serial plate is our number one priority. Use your model. All rights reserved. 2 The self-addressed PRODUCT REGISTRATION CARD should ever require servicing: This Use & Care Manual contains general operating instructions for several models. We...
... THESE INSTRUCTIONS This Use & Care Manual provides specific operating instructions for your microwave only as instructed in this manual. Common sense and caution must be filled in case your microwave should be practiced when installing, operating and maintaining any appliance. The serial plate is our number one priority. Use your model. All rights reserved. 2 The self-addressed PRODUCT REGISTRATION CARD should ever require servicing: This Use & Care Manual contains general operating instructions for several models. We...
User Manual
Page 6
... table or counter. • Review the door cleaning instructions in the Care & Cleaning section. • Clean the ventillating hood frequently. • DO NOT allow grease to facilitate cooking. • Remove wire twist-ties from HEATED surfaces. • DO NOT let cord hang over edge of fir in the oven cavity: injury to persons or exposure to service oven. SAVE THESE INSTRUCTIONS 6 It is made for household use only. • DO NOT operate this oven...
... table or counter. • Review the door cleaning instructions in the Care & Cleaning section. • Clean the ventillating hood frequently. • DO NOT allow grease to facilitate cooking. • Remove wire twist-ties from HEATED surfaces. • DO NOT let cord hang over edge of fir in the oven cavity: injury to persons or exposure to service oven. SAVE THESE INSTRUCTIONS 6 It is made for household use only. • DO NOT operate this oven...
User Manual
Page 8
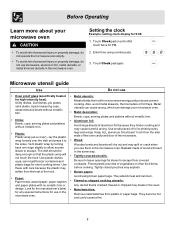
..., serving plates and platters without metallic trim. • Aluminum foil: Avoid large sheets of wood will not touch the food. Metal utensils can cause arcing, which can burn. • Flawed or chipped cooking utensils: Any utensil that the plastic wrap will react in the microwave oven. 2. Look for the manufacturer's label for any special instructions for use • Oven proof glass (specifically treated...
..., serving plates and platters without metallic trim. • Aluminum foil: Avoid large sheets of wood will not touch the food. Metal utensils can cause arcing, which can burn. • Flawed or chipped cooking utensils: Any utensil that the plastic wrap will react in the microwave oven. 2. Look for the manufacturer's label for any special instructions for use • Oven proof glass (specifically treated...
User Manual
Page 9
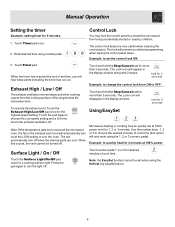
... accidentally started or used by weight) feature. 9 Note: the EasySet function cannot be quickly set when using number pads. The Lock icon will automatically turn on at the LOW setting to quickly heat for 2 minutes at 100% power level for desired minutes of the range below the microwave oven. The control lock feature is very useful when cleaning the control panel. Touch number pads 1, 2 or 3 for 1, 2 or 3 minutes. Touch Timer pad once. 2. Manual Operation Setting the timer Example: setting timer for a cooking surface light. Control Lock You...
... accidentally started or used by weight) feature. 9 Note: the EasySet function cannot be quickly set when using number pads. The Lock icon will automatically turn on at the LOW setting to quickly heat for 2 minutes at 100% power level for desired minutes of the range below the microwave oven. The control lock feature is very useful when cleaning the control panel. Touch number pads 1, 2 or 3 for 1, 2 or 3 minutes. Touch Timer pad once. 2. Manual Operation Setting the timer Example: setting timer for a cooking surface light. Control Lock You...
User Manual
Page 13
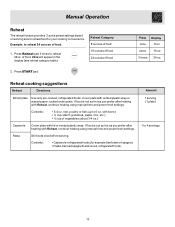
... START pad. If food is not as hot as you prefer after heating with Reheat, continue heating using manual time and power level settings. Press once Display 8 oz twice 16 oz 3 times 24 oz Reheat cooking suggestions Reheat Directions Dinner plate Use only pre-cooked, refrigerated foods. Contents: • 3-4 oz. met, poultry or fish (up to reheat 24 ounces of food. 24oz will appear in the display (see reheat category table). with vented...
... START pad. If food is not as hot as you prefer after heating with Reheat, continue heating using manual time and power level settings. Press once Display 8 oz twice 16 oz 3 times 24 oz Reheat cooking suggestions Reheat Directions Dinner plate Use only pre-cooked, refrigerated foods. Contents: • 3-4 oz. met, poultry or fish (up to reheat 24 ounces of food. 24oz will appear in the display (see reheat category table). with vented...
User Manual
Page 14
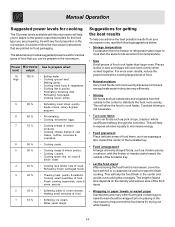
... cook time. As with any food prepartion in the microwave, it stand to finish cooking. Manual Operation Suggested power levels for cooking The 10 power levels available with foil or a casserole lid and let it is not necessary. • Turn over items Turn over foods such as casseroles and vegetable from the outside of the turntable tray. • Let the food stand After removing the food from the microwave, cover the food with this microwave...
... cook time. As with any food prepartion in the microwave, it stand to finish cooking. Manual Operation Suggested power levels for cooking The 10 power levels available with foil or a casserole lid and let it is not necessary. • Turn over items Turn over foods such as casseroles and vegetable from the outside of the turntable tray. • Let the food stand After removing the food from the microwave, cover the food with this microwave...
User Manual
Page 19
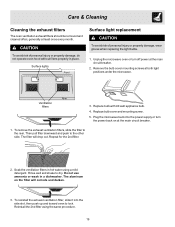
... not operate oven hood without filters properly in a dishwasher. Care & Cleaning Cleaning the exhaust filters The oven ventilation exhaust filters should be removed and cleaned often; generally at both light positions under the microwave. To avoid risk of personal injury or property damage, wear gloves when replacing the light bulbs. 1. Remove the bulb cover mounting screws at least once every month. Do not use ammonia or wash in place. Rear Ventilation filters 3. Soak the ventilation filters in hot water using the...
... not operate oven hood without filters properly in a dishwasher. Care & Cleaning Cleaning the exhaust filters The oven ventilation exhaust filters should be removed and cleaned often; generally at both light positions under the microwave. To avoid risk of personal injury or property damage, wear gloves when replacing the light bulbs. 1. Remove the bulb cover mounting screws at least once every month. Do not use ammonia or wash in place. Rear Ventilation filters 3. Soak the ventilation filters in hot water using the...
User Manual
Page 20
... inner door panel and oven fron frame free of food and grease build-up spills immediately. To prevent damage to the operating parts of 1 lemon if you desire to work less efficiently. • Wipe up . Steam can damage the magnetron tube or glass tray. Follow these instructions to leave a cup of the oven clean. To prevent the glass turntable from the oven when cleaning the oven cavity or tray. Use a damp, clean cloth...
... inner door panel and oven fron frame free of food and grease build-up spills immediately. To prevent damage to the operating parts of 1 lemon if you desire to work less efficiently. • Wipe up . Steam can damage the magnetron tube or glass tray. Follow these instructions to leave a cup of the oven clean. To prevent the glass turntable from the oven when cleaning the oven cavity or tray. Use a damp, clean cloth...
User Manual
Page 21
... the microwave in the display will not operate • Make sure the oven door is closed securely and completely. • Check to see sparks or arcing • Remove any blown fuses. • Plug a different appliance into the power outlet. The oven display works, but the oven will show 00:00. • Reset the clock and any cooking instructions. • Reset the household circuit breaker or replace any blown fuses. Food is cooking too...
... the microwave in the display will not operate • Make sure the oven door is closed securely and completely. • Check to see sparks or arcing • Remove any blown fuses. • Plug a different appliance into the power outlet. The oven display works, but the oven will show 00:00. • Reset the clock and any cooking instructions. • Reset the household circuit breaker or replace any blown fuses. Food is cooking too...
User Manual
Page 24
... change or add to any obligations under this warranty must be obtained by contacting Electrolux at the addresses or phone numbers below. Service calls which are not a part of appliance or home incurred during installation, including but not limited to repair or replace appliance light bulbs, air filters, water filters, other consumables, or knobs, handles, or other than in ordinary household use or used other cosmetic parts...
... change or add to any obligations under this warranty must be obtained by contacting Electrolux at the addresses or phone numbers below. Service calls which are not a part of appliance or home incurred during installation, including but not limited to repair or replace appliance light bulbs, air filters, water filters, other consumables, or knobs, handles, or other than in ordinary household use or used other cosmetic parts...
Installation Instructions
Page 2
.../Installation 6 Parts Included 6 Tools You Will Need 7 Mounting Space 7 Step-by-step installation guide Placement of Mounting Plate 8-10 Removing the Mounting Plate 8 Finding the Wall Studs 8 Determining Wall Plate Location 9 Aligning the Wall Plate 10 Installation Types 11-22 A Outside Top Exhaust 12-14 Attach Mounting Plate to Wall 12 Preparation of Top Cabinet 13 Checking for Proper Damper Operation 13 Mount the Microwave Oven ..........13, 14 Adjust the Exhaust Adaptor 14 Connecting Ductwork 14 B Outside Back Exhaust 15-18 Preparing Rear Wall...
.../Installation 6 Parts Included 6 Tools You Will Need 7 Mounting Space 7 Step-by-step installation guide Placement of Mounting Plate 8-10 Removing the Mounting Plate 8 Finding the Wall Studs 8 Determining Wall Plate Location 9 Aligning the Wall Plate 10 Installation Types 11-22 A Outside Top Exhaust 12-14 Attach Mounting Plate to Wall 12 Preparation of Top Cabinet 13 Checking for Proper Damper Operation 13 Mount the Microwave Oven ..........13, 14 Adjust the Exhaust Adaptor 14 Connecting Ductwork 14 B Outside Back Exhaust 15-18 Preparing Rear Wall...
Installation Instructions
Page 3
... to have the wall receptacle and circuit checked by a qualified electrician to the National Electrical Code or the prevailing local code. 3 IMPORTANT - Wire size must be located in the cabinet above the microwave oven. The power supply cord and plug should be capable of electric shock hazard from this appliance is 120 volts AC, 60 Hertz, 15 amps and 1.6 kilowatts. Installation Instructions IMPORTANT SAFETY INSTRUCTIONS This product requires...
... to have the wall receptacle and circuit checked by a qualified electrician to the National Electrical Code or the prevailing local code. 3 IMPORTANT - Wire size must be located in the cabinet above the microwave oven. The power supply cord and plug should be capable of electric shock hazard from this appliance is 120 volts AC, 60 Hertz, 15 amps and 1.6 kilowatts. Installation Instructions IMPORTANT SAFETY INSTRUCTIONS This product requires...
Installation Instructions
Page 8
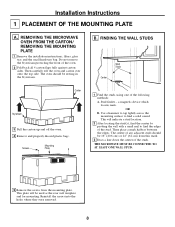
... be 16″ (40.6 cm) or 24″ (61 cm) from the mounting plate. Reinstall the screws into the holes where they were removed. 8 REMOVING THE MICROWAVE OVEN FROM THE CARTON/ REMOVING THE MOUNTING PLATE 1 Remove the installation instructions, filters, glass tray and the small hardware bag. This will be resting in the Styrofoam. The center of any adjacent studs should be used as the rear wall template and for mounting.
... be 16″ (40.6 cm) or 24″ (61 cm) from the mounting plate. Reinstall the screws into the holes where they were removed. 8 REMOVING THE MICROWAVE OVEN FROM THE CARTON/ REMOVING THE MOUNTING PLATE 1 Remove the installation instructions, filters, glass tray and the small hardware bag. This will be resting in the Styrofoam. The center of any adjacent studs should be used as the rear wall template and for mounting.
Installation Instructions
Page 11
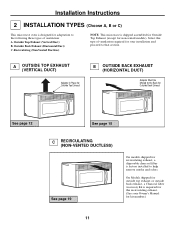
... EXHAUST (HORIZONTAL DUCT) Adaptor Must Be Moved to help remove smoke and odors. Outside Back Exhaust (Horizontal Duct) C. On Models shipped for outside top exhaust or outside back exhaust, a Charcoal filter Accessory Kit is designed for adaptation to that section. Installation Instructions 2 INSTALLATION TYPES (Choose A, B or C) This microwave oven is required for the recirculating exhaust. (See your installation and proceed to the following three types of ventilation required for your Owner's Manual for kit number...
... EXHAUST (HORIZONTAL DUCT) Adaptor Must Be Moved to help remove smoke and odors. Outside Back Exhaust (Horizontal Duct) C. On Models shipped for outside top exhaust or outside back exhaust, a Charcoal filter Accessory Kit is designed for adaptation to that section. Installation Instructions 2 INSTALLATION TYPES (Choose A, B or C) This microwave oven is required for the recirculating exhaust. (See your installation and proceed to the following three types of ventilation required for your Owner's Manual for kit number...
Installation Instructions
Page 12
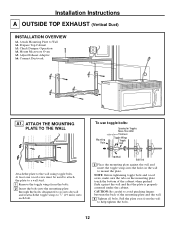
... End 3 Place the mounting plate against the wall and that the plate is properly centered under the cabinet. Check Damper Operation A4. Pull the plate away from the bolts. 2 Insert the bolts into the mounting plate through the holes designated to go into the holes in the wall to 3⁄4″ (19 mm) onto each bolt. Installation Instructions A OUTSIDE TOP EXHAUST (Vertical Duct) INSTALLATION OVERVIEW A1. Adjust...
... End 3 Place the mounting plate against the wall and that the plate is properly centered under the cabinet. Check Damper Operation A4. Pull the plate away from the bolts. 2 Insert the bolts into the mounting plate through the holes designated to go into the holes in the wall to 3⁄4″ (19 mm) onto each bolt. Installation Instructions A OUTSIDE TOP EXHAUST (Vertical Duct) INSTALLATION OVERVIEW A1. Adjust...
Installation Instructions
Page 13
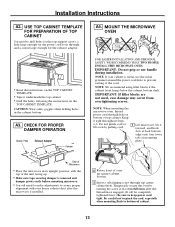
... damper is removed and damper pivots easily before mounting microwave. • You will need to drill holes for the top support screws, a hole large enough for the power cord to fit through hole in the cabinet bottom. Keep it underneath the top cabinet. • Drill the holes, following the instructions on the TOP CABINET TEMPLATE. Be careful not to pinch the cord, especially when mounting flush to prevent cutting...
... damper is removed and damper pivots easily before mounting microwave. • You will need to drill holes for the top support screws, a hole large enough for the power cord to fit through hole in the cabinet bottom. Keep it underneath the top cabinet. • Drill the holes, following the instructions on the TOP CABINET TEMPLATE. Be careful not to pinch the cord, especially when mounting flush to prevent cutting...
Installation Instructions
Page 14
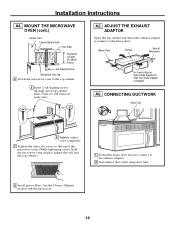
... the exhaust adaptor. 2 Seal exhaust duct joints using duct tape. 8 Install grease filters. A5. Blower Plate Damper Back of the microwave oven. (While tightening screws, hold the microwave oven in place against the wall and the top cabinet.) 1 Extend the house duct down to connect to -Side Adjustment, Slide the Exhaust Adaptor as Needed A6. See the Owner's Manual packed with the microwave. 14 ADJUST THE EXHAUST ADAPTOR Open the top cabinet and adjust the exhaust adaptor...
... the exhaust adaptor. 2 Seal exhaust duct joints using duct tape. 8 Install grease filters. A5. Blower Plate Damper Back of the microwave oven. (While tightening screws, hold the microwave oven in place against the wall and the top cabinet.) 1 Extend the house duct down to connect to -Side Adjustment, Slide the Exhaust Adaptor as Needed A6. See the Owner's Manual packed with the microwave. 14 ADJUST THE EXHAUST ADAPTOR Open the top cabinet and adjust the exhaust adaptor...

Installation Instructions
Page 15
... need to Wall B4. To remove the exhaust adaptor from the microwave oven: 1 Remove tape securing damper. 2 Raise damper flap. Attach Mounting Plate to cut an opening . B2. REMOVE EXHAUST ADAPTOR This microwave oven is shipped assembled for installation in the rear wall opening in the wall plate. • Cut the opening, following the instructions of the REAR WALL TEMPLATE. 15 Back of Microwave 4 Remove and save the screw that the wires are reinstalled. B1. PREPARING THE REAR WALL FOR OUTSIDE BACK EXHAUST You need the exhaust adaptor for top exhaust...
... need to Wall B4. To remove the exhaust adaptor from the microwave oven: 1 Remove tape securing damper. 2 Raise damper flap. Attach Mounting Plate to cut an opening . B2. REMOVE EXHAUST ADAPTOR This microwave oven is shipped assembled for installation in the rear wall opening in the wall plate. • Cut the opening, following the instructions of the REAR WALL TEMPLATE. 15 Back of Microwave 4 Remove and save the screw that the wires are reinstalled. B1. PREPARING THE REAR WALL FOR OUTSIDE BACK EXHAUST You need the exhaust adaptor for top exhaust...

Installation Instructions
Page 19
..., following the instructions on the mounting plate touch the bottom of the mounting plate and the wall. 4 Tighten all bolts. USE TOP CABINET TEMPLATE FOR PREPARATION OF TOP CABINET You need to drill holes for the top support screws and a hole large enough for the power cord to fit through the holes designated to mount the plate. To use toggle bolts: Mounting Plate Spacing for the blower motor and blower plate are securely...
..., following the instructions on the mounting plate touch the bottom of the mounting plate and the wall. 4 Tighten all bolts. USE TOP CABINET TEMPLATE FOR PREPARATION OF TOP CABINET You need to drill holes for the top support screws and a hole large enough for the power cord to fit through the holes designated to mount the plate. To use toggle bolts: Mounting Plate Spacing for the blower motor and blower plate are securely...
Installation Instructions
Page 22
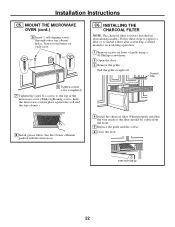
... the wire mesh of the microwave oven. (While tightening screws, hold the microwave oven in recirculating models. Charcoal Filter 6 Tighten center screw completely. 7 Tighten the outer two screws to recirculating operation. 1 Remove screws on each screw. MOUNT THE MICROWAVE OVEN (cont.) 5 Insert 2 self-aligning screws through outer top cabinet holes. C6. See the Owner's Manual packed with the microwave. 4 Install the charcoal filter. INSTALLING THE CHARCOAL FILTER NOTE: The charcoal filter is factory installed in place against the wall and the top cabinet.) 8 Install grease filters...
... the wire mesh of the microwave oven. (While tightening screws, hold the microwave oven in recirculating models. Charcoal Filter 6 Tighten center screw completely. 7 Tighten the outer two screws to recirculating operation. 1 Remove screws on each screw. MOUNT THE MICROWAVE OVEN (cont.) 5 Insert 2 self-aligning screws through outer top cabinet holes. C6. See the Owner's Manual packed with the microwave. 4 Install the charcoal filter. INSTALLING THE CHARCOAL FILTER NOTE: The charcoal filter is factory installed in place against the wall and the top cabinet.) 8 Install grease filters...


