Frigidaire FMV157GB Support Question
Frigidaire FMV157GB Support Question
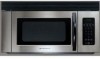
Find answers below for this question about Frigidaire FMV157GB - 1.5 cu. Ft. Microwave Oven.Need a Frigidaire FMV157GB manual? We have 3 online manuals for this item!
Question posted by flagrainbow on March 13th, 2014
Complete Door Assembly
I need to purchase a complete door assembly for Frigidaire FMV157GB, I would like to know the part number to order, cost and how to remove and replace the door. Can you assist me please?
Current Answers
Related Frigidaire FMV157GB Manual Pages
User Manual - Page 1
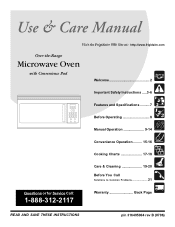
... Web Site at: http://www.frigidaire.com
Over-the-Range
Microwave Oven
with Convenience Pad
Welcome 2
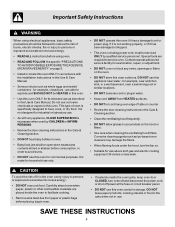
Important Safety Instructions .....3-6
Features and Specifications .......... 7
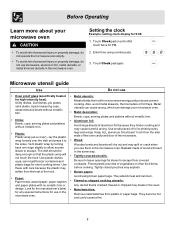
Before Operating 8
Manual Operation 9-14
Convenience Operation ......... 15-16
Cooking Charts 17-18
Care & Cleaning ...
User Manual - Page 2
.... These instructions are very proud of the microwave oven. The serial plate is our number one priority.
Use your model.
All rights reserved.
2 The self-addressed PRODUCT REGISTRATION CARD should ever require servicing:
This Use & Care Manual contains general operating instructions for your purchase of a new microwave!
PLEASE CAREFULLY READ AND SAVE THESE INSTRUCTIONS...
User Manual - Page 5
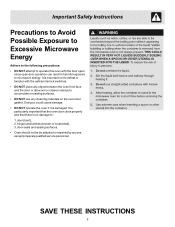
It is important not to defeat or tampler with the door open
since open door operation can result in harmful exposure to microwave energy.
SAVE THESE INSTRUCTIONS
5 It is particularly important that the oven door close properly and that there is damaged. door seals and sealing surfaces. • Oven should not be be adjusted or repaired by anyone...
User Manual - Page 6
...oven.
• If materials inside the oven to facilitate cooking.
• Remove wire twist-ties from HEATED surfaces.
• DO NOT let cord hang over edge of table or counter.
• Review the door cleaning instructions in this oven...cord AWAY from paper or plastic bags before placing bag in order to avoid burns.
• DO NOT use this oven if it has a damaged cord or power plug, if it...
User Manual - Page 7
...
16
7
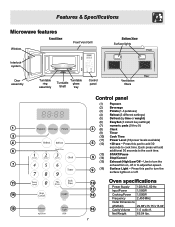
Oven specifications
Power Supply
120VAC, 60 Hz
Input Power
1,550W
Cooking Power 1,000W
Frequency
2,450 MHz
Outer Dimensions
(WxHxD)
29.88"x15.75"x 15.04"
Cavity Volume 1.5 cubic ft. Net Weight
65.04 lbs.
Features & Specifications
Microwave features
Front View
Window
Front Vent Grill
Bottom View Surface lights
Front
Interlock system
Door assembly
1 2 4 6 7
11...
User Manual - Page 8
... may explode.
• Brown paper:
Avoid using number pads. 3. Use small pieces of the food.
...microwave oven.
• Metal utensils:
Metal shields the food from the side walls of the oven cavity and door of vegetables or other food items before cooking. Pierce plastic pouches of the microwave.
• Wood:
Wooden bowls and boards will react in the oven.
• Metal twist ties:
Remove...
User Manual - Page 11
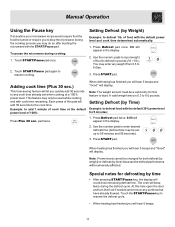
...default power level and cook time determined automatically:
1. The oven will appear in the display.
2. Touch START/Pause pad once.
2. Use the number pads to enter desired defrost time (defrost time may ...1lb.) You may do so after starting the microwave with the default 30% power level for this time open the door and turn the food if needed and remove any weight from 0.3 to the cook time...
User Manual - Page 20
... water standing inside and outside the oven door, wipe with soap and a clean damp cloth. Then rinse and wipe completely dry. Steam can accumulate when operating the oven in high humidity and in no way indicates microwave leakage.
• Never operate the oven without food in oven cavity for 1 or 2 minutes.
• Remove the glass turntable tray from...
User Manual - Page 21
... closed securely and
completely.
• Check to see sparks or arcing • Remove any blown fuses.
Move your microwave further away from the outlet;
The turntable makes noises or sticks • Clean the turntable, roller ring and oven cavity bottom.
• Make sure the turntable and roller ring are stuck to the door seal.
•...
Installation Instructions - Page 1
...8226; IMPORTANT - Keep these instructions completely and carefully.
• IMPORTANT - KEEP THESE INSTRUCTIONS. Be sure to Consumer -
Save these
instructions with the Consumer.
• Note to leave these instructions for future reference.
• Skill level - READ CAREFULLY. 7
Installation Instructions
Over the Range Microwave Oven
Questions? Observe all governing codes and...
Installation Instructions - Page 2
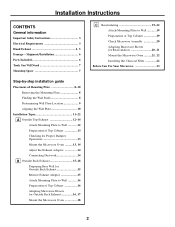
... Outside Back Exhaust 15 Remove Exhaust Adaptor 15 Attach Mounting Plate to Wall 16 Preparation of Top Cabinet 16 Adapting Microwave Blower for Outside Back Exhaust 16, 17 Mount the Microwave Oven 18
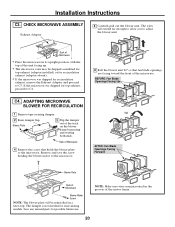
C Recirculating 19-22
Attach Mounting Plate to Wall 19 Preparation of Top Cabinet 19 Check Microwave Assembly 20 Adapting Microwave Blower for Recirculation 20...
Installation Instructions - Page 11
...is shipped assembled for Outside Top Exhaust (except for non-vented models). Recirculating (Non-Vented Ductless)
NOTE: This microwave is factory installed to help remove smoke ...number.)
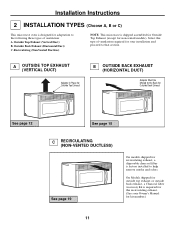
11 Select the type of ventilation: A. Outside Top Exhaust (Vertical Duct) B.
Outside Back Exhaust (Horizontal Duct) C. Installation Instructions
2 INSTALLATION TYPES (Choose A, B or C)
This microwave oven...
Installation Instructions - Page 13
... MICROWAVE OVEN
FOR EASIER INSTALLATION AND PERSONAL SAFETY, WE RECOMMEND THAT TWO PEOPLE INSTALL THIS MICROWAVE OVEN.
NOTE: If your house exhaust duct after the threads have engaged. (It will need ...in its upright position, with your cabinet is removed and
damper pivots easily before mounting microwave.
• You will be completely tightened later.) Be sure to assure proper
alignment...
Installation Instructions - Page 14
...Needed
A6. See the Owner's Manual packed with the microwave.
14
Blower Plate
Damper
Back of Microwave
For Front-to-Back or Side-to the house duct. MOUNT THE MICROWAVE OVEN...
House Duct
6 Tighten center screw completely.
7 Tighten the outer two screws to the top of Cabinet Recess
Self-Aligning Screw
Microwave Oven Top 4 Attach the microwave oven to the exhaust adaptor.
2 Seal...
Installation Instructions - Page 15

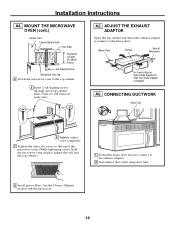
... are reinstalled. Adjust Blower B6. This will need to Wall B4.
Blower Plate
3 Slip the damper out of Microwave Lift off the blower plate. Prepare Rear Wall B2. Mount the Microwave Oven
IMPORTANT NOTES:
• Make sure the screws for outside exhaust. REMOVE EXHAUST ADAPTOR
This microwave oven is shipped assembled for installation in the wall plate.
•...
Installation Instructions - Page 18
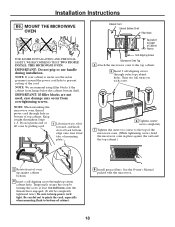
... least two full turns after the threads have engaged. (It will be completely tightened later.) Be sure to keep power cord tight.
Temporarily secure the oven by pulling cord.
1 Lift microwave, tilt it tight throughout Steps 1-3. Installation Instructions
B6. MOUNT THE MICROWAVE OVEN
FOR EASIER INSTALLATION AND PERSONAL SAFETY, WE RECOMMEND THAT TWO PEOPLE INSTALL...
Installation Instructions - Page 19

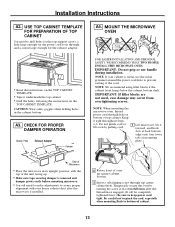
...the Microwave Oven .... USE TOP CABINET TEMPLATE FOR PREPARATION OF TOP CABINET
You need to drill holes for the top support screws and a hole...be used to attach the plate to a wall stud.
1 Remove the toggle wings from the wall to help to prevent excessive ... against the wall and that the wires are reinstalled. Check Microwave Assembly C4. Install Charcoal Filter
IMPORTANT NOTES:
• Make sure...
Installation Instructions - Page 20
...
Roll
AFTER: Fan Blade Openings Facing Forward
Blower Plate
Back of the microwave. The damper is not needed for possible future use.
Blower Plate
3 Slip the damper out of the motor frame.
20
CHECK MICROWAVE ASSEMBLY
Exhaust Adaptor
5 Carefully pull out the blower unit. Remove and save the screw holding the blower motor to the...
Installation Instructions - Page 21

.... (It will be completely tightened later.) Be sure to bottom of Microwave
C5.
Make sure the screw is tight.
9 Replace blower plate with the screw removed in Step 4. Back ...the blower unit wiring.
Temporarily secure the oven by pulling cord.
1 Lift microwave, tilt it tight throughout Steps 1-3. NOTE: When mounting the microwave oven, thread power cord through top center cabinet...
Installation Instructions - Page 22
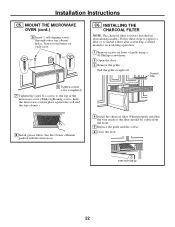
... screw completely.
7 Tighten the outer two screws to recirculating operation.
1 Remove screws on each screw. MOUNT THE MICROWAVE OVEN (cont.)
5 Insert 2 self-aligning screws through outer top cabinet holes. Installation Instructions
C5.
When properly installed, the wire mesh of the filter should be visible from the front.
5 Replace the grille and the screws.
6 Close the door...
Similar Questions

Key Pad
I am interested in learning if the key pad on this device lights up? I just moved into a home with t...
I am interested in learning if the key pad on this device lights up? I just moved into a home with t...
(Posted by dgrieco 5 years ago)


How To Replace Frigidaire Fmv157gb Microwave Door
(Posted by Medan835 10 years ago)

How To Replace Frigidaire Fmv157gc Door
(Posted by viserg 10 years ago)

Frigidaire Gallery 1.7 Cu Ft Over-the-range Microwave (stainless-steel) Won't
heat
heat
(Posted by rmrWillia 10 years ago)