User Manual
Page 2
... completely, signed and returned to cover every possible condition and situation that may not have all the described features. Use your model. Be sure to register your purchase of the microwave oven. Model Number: Serial Number: Purchase Date: © 2007 Electrolux Home Products, Inc. All rights reserved. 2 We hope you with the best service...
... completely, signed and returned to cover every possible condition and situation that may not have all the described features. Use your model. Be sure to register your purchase of the microwave oven. Model Number: Serial Number: Purchase Date: © 2007 Electrolux Home Products, Inc. All rights reserved. 2 We hope you with the best service...
Installation Instructions
Page 11
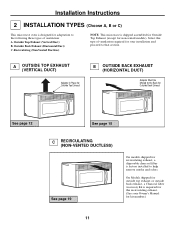
Recirculating (Non-Vented Ductless) NOTE: This microwave is required for the recirculating exhaust. (See your installation and proceed to help remove smoke and odors. On Models shipped for outside top exhaust or outside back exhaust, a Charcoal filter Accessory Kit...DUCTLESS) See page 19 On models shipped for recirculating exhaust, a disposable charcoal filter is designed for adaptation to the following three types of ventilation required for non-vented models). Installation Instructions 2 INSTALLATION TYPES (Choose A, B or C) This microwave oven is factory installed to that ...
Recirculating (Non-Vented Ductless) NOTE: This microwave is required for the recirculating exhaust. (See your installation and proceed to help remove smoke and odors. On Models shipped for outside top exhaust or outside back exhaust, a Charcoal filter Accessory Kit...DUCTLESS) See page 19 On models shipped for recirculating exhaust, a disposable charcoal filter is designed for adaptation to the following three types of ventilation required for non-vented models). Installation Instructions 2 INSTALLATION TYPES (Choose A, B or C) This microwave oven is factory installed to that ...
Installation Instructions
Page 20
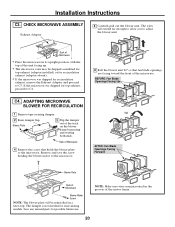
...Blower Plate Back of Microwave • Place the microwave in a later step.... the microwave. 6 Roll the blower unit 90°...; The microwave oven may be reinstalled in its upright position, with the top of the microwave. Installation ...Instructions C3. The damper is not needed for top exhaust, proceed to C5. Save any unused parts for recirculation exhaust, remove the Exhaust Adaptor and proceed to C4. CHECK MICROWAVE... ASSEMBLY Exhaust Adaptor 5 Carefully pull out the blower unit. ADAPTING MICROWAVE BLOWER FOR RECIRCULATION 1...
...Blower Plate Back of Microwave • Place the microwave in a later step.... the microwave. 6 Roll the blower unit 90°...; The microwave oven may be reinstalled in its upright position, with the top of the microwave. Installation ...Instructions C3. The damper is not needed for top exhaust, proceed to C5. Save any unused parts for recirculation exhaust, remove the Exhaust Adaptor and proceed to C4. CHECK MICROWAVE... ASSEMBLY Exhaust Adaptor 5 Carefully pull out the blower unit. ADAPTING MICROWAVE BLOWER FOR RECIRCULATION 1...
Installation Instructions
Page 22
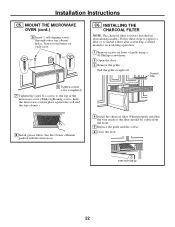
C6. Follow these steps to replace a filter or to install a filter after converting a vented model to the top of the microwave oven. (While tightening screws, hold the microwave oven in recirculating models. Insert mesh-side up 22 Turn two full turns on front of the filter should be visible from the front. 5 Replace the grille and the...
C6. Follow these steps to replace a filter or to install a filter after converting a vented model to the top of the microwave oven. (While tightening screws, hold the microwave oven in recirculating models. Insert mesh-side up 22 Turn two full turns on front of the filter should be visible from the front. 5 Replace the grille and the...


