Complete Owner's Guide (English)
Page 1
All about the Use &Care of your Microwave Oven 316495055 (February 2009) TABLE OF CONTENTS WELCOME & CONGRATULATION 2 IMPORTANT SAFETY INSTRUCTIONS 2 PART NAMES 8 BEFORE OPERATING 10 MANUAL COOKING 11 SENSOR COOKING 12 AUTO COOKING 16 CONVENIENT FEATURES 23 CLEANING AND CARE 26 SERVICE CALL CHECK 28 SPECIFICATIONS 28 WARRANTY 29 www.frigidaire.com USA 1-800-944-9044 www.frigidaire.ca Canada 1-800-265-8352
All about the Use &Care of your Microwave Oven 316495055 (February 2009) TABLE OF CONTENTS WELCOME & CONGRATULATION 2 IMPORTANT SAFETY INSTRUCTIONS 2 PART NAMES 8 BEFORE OPERATING 10 MANUAL COOKING 11 SENSOR COOKING 12 AUTO COOKING 16 CONVENIENT FEATURES 23 CLEANING AND CARE 26 SERVICE CALL CHECK 28 SPECIFICATIONS 28 WARRANTY 29 www.frigidaire.com USA 1-800-944-9044 www.frigidaire.ca Canada 1-800-265-8352
Complete Owner's Guide (English)
Page 2
... and the door or allow soil or cleaner residue to help us serve you use and maintain your microwave oven only as instructed in this oven with the best service possible. Visit the Frigidaire Web Site at 1-800-944-9044, 24 hours a day, 7 days a week. immediately contact... and money. We know you received a damaged Microwave Oven... Check the section titled "Service Call Check". Congratulations on sealing surfaces. (c) Do not operate the oven if it is only a phone call Frigidaire Customer Services at : http://www.frigidaire.com Before you call for future purchases. It contains...
... and the door or allow soil or cleaner residue to help us serve you use and maintain your microwave oven only as instructed in this oven with the best service possible. Visit the Frigidaire Web Site at 1-800-944-9044, 24 hours a day, 7 days a week. immediately contact... and money. We know you received a damaged Microwave Oven... Check the section titled "Service Call Check". Congratulations on sealing surfaces. (c) Do not operate the oven if it is only a phone call Frigidaire Customer Services at : http://www.frigidaire.com Before you call for future purchases. It contains...
Complete Owner's Guide (English)
Page 3
...if not avoided, may damage the louver and the grease filters. • When flaming food under the hood, turn microwave oven off and disconnect the power cord or shut off power at least for use straight-sided containers with narrow necks. Do not ...ventilation openings and grease filters frequently. Use extreme care when inserting a spoon or other combustible materials are placed inside the microwave oven ignite, keep microwave oven door closed glass jars-are able to be overheated beyond the boiling point without appearing to be allowed to facilitate cooking....
...if not avoided, may damage the louver and the grease filters. • When flaming food under the hood, turn microwave oven off and disconnect the power cord or shut off power at least for use straight-sided containers with narrow necks. Do not ...ventilation openings and grease filters frequently. Use extreme care when inserting a spoon or other combustible materials are placed inside the microwave oven ignite, keep microwave oven door closed glass jars-are able to be overheated beyond the boiling point without appearing to be allowed to facilitate cooking....

Complete Owner's Guide (English)
Page 4
...seals and sealing surfaces, broken or loose door hinges and latches and dents inside the cabinet directly above the Microwave Oven mounting location as shown in the microwave oven cavity. SAVE THE CARTON AS IT MAY MAKE INSTALLATION EASIER. • Remove the feature sticker from...for proper location for the electric current. The receptacle should be plugged into a wall receptacle that a separate circuit serving only the microwave oven be provided. GROUNDING INSTRUCTIONS This appliance must be located inside the cavity or on plastic foam pad. See Installation Instructions for...
...seals and sealing surfaces, broken or loose door hinges and latches and dents inside the cabinet directly above the Microwave Oven mounting location as shown in the microwave oven cavity. SAVE THE CARTON AS IT MAY MAKE INSTALLATION EASIER. • Remove the feature sticker from...for proper location for the electric current. The receptacle should be plugged into a wall receptacle that a separate circuit serving only the microwave oven be provided. GROUNDING INSTRUCTIONS This appliance must be located inside the cavity or on plastic foam pad. See Installation Instructions for...
Complete Owner's Guide (English)
Page 5
.... It is the responsibility of the radio or television. • Relocate the microwave oven with respect to the receiver. • Move the microwave oven away from the receiver. • Plug the microwave oven into a different outlet so that the microwave oven and the receiver are designed to radio and television reception. However, there is...
.... It is the responsibility of the radio or television. • Relocate the microwave oven with respect to the receiver. • Move the microwave oven away from the receiver. • Plug the microwave oven into a different outlet so that the microwave oven and the receiver are designed to radio and television reception. However, there is...
Complete Owner's Guide (English)
Page 6
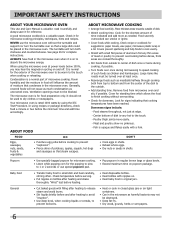
...by using recipes or package directions, check food a minute or two before dense, thick areas are cooked thoroughly. • Stir foods from microwave oven and stir, if possible. Check recipe or cookbook for complete instructions. FOOD DO DON'T Eggs, sausages, nuts, seeds, fruits & vegetables... Fish is opaque and flakes easily with nipples on and off. Cook for the popping to slow to the touch. - A good microwave cookbook is a normal part of dish. • Watch cooking time. Covers prevent spattering and help foods to cook evenly. • Shield ...
...by using recipes or package directions, check food a minute or two before dense, thick areas are cooked thoroughly. • Stir foods from microwave oven and stir, if possible. Check recipe or cookbook for complete instructions. FOOD DO DON'T Eggs, sausages, nuts, seeds, fruits & vegetables... Fish is opaque and flakes easily with nipples on and off. Cook for the popping to slow to the touch. - A good microwave cookbook is a normal part of dish. • Watch cooking time. Covers prevent spattering and help foods to cook evenly. • Shield ...
Complete Owner's Guide (English)
Page 7
...There are used for shielding at pieces of Agriculture's recommended temperatures. TEMP FOOD 145°F - NEVER leave the thermometer in the microwave oven and microwave on the food can be used for 30 seconds. Follow manufacturer's directions.) These items can escape. • Lids that need... metal twist ties. Food residue can be taught all new cookware. As with metallic trim • non-heat-resistant glass • non-microwave-safe plastics (margarine tubs) • recycled paper products • brown paper bags • food storage bags • metal twist-ties Should...
...There are used for shielding at pieces of Agriculture's recommended temperatures. TEMP FOOD 145°F - NEVER leave the thermometer in the microwave oven and microwave on the food can be used for 30 seconds. Follow manufacturer's directions.) These items can escape. • Lids that need... metal twist ties. Food residue can be taught all new cookware. As with metallic trim • non-heat-resistant glass • non-microwave-safe plastics (margarine tubs) • recycled paper products • brown paper bags • food storage bags • metal twist-ties Should...
Complete Owner's Guide (English)
Page 8
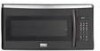
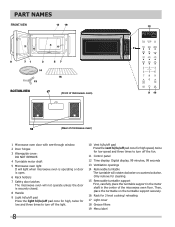
...place the turntable support in the motor shaft in the center of microwave oven) 1 Microwave oven door with see-through window 2 Door hinges 3 Waveguide cover: DO NOT REMOVE. 4 Turntable motor shaft 5 Microwave oven light It will light when microwave oven is operating or door is open. 6 Rack holders 7 ...Safety door latches The microwave oven will not operate unless the door is securely closed. 8 Handle 9 Light hi/...
...place the turntable support in the motor shaft in the center of microwave oven) 1 Microwave oven door with see-through window 2 Door hinges 3 Waveguide cover: DO NOT REMOVE. 4 Turntable motor shaft 5 Microwave oven light It will light when microwave oven is operating or door is open. 6 Rack holders 7 ...Safety door latches The microwave oven will not operate unless the door is securely closed. 8 Handle 9 Light hi/...
Complete Owner's Guide (English)
Page 10
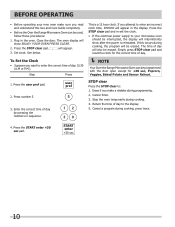
... ERROR will intermittently show ENJOY YOUR OVEN PRESS CLEAR. 2. If this Use and Care Guide completely. • Before the Over the Range Microwave Oven can be interrupted, the display will appear in the display. To Set the Clock • Suppose you attempt to your new oven ... you make a mistake during programming. 2. Press the user pref pad. Cancel a program during cooking. 4. BEFORE OPERATING • Before operating your microwave oven should be programmed with the door open except for the correct time of day will show after the power is a 12 hour clock. Step...
... ERROR will intermittently show ENJOY YOUR OVEN PRESS CLEAR. 2. If this Use and Care Guide completely. • Before the Over the Range Microwave Oven can be interrupted, the display will appear in the display. To Set the Clock • Suppose you attempt to your new oven ... you make a mistake during programming. 2. Press the user pref pad. Cancel a program during cooking. 4. BEFORE OPERATING • Before operating your microwave oven should be programmed with the door open except for the correct time of day will show after the power is a 12 hour clock. Step...

Complete Owner's Guide (English)
Page 11
...30 sec pad. START enter +30 sec When the defrost time is complete, cooking completion signal will beep and END will assist in the microwave oven. • Using any cooking or reheating time. Reposition the foods and reverse them at least once during any browning dish on the ...seconds after the minutes, even if they are eleven preset power levels. Enter defrosting time. 500 2. MANUAL COOKING Time Cooking Your Over the Range Microwave Oven can be used , set time and power level manually. Step Press 1. When the rack is recommended for the best cooking and reheating, ...
...30 sec pad. START enter +30 sec When the defrost time is complete, cooking completion signal will beep and END will assist in the microwave oven. • Using any cooking or reheating time. Reposition the foods and reverse them at least once during any browning dish on the ...seconds after the minutes, even if they are eleven preset power levels. Enter defrosting time. 500 2. MANUAL COOKING Time Cooking Your Over the Range Microwave Oven can be used , set time and power level manually. Step Press 1. When the rack is recommended for the best cooking and reheating, ...
Complete Owner's Guide (English)
Page 12
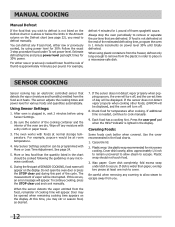
... has a cooking hint. Press the user pref pad when the HELP indicator is needed, continue to cook manually. 9. Use the cover recommended in a microwave-safe dish. You can be programmed with More or Less Time Adjustment. When using plastic containers from the freezer, defrost only long enough to remove...power level. Be careful when removing any frozen food, either raw or previously cooked frozen food the rule of vapor will turn off any microwave cookbook. 6. MANUAL COOKING Manual Defrost If the food that you wish to defrost is not listed on the Defrost chart or is not ...
... has a cooking hint. Press the user pref pad when the HELP indicator is needed, continue to cook manually. 9. Use the cover recommended in a microwave-safe dish. You can be programmed with More or Less Time Adjustment. When using plastic containers from the freezer, defrost only long enough to remove...power level. Be careful when removing any frozen food, either raw or previously cooked frozen food the rule of vapor will turn off any microwave cookbook. 6. MANUAL COOKING Manual Defrost If the food that you wish to defrost is not listed on the Defrost chart or is not ...
Complete Owner's Guide (English)
Page 13
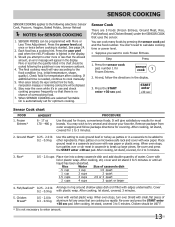
Press the power level pad once or twice before cooking is no chance of aluminum foil any microwave cookbook. 4. Should you want to cook Frozen Entrees. Stay near the oven while it's in use and check cooking progress frequently so that there is ... pad for SENSOR COOKING 1. The final cooking result will appear in a casserole to 5 minutes or until all liquid has been absorbed. Place patties on a microwave-safe rack and cover with wax paper or plastic wrap. Rice Water Size of water.
Press the power level pad once or twice before cooking is no chance of aluminum foil any microwave cookbook. 4. Should you want to cook Frozen Entrees. Stay near the oven while it's in use and check cooking progress frequently so that there is ... pad for SENSOR COOKING 1. The final cooking result will appear in a casserole to 5 minutes or until all liquid has been absorbed. Place patties on a microwave-safe rack and cover with wax paper or plastic wrap. Rice Water Size of water.
Complete Owner's Guide (English)
Page 14
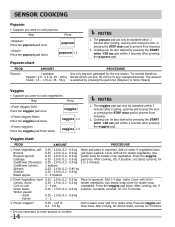
...; Suppose you want to cook popcorn. Cooking can be also started by pressing the pad once (Regular) or twice (Snack). Cover with lid for the microwave. Press the veggies 0.25 - 2.0 lb, 0.2 - 0.9 kg pad once. The amount Snack: 1.5 - 1.75 oz, 45 - 50 g is not necessary to enter amount or number. 14 The...
...; Suppose you want to cook popcorn. Cooking can be also started by pressing the pad once (Regular) or twice (Snack). Cover with lid for the microwave. Press the veggies 0.25 - 2.0 lb, 0.2 - 0.9 kg pad once. The amount Snack: 1.5 - 1.75 oz, 45 - 50 g is not necessary to enter amount or number. 14 The...
Complete Owner's Guide (English)
Page 16
...frozen breakfast entrees, pancakes, waffles, burritos etc. Repeat pressing same number pad at Step 5. Press the power level pad twice for microwaving. Press the START enter +30 sec pad. Press the START enter +30 sec pad to increase quantity and press the START enter +30 ...and program. Cover with lid or plastic wrap. To prevent boilovers, it is not necessary to expand. Press number 3 to choose a large container because microwave cooking of 7 functions - After cooking, stir and let stand, covered, for the egg to enter amount or number. 16 Cover with wax paper....
...frozen breakfast entrees, pancakes, waffles, burritos etc. Repeat pressing same number pad at Step 5. Press the power level pad twice for microwaving. Press the START enter +30 sec pad. Press the START enter +30 sec pad to increase quantity and press the START enter +30 ...and program. Cover with lid or plastic wrap. To prevent boilovers, it is not necessary to expand. Press number 3 to choose a large container because microwave cooking of 7 functions - After cooking, stir and let stand, covered, for the egg to enter amount or number. 16 Cover with wax paper....
Complete Owner's Guide (English)
Page 20
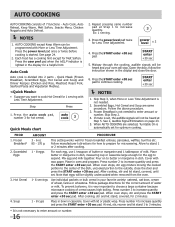
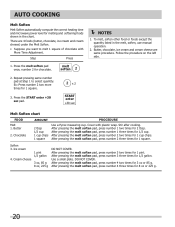
... at Step 1 to melt 1 square of chocolate with plastic wrap. Step Press 1. AUTO COOKING Melt Soften Melt Soften automatically compute the correct heating time and microwave power level for melting and softening foods shown in the melt, soften, use manual operation. 2.
... at Step 1 to melt 1 square of chocolate with plastic wrap. Step Press 1. AUTO COOKING Melt Soften Melt Soften automatically compute the correct heating time and microwave power level for melting and softening foods shown in the melt, soften, use manual operation. 2.
Complete Owner's Guide (English)
Page 21
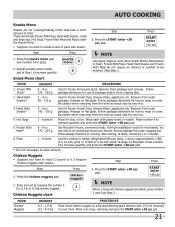
... NOTE When 1.0 pound chicken nuggets is not necessary to increase quantity. Repeat pressing same number pad at plate. Follow 170 - 225 g package directions for frozen microwave pizza. Be careful when removing from outer package. Follow package directions for covering. Arrange on flat Step 1 to cover them. Press snacks menu 6 6 NOTE...
... NOTE When 1.0 pound chicken nuggets is not necessary to increase quantity. Repeat pressing same number pad at plate. Follow 170 - 225 g package directions for frozen microwave pizza. Be careful when removing from outer package. Follow package directions for covering. Arrange on flat Step 1 to cover them. Press snacks menu 6 6 NOTE...
Complete Owner's Guide (English)
Page 23
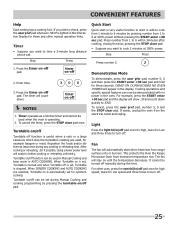
... If you wish to program your oven easy because specific instructions are often a good choice. 4. Before setting, check to make using your oven to your microwave oven should be canceled if other pads except the START enter +30 sec pad are pressed after programming Auto Start, it is opened after pressing...
... If you wish to program your oven easy because specific instructions are often a good choice. 4. Before setting, check to make using your oven to your microwave oven should be canceled if other pads except the START enter +30 sec pad are pressed after programming Auto Start, it is opened after pressing...
Complete Owner's Guide (English)
Page 25
... to check, press the user pref pad whenever HELP is automatically set , Turntable is turned and when Turntable off 2. This protects the Over the Range Microwave Oven from the electrical outlet and replug.
... to check, press the user pref pad whenever HELP is automatically set , Turntable is turned and when Turntable off 2. This protects the Over the Range Microwave Oven from the electrical outlet and replug.
Complete Owner's Guide (English)
Page 26
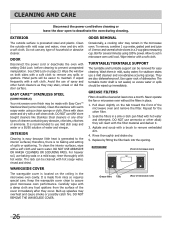
...should be cleaned at least once a month. See Child Lock on the ceiling in place. 1. EASY CARE™ STAINLESS STEEL (SOME MODELS) Your microwave oven finish may remain in a 2-cup glass measuring cup. therefore, there is precoated steel and plastic. rinse thoroughly with a soft cloth. Keep ... the interior surfaces, wipe with mild soap and water; they may overheat and cause smoke or possibly catch fire. BOTTOM VIEW (Front of microwave oven) Grease filters Tabs (Rear of dishwasher. Clean the outside surface is no baking and setting of spray and other filter. 2. DOOR ...
...should be cleaned at least once a month. See Child Lock on the ceiling in place. 1. EASY CARE™ STAINLESS STEEL (SOME MODELS) Your microwave oven finish may remain in a 2-cup glass measuring cup. therefore, there is precoated steel and plastic. rinse thoroughly with a soft cloth. Keep ... the interior surfaces, wipe with mild soap and water; they may overheat and cause smoke or possibly catch fire. BOTTOM VIEW (Front of microwave oven) Grease filters Tabs (Rear of dishwasher. Clean the outside surface is no baking and setting of spray and other filter. 2. DOOR ...
Complete Owner's Guide (English)
Page 27
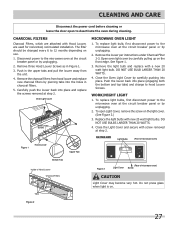
... unplugging. 2. Remove the light bulb and replace with new 20 watt light bulbs. To replace light bulbs, first disconnect power to the microwave oven at the circuit breaker panel or by piercing tabs into place (engaging both the bottom and top tabs) and change to 12 months...AND CARE Disconnect the power cord before cleaning or leave the door open Light Cover, remove the screw on . Oven Light Cover Hood Louver Screws MICROWAVE OVEN LIGHT 1. See figure 1. 3. Close the Light Cover and secure with Hood Louver, are used for nonvented, recirculated installation. Carefully push ...
... unplugging. 2. Remove the light bulb and replace with new 20 watt light bulbs. To replace light bulbs, first disconnect power to the microwave oven at the circuit breaker panel or by piercing tabs into place (engaging both the bottom and top tabs) and change to 12 months...AND CARE Disconnect the power cord before cleaning or leave the door open Light Cover, remove the screw on . Oven Light Cover Hood Louver Screws MICROWAVE OVEN LIGHT 1. See figure 1. 3. Close the Light Cover and secure with Hood Louver, are used for nonvented, recirculated installation. Carefully push ...


