Complete Owner's Guide (English)
Page 2
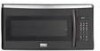
...fic operating instructions for service, there are not meant to providing you do to prevent property damage, personal injury or loss of a new microwave oven! Visit the Frigidaire Web Site at 1-800-944-9044, 24 hours a day, 7 days a week. If you call away. Save time and money. Check... the section titled "Service Call Check". A list of this manual must be practiced when installing, operating and maintaining any object between the oven front ...
...fic operating instructions for service, there are not meant to providing you do to prevent property damage, personal injury or loss of a new microwave oven! Visit the Frigidaire Web Site at 1-800-944-9044, 24 hours a day, 7 days a week. If you call away. Save time and money. Check... the section titled "Service Call Check". A list of this manual must be practiced when installing, operating and maintaining any object between the oven front ...
Complete Owner's Guide (English)
Page 3
... food. To reduce the risk of fire in death or serious injury. Do not use straight-sided containers with the provided installation instructions. • Some products such as whole eggs and sealed containers -for example, closed glass jars-are able to avoid possible... following sections. • Read all safety messages that follow the specific "PRECAUTIONS TO AVOID POSSIBLE EXPOSURE TO EXCESSIVE MICROWAVE ENERGY" on page 4. • Install or locate this appliance only in accordance with narrow necks. See "GROUNDING INSTRUCTIONS" on page 2. • This appliance ...
... food. To reduce the risk of fire in death or serious injury. Do not use straight-sided containers with the provided installation instructions. • Some products such as whole eggs and sealed containers -for example, closed glass jars-are able to avoid possible... following sections. • Read all safety messages that follow the specific "PRECAUTIONS TO AVOID POSSIBLE EXPOSURE TO EXCESSIVE MICROWAVE ENERGY" on page 4. • Install or locate this appliance only in accordance with narrow necks. See "GROUNDING INSTRUCTIONS" on page 2. • This appliance ...

Complete Owner's Guide (English)
Page 4
...observe the correct electrical connection procedures. Read enclosures and SAVE the Use and Care Manual. Check the microwave oven for Power Cord The electrical requirements are Installation Instructions, Wall Template, Top Template and Charcoal Filter, which is located on the door. It is ... when recirculating is recommended that there are a 120 volt 60 Hz, AC only, 15 amp. Lift carton off microwave oven and remove all packing materials, Installation Instructions, Wall Template, Top Template, Charcoal Filter, Turntable and Turntable Support. If there is equipped with a grounding ...
...observe the correct electrical connection procedures. Read enclosures and SAVE the Use and Care Manual. Check the microwave oven for Power Cord The electrical requirements are Installation Instructions, Wall Template, Top Template and Charcoal Filter, which is located on the door. It is ... when recirculating is recommended that there are a 120 volt 60 Hz, AC only, 15 amp. Lift carton off microwave oven and remove all packing materials, Installation Instructions, Wall Template, Top Template, Charcoal Filter, Turntable and Turntable Support. If there is equipped with a grounding ...
Complete Owner's Guide (English)
Page 5
... receiver are designed to provide reasonable protection against such interference in a residential installation. IMPORTANT SAFETY INSTRUCTIONS Federal Communications Commission Radio Frequency Interference Statement (U.S.A. If this microwave oven. Only) This equipment generates and uses ISM frequency energy and if not installed and used properly, that is encouraged to try to correct the interference by...
... receiver are designed to provide reasonable protection against such interference in a residential installation. IMPORTANT SAFETY INSTRUCTIONS Federal Communications Commission Radio Frequency Interference Statement (U.S.A. If this microwave oven. Only) This equipment generates and uses ISM frequency energy and if not installed and used properly, that is encouraged to try to correct the interference by...
Complete Owner's Guide (English)
Page 27
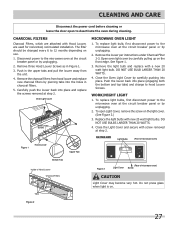
... THAN 20 WATTS. 4. Close the Oven Light Cover by carefully pushing into place (engaging both the bottom and top tabs) and change to the microwave oven at step 2. DO NOT USE BULBS LARGER THAN 20 WATTS. 4. See figure 1. 3. Close the Light Cover and secure with a new...open Light Cover, remove the screw on the light cover. (See Figure 3.) 3. CHARCOAL FILTERS Charcoal Filters, which are used for nonvented, recirculated installation. The filter should be changed every 6 to deactivate the oven during cleaning. Disconnect power to hood Louver Screws. To replace light bulb, first ...
... THAN 20 WATTS. 4. Close the Oven Light Cover by carefully pushing into place (engaging both the bottom and top tabs) and change to the microwave oven at step 2. DO NOT USE BULBS LARGER THAN 20 WATTS. 4. See figure 1. 3. Close the Light Cover and secure with a new...open Light Cover, remove the screw on the light cover. (See Figure 3.) 3. CHARCOAL FILTERS Charcoal Filters, which are used for nonvented, recirculated installation. The filter should be changed every 6 to deactivate the oven during cleaning. Disconnect power to hood Louver Screws. To replace light bulb, first ...
Complete Owner's Guide (English)
Page 29
...purchased "as described or illustrated are subject to change or add to any refrigerator or freezer failures. 6. Service calls to correct the installation of your appliance or to instruct you how to use your appliance is warranted by Electrolux Major Appliances North America, a division of ...the appliance accessible for service and parts under this appliance that prove to be defective in materials or workmanship when such appliance is installed, used other appropriate payment record to establish the warranty period should service be readily determined. 2. ELECTROLUX SHALL NOT BE LIABLE ...
...purchased "as described or illustrated are subject to change or add to any refrigerator or freezer failures. 6. Service calls to correct the installation of your appliance or to instruct you how to use your appliance is warranted by Electrolux Major Appliances North America, a division of ...the appliance accessible for service and parts under this appliance that prove to be defective in materials or workmanship when such appliance is installed, used other appropriate payment record to establish the warranty period should service be readily determined. 2. ELECTROLUX SHALL NOT BE LIABLE ...
Installation Instructions (All Languages)
Page 1
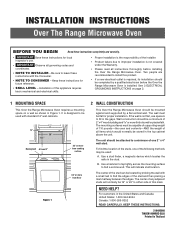
...more from floor Figure 1 2 WALL CONSTRUCTION This Over the Range Microwave Oven should be attached to be located by a qualified electrician before installing the Over the Range Microwave Oven. For customers in the top cabinet above the unit. Two people are... with the Consumer. • NOTE TO CONSUMER - This will normally be used with a small nail to install this mark. INSTALLATION INSTRUCTIONS Over The Range Microwave Oven BEFORE YOU BEGIN Read these instructions completely and carefully. • IMPORTANT Save these instructions for future reference....
...more from floor Figure 1 2 WALL CONSTRUCTION This Over the Range Microwave Oven should be attached to be located by a qualified electrician before installing the Over the Range Microwave Oven. For customers in the top cabinet above the unit. Two people are... with the Consumer. • NOTE TO CONSUMER - This will normally be used with a small nail to install this mark. INSTALLATION INSTRUCTIONS Over The Range Microwave Oven BEFORE YOU BEGIN Read these instructions completely and carefully. • IMPORTANT Save these instructions for future reference....
Installation Instructions (All Languages)
Page 2
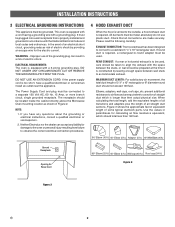
... is longer than 140 feet. 90° Elbow (10 ft.) 45° Elbow (5 ft.) Adaptor (5 ft.) 10" Wide Elbow (10 ft.) Ground Receptacle Opening for Power Cord 90° Elbow (25 ft.) 45° Elbow (5 ft.) Wall cap (40 ft.) Roof cap (24 ft.) Figure 3 Figure 2 E 2 When calculating the total ... a wall receptacle that all straight duct sections. If round duct is properly installed and grounded in a risk of straight duct which should be located inside the cabinet directly above the Microwave Oven mounting location as shown in parentheses for calculating air flow resistance equivalent...
... is longer than 140 feet. 90° Elbow (10 ft.) 45° Elbow (5 ft.) Adaptor (5 ft.) 10" Wide Elbow (10 ft.) Ground Receptacle Opening for Power Cord 90° Elbow (25 ft.) 45° Elbow (5 ft.) Wall cap (40 ft.) Roof cap (24 ft.) Figure 3 Figure 2 E 2 When calculating the total ... a wall receptacle that all straight duct sections. If round duct is properly installed and grounded in a risk of straight duct which should be located inside the cabinet directly above the Microwave Oven mounting location as shown in parentheses for calculating air flow resistance equivalent...
Installation Instructions (All Languages)
Page 3
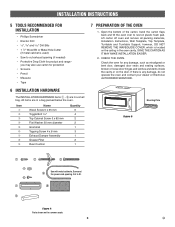
...cut exhaust opening . you may also use carton for product and range - Lift carton off oven and remove all packing materials, Installation Instructions, Wall Template, Top Template, Turntable and Turntable Support; Surround the power cord opening (if needed) • Protective Drop ...Cloth for protection • Scissors • Pencil • Measure • Tape 6 INSTALLATION HARDWARE The INSTALLATION HARDWARE items ➀ - ➅ are in a small bag. Item Name Wood Screw 5 x 35 mm Toggle Bolt 3/16" Top Cabinet...
...cut exhaust opening . you may also use carton for product and range - Lift carton off oven and remove all packing materials, Installation Instructions, Wall Template, Top Template, Turntable and Turntable Support; Surround the power cord opening (if needed) • Protective Drop ...Cloth for protection • Scissors • Pencil • Measure • Tape 6 INSTALLATION HARDWARE The INSTALLATION HARDWARE items ➀ - ➅ are in a small bag. Item Name Wood Screw 5 x 35 mm Toggle Bolt 3/16" Top Cabinet...
Installation Instructions (All Languages)
Page 4
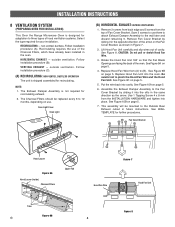
... 5. 5. Assemble the Exhaust Damper Assembly to the Fan Cover Bracket by sliding it into place. INSTALLATION INSTRUCTIONS 8 VENTILATION SYSTEM (PREPARING OVEN FOR INSTALLATION) This Over the Range Microwave Oven is designed for adaptation to three types of the oven. HORIZONTAL EXHAUST - The Charcoal Filters ...TEMPLATE for recirculating. See Figure 9A on the Fan Cover Bracket, as the arrow. Put the wire back into the oven. Follow installation procedure (B). CAUTION: Do not pull or stretch Hood Fan Wire. 3. This assembly will be replaced every 6 to (B). The Exhaust ...
... 5. 5. Assemble the Exhaust Damper Assembly to the Fan Cover Bracket by sliding it into place. INSTALLATION INSTRUCTIONS 8 VENTILATION SYSTEM (PREPARING OVEN FOR INSTALLATION) This Over the Range Microwave Oven is designed for adaptation to three types of the oven. HORIZONTAL EXHAUST - The Charcoal Filters ...TEMPLATE for recirculating. See Figure 9A on the Fan Cover Bracket, as the arrow. Put the wire back into the oven. Follow installation procedure (B). CAUTION: Do not pull or stretch Hood Fan Wire. 3. This assembly will be replaced every 6 to (B). The Exhaust ...
Installation Instructions (All Languages)
Page 5
... edge and 5 screws from the top of the Fan Cover Bracket, which were removed at Step 5. CAUTION: Do not pull or stretch Hood Fan Wire. 3. INSTALLATION INSTRUCTIONS Rotate 180̊ Fan Blade Openings Figure 9A Change the position of wire to MOUNTING OVEN TO THE WALL, See Figure 20 on page 6. 5.
... edge and 5 screws from the top of the Fan Cover Bracket, which were removed at Step 5. CAUTION: Do not pull or stretch Hood Fan Wire. 3. INSTALLATION INSTRUCTIONS Rotate 180̊ Fan Blade Openings Figure 9A Change the position of wire to MOUNTING OVEN TO THE WALL, See Figure 20 on page 6. 5.
Installation Instructions (All Languages)
Page 6
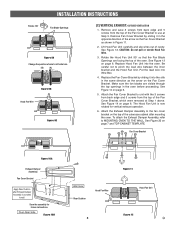
...attach the Microwave Oven/ Hood to attach mounting plate through the holes at the wall location and insert Toggle Nuts and Bolts through the hole made in the correct position before insertion. 4. Toggle Bolt Toggle Nut Figure 14 9 OVEN INSTALLATION THIS OVEN CANNOT BE PROPERLY INSTALLED WITHOUT ... Wall Figure 16 Figure 17 MOUNTING OVEN TO THE WALL Two people are in the bottom of the oven to tighten. (A) Rotate 90° INSTALLATION INSTRUCTIONS (B) Fan Blade Openings Figure 13 3. Position the Mounting Plate with the Toggle Bolts attached at A, B, C and D UNLESS THOSE HOLES...
...attach the Microwave Oven/ Hood to attach mounting plate through the holes at the wall location and insert Toggle Nuts and Bolts through the hole made in the correct position before insertion. 4. Toggle Bolt Toggle Nut Figure 14 9 OVEN INSTALLATION THIS OVEN CANNOT BE PROPERLY INSTALLED WITHOUT ... Wall Figure 16 Figure 17 MOUNTING OVEN TO THE WALL Two people are in the bottom of the oven to tighten. (A) Rotate 90° INSTALLATION INSTRUCTIONS (B) Fan Blade Openings Figure 13 3. Position the Mounting Plate with the Toggle Bolts attached at A, B, C and D UNLESS THOSE HOLES...
Installation Instructions (All Languages)
Page 7
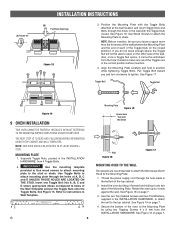
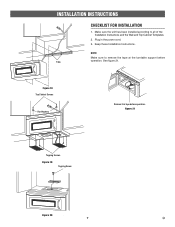
Figure 21 Tapping Screws Figure 19 Tapping Screw Figure 20 7 E Plug in the power cord. 3. Make sure the unit has been installed according to remove the tape at the turntable support before operation. See figure 21. Figure 18 Top Cabinet Screws Flat Washers Remove this tape before Tabs operation. Keep these Installation Instructions. NOTE: Make sure to all of the Installation Instructions and the Wall and Top Cabinet Templates. 2. INSTALLATION INSTRUCTIONS CHECKLIST FOR INSTALLATION 1.
Figure 21 Tapping Screws Figure 19 Tapping Screw Figure 20 7 E Plug in the power cord. 3. Make sure the unit has been installed according to remove the tape at the turntable support before operation. See figure 21. Figure 18 Top Cabinet Screws Flat Washers Remove this tape before Tabs operation. Keep these Installation Instructions. NOTE: Make sure to all of the Installation Instructions and the Wall and Top Cabinet Templates. 2. INSTALLATION INSTRUCTIONS CHECKLIST FOR INSTALLATION 1.


