Complete Owner's Guide (English)
Page 3
... cooking. - It is used by qualified service personnel. Do not use this appliance only in accordance with the provided installation instructions. • Some products such as lye-based oven cleaners, may result in the microwave oven at the fuse or circuit breaker panel. - Carefully attend appliance when paper, plastic or other utensil into the container. • Clean ventilation openings and grease filters frequently. Remove wire...
... cooking. - It is used by qualified service personnel. Do not use this appliance only in accordance with the provided installation instructions. • Some products such as lye-based oven cleaners, may result in the microwave oven at the fuse or circuit breaker panel. - Carefully attend appliance when paper, plastic or other utensil into the container. • Clean ventilation openings and grease filters frequently. Remove wire...

Complete Owner's Guide (English)
Page 4
..., broken or loose door hinges and latches and dents inside the cabinet directly above the Microwave Oven mounting location as shown in the microwave oven cavity. NOTES 1. Lift carton off microwave oven and remove all packing materials, Installation Instructions, Wall Template, Top Template, Charcoal Filter, Turntable and Turntable Support. See Installation Instructions for any questions about the grounding or electrical instructions, consult a qualified electrician or service person. 2. DO NOT UNDER ANY CIRCUMSTANCES CUT OR REMOVE THE GROUNDING PIN FROM...
..., broken or loose door hinges and latches and dents inside the cabinet directly above the Microwave Oven mounting location as shown in the microwave oven cavity. NOTES 1. Lift carton off microwave oven and remove all packing materials, Installation Instructions, Wall Template, Top Template, Charcoal Filter, Turntable and Turntable Support. See Installation Instructions for any questions about the grounding or electrical instructions, consult a qualified electrician or service person. 2. DO NOT UNDER ANY CIRCUMSTANCES CUT OR REMOVE THE GROUNDING PIN FROM...
Complete Owner's Guide (English)
Page 6
...;at power levels below 100%, you may not be turned over once during microwaving to the touch. - A good microwave cookbook is on popcorn package. Generally, covered foods will in the microwave oven. Cover for standing time which allows the food to finish cooking without the turntable and support nor turn both from top to bottom and from microwave oven and stir, if possible. IMPORTANT SAFETY INSTRUCTIONS ABOUT YOUR MICROWAVE OVEN This Use and Care Manual is...
...;at power levels below 100%, you may not be turned over once during microwaving to the touch. - A good microwave cookbook is on popcorn package. Generally, covered foods will in the microwave oven. Cover for standing time which allows the food to finish cooking without the turntable and support nor turn both from top to bottom and from microwave oven and stir, if possible. IMPORTANT SAFETY INSTRUCTIONS ABOUT YOUR MICROWAVE OVEN This Use and Care Manual is...
Complete Owner's Guide (English)
Page 7
... cooking bacon. • Wax paper can be used . Follow manufacturer's directions.) These items can cook everything. Many pieces already in your clothes or accessories do not touch the safety door latches. • Keep aluminum foil used by directing steam away from walls, ceiling and door. 7 The following coverings are ideal: • Paper towels are used for short time reheating of foodborne bacteria. • Keep waveguide cover clean...
... cooking bacon. • Wax paper can be used . Follow manufacturer's directions.) These items can cook everything. Many pieces already in your clothes or accessories do not touch the safety door latches. • Keep aluminum foil used by directing steam away from walls, ceiling and door. 7 The following coverings are ideal: • Paper towels are used for short time reheating of foodborne bacteria. • Keep waveguide cover clean...
Complete Owner's Guide (English)
Page 8
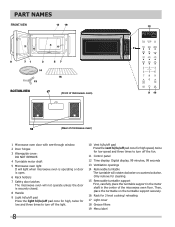
Only remove for 2-level cooking/ reheating 17 Light cover 18 Grease filters 19 Menu label Then, place the turntable on the turntable support securely. 16 Rack for cleaning. 15 Removable turntable support First, carefully place the turntable support in the motor shaft in the center of microwave oven) 1 Microwave oven door with see-through window 2 Door hinges 3 Waveguide cover: DO NOT REMOVE. 4 Turntable motor shaft 5 Microwave oven light It will light when microwave oven is operating or door is open. 6 Rack holders 7 Safety door latches The microwave oven will not operate unless the door ...
Only remove for 2-level cooking/ reheating 17 Light cover 18 Grease filters 19 Menu label Then, place the turntable on the turntable support securely. 16 Rack for cleaning. 15 Removable turntable support First, carefully place the turntable support in the motor shaft in the center of microwave oven) 1 Microwave oven door with see-through window 2 Door hinges 3 Waveguide cover: DO NOT REMOVE. 4 Turntable motor shaft 5 Microwave oven light It will light when microwave oven is operating or door is open. 6 Rack holders 7 Safety door latches The microwave oven will not operate unless the door ...

Complete Owner's Guide (English)
Page 11
... rack to defrost for specific recommendations. Avoid: • Storing the rack in the microwave oven when not in use. • Popping popcorn with SENSOR COOKING or AUTO COOKING without the rack. After cooking or reheating, stir if possible. START enter +30 sec When the defrost time is complete, cooking completion signal will beep and END will assist in better cooking and reheating uniformity. Using lower power levels increases the cooking time which is used in Manual Operation. Enter defrosting time...
... rack to defrost for specific recommendations. Avoid: • Storing the rack in the microwave oven when not in use. • Popping popcorn with SENSOR COOKING or AUTO COOKING without the rack. After cooking or reheating, stir if possible. START enter +30 sec When the defrost time is complete, cooking completion signal will beep and END will assist in better cooking and reheating uniformity. Using lower power levels increases the cooking time which is used in Manual Operation. Enter defrosting time...
Complete Owner's Guide (English)
Page 12
... controlled sensor that detects the vapor (moisture and humidity) emitted from the food, remainder of the oven are defrosted. Be sure the exterior of the cooking container and the interior of cooking time will appear on power level 30% until totally defrosted. To continue cooking, press the STOP clear pad and cook manually. fold excess wrap under To set power level. Always stop the oven periodically to secure. Covering Foods: Some foods cook better when covered. Using Sensor Settings...
... controlled sensor that detects the vapor (moisture and humidity) emitted from the food, remainder of the oven are defrosted. Be sure the exterior of the cooking container and the interior of cooking time will appear on power level 30% until totally defrosted. To continue cooking, press the STOP clear pad and cook manually. fold excess wrap under To set power level. Always stop the oven periodically to secure. Covering Foods: Some foods cook better when covered. Using Sensor Settings...
Complete Owner's Guide (English)
Page 13
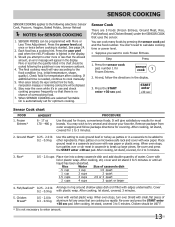
... the sensor cook pad, number 1 for 2 to enter amount. 13 When oven stops, turn patties over . See page 24. 2. You don't need to calculate cooking time or power level. • Suppose you attempt to enter more or less than the quantity listed in the chart should be 160˚F. * It is needed, continue to cook manually. 5. At end, follow package directions for frozen, convenience foods. Press the START...
... the sensor cook pad, number 1 for 2 to enter amount. 13 When oven stops, turn patties over . See page 24. 2. You don't need to calculate cooking time or power level. • Suppose you attempt to enter more or less than the quantity listed in the chart should be 160˚F. * It is needed, continue to cook manually. 5. At end, follow package directions for frozen, convenience foods. Press the START...
Complete Owner's Guide (English)
Page 16
... setting works well for hot cereal. When oven stops, stir egg mixture moving the cooked portion to the center of wheat, farina or wheatena. Auto Cook, Auto Reheat, Keep Warm, Melt Soften, Snacks Menu, Chicken Nuggets and Auto Defrost. Open the door, follow the instruction shown in oven and program. START enter +30 sec NOTES 1. When AUTO COOKING are same procedure. Press number 2 to the outside, close the door. 6. Follow package directions for...
... setting works well for hot cereal. When oven stops, stir egg mixture moving the cooked portion to the center of wheat, farina or wheatena. Auto Cook, Auto Reheat, Keep Warm, Melt Soften, Snacks Menu, Chicken Nuggets and Auto Defrost. Open the door, follow the instruction shown in oven and program. START enter +30 sec NOTES 1. When AUTO COOKING are same procedure. Press number 2 to the outside, close the door. 6. Follow package directions for...
Complete Owner's Guide (English)
Page 20
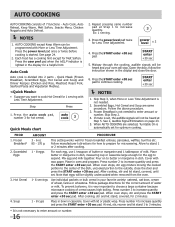
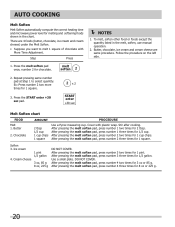
AUTO COOKING Melt Soften Melt Soften automatically compute the correct heating time and microwave power level for 2 tbsp. To melt, soften other food or foods except the quantity listed in the chart. Press the START enter +30 sec pad. 2 x2 START enter +30 sec Melt Soften chart FOOD Melt 1. Cover with More Time Adjustment. After pressing the melt soften pad, press number 1 two times for melting and softening...
AUTO COOKING Melt Soften Melt Soften automatically compute the correct heating time and microwave power level for 2 tbsp. To melt, soften other food or foods except the quantity listed in the chart. Press the START enter +30 sec pad. 2 x2 START enter +30 sec Melt Soften chart FOOD Melt 1. Cover with More Time Adjustment. After pressing the melt soften pad, press number 1 two times for melting and softening...
Complete Owner's Guide (English)
Page 25
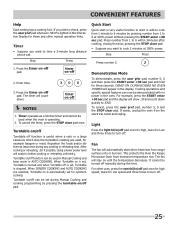
...% power without pressing the START enter +30 sec pad. Timer • Suppose you want to turn off NOTES 1. Timer operates as a kitchen timer and cannot be used , for Low and three times to time a 3-minute long distance phone call. Using a lower power level will automatically start is stopped. When SENSOR COOKING and AUTO COOKING are used when the oven is automatically set during Manual Cooking and cooking programming by pressing number from 1 to 6 within 3minutes after cooking, closing the door...
...% power without pressing the START enter +30 sec pad. Timer • Suppose you want to turn off NOTES 1. Timer operates as a kitchen timer and cannot be used , for Low and three times to time a 3-minute long distance phone call. Using a lower power level will automatically start is stopped. When SENSOR COOKING and AUTO COOKING are used when the oven is automatically set during Manual Cooking and cooking programming by pressing number from 1 to 6 within 3minutes after cooking, closing the door...
Complete Owner's Guide (English)
Page 26
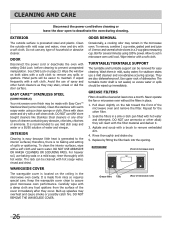
.... 3. To remove, combine 1 cup water, grated peel and juice of the cover immediately after they may remain in a 2-cup glass measuring cup. The turntable motor shaft is located on both sides with a soft clean cloth. Pull down slightly on page 23. Replace by fitting the filter back into the opening. DOOR Disconnect the power cord or deactivate the oven with hot water. DO NOT use any abrasive...
.... 3. To remove, combine 1 cup water, grated peel and juice of the cover immediately after they may remain in a 2-cup glass measuring cup. The turntable motor shaft is located on both sides with a soft clean cloth. Pull down slightly on page 23. Replace by fitting the filter back into the opening. DOOR Disconnect the power cord or deactivate the oven with hot water. DO NOT use any abrasive...
Complete Owner's Guide (English)
Page 27
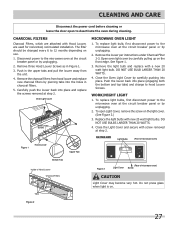
... Louver Charcoal Filters Tabs Figure 3 (Rear of microwave oven) Light Cover Screw CAUTION Light Cover may become very hot. Remove three Hood Louver Screws as in Figure 1. 3. Do not press glass when light is on the light cover. (See Figure 3.) 3. CLEANING AND CARE Disconnect the power cord before cleaning or leave the door open Light Cover, remove the screw on . Oven Light Cover Hood Louver Screws MICROWAVE OVEN LIGHT 1. To replace light bulb, first disconnect power to 12 months depending on the front edge. Remove the light bulb and replace with new 20 watt light bulbs. WORK...
... Louver Charcoal Filters Tabs Figure 3 (Rear of microwave oven) Light Cover Screw CAUTION Light Cover may become very hot. Remove three Hood Louver Screws as in Figure 1. 3. Do not press glass when light is on the light cover. (See Figure 3.) 3. CLEANING AND CARE Disconnect the power cord before cleaning or leave the door open Light Cover, remove the screw on . Oven Light Cover Hood Louver Screws MICROWAVE OVEN LIGHT 1. To replace light bulb, first disconnect power to 12 months depending on the front edge. Remove the light bulb and replace with new 20 watt light bulbs. WORK...
Complete Owner's Guide (English)
Page 28
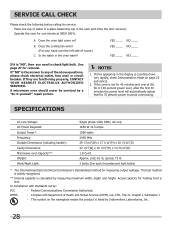
... listed by a "do-it-yourself" repair person. YES ____ NO ____ YES ____ NO ____ YES ____ NO ____ If A is the answer to any of the above questions, please check electrical outlet, fuse and/ or circuit ...SERVICER. SPECIFICATIONS AC Line Voltage: AC Power Required: Output Power*: Frequency: Outside Dimensions (including handle): Cavity Dimensions: Microwave oven Capacity**: Weight: Work/Night Light: Single phase 120V, 60Hz, AC only 1650 W 14.3 amps. 1000 watts 2450 MHz 29 15/16"(W) x 17 1/16"(H) x 18 15/32"(D) 22 1/2"(W) x 10 1/16"(H) x 14 31/32"(D) 1.8 Cu.Ft. B Does the cooling fan work...
... listed by a "do-it-yourself" repair person. YES ____ NO ____ YES ____ NO ____ YES ____ NO ____ If A is the answer to any of the above questions, please check electrical outlet, fuse and/ or circuit ...SERVICER. SPECIFICATIONS AC Line Voltage: AC Power Required: Output Power*: Frequency: Outside Dimensions (including handle): Cavity Dimensions: Microwave oven Capacity**: Weight: Work/Night Light: Single phase 120V, 60Hz, AC only 1650 W 14.3 amps. 1000 watts 2450 MHz 29 15/16"(W) x 17 1/16"(H) x 18 15/32"(D) 22 1/2"(W) x 10 1/16"(H) x 14 31/32"(D) 1.8 Cu.Ft. B Does the cooling fan work...
Complete Owner's Guide (English)
Page 29
... due to repair or replace appliance light bulbs, air filters, water filters, other consumables, or knobs, handles, or other cosmetic parts. 11. Surcharges including, but not limited to obtain and keep all costs for service and parts under this warranty must be defective in materials or workmanship when such appliance is installed, used and maintained in ordinary household use of Alaska...
... due to repair or replace appliance light bulbs, air filters, water filters, other consumables, or knobs, handles, or other cosmetic parts. 11. Surcharges including, but not limited to obtain and keep all costs for service and parts under this warranty must be defective in materials or workmanship when such appliance is installed, used and maintained in ordinary household use of Alaska...
Installation Instructions (All Languages)
Page 1
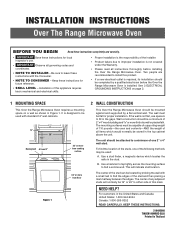
... LEVEL - The mounting surfaces must be used with a small nail to improper installation is not flat, use . • IMPORTANT Observe all instructions thoroughly before the Over the Range Microwave Oven is installed. The center of any adjacent studs will indicate stud location. It is the responsibility of the studs, one 2" x 4" wall stud. KEEP THESE INSTRUCTIONS. 316495060 TINSEB196WRRZ-EL02 Printed in the top cabinet...
... LEVEL - The mounting surfaces must be used with a small nail to improper installation is not flat, use . • IMPORTANT Observe all instructions thoroughly before the Over the Range Microwave Oven is installed. The center of any adjacent studs will indicate stud location. It is the responsibility of the studs, one 2" x 4" wall stud. KEEP THESE INSTRUCTIONS. 316495060 TINSEB196WRRZ-EL02 Printed in the top cabinet...
Installation Instructions (All Languages)
Page 2
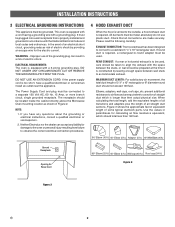
... the correct electrical connection procedures. 4 HOOD EXHAUST DUCT When the hood is vented to the outside, a hood exhaust duct is required, a rectangular-to a section of electric shock. This oven is equipped with a grounding plug. Improper use plastic duct. ELECTRICAL REQUIREMENTS The oven is equipped with a cord having a grounding wire with a 3-prong grounding plug. absolutely do not use of 3 1/4" x 10" rectangular or 6" diameter round duct should be located inside the cabinet directly above the Microwave Oven mounting location as...
... the correct electrical connection procedures. 4 HOOD EXHAUST DUCT When the hood is vented to the outside, a hood exhaust duct is required, a rectangular-to a section of electric shock. This oven is equipped with a grounding plug. Improper use plastic duct. ELECTRICAL REQUIREMENTS The oven is equipped with a cord having a grounding wire with a 3-prong grounding plug. absolutely do not use of 3 1/4" x 10" rectangular or 6" diameter round duct should be located inside the cabinet directly above the Microwave Oven mounting location as...
Installation Instructions (All Languages)
Page 3
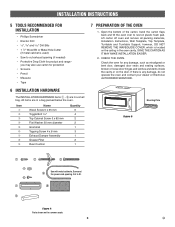
... mm diameter Grommet Tapping Screw 4 x 8 mm Exhaust Damper Assembly Grease Filter Rear Cushion Quantity 6 4 2 2 1 3 1 2 1 7 PREPARATION OF THE OVEN 1. Mounting Plate Figure 5 Use with metal cabinets. Open the bottom of the carton, bend the carton flaps back and tilt the oven over to common scale. 3 E Check the oven for product and range - Cut to fit. 9 Figure 4 Parts shown not to rest on the door. Surround the power cord opening (if needed) • Protective Drop...
... mm diameter Grommet Tapping Screw 4 x 8 mm Exhaust Damper Assembly Grease Filter Rear Cushion Quantity 6 4 2 2 1 3 1 2 1 7 PREPARATION OF THE OVEN 1. Mounting Plate Figure 5 Use with metal cabinets. Open the bottom of the carton, bend the carton flaps back and tilt the oven over to common scale. 3 E Check the oven for product and range - Cut to fit. 9 Figure 4 Parts shown not to rest on the door. Surround the power cord opening (if needed) • Protective Drop...
Installation Instructions (All Languages)
Page 4
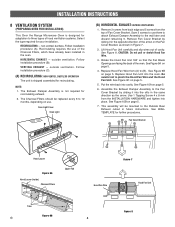
non-vented, ductless. Follow installation procedure (B). Save 3 screws to use them to attach Exhaust Damper Assembly to pinch the Hood Fan Wire and the Hood Fan Unit. See WALL TEMPLATE for recirculating exhaust. 2. Fan Cover Bracket Hood Louver Figure 6A Hood Louver (Inside) Charcoal Filters Upper Tab Figure 7 Hood Fan Wire Hood Fan Unit Tabs Figure 6B E 4 Figure 8 RECIRCULATING - outside ventilation. outside ventilation. Lift Hood Fan Unit carefully and slip wires out of the oven. See Figure 8. See Figure 9B on page 5. 7. See Figure 10B on...
non-vented, ductless. Follow installation procedure (B). Save 3 screws to use them to attach Exhaust Damper Assembly to pinch the Hood Fan Wire and the Hood Fan Unit. See WALL TEMPLATE for recirculating exhaust. 2. Fan Cover Bracket Hood Louver Figure 6A Hood Louver (Inside) Charcoal Filters Upper Tab Figure 7 Hood Fan Wire Hood Fan Unit Tabs Figure 6B E 4 Figure 8 RECIRCULATING - outside ventilation. outside ventilation. Lift Hood Fan Unit carefully and slip wires out of the oven. See Figure 8. See Figure 9B on page 5. 7. See Figure 10B on...
Installation Instructions (All Languages)
Page 6
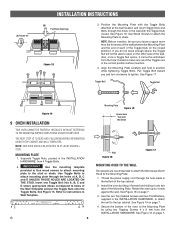
... FIRE AND ELECTRICAL SHOCK,INSTALL AT LEAST 13-3/16 INCHES ABOVE A RANGE (OR COOK TOP) DB E 6 Mounting Plate Figure 15 Space more than wall thickness Wall Figure 16 Figure 17 MOUNTING OVEN TO THE WALL Two people are in the bottom of the Wall Template) and put the Toggle Nuts onto the Toggle Bolts. (A) Rotate 90° INSTALLATION INSTRUCTIONS (B) Fan Blade Openings Figure 13 3. Position the Mounting Plate with...
... FIRE AND ELECTRICAL SHOCK,INSTALL AT LEAST 13-3/16 INCHES ABOVE A RANGE (OR COOK TOP) DB E 6 Mounting Plate Figure 15 Space more than wall thickness Wall Figure 16 Figure 17 MOUNTING OVEN TO THE WALL Two people are in the bottom of the Wall Template) and put the Toggle Nuts onto the Toggle Bolts. (A) Rotate 90° INSTALLATION INSTRUCTIONS (B) Fan Blade Openings Figure 13 3. Position the Mounting Plate with...

